Shader是绘图过程中的着色器,实现绘制各种不同的效果,比如镜像,水波纹,雷达等等,Shader有以下五个子类:
- BitmapShader用于Bitmap图片的渲染
- ComposeShader用于混合渲染
- LinearGradient用于线性渲染
- RadialGradient用于环形渲染
- SweepGradient用于梯度渲染
Shader的三种模式TileMode
- CLAMP 当绘制的区域超过了原始的大小,超出的区域就会用边缘的颜色进行拉伸
- REPEAT 重复水平或者竖直方向的图片
- MIRROR 用图片的镜像填充
BitmapShader
构造方法
BitmapShader(Bitmap bitmap, TileMode tileX, TileMode tileY)
- bitmap:需要着色的位图
- tileX:X方向的填充模式
- tileY:Y方向的填充模式
实例

这是一个充值后的影魔,直接看看代码的实现:
public class ShaderView extends View {
    Bitmap mBitmap;
    BitmapShader mBitmapShader;
    Paint mPaint;
    int mWidth;
    int mHeight;

    public ShaderView(Context context) {
        super(context);
        init();
    }

    private void init() {
        mPaint = new Paint(Paint.ANTI_ALIAS_FLAG);
        mBitmap = BitmapFactory.decodeResource(getResources(), R.mipmap.test);
        mBitmapShader = new BitmapShader(mBitmap, Shader.TileMode.CLAMP, Shader.TileMode.MIRROR);
    }

    public ShaderView(Context context, AttributeSet attrs) {
        super(context, attrs);
        init();
    }

    @Override
    protected void onMeasure(int widthMeasureSpec, int heightMeasureSpec) {
        super.onMeasure(widthMeasureSpec, heightMeasureSpec);
        mWidth = getMeasuredWidth();
        mHeight = getMeasuredHeight();

    }

    @Override
    protected void onDraw(Canvas canvas) {
        super.onDraw(canvas);
        mPaint.setShader(mBitmapShader);
        canvas.drawRect(0, 0, mWidth, mHeight, mPaint);
    }
}
- 1
- 2
- 3
- 4
- 5
- 6
- 7
- 8
- 9
- 10
- 11
- 12
- 13
- 14
- 15
- 16
- 17
- 18
- 19
- 20
- 21
- 22
- 23
- 24
- 25
- 26
- 27
- 28
- 29
- 30
- 31
- 32
- 33
- 34
- 35
- 36
- 37
- 38
这里的X轴采用的是CLAMP,所以右边是拉伸边缘的像素点,Y轴采用的是MIRROR,上下都是镜像的。
现在我们把drawRect注释点,来绘制一个圆
//        canvas.drawRect(0, 0, mWidth, mHeight, mPaint);
        canvas.drawCircle(mWidth / 2, mHeight / 2, mWidth / 2, mPaint);
- 1
- 2
- 3

可以看到以上的效果,所以可不可以这样理解呢,这里的BitmapShader就是给绘制的内容加上我们所设置的Bitmap作为背景。
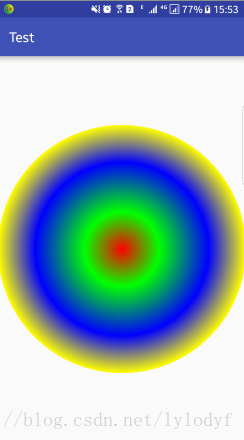
RadialGradient
主要用于在某一区域内实现环形的渐变效果,RadialGradient的意思是放射渐变,即它会向一个放射源一样,从一个点开始向外从一个颜色渐变成另一种颜色。
构造方法
RadialGradient(float centerX, float centerY, float radius,int centerColor, int edgeColor, TileMode tileMode)
- centerX:渐变中心点X坐标
- centerY:渐变中心点Y坐标
- radius:渐变半径
- centerColor:渐变中心的颜色,取值类型必须是八位的0xAARRGGBB色值
- edgeColor:渐变结束的颜色
- tileMode:填充的模式RadialGradient(float centerX, float centerY, float radius,int colors[], float stops[], @NonNull TileMode tileMode)
- int[] colors:表示所需要的渐变颜色数组
- float[] stops:表示每个渐变颜色所在的位置百分点,取值0-1
示例
下面是两种构造函数实现的
代码
public class RadialGradientView extends View {
private RadialGradient mRadialGradient;
private Paint mPaint = new Paint(Paint.ANTI_ALIAS_FLAG);
int mWidth;
int mHeight;
public RadialGradientView(Context context) {
super(context);
}
public RadialGradientView(Context context, AttributeSet attrs) {
super(context, attrs);
}
@Override
protected void onMeasure(int widthMeasureSpec, int heightMeasureSpec) {
super.onMeasure(widthMeasureSpec, heightMeasureSpec);
mWidth = getMeasuredWidth();
mHeight = getMeasuredHeight();
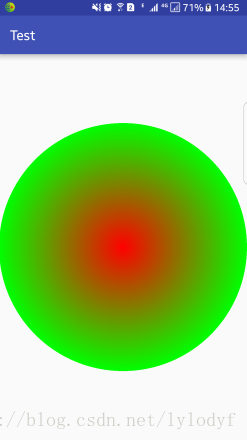
// mRadialGradient = new RadialGradient(mWidth / 2, mHeight / 2, mWidth / 2, 0xffff0000, 0xff00ff00, Shader.TileMode.CLAMP);
int[] colors = new int[]{0xffff0000, 0xff00ff00, 0xff0000ff, 0xffffff00};
float[] stops = new float[]{0f, 0.3f, 0.7f, 1f};
mRadialGradient = new RadialGradient(mWidth / 2, mHeight / 2, mWidth / 2, colors, stops, Shader.TileMode.REPEAT);
mPaint.setShader(mRadialGradient);
}
@Override
protected void onDraw(Canvas canvas) {
super.onDraw(canvas);
canvas.drawCircle(mWidth / 2, mHeight / 2, mWidth / 2, mPaint);
}
}
- 1
- 2
- 3
- 4
- 5
- 6
- 7
- 8
- 9
- 10
- 11
- 12
- 13
- 14
- 15
- 16
- 17
- 18
- 19
- 20
- 21
- 22
- 23
- 24
- 25
- 26
- 27
- 28
- 29
- 30
- 31
- 32
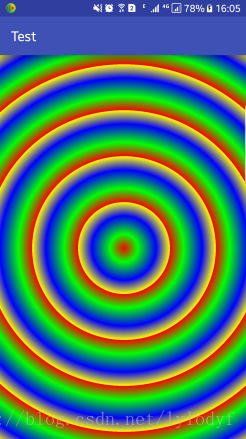
再次修改一下
@Override
    protected void onMeasure(int widthMeasureSpec, int heightMeasureSpec) {
        super.onMeasure(widthMeasureSpec, heightMeasureSpec);
        mWidth = getMeasuredWidth();
        mHeight = getMeasuredHeight();
        int[] colors = new int[]{0xffff0000, 0xff00ff00, 0xff0000ff, 0xffffff00};
        float[] stops = new float[]{0f, 0.3f, 0.7f, 1f};
        mRadialGradient = new RadialGradient(mWidth / 2, mHeight / 2, 200, colors, stops, Shader.TileMode.REPEAT);
        mPaint.setShader(mRadialGradient);
    }

    @Override
    protected void onDraw(Canvas canvas) {
        super.onDraw(canvas);
        canvas.drawRect(new Rect(0,0,mWidth,mHeight),mPaint);
    }
- 1
- 2
- 3
- 4
- 5
- 6
- 7
- 8
- 9
- 10
- 11
- 12
- 13
- 14
- 15
- 16
效果如下
水波纹效果实现

代码如下,就不多说了
public class RippleView extends TextView {
    private int mX, mY;
    private ObjectAnimator mAnimator;
    private int DEFAULT_RADIUS = 50;
    private int mCurRadius = 0;
    private RadialGradient mRadialGradient;
    private Paint mPaint = new Paint();

    public RippleView(Context context) {
        super(context);
    }

    public RippleView(Context context, AttributeSet attrs) {
        super(context, attrs);
    }


    @Override
    public boolean onTouchEvent(MotionEvent event) {
        if (mX != event.getX() || mY != event.getY()) {
            mX = (int) event.getX();
            mY = (int) event.getY();
            setRadius(DEFAULT_RADIUS);
        }

        if (event.getAction() == MotionEvent.ACTION_DOWN) {
            //如果不返回true,后续的事件收不到
            return true;
        } else if (event.getAction() == MotionEvent.ACTION_UP) {
            if (mAnimator != null && mAnimator.isRunning()) {
                mAnimator.cancel();
            }
            if (mAnimator == null) {
                //这里第一个对象传递当前对象,在当前对象中设置了setRadius方法,所以这里传递radius
                //每当值变化时就会调用这个setRadius方法
                mAnimator = ObjectAnimator.ofInt(this, "radius", DEFAULT_RADIUS, getWidth());
            }
            mAnimator.setInterpolator(new AccelerateInterpolator());
            mAnimator.addListener(new Animator.AnimatorListener() {
                @Override
                public void onAnimationStart(Animator animation) {
                }

                @Override
                public void onAnimationEnd(Animator animation) {
                    setRadius(0);
                }

                @Override
                public void onAnimationCancel(Animator animation) {
                }

                @Override
                public void onAnimationRepeat(Animator animation) {
                }
            });
            mAnimator.start();
        }

        return super.onTouchEvent(event);
    }

    //注意这里的方法名必须是setRadius
    public void setRadius(final int radius) {
        mCurRadius = radius;
        if (mCurRadius > 0) {
            mRadialGradient = new RadialGradient(mX, mY, mCurRadius, 0x00FFFFFF, 0xFF58FAAC, Shader.TileMode.CLAMP);
            mPaint.setShader(mRadialGradient);
        }
        invalidate();
    }


    @Override
    protected void onDraw(Canvas canvas) {
        super.onDraw(canvas);
        canvas.drawCircle(mX, mY, mCurRadius, mPaint);
    }
}
- 1
- 2
- 3
- 4
- 5
- 6
- 7
- 8
- 9
- 10
- 11
- 12
- 13
- 14
- 15
- 16
- 17
- 18
- 19
- 20
- 21
- 22
- 23
- 24
- 25
- 26
- 27
- 28
- 29
- 30
- 31
- 32
- 33
- 34
- 35
- 36
- 37
- 38
- 39
- 40
- 41
- 42
- 43
- 44
- 45
- 46
- 47
- 48
- 49
- 50
- 51
- 52
- 53
- 54
- 55
- 56
- 57
- 58
- 59
- 60
- 61
- 62
- 63
- 64
- 65
- 66
- 67
- 68
- 69
- 70
- 71
- 72
- 73
- 74
- 75
- 76
- 77
- 78
- 79
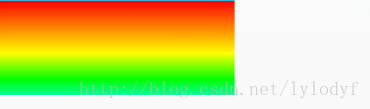
LinearGradient
线性渲染,对某一区域实现线性渐变效果。
构造函数
LinearGradient(float x0, float y0, float x1, float y1, int color0, int color1,TileMode tile)
- x0,y0是渐变的起点坐标
- x1,y1是渐变的终点坐标
- color0是开始颜色
- color1是结束颜色
LinearGradient(float x0, float y0, float x1, float y1, int colors[], float positions[],TileMode tile)
- colors和positions意义和之前的RadialGradient一样。
示例
public class LinearGradientView extends View {
    Paint mPaint = new Paint();
    LinearGradient mLinearGradient;
    int[] colors = new int[]{
            0xFFFF0000,
            0xffFF7F00,
            0xffFFFF00,
            0xff00FF00,
            0xff00FFFF,
            0xff0000FF,
            0xff8B00FF};

    public LinearGradientView(Context context) {
        super(context);
    }

    public LinearGradientView(Context context, AttributeSet attrs) {
        super(context, attrs);
    }

    @Override
    protected void onDraw(Canvas canvas) {
        super.onDraw(canvas);
        if (mLinearGradient == null) {
            mLinearGradient = new LinearGradient(0, 0, 0, 400, colors, null, Shader.TileMode.CLAMP);
            mPaint.setShader(mLinearGradient);
        }
        canvas.drawRect(new Rect(0,0,getWidth(),getHeight()),mPaint);
    }
}
- 1
- 2
- 3
- 4
- 5
- 6
- 7
- 8
- 9
- 10
- 11
- 12
- 13
- 14
- 15
- 16
- 17
- 18
- 19
- 20
- 21
- 22
- 23
- 24
- 25
- 26
- 27
- 28
- 29
- 30
霓虹文字效果

这里实现主要是继承TextView,获得它绘制文字的Paint,给这个Paint设置LinearGradient的Shader,把这个Shader从左边开始向右移动,实现霓虹效果。
public class LinearGradientText extends TextView {
    Paint mPaint;
    LinearGradient mLinearGradient;
    private Matrix mMatrix;
    private int mX;

    public LinearGradientText(Context context) {
        super(context);
        init();
    }

    public LinearGradientText(Context context, AttributeSet attrs) {
        super(context, attrs);
        init();
    }

    private void init() {
        //注意这里必须是TextView的Paint,因为绘制文字就是用这个Paint
        mPaint = getPaint();
        mMatrix = new Matrix();
    }

    private void initAnimtor(int width) {
        ValueAnimator animator = ValueAnimator.ofInt(0, width * 2);  //我们设置value的值为0-getMeasureWidth的3 倍
        animator.addUpdateListener(new ValueAnimator.AnimatorUpdateListener() {
            @Override
            public void onAnimationUpdate(ValueAnimator animation) {
                mX = (Integer) animation.getAnimatedValue();
                postInvalidate();
            }
        });
        animator.setRepeatMode(ValueAnimator.RESTART);   //重新播放
        animator.setRepeatCount(ValueAnimator.INFINITE);   //无限循环
        animator.setDuration(2000);
        animator.start();
    }

    @Override
    protected void onSizeChanged(int w, int h, int oldw, int oldh) {
        super.onSizeChanged(w, h, oldw, oldh);

        //设置LinearGradient,绘制的范围这里设置的是-w到w,相当于两个宽度,然后把Shader向右移动实现了效果
        mLinearGradient = new LinearGradient(-w, 0, w, 0, new int[]{getCurrentTextColor(), Color.RED, Color.YELLOW, Color.BLUE, getCurrentTextColor(),}
                , null, Shader.TileMode.CLAMP);
        mPaint.setShader(mLinearGradient);

        initAnimtor(w);
    }

    @Override
    protected void onDraw(Canvas canvas) {
        super.onDraw(canvas);
        mMatrix.reset();
        mMatrix.preTranslate(mX, 0);
        mLinearGradient.setLocalMatrix(mMatrix);
    }
}
- 1
- 2
- 3
- 4
- 5
- 6
- 7
- 8
- 9
- 10
- 11
- 12
- 13
- 14
- 15
- 16
- 17
- 18
- 19
- 20
- 21
- 22
- 23
- 24
- 25
- 26
- 27
- 28
- 29
- 30
- 31
- 32
- 33
- 34
- 35
- 36
- 37
- 38
- 39
- 40
- 41
- 42
- 43
- 44
- 45
- 46
- 47
- 48
- 49
- 50
- 51
- 52
- 53
- 54
- 55
- 56
- 57
SweepGradient
梯度渲染,是指在某一中心以x轴正方向逆时针旋转一周而形成的扫描效果的渲染形式
构造函数
SweepGradient(float cx, float cy, int colors[], float positions[])
- cx,cy:中心坐标点
- colors、positions同样和之前一样
SweepGradient(float cx, float cy, int color0, int color1)
- cx,cy中心坐标点
- color0、color1开始和结束的颜色
简单示例
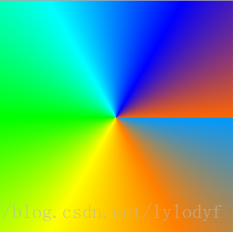
@Override
    protected void onSizeChanged(int w, int h, int oldw, int oldh) {
        super.onSizeChanged(w, h, oldw, oldh);
        width = w;
        height = h;
        mSweepGradient = new SweepGradient(w / 2, h / 2, colors, null);
        mPaint.setShader(mSweepGradient);
    }

    @Override
    protected void onDraw(Canvas canvas) {
        super.onDraw(canvas);

        canvas.drawRect(new Rect(0, 0, width, height), mPaint);
    }
- 1
- 2
- 3
- 4
- 5
- 6
- 7
- 8
- 9
- 10
- 11
- 12
- 13
- 14
- 15
雷达扫描实现

/**
 * Created by lzy on 2017/4/13.
 */
public class RadarView extends View {

    private static final int MSG_WHAT = 10086;
    private static final int DELAY_TIME = 20;
    //设置默认宽高,雷达一般都是圆形,所以我们下面取宽高会去Math.min(宽,高)
    private final int DEFAULT_WIDTH = 200;
    private final int DEFAULT_HEIGHT = 200;

    private int mRadarRadius;  //雷达的半径

    private Paint mRadarPaint;//雷达画笔

    private Paint mRadarBg;//雷达底色画笔

    private int radarCircleCount = 4;//雷达圆圈的个数,默认4个

    private int mRadarLineColor = Color.WHITE; //雷达线条的颜色,默认为白色

    private int mRadarBgColor = Color.BLACK; //雷达圆圈背景色
    private Shader radarShader;  //paintShader

    //雷达扫描时候的起始和终止颜色
    private int startColor = 0x0000ff00;
    private int endColor = 0xaa00ff00;


    public RadarView(Context context) {
        this(context, null);
    }

    public RadarView(Context context, AttributeSet attrs) {
        this(context, attrs, 0);
    }

    public RadarView(Context context, AttributeSet attrs, int defStyleAttr) {
        super(context, attrs, defStyleAttr);
        init(context, attrs);


        mRadarPaint = new Paint(Paint.ANTI_ALIAS_FLAG);     //设置抗锯齿
        mRadarPaint.setColor(mRadarLineColor);                  //画笔颜色
        mRadarPaint.setStyle(Paint.Style.STROKE);           //设置空心的画笔,只画圆边
        mRadarPaint.setStrokeWidth(2);                      //画笔宽度


        mRadarBg = new Paint(Paint.ANTI_ALIAS_FLAG);     //设置抗锯齿
        mRadarBg.setColor(mRadarBgColor);                  //画笔颜色
        mRadarBg.setStyle(Paint.Style.FILL);           //设置空心的画笔,只画圆边


        radarShader = new SweepGradient(0, 0, startColor, endColor);

        matrix = new Matrix();
    }


    //初始化,拓展可设置参数供布局使用
    private void init(Context context, AttributeSet attrs) {
        if (attrs != null) {
            TypedArray ta = context.obtainStyledAttributes(attrs, R.styleable.RadarView);
            startColor = ta.getColor(R.styleable.RadarView_startColor, startColor);
            endColor = ta.getColor(R.styleable.RadarView_endColor, endColor);
            mRadarBgColor = ta.getColor(R.styleable.RadarView_bgColor, mRadarBgColor);
            mRadarLineColor = ta.getColor(R.styleable.RadarView_lineColor, mRadarLineColor);
            radarCircleCount = ta.getInteger(R.styleable.RadarView_circleCount, radarCircleCount);
            ta.recycle();
        }
    }

    @Override
    protected void onMeasure(int widthMeasureSpec, int heightMeasureSpec) {
        super.onMeasure(widthMeasureSpec, heightMeasureSpec);
        int width = measureSize(1, DEFAULT_WIDTH, widthMeasureSpec);
        int height = measureSize(0, DEFAULT_HEIGHT, heightMeasureSpec);
        int measureSize = Math.max(width, height);   //取最大的 宽|高
        setMeasuredDimension(measureSize, measureSize);
    }


    /**
     * 测绘measure
     *
     * @param specType    1为宽, 其他为高
     * @param contentSize 默认值
     */
    private int measureSize(int specType, int contentSize, int measureSpec) {
        int result;
        //获取测量的模式和Size
        int specMode = MeasureSpec.getMode(measureSpec);
        int specSize = MeasureSpec.getSize(measureSpec);

        if (specMode == MeasureSpec.EXACTLY) {
            result = Math.max(contentSize, specSize);
        } else {
            result = contentSize;

            if (specType == 1) {
                // 根据传人方式计算宽
                result += (getPaddingLeft() + getPaddingRight());
            } else {
                // 根据传人方式计算高
                result += (getPaddingTop() + getPaddingBottom());
            }
        }

        return result;

    }

    @Override
    protected void onSizeChanged(int w, int h, int oldw, int oldh) {
        super.onSizeChanged(w, h, oldw, oldh);
        mRadarRadius = Math.min(w / 2, h / 2);

    }

    //旋转的角度
    private int rotateAngel = 0;

    @Override
    protected void onDraw(Canvas canvas) {
        super.onDraw(canvas);


        canvas.translate(mRadarRadius, mRadarRadius);   //将画板移动到屏幕的中心点

        mRadarBg.setShader(null);
        canvas.drawCircle(0, 0, mRadarRadius, mRadarBg);  //绘制底色(默认为黑色),可以使雷达的线看起来更清晰

        for (int i = 1; i <= radarCircleCount; i++) {     //根据用户设定的圆个数进行绘制
            canvas.drawCircle(0, 0, (float) (i * 1.0 / radarCircleCount * mRadarRadius), mRadarPaint);  //画圆圈
        }

        canvas.drawLine(-mRadarRadius, 0, mRadarRadius, 0, mRadarPaint);  //绘制雷达基线 x轴
        canvas.drawLine(0, mRadarRadius, 0, -mRadarRadius, mRadarPaint);  //绘制雷达基线 y轴


//        canvas.rotate(rotateAngel,0,0);
        //设置颜色渐变从透明到不透明
        mRadarBg.setShader(radarShader);
        canvas.concat(matrix);
        canvas.drawCircle(0, 0, mRadarRadius, mRadarBg);
    }

    private Matrix matrix;

    private Handler mHandler = new Handler() {
        @Override
        public void handleMessage(Message msg) {
            super.handleMessage(msg);

            rotateAngel += 3;
            postInvalidate();

            matrix.reset();
            matrix.preRotate(rotateAngel, 0, 0);
            mHandler.sendEmptyMessageDelayed(MSG_WHAT, DELAY_TIME);
        }
    };


    public void startScan() {
        mHandler.removeMessages(MSG_WHAT);
        mHandler.sendEmptyMessage(MSG_WHAT);
    }

    public void stopScan() {
        mHandler.removeMessages(MSG_WHAT);
    }
}
- 1
- 2
- 3
- 4
- 5
- 6
- 7
- 8
- 9
- 10
- 11
- 12
- 13
- 14
- 15
- 16
- 17
- 18
- 19
- 20
- 21
- 22
- 23
- 24
- 25
- 26
- 27
- 28
- 29
- 30
- 31
- 32
- 33
- 34
- 35
- 36
- 37
- 38
- 39
- 40
- 41
- 42
- 43
- 44
- 45
- 46
- 47
- 48
- 49
- 50
- 51
- 52
- 53
- 54
- 55
- 56
- 57
- 58
- 59
- 60
- 61
- 62
- 63
- 64
- 65
- 66
- 67
- 68
- 69
- 70
- 71
- 72
- 73
- 74
- 75
- 76
- 77
- 78
- 79
- 80
- 81
- 82
- 83
- 84
- 85
- 86
- 87
- 88
- 89
- 90
- 91
- 92
- 93
- 94
- 95
- 96
- 97
- 98
- 99
- 100
- 101
- 102
- 103
- 104
- 105
- 106
- 107
- 108
- 109
- 110
- 111
- 112
- 113
- 114
- 115
- 116
- 117
- 118
- 119
- 120
- 121
- 122
- 123
- 124
- 125
- 126
- 127
- 128
- 129
- 130
- 131
- 132
- 133
- 134
- 135
- 136
- 137
- 138
- 139
- 140
- 141
- 142
- 143
- 144
- 145
- 146
- 147
- 148
- 149
- 150
- 151
- 152
- 153
- 154
- 155
- 156
- 157
- 158
- 159
- 160
- 161
- 162
- 163
- 164
- 165
- 166
- 167
- 168
- 169
- 170
- 171
- 172
- 173
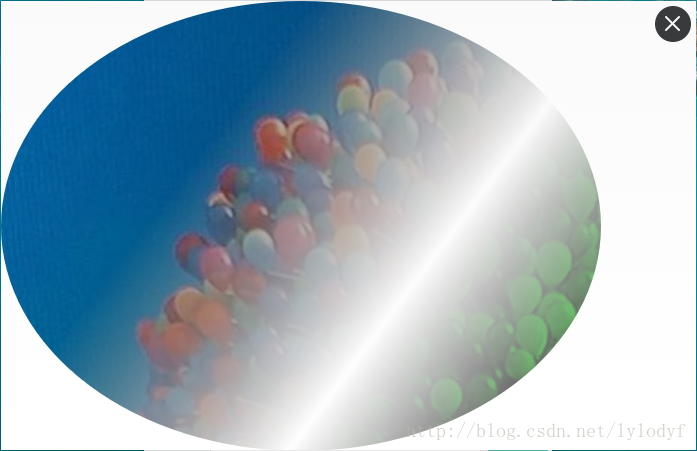
ComposeShader
组合渲染
构造函数
ComposeShader(Shader shaderA, Shader shaderB, Xfermode mode)
- shaderA :渲染器A
- shaderB :渲染器B
- Xfermode :两种渲染器组合的模式,Xfermode对象
ComposeShader(Shader shaderA, Shader shaderB, Mode mode)- Mode :两种渲染器组合的模式,ProterDuff.Mode对象
简单实例
这里是结合了BitmapShader和LinearGradient实现的效果public class ComposeShaderView extends View { Bitmap mBitmap; BitmapShader mBitmapShader; Paint mPaint; LinearGradient mLinearGradient; ComposeShader mComposeShader; int mWidth; int mHeight; public ComposeShaderView(Context context) { super(context); init(); } public ComposeShaderView(Context context, AttributeSet attrs) { super(context, attrs); init(); } private void init() { mBitmap = BitmapFactory.decodeResource(getResources(), R.mipmap.test_3); mBitmapShader = new BitmapShader(mBitmap, Shader.TileMode.CLAMP, Shader.TileMode.CLAMP); mPaint = new Paint(Paint.ANTI_ALIAS_FLAG); } @Override protected void onSizeChanged(int w, int h, int oldw, int oldh) { super.onSizeChanged(w, h, oldw, oldh); mWidth = w; mHeight = h; mLinearGradient = new LinearGradient(0, 0, w, h, new int[] { Color.WHITE, Color.LTGRAY, Color.TRANSPARENT, Color.GREEN }, null, Shader.TileMode.CLAMP); mComposeShader = new ComposeShader(mBitmapShader, mLinearGradient, PorterDuff.Mode.MULTIPLY); mPaint.setShader(mComposeShader); } @Override protected void onDraw(Canvas canvas) { super.onDraw(canvas); canvas.drawOval(0, 0, mWidth, mHeight, mPaint); } }- 1
- 2
- 3
- 4
- 5
- 6
- 7
- 8
- 9
- 10
- 11
- 12
- 13
- 14
- 15
- 16
- 17
- 18
- 19
- 20
- 21
- 22
- 23
- 24
- 25
- 26
- 27
- 28
- 29
- 30
- 31
- 32
- 33
- 34
- 35
- 36
- 37
- 38
- 39
- 40
- 41
- 42
- 43
- 44
- 45
- 46
转载来源:https://blog.csdn.net/lylodyf/article/details/70053205