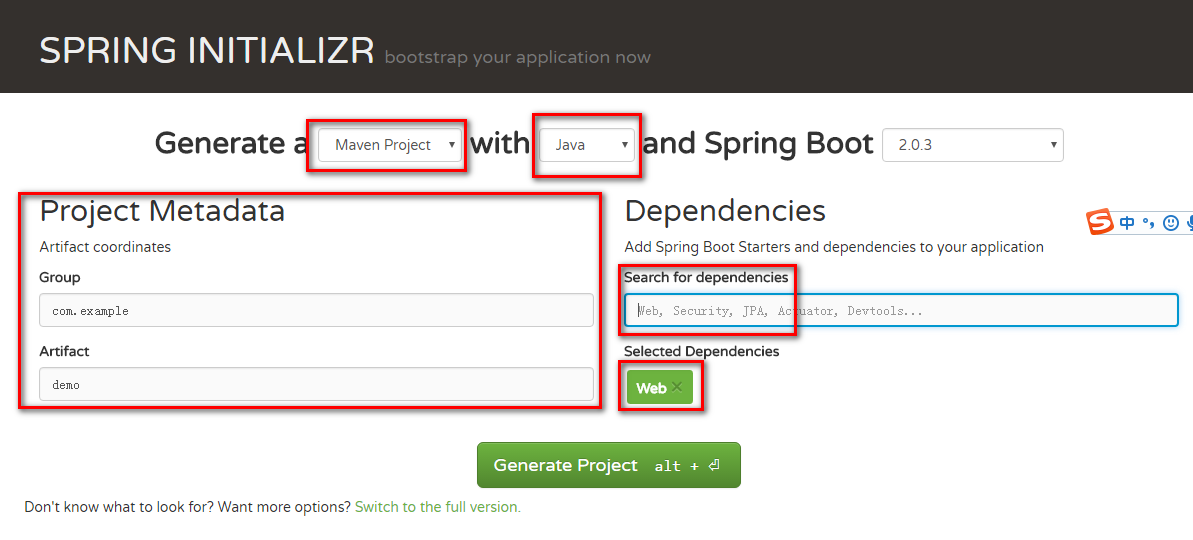
- 从官网上下载demo,地址:http://start.spring.io/
-
我们要构建一个基于maven、java、web项目的,上述截图选择完后点击Generate Project下载项目(需要对maven有一定基础的)
- 下载完解压,然后导入eclipse里面(其它ide也可以,只要支持maven即可导入)
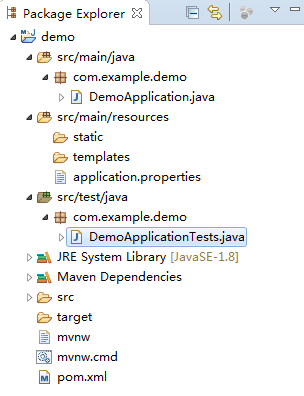
- 该目录还是比较熟悉的,这边提一下resources目录下的static和templates目录:static用于存放静态资源,比如图片、css、js等,而templates用于存放web页面的模板文件
- maven配置分析
<?xml version="1.0" encoding="UTF-8"?>
<project xmlns="http://maven.apache.org/POM/4.0.0" xmlns:xsi="http://www.w3.org/2001/XMLSchema-instance"
    xsi:schemaLocation="http://maven.apache.org/POM/4.0.0 http://maven.apache.org/xsd/maven-4.0.0.xsd">
    <modelVersion>4.0.0</modelVersion>

    <groupId>com.example</groupId>
    <artifactId>demo</artifactId>
    <version>0.0.1-SNAPSHOT</version>
    <packaging>jar</packaging>

    <name>demo</name>
    <description>Demo project for Spring Boot</description>

    <parent>
        <groupId>org.springframework.boot</groupId>
        <artifactId>spring-boot-starter-parent</artifactId>
        <version>2.0.3.RELEASE</version>
        <relativePath/> <!-- lookup parent from repository -->
    </parent>

    <properties>
        <project.build.sourceEncoding>UTF-8</project.build.sourceEncoding>
        <project.reporting.outputEncoding>UTF-8</project.reporting.outputEncoding>
        <java.version>1.8</java.version>
    </properties>

    <dependencies>
        <dependency>
            <groupId>org.springframework.boot</groupId>
            <artifactId>spring-boot-starter-web</artifactId>
        </dependency>

        <dependency>
            <groupId>org.springframework.boot</groupId>
            <artifactId>spring-boot-starter-test</artifactId>
            <scope>test</scope>
        </dependency>
    </dependencies>

    <build>
        <plugins>
            <plugin>
                <groupId>org.springframework.boot</groupId>
                <artifactId>spring-boot-maven-plugin</artifactId>
            </plugin>
        </plugins>
    </build>


</project>
分析点:
- <packaging>jar</packaging>:spring-boot默认将该web应用打包为jar的形式,而非传统的war形式,因为默认的web模块依赖会包含嵌入式的Tomcat,这样使得我们的应用jar自身就具备了提供web服务的能力;
- 父项目parent配置指定为spring-boot-starter-parent的2.0.3.RELEASE版本,该父项目中定义了spring boot版本的基础依赖以及一些默认配置的内容,比如配置文件application.properties的位置等;
- 项目构建的build部分,引入了spring boot的maven插件,该插件非常实用,可以帮助我们方便地启停应用,这样在开发时就不用每次都去找主类或者打包成jar来运行微服务,只需要通过mvn spring-boot:run 命令就可以快速启动spring boot应用(我尝试把这块构建去掉,然后启动服务通过下面三种启动方式去启动,结果通过运行main函数和mvn spring-boot:run这两个方式依然可以启动,但是通过install完,再java -jar xxx.jar方式无法启动
 )
) - 目标依赖dependencies配置:
- spring-boot-starter-web:全栈web开发模块,包含嵌入式tomcat、spring mvc
- spring-boot-starter-test:通用测试模块,包含junit、hamcrest、mockito
- 这里所引用的web和test模块,在spring boot生态中被称为Starter POMs。Starter POMs是一系列轻便的依赖包,是一套一站式的spring相关技术的解决方案,开发者在使用和整合模块时,不必再去搜寻样例代码中的依赖配置来复制使用,只需要引入对应的模块包即可。比如,开发web的时候就引入spring-boot-starter-web,希望访问数据库能力的时候,那就再引入spring-boot-starter-jdbc或是更好用的spring-boot-starter-data-jpa。在使用spring-boot构建应用的时候,各项功能模块的整合不再像传统spring应用的开发方式那样,需要在pom.xml中做大量的依赖配置,而是通过使用Starter POMs定义的依赖包,使得功能模块整合变得非常轻巧,易于理解与使用。
- spring-boot的Starter POMs采用spring-boot-starter-*的命名方式,*代表一个特别的应用功能某块。
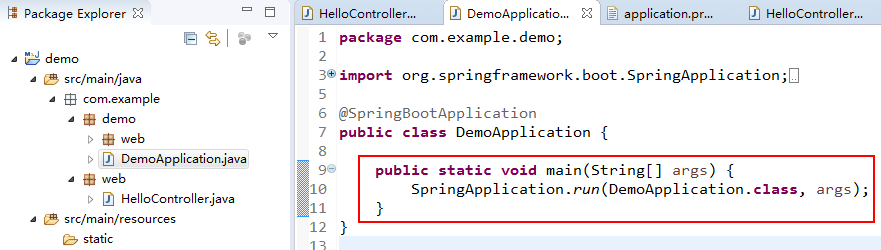
- 实现RESTful API:在spring -boot中创建一个RESTful API的实现代码同spring mvc应用一样,只是不需要像spring mvc那样先做很多配置,而是像下面这样直接开始编写Controller内容
- 新建package,命名为com.example.demo.web,可根据实际的构建情况修改成自己的路径(初学者需要注意该路径,不然会访问不到)
- 新建HelloController类
package com.example.demo.web;

import org.springframework.web.bind.annotation.RequestMapping;
import org.springframework.web.bind.annotation.RestController;

@RestController
public class HelloController {

    @RequestMapping("/hello")
    public String index() {
        return "hello world";
    }
}
-
启动该应用,通过浏览器访问http://localhost:8080/hello,我们可以看到返回了预期结果:hello world
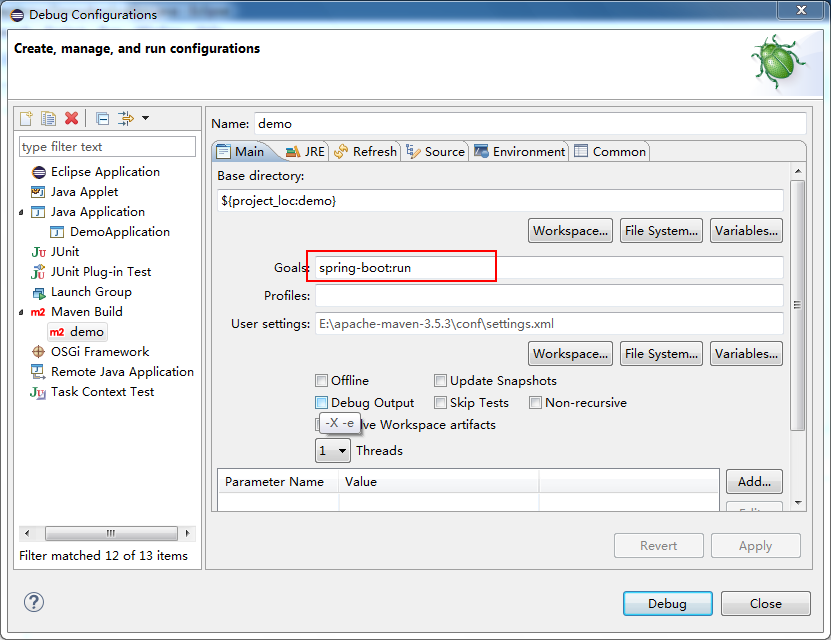
- 启动spring-boot应用的方式很多种(以下三种随便一种都可以):
- 通过运行main函数
-
执行mvn spring-boot:run
-
-
把install成jar包,通过java -jar xxx.jar 运行
- 单元测试
package com.example.demo;

import org.junit.Before;
import org.junit.Test;
import org.junit.runner.RunWith;
import org.springframework.boot.SpringBootConfiguration;
import org.springframework.boot.autoconfigure.SpringBootApplication;
import org.springframework.boot.test.context.SpringBootTest;
import org.springframework.http.MediaType;
import org.springframework.test.context.junit4.SpringJUnit4ClassRunner;
import org.springframework.test.context.junit4.SpringRunner;
import org.springframework.test.context.web.WebAppConfiguration;
import org.springframework.test.web.servlet.MockMvc;
import org.springframework.test.web.servlet.request.MockMvcRequestBuilders;
import org.springframework.test.web.servlet.setup.MockMvcBuilders;

import static org.hamcrest.Matchers.equalTo;
import static org.springframework.test.web.servlet.result.MockMvcResultMatchers.content;
import static org.springframework.test.web.servlet.result.MockMvcResultMatchers.status;

import com.example.demo.web.HelloController;
import com.fasterxml.jackson.databind.Module.SetupContext;

import ch.qos.logback.core.status.Status;

//@RunWith(SpringRunner.class)
//@SpringBootTest

@RunWith(SpringJUnit4ClassRunner.class)
@SpringBootTest(classes = DemoApplication.class)
@WebAppConfiguration
public class DemoApplicationTests {

    private MockMvc mvc;

    @Before
    public void setUp() throws Exception {
        mvc = MockMvcBuilders.standaloneSetup(new HelloController()).build();
    }

    @Test
    public void contextLoads() throws Exception {
        mvc.perform(MockMvcRequestBuilders.get("/hello").accept(MediaType.APPLICATION_JSON)).andExpect(status().isOk())
                .andExpect(content().string(equalTo("hello world")));
    }

}
解析:
- @RunWith(SpringJUnit4ClassRunner.class):引入Spring对JUnit4的支持
- @SpringBootTest(classes = DemoApplication.class):指定Spring Boot的启动类
- @WebAppConfiguration:开启web应用的配置,用于模拟ServletContext
- MockMvc 对象:用于模拟调用controller的接口发起请求,在@Test定义的hello测试用例中,perform函数执行一次请求调用,accept用于执行接收的数据类型,andExpect用于判断接口返回的期望值
- @Before:JUnit中定义在测试用例@Test内容执行前预加载的内容,这里用来初始化对HelloController的模拟
- 注意引入下面的静态引用,让status、content、equalTo函数可用
-
import static org.hamcrest.Matchers.equalTo;
import static org.springframework.test.web.servlet.result.MockMvcResultMatchers.content;
import static org.springframework.test.web.servlet.result.MockMvcResultMatchers.status;
-
ps:学习来自《spring cloud微服务实战》