目录
bean 的配置元数据的信息:
bean 定义的属性
| 属性 | 描述 |
|---|---|
| class | 这个属性是强制性的,并且指定用来创建 bean 的 bean 类。 |
| name | 这个属性指定唯一的 bean 标识符。在基于 XML 的配置元数据中,你可以使用 ID 和/或 name 属性来指定 bean 标识符。 |
| scope | 这个属性指定由特定的 bean 定义创建的对象的作用域,它将会在 bean 作用域的章节中进行讨论。 |
| constructor-arg | 它是用来注入依赖关系的,并会在接下来的章节中进行讨论。 |
| properties | 它是用来注入依赖关系的,并会在接下来的章节中进行讨论。 |
| autowiring mode | 它是用来注入依赖关系的,并会在接下来的章节中进行讨论。 |
| lazy-initialization mode | 延迟初始化的 bean 告诉 IoC 容器在它第一次被请求时,而不是在启动时去创建一个 bean 实例。 |
| initialization 方法 | 在 bean 的所有必需的属性被容器设置之后,调用回调方法。它将会在 bean 的生命周期章节中进行讨论。 |
| destruction 方法 | 当包含该 bean 的容器被销毁时,使用回调方法。它将会在 bean 的生命周期章节中进行讨论。 |
spring通过xml配置元数据
<?xml version="1.0" encoding="UTF-8"?>

<beans xmlns="http://www.springframework.org/schema/beans"
    xmlns:xsi="http://www.w3.org/2001/XMLSchema-instance"
    xsi:schemaLocation="http://www.springframework.org/schema/beans
    http://www.springframework.org/schema/beans/spring-beans-3.0.xsd">

   <!-- 默认配置 -->
   <bean id="..." class="...">
       <!-- collaborators and configuration for this bean go here -->
   </bean>

   <!-- 配置了延迟初始方法 -->
   <bean id="..." class="..." lazy-init="true">
       <!-- collaborators and configuration for this bean go here -->
   </bean>

   <!-- 配置了初始化方法 -->
   <bean id="..." class="..." init-method="...">
       <!-- collaborators and configuration for this bean go here -->
   </bean>

   <!-- 配置了销毁方法 -->
   <bean id="..." class="..." destroy-method="...">
       <!-- collaborators and configuration for this bean go here -->
   </bean>

</beans>
bean的作用域scope:
scope的属性
| 作用域 | 描述 |
|---|---|
| singleton | 该作用域将 bean 的定义的限制在每一个 Spring IoC 容器中的一个单一实例(默认)。只能有一个实例 |
| prototype | 该作用域将单一 bean 的定义限制在任意数量的对象实例。可以有任意数量的实例 |
| request | 该作用域将 bean 的定义限制为 HTTP 请求。只在 web-aware Spring ApplicationContext 的上下文中有效。 |
| session | 该作用域将 bean 的定义限制为 HTTP 会话。 只在web-aware Spring ApplicationContext的上下文中有效。 |
| global-session | 该作用域将 bean 的定义限制为全局 HTTP 会话。只在 web-aware Spring ApplicationContext 的上下文中有效。 |
singleton作用域
HelloWorld类的内容
package com.xiaosousou.springHello;
public class HelloWorld {

   private String message;

   public void setMessage(String message){
      this.message  = message;
   }

   public void getMessage(){
      System.out.println("Your Message : " + message);
   }

}
MainApp类的内容
package com.xiaosousou.springHello;
import org.springframework.context.ApplicationContext;
import org.springframework.context.support.ClassPathXmlApplicationContext;
public class MainApp {

   public static void main(String[] args) {
        //得到Bean.xml
      ApplicationContext context = new ClassPathXmlApplicationContext("Beans.xml");
        //objA得到bean helloWorld
      HelloWorld objA = (HelloWorld) context.getBean("helloWorld");
        //设置message
      objA.setMessage("I'm object A");
        //objA调用getMessage方法
      objA.getMessage();
        //objB得到bean helloworld
      HelloWorld objB = (HelloWorld) context.getBean("helloWorld");
        //objB调用getMessage方法
      objB.getMessage();

   }

}
Bean.xml配置
<?xml version="1.0" encoding="UTF-8"?>

<beans xmlns="http://www.springframework.org/schema/beans"
    xmlns:xsi="http://www.w3.org/2001/XMLSchema-instance"
    xsi:schemaLocation="http://www.springframework.org/schema/beans
    http://www.springframework.org/schema/beans/spring-beans-3.0.xsd">

    <!-- 设置scope为singleton -->
   <bean id="helloWorld" class="com.tutorialspoint.HelloWorld" scope="singleton">

   </bean>

</beans>
运行MainApp,得到结果
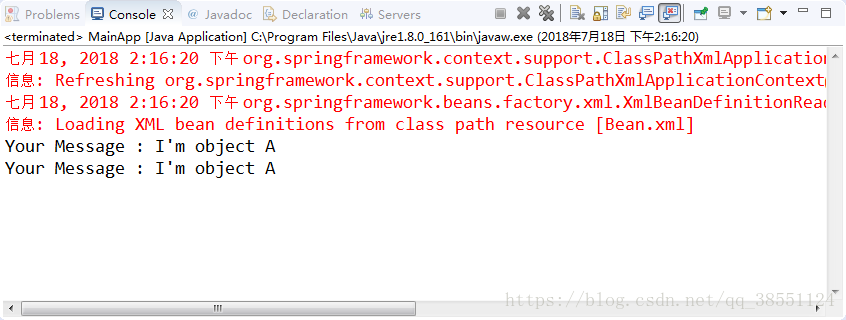
说明ioc容器中只有一个helloworld实例
prototype作用域
我们通过更改上面的Bean.xml配置,实现prototype作用域
Bean.xml的内容
<?xml version="1.0" encoding="UTF-8"?>

<beans xmlns="http://www.springframework.org/schema/beans"
    xmlns:xsi="http://www.w3.org/2001/XMLSchema-instance"
    xsi:schemaLocation="http://www.springframework.org/schema/beans
    http://www.springframework.org/schema/beans/spring-beans-3.0.xsd">

    <!-- 设置scope为singleton -->
   <bean id="helloWorld" class="com.tutorialspoint.HelloWorld" scope="prototype">

   </bean>

</beans>
运行MainApp得到

说明objB没有得到objA的实例
Bean的生存周期:
理解 Spring bean 的生命周期很容易。当一个 bean 被实例化时,它可能需要执行一些初始化使它转换成可用状态。同样,当 bean 不再需要,并且从容器中移除时,可能需要做一些清除工作。
在bean初始化时会调用初始化方法,销毁时会调用销毁方法。
为了定义安装和拆卸一个 bean,我们只要声明带有 init-method 和/或 destroy-method 参数的 。
init方法
可以使用实现接口的方法自定义初始化/销毁方法,也可以通过xml配置属性,自定义初始化/销毁方法
通过接口实现初始化方法
通过实现org.springframework.beans.factory.InitializingBean 接口指定一个单一的方法
public class ExampleBean implements InitializingBean {
   public void afterPropertiesSet() {
      // do some initialization work
   }
}
在基于xml数据元配置,可以通过init-method属性来实现初始化方法
<bean id="exampleBean" class="examples.ExampleBean" init-method="init"/>下面是类中的定义
public class ExampleBean {
   public void init() {
      // do some initialization work
   }
}
destroy方法
通过接口实现销毁方法
通过实现org.springframework.beans.factory.DisposableBean 接口指定一个单一的方法
public class ExampleBean implements DisposableBean {
   public void destroy() {
      // do some destruction work
   }
}
在基于xml数据元配置,可以通过destroy-method属性来实现初始化方法
<bean id="exampleBean" class="examples.ExampleBean" destroy-method="destroy"/>下面是类中的定义
public class ExampleBean {
   public void destroy() {
      // do some destruction work
   }
}
实例
HelloWorld类的内容
public class HelloWorld {

   private String message;

   public void setMessage(String message){
      this.message  = message;
   }

   public void getMessage(){
      System.out.println("Your Message : " + message);
   }

    //init初始化方法
   public void init(){
      System.out.println("Bean is going through init.");
   }

    //destroy销毁方法
   public void destroy(){
      System.out.println("Bean will destroy now.");
   }

}
MainApp类的内容
import org.springframework.context.support.AbstractApplicationContext;
import org.springframework.context.support.ClassPathXmlApplicationContext;
public class MainApp {

   public static void main(String[] args) {

      AbstractApplicationContext context = new ClassPathXmlApplicationContext("Beans.xml");
      HelloWorld obj = (HelloWorld) context.getBean("helloWorld");
      obj.getMessage();
        //使用registerShutdownHook方法,确保bean会销毁,实现调用destroy方法
      context.registerShutdownHook();

   }

}
Bean.xml的内容
<?xml version="1.0" encoding="UTF-8"?>

<beans xmlns="http://www.springframework.org/schema/beans"
    xmlns:xsi="http://www.w3.org/2001/XMLSchema-instance"
    xsi:schemaLocation="http://www.springframework.org/schema/beans
    http://www.springframework.org/schema/beans/spring-beans-3.0.xsd">
    <!-- 自定义初始化/销毁方法 -->
   <bean id="helloWorld" class="com.xiaosousou.springHello.HelloWorld" init-method="init" destroy-method="destroy">
           <property name="message" value="Hello World!"/>
   </bean>

</beans>
运行MainApp
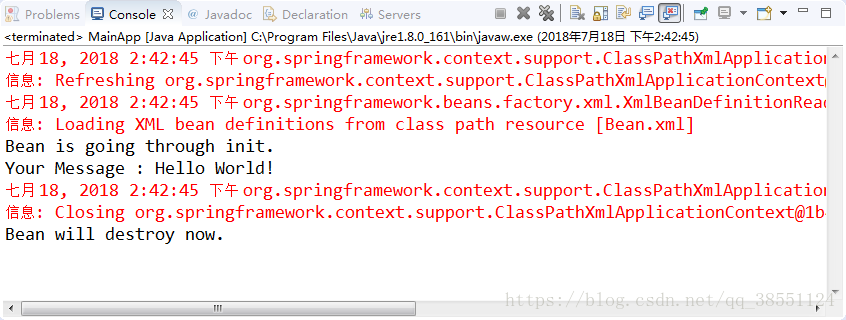
成功调用init/destroy方法
默认初始化和销毁方法
如果有许多bean都有相同的初始化方法和销毁方法,可以使用default-init-method 和 default-destroy-method属性,实现默认配置初始化方法和销毁方法
<beans xmlns="http://www.springframework.org/schema/beans"
    xmlns:xsi="http://www.w3.org/2001/XMLSchema-instance"
    xsi:schemaLocation="http://www.springframework.org/schema/beans
    http://www.springframework.org/schema/beans/spring-beans-3.0.xsd"
    default-init-method="init"
    default-destroy-method="destroy">
    <!-- ↑通过设置default-init-method和default-destroy-method方法实现默认初始化和销毁 -->
   <bean id="..." class="...">
       <!-- collaborators and configuration for this bean go here -->
   </bean>

</beans>
后置处理器
BeanPostProcessor 接口实现回调方法
应该是所有实现了BeanPostProcessor 接口的bean,在context装载bean的时候,完成属性set之后,在执行init方法(如果设置)之前,调用PostProcessBeforeInitialization和PostProcessAfterInitialization。
Helloworld类的内容
public class HelloWorld {

   private String message;

   public void setMessage(String message){
      this.message  = message;
   }

   public void getMessage(){
      System.out.println("Your Message : " + message);
   }

   public void init(){
      System.out.println("Bean is going through init.");
   }

   public void destroy(){
      System.out.println("Bean will destroy now.");
   }

}
InitPostProcessor类的内容
import org.springframework.beans.factory.config.BeanPostProcessor;
import org.springframework.beans.BeansException;

public class InitPostProcessor implements BeanPostProcessor {

    //Before实现初始化前的逻辑
   public Object postProcessBeforeInitialization(Object bean, String beanName) throws BeansException {

      System.out.println("BeforeInitialization : " + beanName);
      return bean;  // you can return any other object as well

   }

    //after实现初始化后的逻辑
   public Object postProcessAfterInitialization(Object bean, String beanName) throws BeansException {

      System.out.println("AfterInitialization : " + beanName);
      return bean;  // you can return any other object as well

   }

}
MainApp类的内容
import org.springframework.context.support.AbstractApplicationContext;
import org.springframework.context.support.ClassPathXmlApplicationContext;

public class MainApp {

   public static void main(String[] args) {

      AbstractApplicationContext context = new ClassPathXmlApplicationContext("Beans.xml");
      HelloWorld obj = (HelloWorld) context.getBean("helloWorld");
      obj.getMessage();
      context.registerShutdownHook();

   }

}
Bean.xml的内容
<?xml version="1.0" encoding="UTF-8"?>

<beans xmlns="http://www.springframework.org/schema/beans"
    xmlns:xsi="http://www.w3.org/2001/XMLSchema-instance"
    xsi:schemaLocation="http://www.springframework.org/schema/beans
    http://www.springframework.org/schema/beans/spring-beans-3.0.xsd">

   <bean id="helloWorld" class="com.tutorialspoint.HelloWorld" init-method="init" destroy-method="destroy">
       <property name="message" value="Hello World!"/>
   </bean>

   <bean class="com.xiaosousou.springHello.InitPostProcessor" />

</beans>
运行MainApp
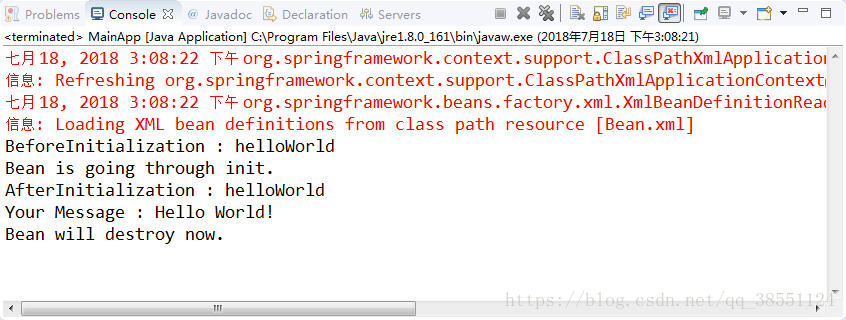
在初始化前调用了 postProcessBeforeInitialization方法,初始化后调用了postProcessAfterInitialization方法
Bean的继承
bean的配置通过parent 属性实现继承父类
helloworld有2个属性,message1、message2
helloIndia有3个属性,message1、message2、message3(message2继承了父类helloworld,重写了message1,新增了message3属性)
Bean.xml的内容
<?xml version="1.0" encoding="UTF-8"?>

<beans xmlns="http://www.springframework.org/schema/beans"
    xmlns:xsi="http://www.w3.org/2001/XMLSchema-instance"
    xsi:schemaLocation="http://www.springframework.org/schema/beans
    http://www.springframework.org/schema/beans/spring-beans-3.0.xsd">

   <bean id="helloWorld" class="com.tutorialspoint.HelloWorld">
      <property name="message1" value="Hello World!"/>
      <property name="message2" value="Hello Second World!"/>
   </bean>

   <bean id="helloIndia" class="com.tutorialspoint.HelloIndia" parent="helloWorld">
      <property name="message1" value="Hello India!"/>
      <property name="message3" value="Namaste India!"/>
   </bean>

</beans>
HelloWorld类的内容
public class HelloWorld {

   private String message1;
   private String message2;

   public void setMessage1(String message){
      this.message1  = message;
   }

   public void setMessage2(String message){
      this.message2  = message;
   }

   public void getMessage1(){
      System.out.println("World Message1 : " + message1);
   }

   public void getMessage2(){
      System.out.println("World Message2 : " + message2);
   }

}
HelloIndia类的内容
public class HelloIndia {
   private String message1;
   private String message2;
   private String message3;

   public void setMessage1(String message){
      this.message1  = message;
   }

   public void setMessage2(String message){
      this.message2  = message;
   }

   public void setMessage3(String message){
      this.message3  = message;
   }

   public void getMessage1(){
      System.out.println("India Message1 : " + message1);
   }

   public void getMessage2(){
      System.out.println("India Message2 : " + message2);
   }

   public void getMessage3(){
      System.out.println("India Message3 : " + message3);
   }

}
MainApp类的内容
import org.springframework.context.ApplicationContext;
import org.springframework.context.support.ClassPathXmlApplicationContext;

public class MainApp {
   public static void main(String[] args) {

      ApplicationContext context = new ClassPathXmlApplicationContext("Beans.xml");

      HelloWorld objA = (HelloWorld) context.getBean("helloWorld");

      objA.getMessage1();
      objA.getMessage2();

      HelloIndia objB = (HelloIndia) context.getBean("helloIndia");
      objB.getMessage1();
      objB.getMessage2();
      objB.getMessage3();

   }

}
运行MainApp

IndiaMessage2继承了父类world的message2