概念
- 什么是Android消息机制?
刚开始用时都会以为Android消息机制就是指Handler,因为在UI线程使用时都只需要Handler。其实,消息机制的组成不仅包括Handler,还包括Looper、MessegeQueue等。 - Android消息机制的作用?
2个作用:
1、代码逻辑转移。
可以是在线程内部也可以是在线程间转移。
用post(Runnable task)时,若task创建时所在的线程a和该Handler绑定的线程b不是同一个的话代码逻辑就线程a被转移到线程b中执行,若a、b是同一个线程的话代码逻辑的转移就只是在该线程内部。
用send方法时,若Handler创建时所在的线程a和该Handler绑定的线程b不是同一个的话代码逻辑就线程a被转移到线程b中执行,若a、b是同一个线程的话代码逻辑的转移就只是在该线程内部。
例子:IntentService中Handler将代码逻辑(即onHandleIntent()中的代码)从IntentService所在的线程即UI线程转移到IntentService中的HandlerThread这一线程中执行。
2、发送消息。
可以是在线程内部也可以在线程间发送消息。实际上也是代码逻辑的转移。
例子:子线程发送消息通知UI线程更改UI(即调用Handler的handleMesseage()方法,这是代码逻辑在线程内部转移)。
先上个图看下消息机制的大概原理:(是这篇文章的总结,很重要!!!,图比较小的可用浏览器新的标签页打开或下载下来)
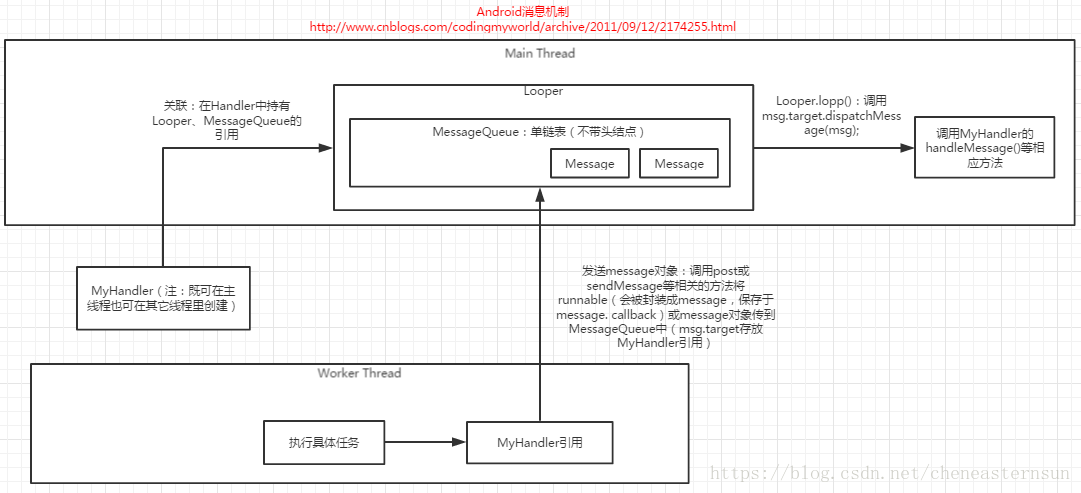
看懂上图的你就已经掌握消息机制的一大半了,接下来我们结合源码逐个认识消息机制的组成成员,对每个类的介绍基本都是按照Field、Field的初始化、成员方法这一顺序来介绍的,嘻嘻。。。
Handler
作用:通过Handler的post、send方法发送一个Message(持有该Handler对象)到Handler关联的Looper的MessageQueue中。
关键:post、send方法。
1、 Handler中持有的Field(持有Loopper、MesseageQueue的对象)
final MessageQueue mQueue;
final Looper mLooper;//关联Looper,其实就是关联Looper所在的线程。
它们在构造方法中被赋值,看下面Handler的初始化。
2、 Handler的初始化
- 不指定Looper 的:handler = new Handler();
public Handler() {
        this(null, false);
}

public Handler(Callback callback, boolean async) {
        mLooper = Looper.myLooper();//默认使用当前线程的Looper。
        if (mLooper == null) {//Handler必须创建在有Looper的线程中。
            throw new RuntimeException(
                "Can't create handler inside thread that has not called Looper.prepare()");
        }
        mQueue = mLooper.mQueue;
        mCallback = callback;
        mAsynchronous = async;
}
UI线程中创建Handler一般就是用这种不用指定Looper,直接默认用当前UI线程的Looper。
- 指定Looper 的:handler = new Handler(looper);
public Handler(Looper looper) {
        this(looper, null, false);
}
public Handler(Looper looper, Callback callback, boolean async) {
        mLooper = looper;
        mQueue = looper.mQueue;
        mCallback = callback;
        mAsynchronous = async;
}
3、 Handler的使用
- post(Runnable r)
public final boolean post(Runnable r)
{
       return  sendMessageDelayed(getPostMessage(r), 0);
}

//将Runnable对象封装为Message对象
private static Message getPostMessage(Runnable r) {
    Message m = Message.obtain();
    m.callback = r;
    return m;
}

public final boolean sendMessageDelayed(Message msg, long delayMillis)
{
    if (delayMillis < 0) {
        delayMillis = 0;
    }
    return sendMessageAtTime(msg, SystemClock.uptimeMillis() + delayMillis);
}

public boolean sendMessageAtTime(Message msg, long uptimeMillis) {
    MessageQueue queue = mQueue;//Handler持有的MQ
    if (queue == null) {
        RuntimeException e = new RuntimeException(
                this + " sendMessageAtTime() called with no mQueue");
        Log.w("Looper", e.getMessage(), e);
        return false;
    }
    return enqueueMessage(queue, msg, uptimeMillis);
}

//调用MessageQueue的enqueueMessage()方法将message添加到它的队列中。
private boolean enqueueMessage(MessageQueue queue, Message msg, long uptimeMillis) {
    msg.target = this;
    if (mAsynchronous) {
        msg.setAsynchronous(true);
    }
    return queue.enqueueMessage(msg, uptimeMillis);
}
- 各种send方法
1、 各种send empty message,下面只看sendEmptyMessage()的,其它方法类似。
public final boolean sendEmptyMessage(int what)
{
    return sendEmptyMessageDelayed(what, 0);
}

public final boolean sendEmptyMessageDelayed(int what, long delayMillis) {
    //封装为message
    Message msg = Message.obtain();
    msg.what = what;
    return sendMessageDelayed(msg, delayMillis);
}
2、 各种send message的方法
public final boolean sendMessage(Message msg)
{
    return sendMessageDelayed(msg, 0);
}
总结:post、send除了上面这种常见的方法,它们还都有相应的延迟发送、定时发送、message入到链表头部(即最先开始被调用)的方法,这些方法最终都会调用Handler的enqueueMessage(MessageQueue queue, Message msg, long uptimeMillis),进而调用Handler中持有的MessageQueue 对象的enqueueMessage()方法,也就是说,无论哪种方法,最终都会以一个Message对象的形式被插入到MessageQueue中。
注意:在对Message对象初始化时要用Handler的各种obtainMessage()方法,因为最终会调用Message的静态方法obtain()来获取Message的global pool中的message对象,这样可避免重新new一个message。
/**
 * Return a new Message instance from the global pool. Allows us to
 * avoid allocating new objects in many cases.
 */
public static Message obtain() {
......
}
Looper
作用:调用自身的loop()方法,循环获取自身MessageQueue中的Message并,调用msg.target.dispatchMessage()。这个target就是Message持有的Handler对象。
关键:loop()方法。
Looper:一个线程最多只能有一个Looper,一个Looper也只能关联有一个线程。是一种一一对应的关系。
1、 Looper持有的Field
static final ThreadLocal<Looper> sThreadLocal = new ThreadLocal<Looper>();
private static Looper sMainLooper;  // guarded by Looper.class

final MessageQueue mQueue;
final Thread mThread;//关联线程
2、 Looper的初始化
Looper只有一个private的构造方法,它的初始化是通过静态的prepare()方法。
public static void prepare() {
    prepare(true);
}

private static void prepare(boolean quitAllowed) {
    if (sThreadLocal.get() != null) {
        throw new RuntimeException("Only one Looper may be created per thread");
    }
    sThreadLocal.set(new Looper(quitAllowed));//将Looper对象保存在ThreadLocal中。将在下面介绍ThreadLocal。
}
3、 Looper的使用
在使用Handler之前要在线程中初始化Looper。
- 普通线程中Looper的初始化:
new Thread(new Runnable() {
    @Override
    public void run() {
        Looper.prepare();//初始化Looper并将Looper对象保存在mThreadLocal中。
        Looper.loop();//循环获取MessageQueue中的Message,是个死循环。
    }
});
- 在UI线程中,Looper的初始化如下:
public final class ActivityThread {
    public static void main(String[] args) {
        Looper.prepareMainLooper();
        Looper.loop();
    }
}
注意:线程中有Looper时,在线程结束时应该主动调用Looper的quit()或quitSafely()方法,才能结束loop()中的死循环,进而才能线程才会结束。原理可看源码:
Looper的loop()源码:理解消息机制的关键!!!
public static void loop() {
    final Looper me = myLooper();
    if (me == null) {
        throw new RuntimeException("No Looper; Looper.prepare() wasn't called on this thread.");
    }
    final MessageQueue queue = me.mQueue;

    ......

    for (;;) {//死循环,取出MessageQueue中的Message
        Message msg = queue.next(); // might block
        if (msg == null) {
            // No message indicates that the message queue is quitting.
            return;//MessageQueue 的next()方法返回null才会结束死循环。
        }

        msg.target.dispatchMessage(msg);//调用Handler的dispatchMessage()方法
    }
}
由上面源码猜测,Looper的quit()方法能使MessageQueue的next()方法返回null,看源码:
Looper的quit()方法源码:
public void quit() {
    mQueue.quit(false);
}
MessageQueue的quit()方法源码:
void quit(boolean safe) {
    synchronized (this) {
        if (mQuitting) {
            return;
        }
        mQuitting = true;//退出标志,为true时MessageQueue 的next()返回null。

        //清空MessageQueue链表
        if (safe) {
            removeAllFutureMessagesLocked();
        } else {
            removeAllMessagesLocked();
        }

        // We can assume mPtr != 0 because mQuitting was previously false.
        nativeWake(mPtr);
    }
}
再来看MessageQueue的next()方法源码:
Message next() {
    // Return here if the message loop has already quit and been disposed.
    // This can happen if the application tries to restart a looper after quit
    // which is not supported.
    final long ptr = mPtr;
    if (ptr == 0) {
        return null;
    }

    int pendingIdleHandlerCount = -1; // -1 only during first iteration
    int nextPollTimeoutMillis = 0;
    for (;;) {//死循环,直到找到msg(不为null)并返回,或Looper调用quit方法时才返回null。
        synchronized (this) {
            // Try to retrieve the next message.  Return if found.
            final long now = SystemClock.uptimeMillis();
            Message prevMsg = null;
            Message msg = mMessages;
            if (msg != null && msg.target == null) {
                // Stalled by a barrier.  Find the next asynchronous message in the queue.
                do {
                    prevMsg = msg;
                    msg = msg.next;
                } while (msg != null && !msg.isAsynchronous());
            }
            if (msg != null) {
                if (now < msg.when) {
                    // Next message is not ready.  Set a timeout to wake up when it is ready.
                    nextPollTimeoutMillis = (int) Math.min(msg.when - now, Integer.MAX_VALUE);
                } else {
                    // Got a message.
                    mBlocked = false;
                    if (prevMsg != null) {
                        prevMsg.next = msg.next;
                    } else {
                        mMessages = msg.next;
                    }
                    msg.next = null;
                    if (DEBUG) Log.v(TAG, "Returning message: " + msg);
                    msg.markInUse();
                    return msg;//找到下个要处理的msg,结束死循环。
                }
            } else {
                // No more messages.
                nextPollTimeoutMillis = -1;
            }

            // Process the quit message now that all pending messages have been handled.
            if (mQuitting) {//Looper调用quit方法时,mQuitting 为true
                dispose();
                return null;
            }
            ......
        }
        ......
    }
}
4、 Looper对象的获取
- 获取非UI线程的Looper
/**
 * Return the Looper object associated with the current thread.  Returns
 * null if the calling thread is not associated with a Looper.
 */
public static @Nullable Looper myLooper() {
    return sThreadLocal.get();
}
- 获取UI线程的Looper
/**
 * Returns the application's main looper, which lives in the main thread of the application.
 */
public static Looper getMainLooper() {
    synchronized (Looper.class) {
        return sMainLooper;
    }
}
到这里必须介绍下ThreadLocal:
ThreadLocal
- 概念:一个线程内部的数据存储类,通过它可在指定的线程中存储数据,数据存储以后,只有在指定线程中可以获取到存储的数据,其他线程无法获取到。换句话说,它是以线程为作用域的,只能获取到当前所在线程存储的数据。
- 原理:每个线程都持有一个数组 ThreadLocal.Values localValues; 调用ThreadLocal对象的get()方法会获取当前线程的数组,并根据该ThreadLocal对象的引用去获取相应的数据。存储数据时,也是获取当前线程的数组并根据该ThreadLocal对象的引用去存储到数组中。
ThreadLocal的set()源码:
public void set(T value) {
    Thread currentThread = Thread.currentThread();
    Values values = values(currentThread);//获取当前线程的持有的ThreadLocal.Values数组
    if (values == null) {
        values = initializeValues(currentThread);
    }
    values.put(this, value);
}

void put(ThreadLocal<?> key, Object value) {
    cleanUp();

    // Keep track of first tombstone. That's where we want to go back
    // and add an entry if necessary.
    int firstTombstone = -1;

    for (int index = key.hash & mask;; index = next(index)) {
        Object k = table[index];

        if (k == key.reference) {//ThreadLocal对象的引用
            // Replace existing entry.
            table[index + 1] = value;
            return;
        }
        ......
    }
}
ThreadLocal的get()的源码:
public T get() {
    // Optimized for the fast path.
    Thread currentThread = Thread.currentThread();
    Values values = values(currentThread);//获取当前线程的持有的ThreadLocal.Values数组
    if (values != null) {
        Object[] table = values.table;
        int index = hash & values.mask;
        if (this.reference == table[index]) {//ThreadLocal对象的引用
            return (T) table[index + 1];
        }
    } else {
        values = initializeValues(currentThread);
    }

    return (T) values.getAfterMiss(this);
}
- 应用:当多个线程需要各自存储同一类型对象但又相互不影响即作用域只是在本线程内部时可使用同一ThreadLocal对象来存储。注:一个ThreadLocal对象只能存储一种数据类型的一个对象。
- 各种变量的作用域
局部变量:方法
全局变量Field:对象
ThreadLocal:线程
静态变量:进程
MessageQueue
- 概念:一个不带头结点的单链表,结点是Message类型,持有Message mMessages; mMessages指向链表的首结点。
注意:首结点指的是链表的第一个结点,可能为null。头结点并不是用来存放数据的,与其他存放数据的结点不同。
1、 Field
持有一个Message对象,指向该链表的首结点。
Message mMessages;
2、 方法:既然是链表,那就有插入结点、移出结点的操作。
- 插入结点:enqueueMessage()方法,按Message的执行时间升序排序,首结点的时间最小,也就是说首结点是最先需要被处理的Message。
boolean enqueueMessage(Message msg, long when) {
    synchronized (this) {
        if (mQuitting) {
            IllegalStateException e = new IllegalStateException(
                    msg.target + " sending message to a Handler on a dead thread");
            Log.w(TAG, e.getMessage(), e);
            msg.recycle();
            return false;
        }

        msg.markInUse();
        msg.when = when;//Message的执行时间
        Message p = mMessages;//链表首结点
        boolean needWake;
        if (p == null || when == 0 || when < p.when) {
            // New head, wake up the event queue if blocked.
            msg.next = p;
            mMessages = msg;
            needWake = mBlocked;
        } else {
            // Inserted within the middle of the queue.  Usually we don't have to wake
            // up the event queue unless there is a barrier at the head of the queue
            // and the message is the earliest asynchronous message in the queue.
            needWake = mBlocked && p.target == null && msg.isAsynchronous();
            Message prev;
            for (;;) {
                prev = p;
                p = p.next;
                if (p == null || when < p.when) {//按升序排序插入链表
                    break;
                }
                if (needWake && p.isAsynchronous()) {
                    needWake = false;
                }
            }
            msg.next = p; // invariant: p == prev.next
            prev.next = msg;
        }
        ......
    }
    return true;
}
- 移出结点:next()方法,找到需要处理的结点,移出链表并返回该结点。
下面简单介绍下作为MessageQueue的结点的Message:
Message
直接上源码:
public final class Message implements Parcelable {
    /**
     * User-defined message code so that the recipient can identify
     * what this message is about. Each {@link Handler} has its own name-space
     * for message codes, so you do not need to worry about yours conflicting
     * with other handlers.
     */
    public int what;//标志信息

    /**
     * arg1 and arg2 are lower-cost alternatives to using
     * {@link #setData(Bundle) setData()} if you only need to store a
     * few integer values.
     */
    public int arg1; //只传递1-2个int数据时的低成本方式
    public int arg2;

    /**
     * An arbitrary object to send to the recipient.  When using
     * {@link Messenger} to send the message across processes this can only
     * be non-null if it contains a Parcelable of a framework class (not one
     * implemented by the application).   For other data transfer use
     * {@link #setData}.
     *
     * <p>Note that Parcelable objects here are not supported prior to
     * the {@link android.os.Build.VERSION_CODES#FROYO} release.
     */
    public Object obj;//只能传递framework中已实现Parcelable的数据,自定义的不行。自定义的只能通过setData(Bundle data)传递。

    /**
     * Optional Messenger where replies to this message can be sent.  The
     * semantics of exactly how this is used are up to the sender and
     * receiver.
     */
    public Messenger replyTo;//存放Messenger,使接受者也能发送信息给对方。

    /**
     * Optional field indicating the uid that sent the message.  This is
     * only valid for messages posted by a {@link Messenger}; otherwise,
     * it will be -1.
     */
    public int sendingUid = -1;

    /**
     * Sets a Bundle of arbitrary data values. Use arg1 and arg2 members
     * as a lower cost way to send a few simple integer values, if you can.
     * @see #getData()
     * @see #peekData()
     */
    public void setData(Bundle data) {
        this.data = data;
    }

    /**
     * Sends this Message to the Handler specified by {@link #getTarget}.
     * Throws a null pointer exception if this field has not been set.
     */
    public void sendToTarget() {//相当于handler.sendMessage(msg)。
        target.sendMessage(this);
    }

    /**
     * Return a new Message instance from the global pool. Allows us to
     * avoid allocating new objects in many cases.
     */
    public static Message obtain() {//从global pool中返回一个已有的Message对象,不用再去new一个新的,可以节省资源。
        synchronized (sPoolSync) {
            if (sPool != null) {
                Message m = sPool;
                sPool = m.next;
                m.next = null;
                m.flags = 0; // clear in-use flag
                sPoolSize--;
                return m;
            }
        }
        return new Message();
    }
}
结语:以上就是Android消息机制的原理,其实弄懂最上面那张图就基本都懂了。