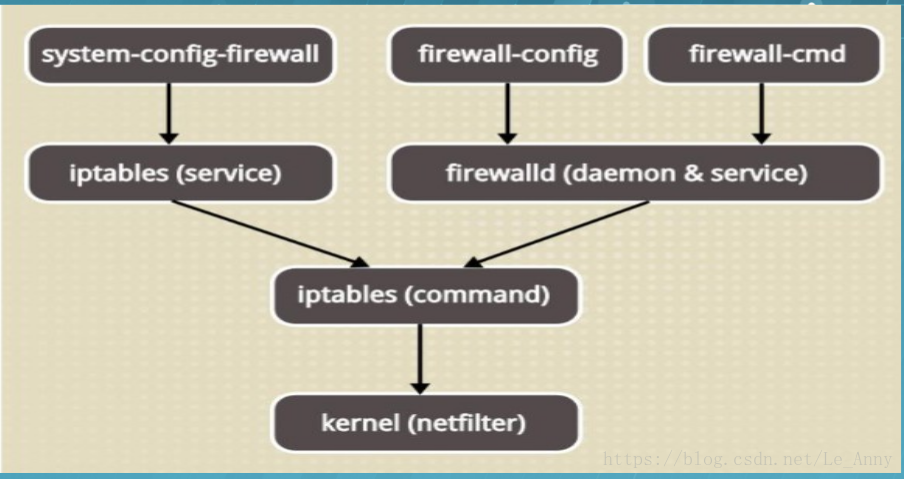
Firewalld
动态防火墙后台程序 firewalld 提供了一个 动态管理的防火墙, 用以支持网络 “ zones”,以分配对一个网络及其相关链接和界面一定程度的信任。它具备对 IP v4 和 IP v6 防火墙设置的支持。它支持以太网桥 , 并有分离运行时间和永久性配置选择。它还具备一个通向服务或者应用程序以直接增加防火墙规则的接口系统,提供了图像化的配置工具 firewall-config 、 system-config-firewall, 提供命令行客户端 firewall-cmd, 用于配置 firewalld 永久性或非永久性运行时间的改变 : 它依次用iptables 工具与执行数据包筛选的内核中的 Netfilter 通信
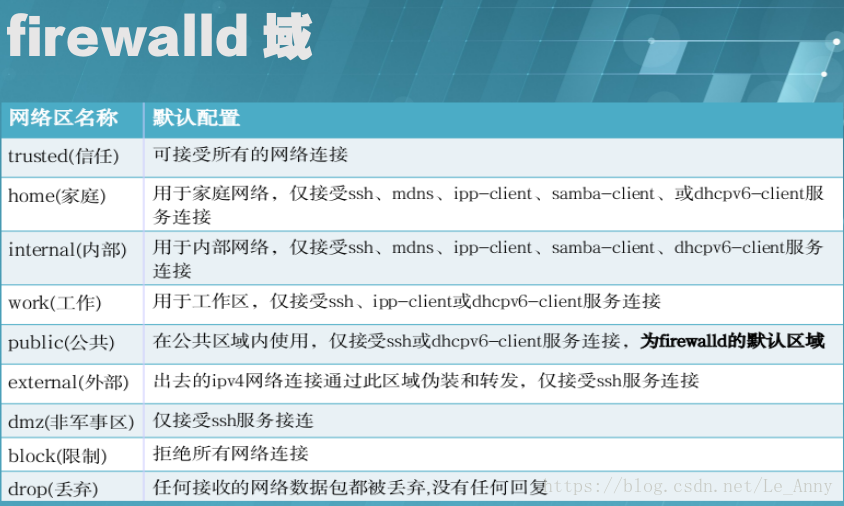
firewalld 域
一·安装服务配置
1、安装防火墙
[root@client Desktop]# yum install firewalld -firewall-config  -y
[root@client Desktop]# systemct start firewalld
[root@client Desktop]# systemctl enable firewalld
[root@client Desktop]# systemctl stop iptables
[root@client Desktop]# systemctl disable iptables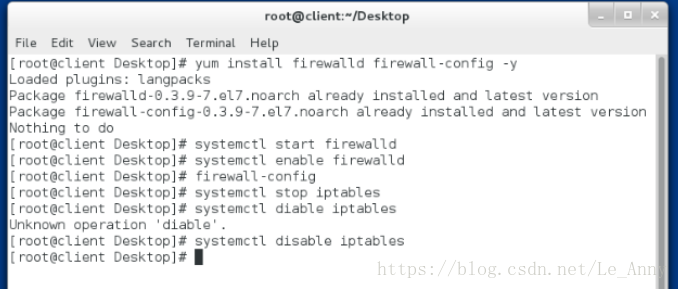
[root@client Desktop]# firewall-config ##直接打开界面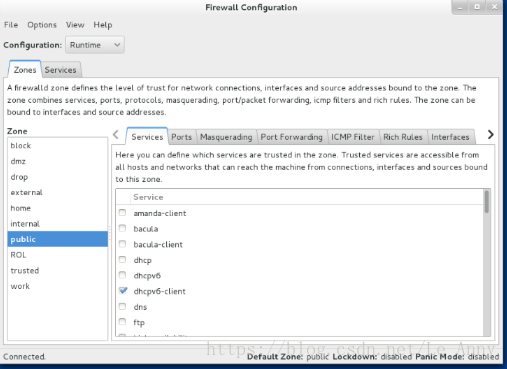
2、安装iptables
[root@client ~]# yum search iptables   ##搜索软件名
[root@client ~]# yum install iptables-services.x86_64  -y    ##安装
[root@client ~]# systemctl start iptables    ##打开服务
[root@client ~]# systemctl enable iptables   ##开机自动打开
[root@client ~]# systemctl stop firewalld   ##关闭火墙
[root@client ~]# systemctl disable firewalld   ##开机自动关闭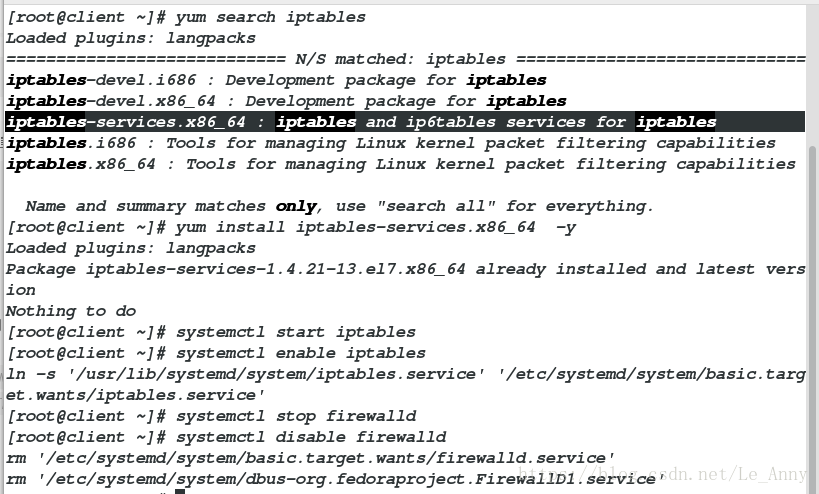
二·使用命令行接口配置防火墙
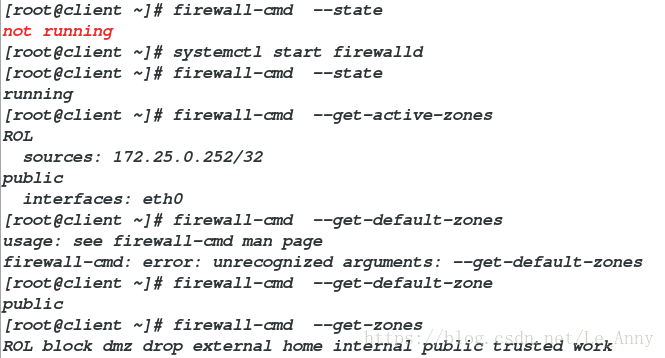
firewall-cmd –state查看火墙状态
firewall-cmd –get-active-zones查看火墙当前生效的域
firewall-cmd –get-default-zone查看默认的域
firewall-cmd –get-zones查看所有的域
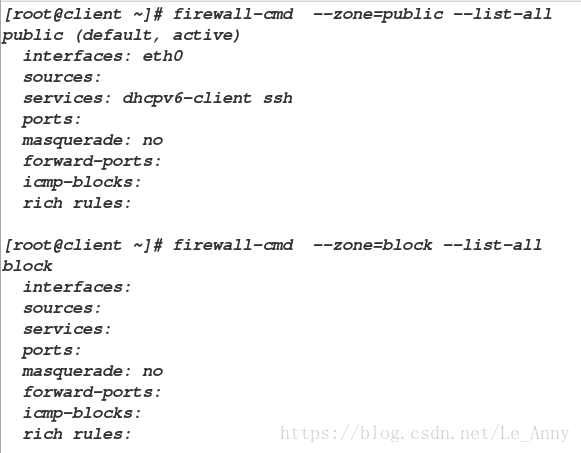
firewall-cmd –zone=public –list-all查看public域里面的信息
firewall-cmd –zone=block –list-all查看block域里面的信息
firewall-cmd –list-all-zones查看所有域的状态
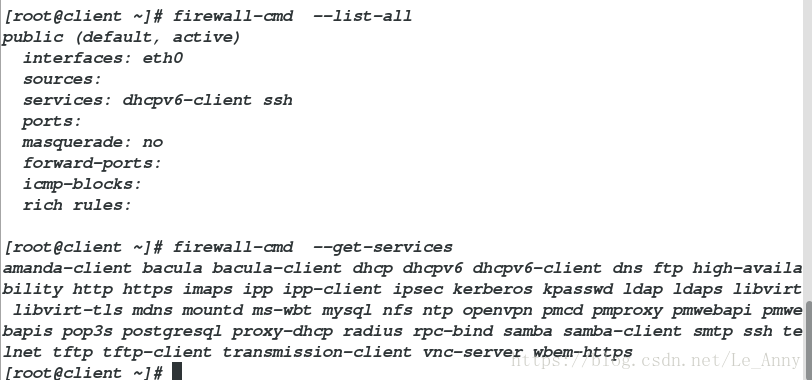
firewall-cmd –list-all列出所有域的规则
firewall-cmd –get-services列出系统当中用名称代表的服务
firewall-config打开防火墙界面

三·修改 firewalld 域
[root@client ~]# firewall-cmd --set-default-zone=trusted    ##代表可以接收所有网络访问
success
[root@client ~]# yum install httpd  -y   ##安装阿帕奇
[root@client ~]# systemctl start httpd
[root@client ~]# echo westos> /var/www/html/index.html   ##给默认发布文件写入内容westos
浏览器:172.25.254.119

注意:如果在浏览器浏览不到自己写的内容,需要把firewalld的域为trusted
四·使用命令行配置防火墙
做实验前需要添加网卡:
[kiosk@foundation71 Desktop]$ su
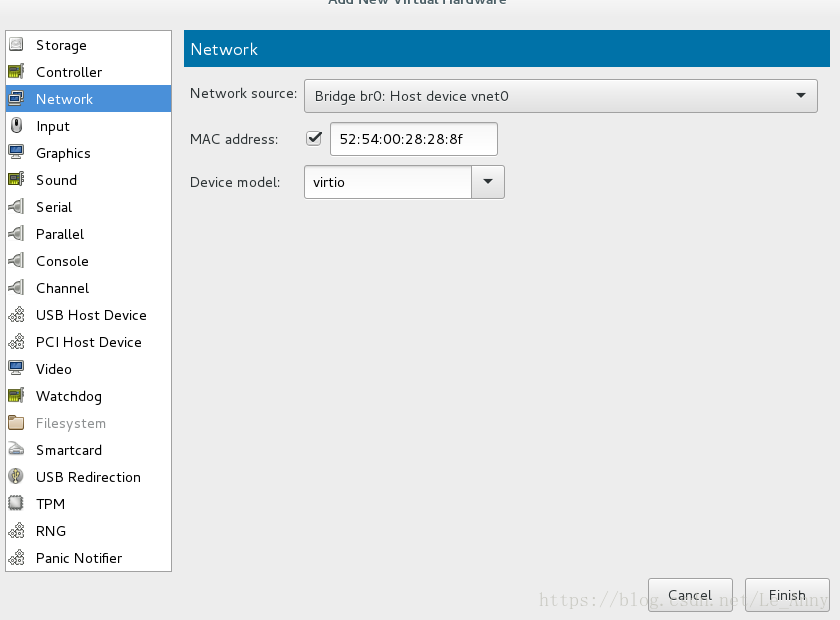
[root@foundation71 Desktop]# virt-manager 第一步:点击ADD Hardware
第二步:点击Network、选择virtio、点击Finish
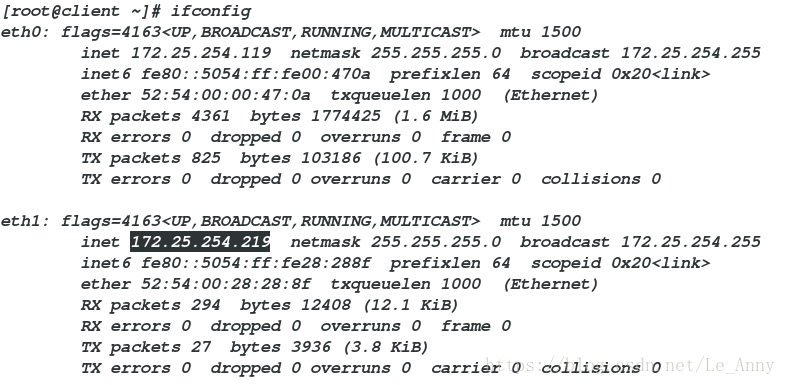
[root@client ~]# ifconfig    ##查看ip
[root@client ~]# nm-connection-editor   ##添加ip
[root@client ~]# ifconfig 
1、更改域为public
[root@client ~]# firewall-cmd  --list-all    ##列出所有
[root@client ~]# firewall-cmd  --set-default-zone=public   ##更改域
success
[root@client ~]# firewall-cmd  --list-all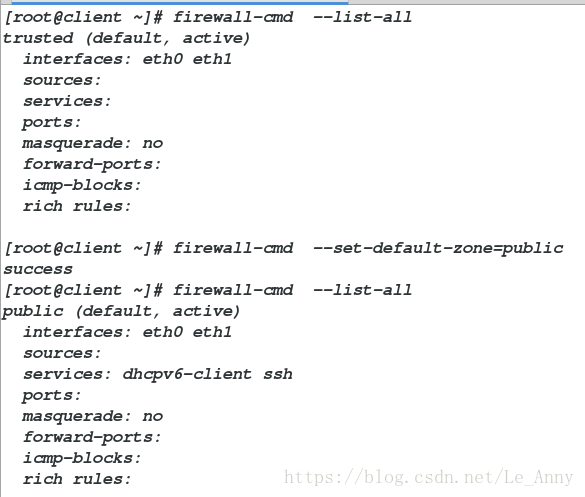
2、添加主机ip为信任
[root@client ~]# firewall-cmd  --add-source=172.25.254.71 --zone=trusted    ##添加主机IP域为信任
success
[root@client ~]# systemctl restart firewalld   ##重启
[root@client ~]# firewall-cmd  --list-all  --zone=trusted   ##查看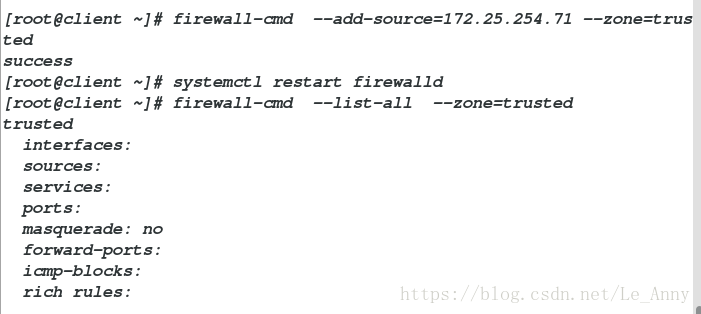
3、修改设备状态
[root@client ~]# firewall-cmd  --list-interfaces   ##查看端口
eth0 eth1
[root@client ~]# systemctl restart firewalld
[root@client ~]# firewall-cmd  --get-zone-of-interface=eth0   ##查看eth0状态
public
[root@client ~]# firewall-cmd  --get-zone-of-interface=eth1   ##查看eth1状态
public
[root@client ~]# firewall-cmd  --change-interface=eth0  --zone=trusted   ##更改域
success
[root@client ~]# firewall-cmd  --get-zone-of-interface=eth0   ##查看eth0状态
trusted
[root@client ~]# firewall-cmd  --remove-interface=eth0  --zone=trusted  ##移处eth0
success
[root@client ~]# firewall-cmd  --get-zone-of-interface=eth0   ##查看eth0状态时,报错已经不存在域
no zone
[root@client ~]# firewall-cmd  --add-interface=eth0 --zone=public   ##添加et0域为public
success
[root@client ~]# firewall-cmd  --get-zone-of-interface=eth0   ##查看eth0状态
public
[root@client ~]# firewall-cmd  --list-interfaces   ##查看端口
eth0 eth1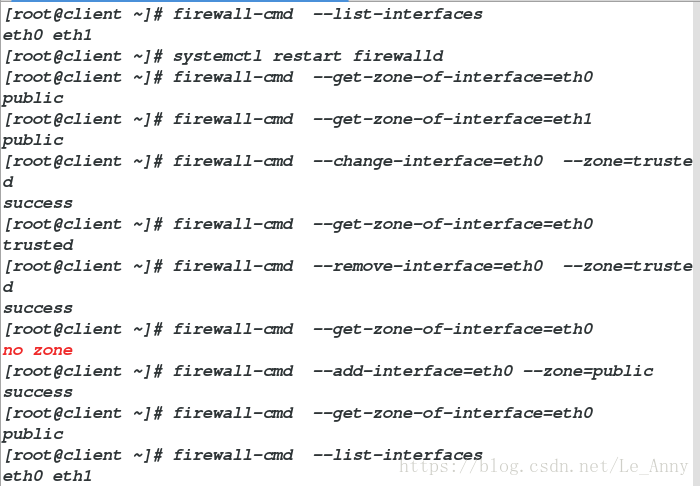
4、临时添加主机域
重启之后会失效
[root@client ~]# firewall-cmd  --add-source=172.25.254.71   ##添加真机ip
success
[root@client ~]# firewall-cmd  --list-all   ##列出
sources: 172.25.254.71
[root@client ~]# systemctl restart firewalld   ##重启服务
[root@client ~]# firewall-cmd  --list-all   ##再次列出,会消失
sources: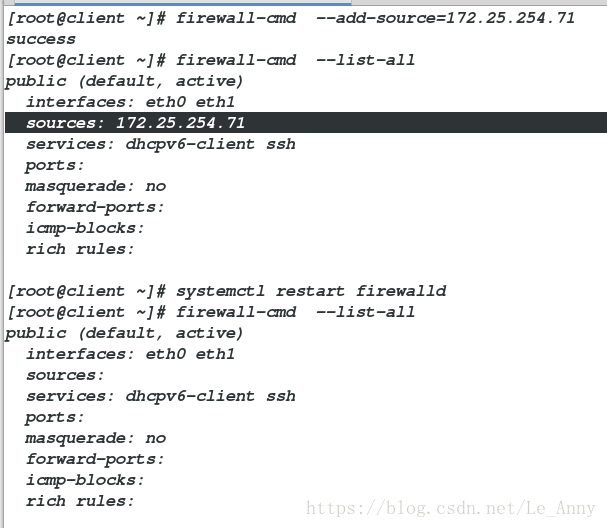
5、修改端口
[root@client zones]# firewall-cmd  --add-port=8080/tcp --zone=public   ##更改端口
success
[root@client zones]# firewall-cmd  --list-all
ports: 8080/tcp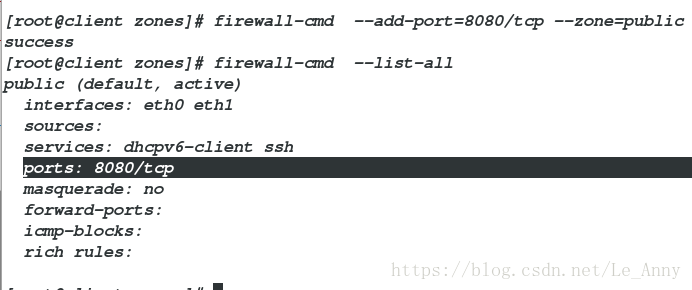
6、ssh服务的移除
[root@client ~]# firewall-cmd  --remove-service=ssh   ##移除ssh
success
[root@client ~]# firewall-cmd  --list-all   ##查看
  services: dhcpv6-client
移除允许服务后在真机测试,不能使用ssh服务连接到主机
[root@foundation71 Desktop]# ssh [email protected]
ssh: connect to host 172.25.254.119 port 22: No route to host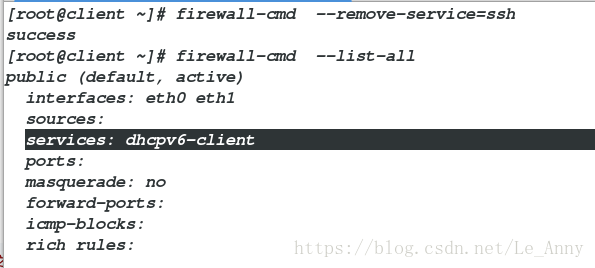
移除后真机连接不到虚拟机

[root@client ~]# firewall-cmd  --reload   ##刷新
success
[root@client ~]# firewall-cmd  --list-all    ##查看
  services: dhcpv6-client ssh
[root@client ~]# firewall-cmd  --complete-reload    ##对移除之后和之前的访问都有影响
刷新后还是可以看到ssh服务
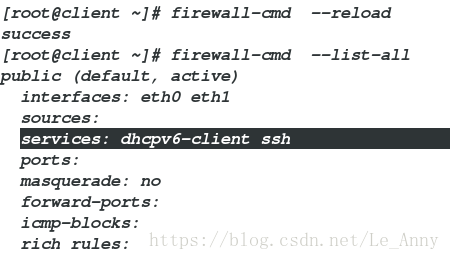
当删除firewlld允许的ssh服务时 firewall-cmd –reload 与firewall-cmd –complete-reload 重新加载的区别:
在真机连接到服务主机之后
使用 firewall-cmd –reload 重新加载时,不会断开连接,可以进行操作
使用 firewall-cmd –complete-reload 重新加载时,会中断连接,不能进行操作
五·允许(拒绝)登陆
[root@localhost ~]# yum install firewalld firewall-config
[root@localhost ~]# yum install httpd
[root@localhost ~]# systemctl start firewalld ##开启服务
[root@localhost ~]# systemctl start httpd
[root@localhost ~]# firewall-cmd --list-sll ##列出所有
services: dhcpv6-client ssh
[root@localhost ~]# firewall-cmd --permanent --add-service=http ##添加http协议
[root@localhost ~]# firewall-cmd --reload ##刷新
[root@localhost ~]# firewall-cmd --list-all ##列出
services: dhcpv6-client http ssh
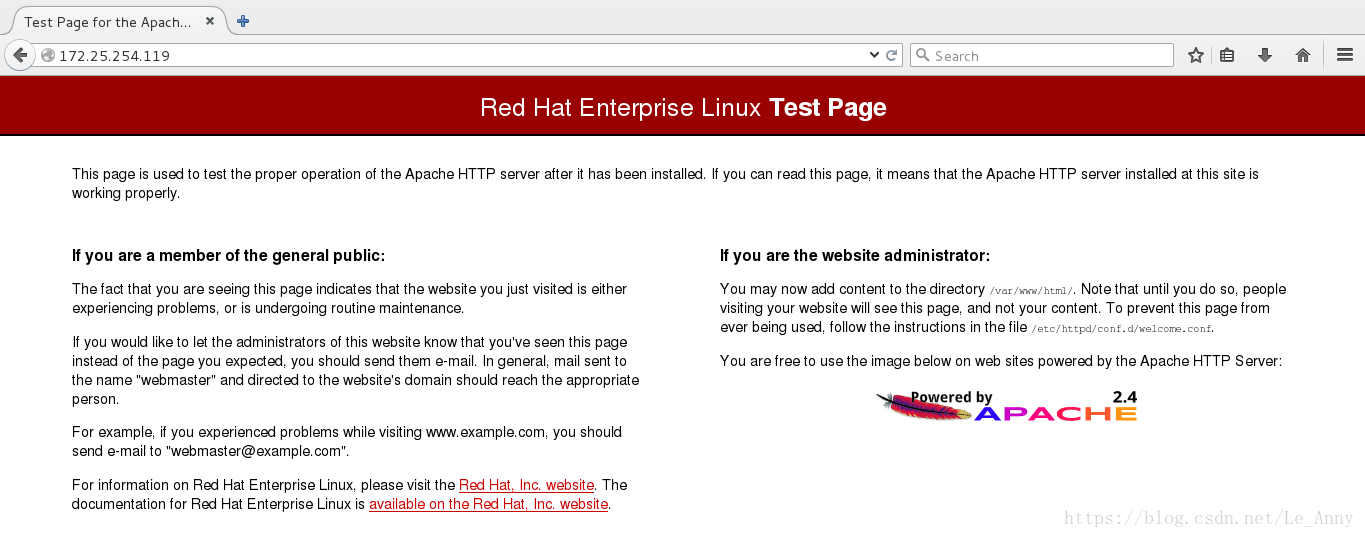
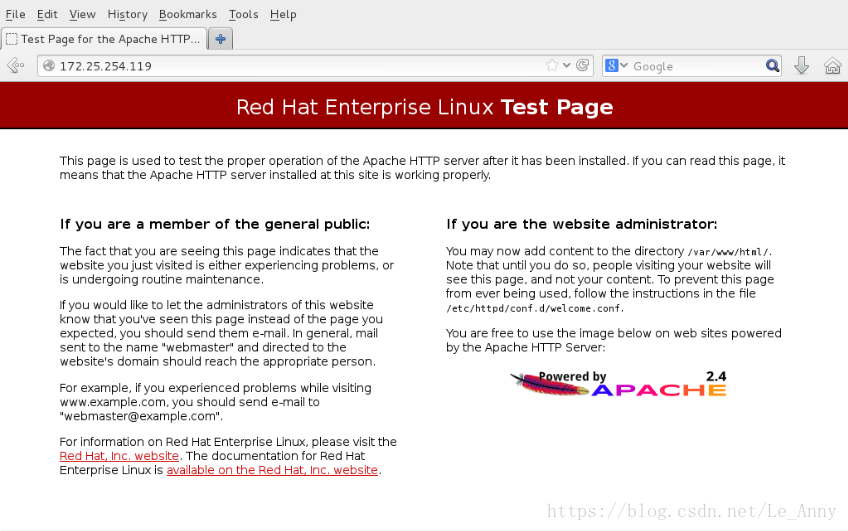
浏览器:
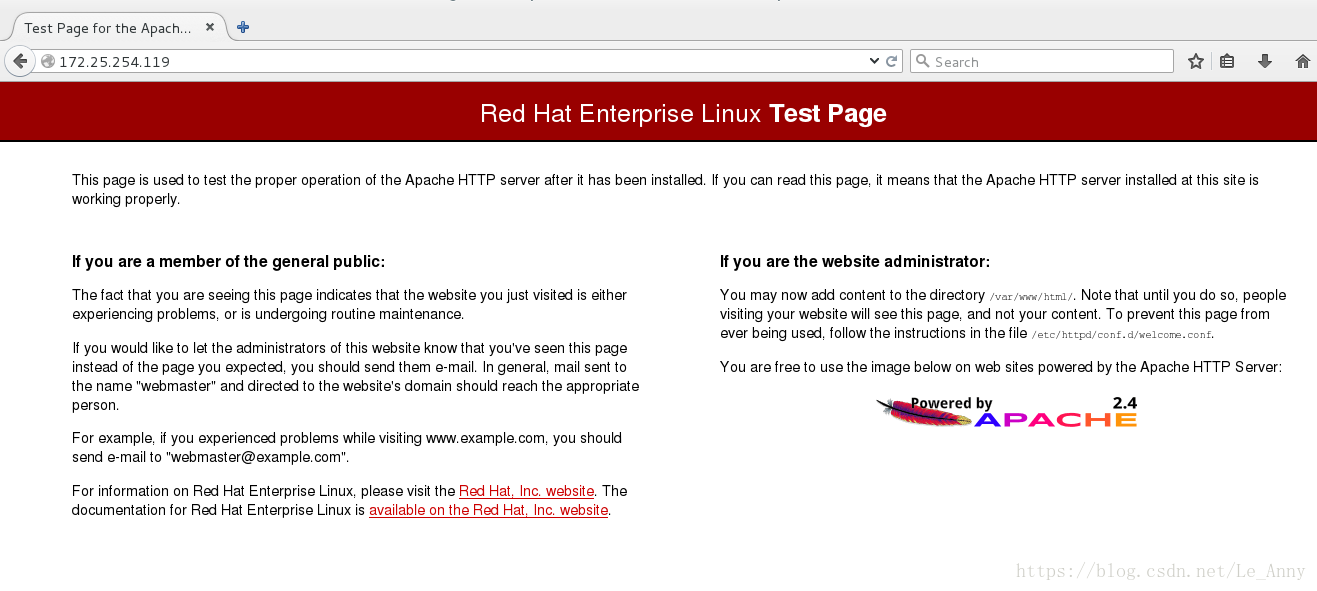
真机:17225.254.119(可以浏览)
server:172.25.254.119(可以浏览)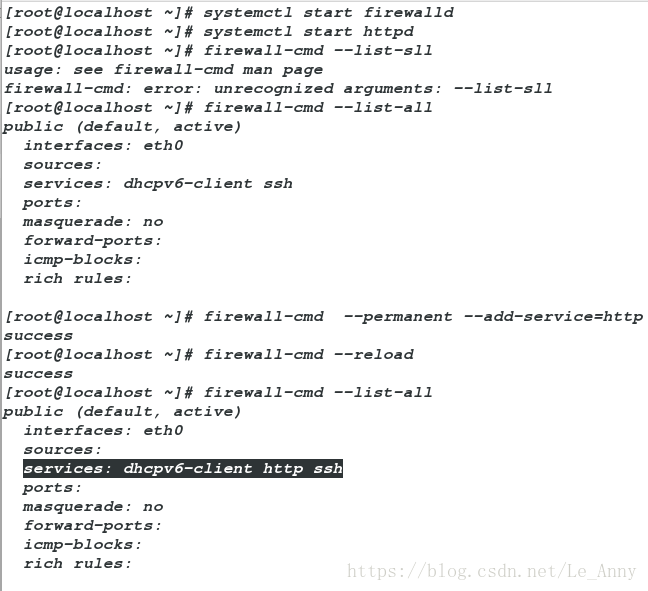
真机:
server:
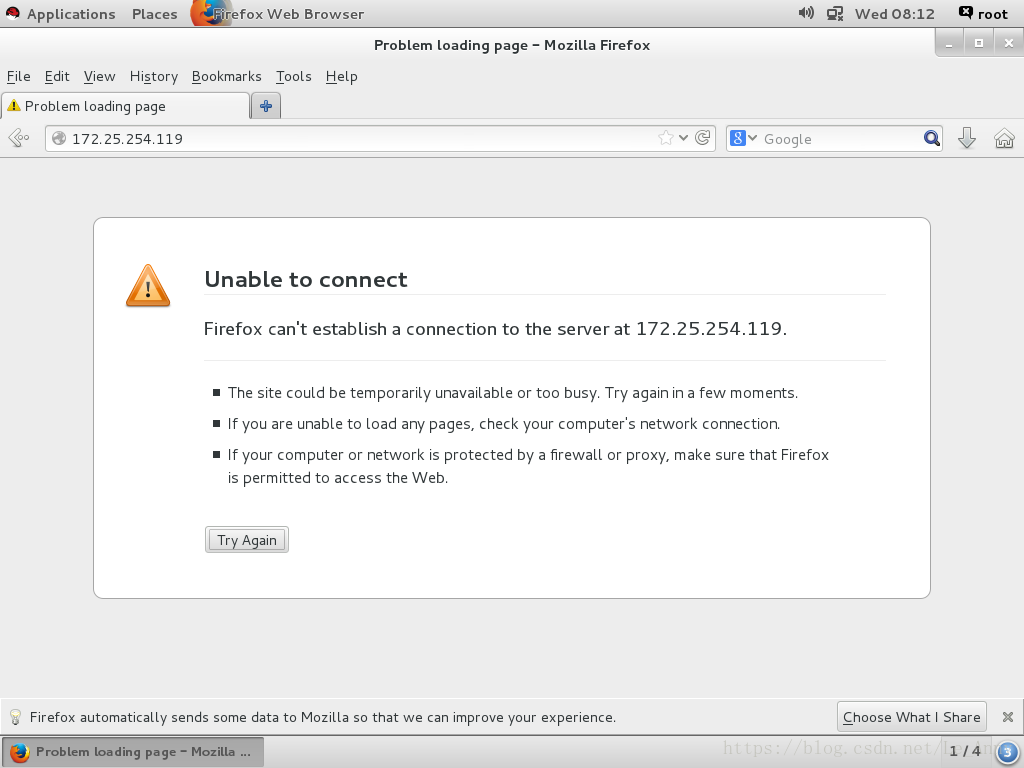
真机拒绝访问
[root@localhost ~]# firewall-cmd --permanent --remove-service=http   ##移除http协议
[root@localhost ~]# firewall-cmd --reload
[root@localhost ~]# firewall-cmd --list-all
  services: dhcpv6-client ssh
[root@localhost ~]# firewall-cmd --direct --add-rule ipv4 filter INPUT 1 -p tcp --dport 80 -s 172.25.254.71 -j REJECT    ##拒绝真机访问
-p:所写协议
-s:数据来源
-j:动作
REJECT:拒绝
ACCEPT:允许
DROP:丢弃
浏览器:
真机:172.25.254.119(被拒绝)
server:172.25.254.119(可以访问)
真机:
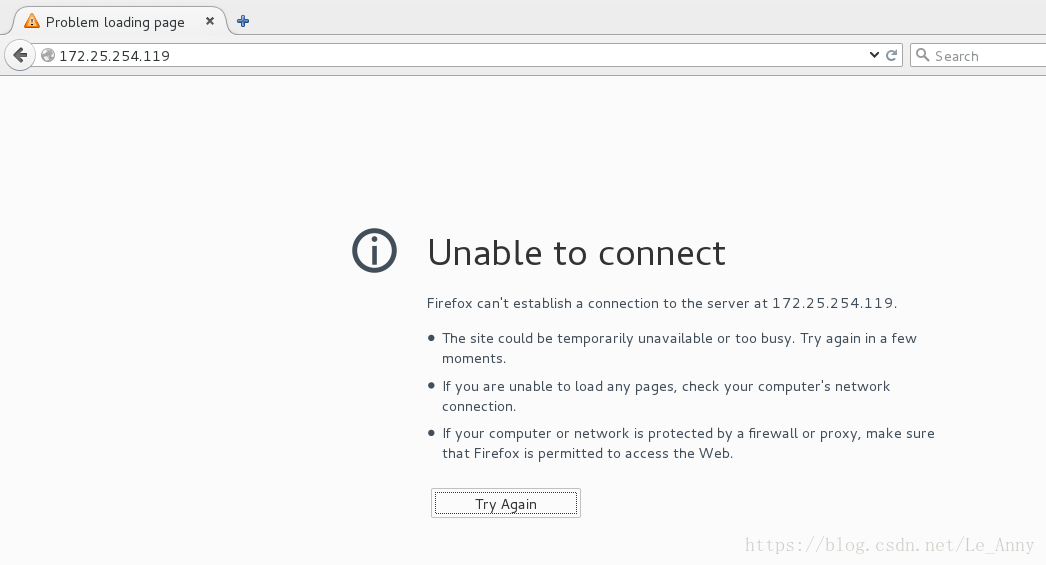
server:

允许真机访问:
[root@localhost ~]# firewall-cmd  --direct --add-rule ipv4 filter INPUT 1 -p tcp --dport 80 -s 172.25.254.71 -j ACCEPT     ##允许真机访问
浏览器
真机:172.25.254.119(允许访问)
server:172.25.254.119(拒绝)
真机:
server:
六·地址伪装和端口转发
1、端口转发(外网到内网)
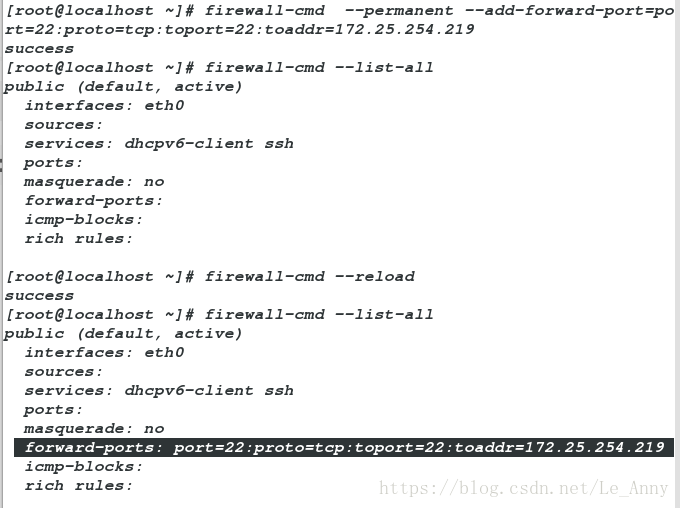
[root@localhost ~]# firewall-cmd --permanent --add-forward-port=port=22:proto=tcp:toport=22:toaddr=172.25.254.219 ##伪装端口,连接本机时看到的是伪装的IP
[root@localhost ~]# firewall-cmd --reload ##刷新
[root@localhost ~]# firewall-cmd --list-all
forward-ports: port=22:proto=tcp:toport=22:toaddr=172.25.254.219 ##添加成功
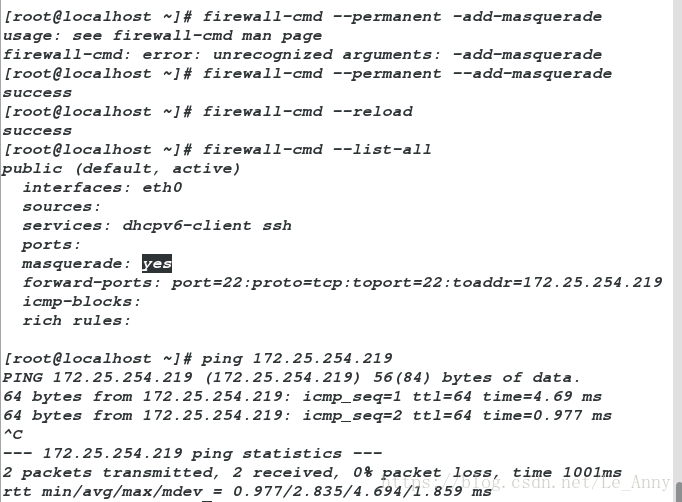
[root@localhost ~]# firewall-cmd --permanent --add-masquerade ##打开服务
[root@localhost ~]# firewall-cmd --reload
[root@localhost ~]# firewall-cmd --list-all
masquerade: yes
[root@localhost ~]# ping 172.25.254.219 ##查看伪装端口网络是否畅通
真机连接:
[kiosk@foundation71 Desktop]$ ssh root@172.25.254.119 ##连接的时候输入的是伪装IP的密码
[root@localhost ~]# ifconfig ##查看ip是否伪装成功添加伪装端口:
打开服务:
真机测试

有可能会报错:
[root@localhost ~]# rm -fr ~/.ssh/known_hosts ##删除后再测试连接做完以上实验,需删除伪装端口
2、地址伪装
在desktop中添加eth1 (设置ip为172.25.0.119)
[root@localhost ~]# firewall-cmd --add-masquerade ##打开
[root@localhost ~]# firewall-cmd --list-all ##列出
masquerade: yes
在server中设置ip为172.25.0.19
添加网关:
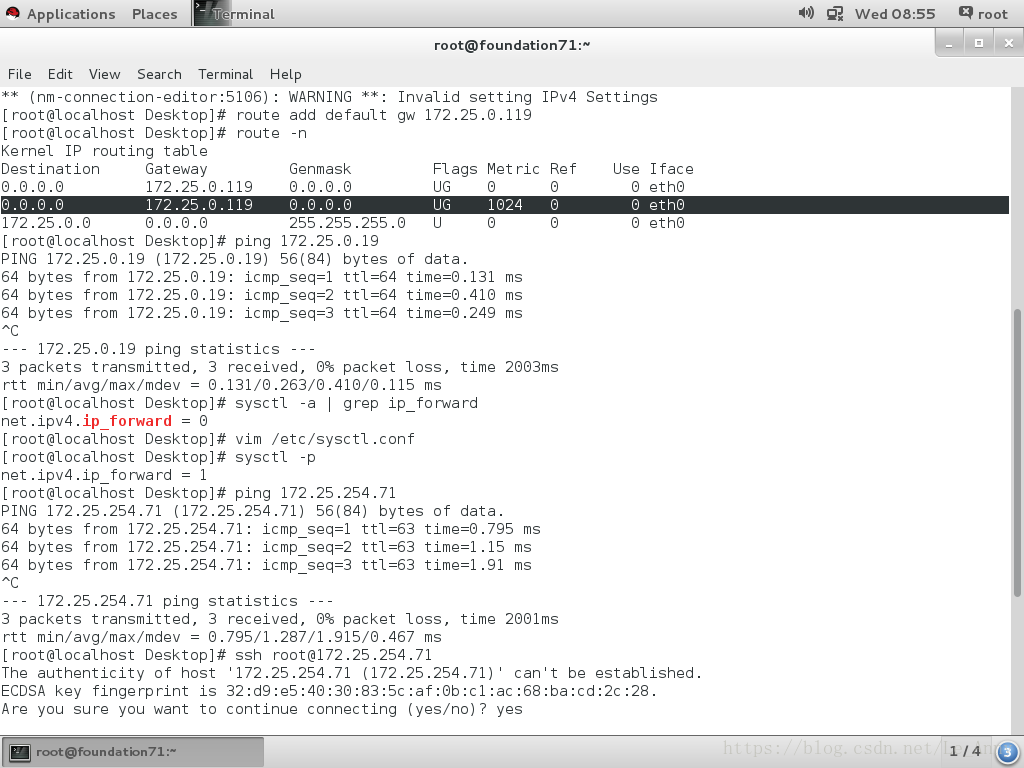
[root@localhost ~]# route add default gw 172.25.0.119 ##添加不在一个网段的网卡
[root@localhost ~]# route -n ##查看网关
[root@localhost ~]# ping 172.25.0.19 ##测试
[root@localhost ~]# sysctl -a | grep ip_forward
net.ipv4.ip_forward = 0
[root@localhost ~]# vim /etc/sysctl.conf ##编辑文件
net.ipv4.ip_forward = 1
[root@localhost ~]# sysctl -p
net.ipv4.ip_forward = 1
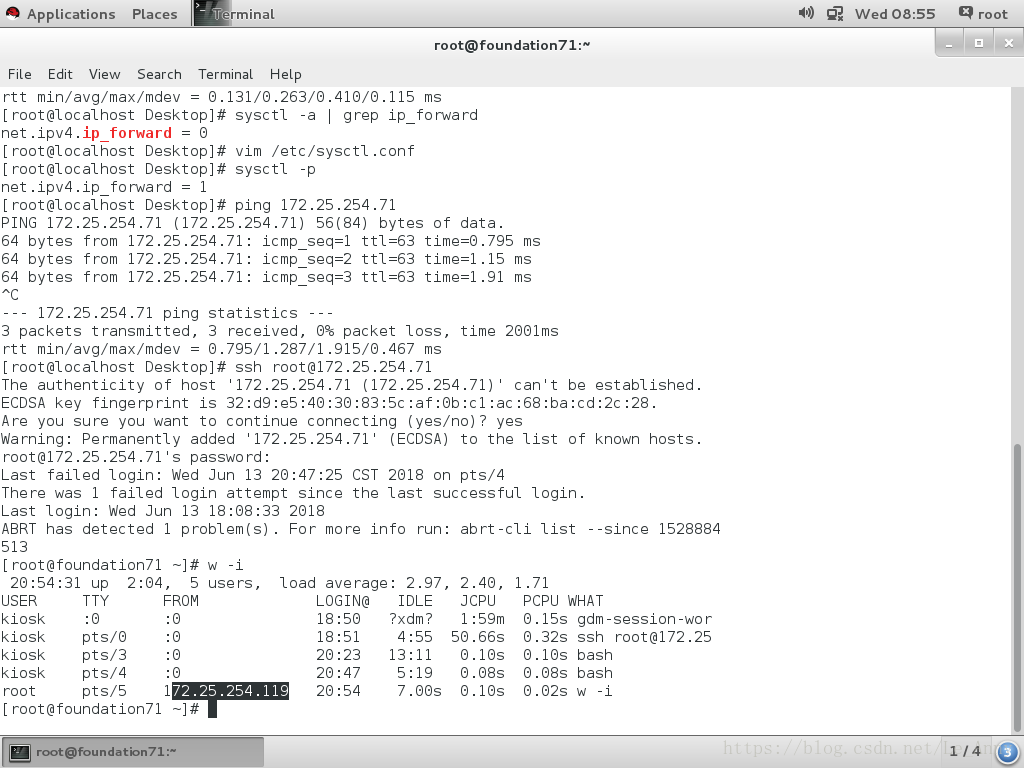
[root@localhost ~]# ping 172.25.254.71 ##可以ping通与本机不同网段的IP
[root@foundation71 ~]# w -i 添加网卡eth1