前言:
部分国内ROM系统对消息栏做了拦截,因此,需要用户手动授权开启消息栏通知。 若是能够找到开启的代码,是否可以绕过拦截,默认开启呢?
本篇文章,介绍如何找到拦截点,如何去突破。至于其他的ROM系统的拦截,也是类似。
联想K5 Play为案 , 探究消息栏突破拦截
1. 获取到system文件夹
通过下载系统的Rom 包,或者adb pull方式获取到系统的system下的文件。
具体如何操作,请阅读Android反编译之各大手机厂商的系统(adb pull和Rom包).
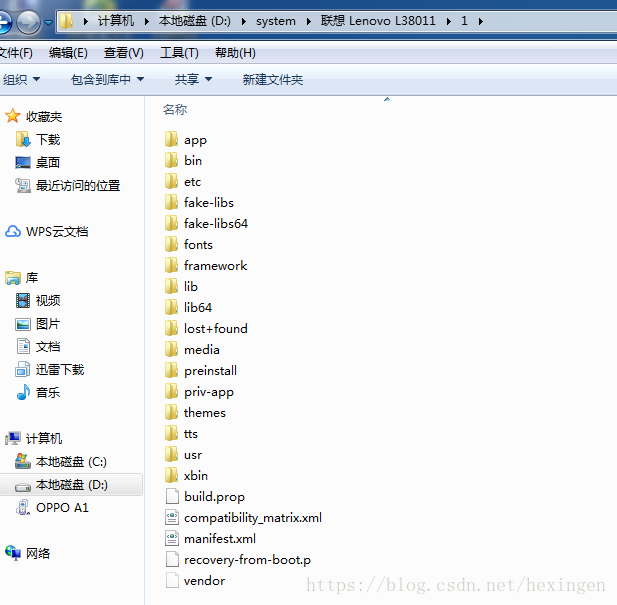
这里,本人通过去联想官网下载到对应Rom压缩包,再通过Rom助手,提取出system文件夹,如下图所示:
2. 反编译Framework层源码或者系统app的源码
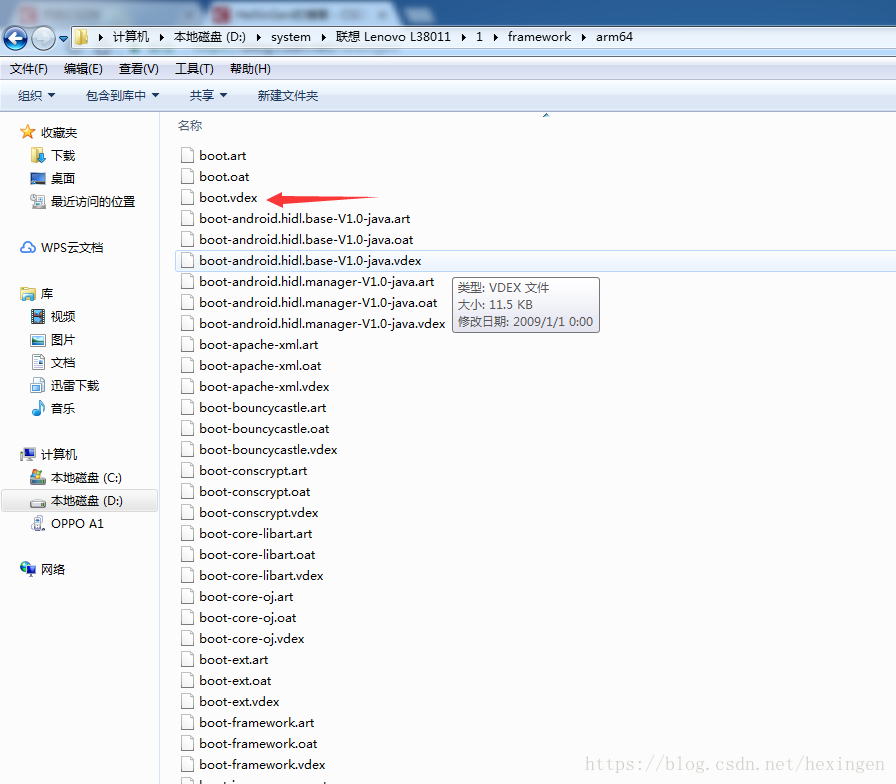
找到system/framework文件夹下,通常都是反编译boot.oat就可以获取到Android.jar对应的系统源码,但这里会发现多个了一个vdex文件,如下图所示:
通过查找度娘,这里,稍微总结一下:
- dex: 是Android平台上(Dalvik虚拟机)的可执行文件,里面包含了该app的所有源码, 通过反编译工具可以获取到相应的java源码。
- odex: 是同名apk经系统优化后的dex文件,通过反编方式可获取到dex文件。
- vdex:Android 8.0引入了全新的vdex文件,为了避免不必要的验证Dex 文件合法性的过程,通过反编方式获取到dex文件。
更多dex, odex,vdex,oat的资料,请自行度娘搜索。
将oat2dex.jar拷贝到该system/framework文件夹下,然后,打开命令行执行java -jar oat2dex.jar boot.vdex ,纳尼,神奇发现,里面没有需要的源码,找到一个假的李逵。
苦命的娃,继续找,直到反编译boot-framework.vdex,会发现android.jar里面的源码藏到这里了,如下图所示:
实际上,部分Rom厂商的android.jar的源码放到boot.oat或者boot-framework.oat 中
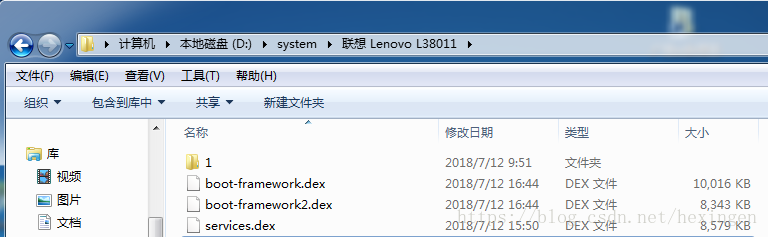
依葫芦画瓢,继续反编译service.vdex,获取到sevice层的系统源码。
3. 查找对应的拦截或者开启的源码
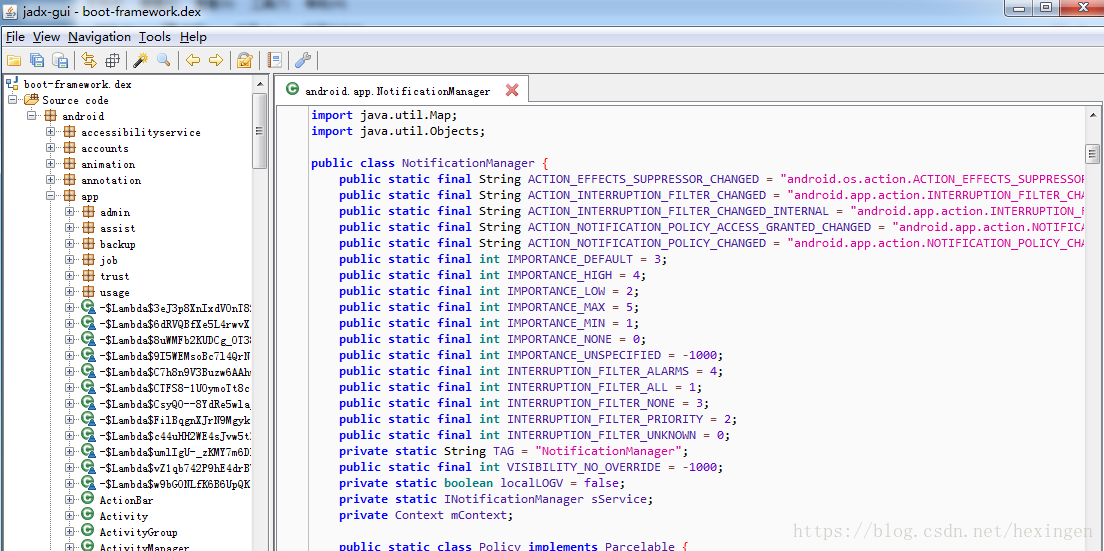
查看framework.dex ,service.dex的源码,一路追踪,会发现最后跑到SystemUI 中PhoneStatubar类开启了Notification。这里不探讨Notificatin源码分析走向,否则,文章篇幅会过大。
打开联想K5 Play的设置,一直到到开启消息栏的界面,如下图所示:
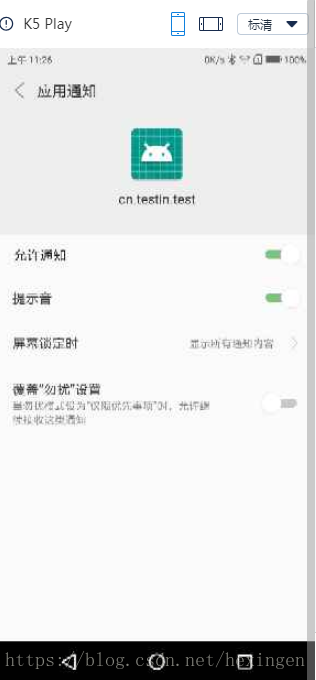
这时候,只需要确定该Activity处于哪个apk中,就可以反编译,从而查看到开启的代码。
查看界面属于哪个Activity:
执行以下命令行adb shell dumpsys activity top查看到栈顶的Activity ,这里是Activity是SubSettings,显示的fragment是AppNotificationSettings。
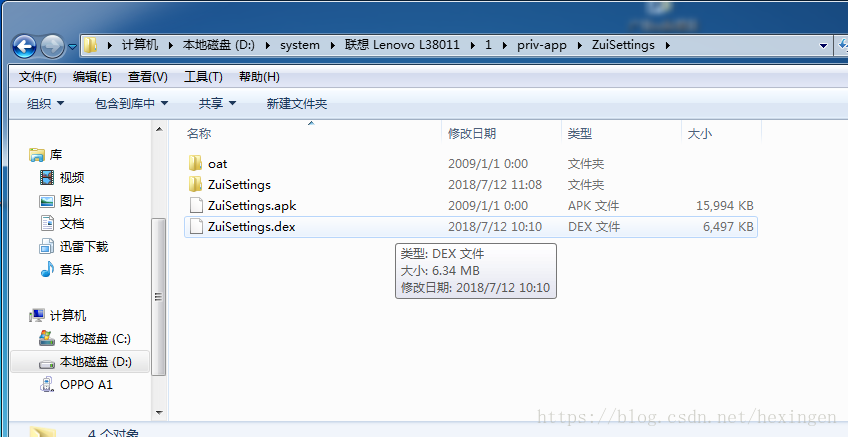
查看当前Activity属于哪个Apk:
执行以下命令行adb shell dumpsys activity activities ,发现当前activity属于sysytem/priv-app/ZuiSetttings/ZuiSettings.apk
反编译ZuiSettings.vdex获取到对应的dex文件,打开如下:
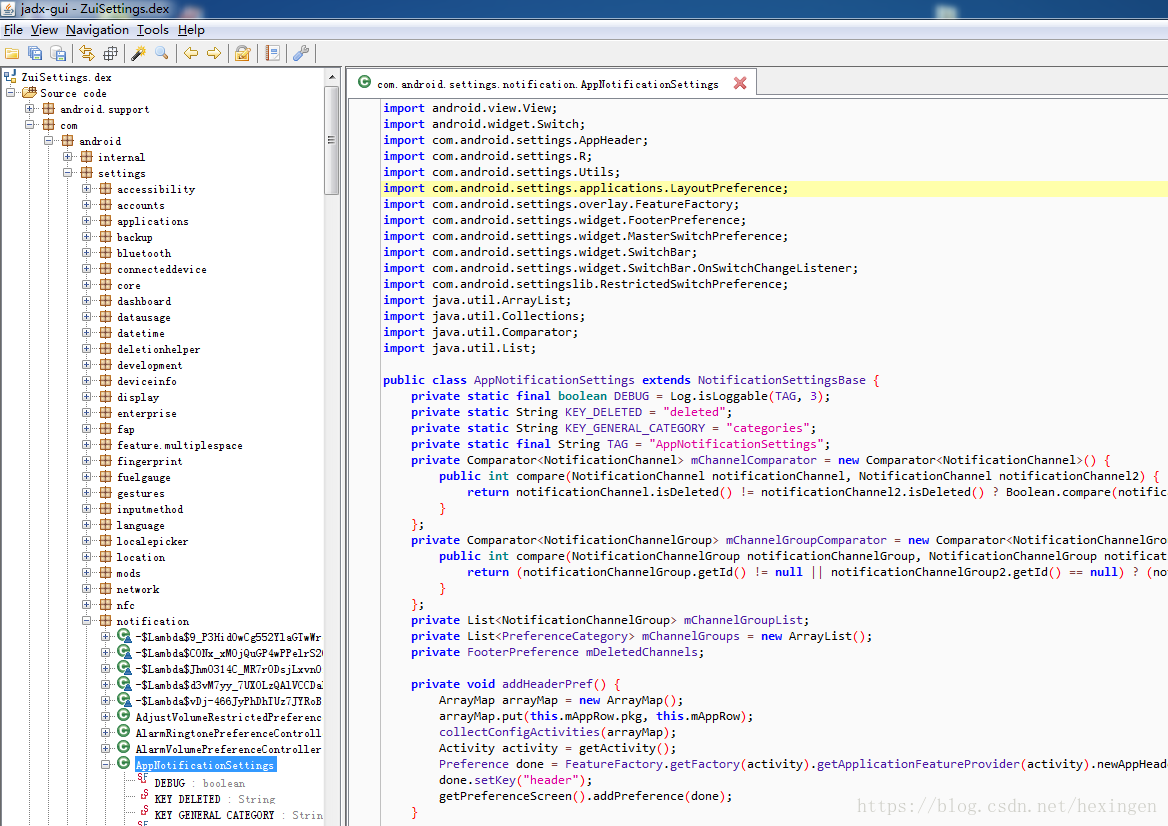
在AppNotificationSettings类中,查找到开启消息栏的源码:
 protected void setupBlock() {
        View inflate = LayoutInflater.from(getPrefContext()).inflate(R.layout.styled_switch_bar, null);
        this.mSwitchBar = (SwitchBar) inflate.findViewById(R.id.switch_bar);
        this.mSwitchBar.addOnSwitchChangeListener(new OnSwitchChangeListener() {
            public void onSwitchChanged(Switch switchR, boolean z) {
                boolean z2 = false;
                if (AppNotificationSettings.this.mShowLegacyChannelConfig && AppNotificationSettings.this.mChannel != null) {
                    int i = z ? NotificationManagerCompat.IMPORTANCE_UNSPECIFIED : 0;
                    RestrictedSwitchPreference restrictedSwitchPreference = AppNotificationSettings.this.mImportanceToggle;
                    if (i == NotificationManagerCompat.IMPORTANCE_UNSPECIFIED) {
                        z2 = true;
                    }
                    restrictedSwitchPreference.setChecked(z2);
                    //这里是重点
                    AppNotificationSettings.this.mChannel.setImportance(i);
                    AppNotificationSettings.this.mChannel.lockFields(4);
                    AppNotificationSettings.this.mBackend.updateChannel(AppNotificationSettings.this.mPkg, AppNotificationSettings.this.mUid, AppNotificationSettings.this.mChannel);
                }
                 //这里是重点
                AppNotificationSettings.this.mBackend.setNotificationsEnabledForPackage(AppNotificationSettings.this.mPkgInfo.packageName, AppNotificationSettings.this.mUid, z);
                AppNotificationSettings.this.mAppRow.banned = true;
                AppNotificationSettings.this.updateDependents(z ^ 1);
                if (z) {
                    AppNotificationSettings.this.mSwitchBar.setText(AppNotificationSettings.this.getResources().getString(R.string.notification_allow));
                } else {
                    AppNotificationSettings.this.mSwitchBar.setText(AppNotificationSettings.this.getResources().getString(R.string.notification_close));
                }
            }
        });
}以上的代码中mBackend属性对应是NotificationBackend类对象,打开该类查看调用的updateChannel()和setNotificationsEnabledForPackage():
public class NotificationBackend {
    private static final String TAG = "NotificationBackend";
    static INotificationManager sINM = Stub.asInterface(ServiceManager.getService("notification"));
    //省略部分代码
    public boolean setNotificationsEnabledForPackage(String str, int i, boolean z) {
        try {
            sINM.setNotificationsEnabledForPackage(str, i, z);
            return true;
        } catch (Throwable e) {
            Log.w(TAG, "Error calling NoMan", e);
            return false;
        }
    }

    public void updateChannel(String str, int i, NotificationChannel notificationChannel) {
        try {
            sINM.updateNotificationChannelForPackage(str, i, notificationChannel);
        } catch (Throwable e) {
            Log.w(TAG, "Error calling NoMan", e);
        }
    }
}
最终,发现是跨进程通讯,调用在NotificationManagerService中。
4. 编写适配对应Rom的代码
根据以上的源码追踪,锁定如何开启的功能代码。编写以下反射代码:
 /**
     * 联想 K5 play 8.0系统适配: 需要系统进程(未适配成功)
     *
     * @param context
     */
    private static void adapterZUISystem8(Context context) {

        String packageName = context.getPackageName();
        try {
            Class<?> NotificationManager = Class.forName("android.app.NotificationManager");
            Method getService = NotificationManager.getDeclaredMethod("getService");
            getService.setAccessible(true);
            Object mNotificationService = getService.invoke(null);
            int uid = context.getPackageManager().getApplicationInfo(context.getPackageName(), 0).uid;
            try {
                final int IMPORTANCE_UNSPECIFIED = -1000;
                //先获取到NotificationChannel
                Method getNotificationChannelForPackageMethod = mNotificationService.getClass().getMethod("getNotificationChannelForPackage", String.class, int.class, String.class, boolean.class);
                getNotificationChannelForPackageMethod.setAccessible(true);
                Object NotificationChannel = getNotificationChannelForPackageMethod.invoke(mNotificationService, packageName, uid, "miscellaneous", true);
                //设置NotificationChannel中值
                Method setImportanceMethod = NotificationChannel.getClass().getDeclaredMethod("setImportance", int.class);
                setImportanceMethod.setAccessible(true);
                setImportanceMethod.invoke(NotificationChannel, IMPORTANCE_UNSPECIFIED);
                Method lockFieldsMethod = NotificationChannel.getClass().getDeclaredMethod("lockFields", int.class);
                lockFieldsMethod.setAccessible(true);
                lockFieldsMethod.invoke(NotificationChannel, 4);
                //更新NotificationChannel
                Method updateNotificationChannelForPackageMethod = mNotificationService.getClass().getMethod("updateNotificationChannelForPackage", String.class, int.class, Class.forName("android.app.NotificationChannel"));
                updateNotificationChannelForPackageMethod.setAccessible(true);
                updateNotificationChannelForPackageMethod.invoke(mNotificationService, packageName, uid, NotificationChannel);
            } catch (Exception e) {
                e.printStackTrace();
            }
            Method setNotificationsEnabledForPackage = mNotificationService.getClass().getMethod("setNotificationsEnabledForPackage", String.class, int.class, boolean.class);
            setNotificationsEnabledForPackage.setAccessible(true);
            setNotificationsEnabledForPackage.invoke(mNotificationService, context.getPackageName(), uid, true);
        } catch (Exception e) {
            e.printStackTrace();
        }
}开开心心的运行以上代码,结果还是很悲催,报错安全 SecurityException异常。猜测该方式只能在系统进程中调用。
为了验证一番,打开service.dex,找到NotificationManagerService类,找到该调用方法,如下图所示:
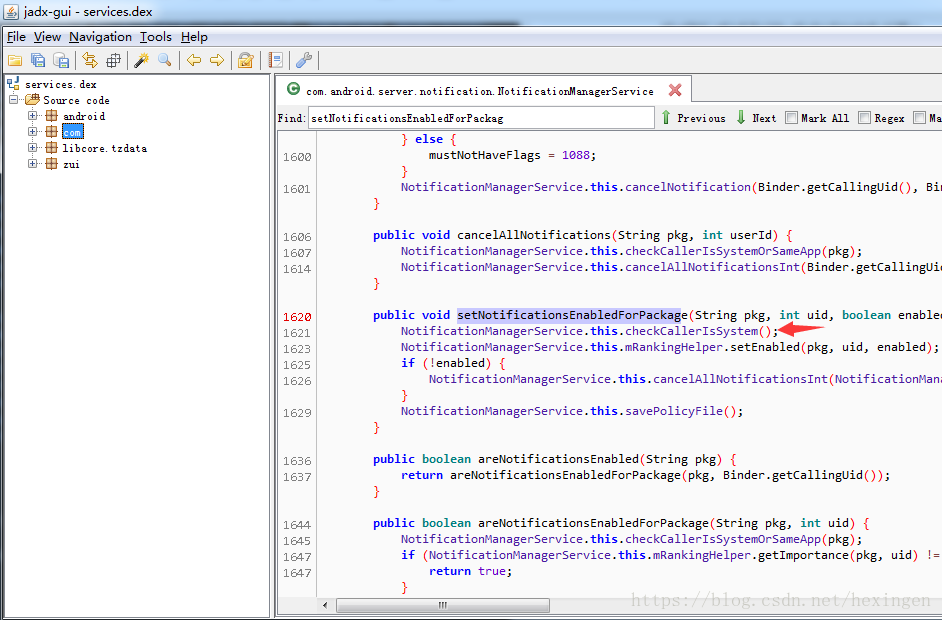
查看checkCallerIsSystem()
  private void checkCallerIsSystem() {
        if (!isCallerSystemOrPhone()) {
            throw new SecurityException("Disallowed call for uid " + Binder.getCallingUid());
        }
    }
最后,不得不放弃,宣告适配失败。
这里扯上几句屁话:
- 适配国产ROM系统,程序员还是很辛苦的,特别是遇到混淆后的系统源码,盯着几个a ,b ,c,简直需要诵读佛经,消除戾气。
- 适配工作长路漫漫,需要不断的探索,和打抗日持久战的耐心。
- 适配没有成功也不需要气馁,不过接下来的时候,就该让公司的商务出马,和手机厂商谈合作,增加白名单。
资源参考: