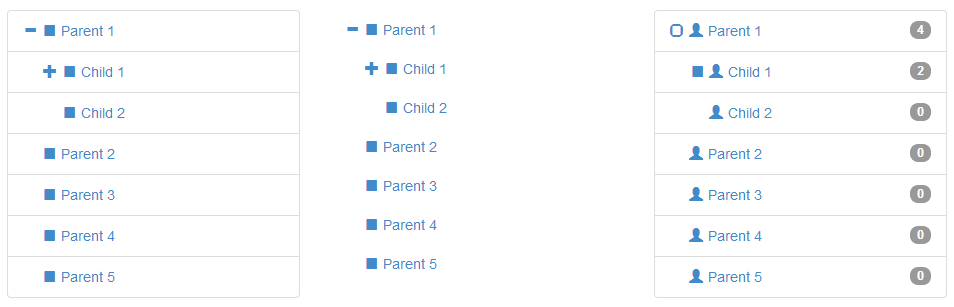
bootstrap-tree view是一款非常好用的插件,它可以添加任意多层节点,效果如下所示:
使用之前需要在HTML页面添加依赖文件:
<link href="bootstrap.css" rel="stylesheet">
<script src="jquery.js"></script> <script src="bootstrap-treeview.js"></script>
它的树结构如下所示:
var tree = [
{
text:
"Parent 1"
,
nodes: [
{
text:
"Child 1"
,
nodes: [
{
text:
"Grandchild 1"
},
{
text:
"Grandchild 2"
}
]
},
{
text:
"Child 2"
}
]
},
{
text:
"Parent 2"
}
];
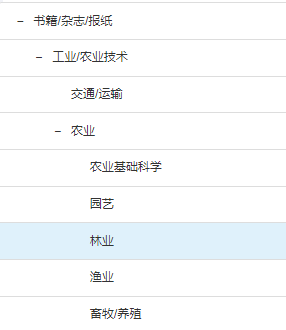
text参数是必选项,当然你还可以根据实际需要添加其他参数,如下图所示,这是我项目中遇到的一个需要展示的部分树结构。。
[
  {
    "id": 33,
    "text": "书籍\/杂志\/报纸",
    "nodes":[
        {
          "id": 50004788,
          "text": "工业\/农业技术", "nodes": [ { "id": 50004956, "text": "交通\/运输" }, { "id": 50004782, "text": "农业", "nodes": [ { "id": 50004786, "text": "农业基础科学" }, { "id": 50004787, "text": "园艺" }, { "id": 50004785, "text": "林业" }, { "id": 50004784, "text": "渔业" }, { "id": 50004783, "text": "畜牧\/养殖" } ] }      ]     }   ]  } ]
这个树有四层,实际展示效果如下:
刚开始因为我之前做过一些基础工作,这些结构我都有,所以我手动地按照tree view要求的结构构造了我的json文件,但我要在前端页面展示出来,因此我还要读取json文件,再把它封装一下传到前端。。。。这个过程费了我老大的劲了。。。。。真的是,最初为了省事,结果最后越来越麻烦。。。下面我将我这个费劲的过程记录一下。不过这样也是有好处的,比如树结构是固定不变的,就可以采用这个方法。
首先是读取文件,此处要注意字符问题,如果代码中有中文,一定要注意在读文件的过程中要设置字符编码。
 1 String cateList = "";
 2         try {
 3 String url = Thread.currentThread().getContextClassLoader().getResource("xx.json").getFile();  4 FileInputStream fis = new FileInputStream(url);  5 InputStreamReader isr = new InputStreamReader(fis, "UTF-8");  6 br = new BufferedReader(isr);  7 String tempString = null;  8 StringBuilder sb = new StringBuilder();  9 while ((tempString = br.readLine()) != null) { 10  sb.append(tempString); 11  } 12 cateList = sb.toString(); 13 }catch (IOException e){ 14  e.printStackTrace(); 15 }
这里我先将xx.json按行读取,存放到cateList中,然后开始进行json的转换
 1         JSONArray jsonArray = JSONArray.fromObject(cateList);       //将读取的数据转换为JSONArray
 2         Map<String, JSONObject> map_parent = new HashMap<>();           //存放最外层数组  3 Map<String, JSONObject> map = new HashMap<>(); //第二层  4 Map<String, JSONObject> map_child = new HashMap<>(); //第三层  5 Map<String, JSONObject> map_grandchild = new HashMap<>(); //第四层  6 for (int i = 0; i < jsonArray.size(); i++) {  7 CategoryNode node_parent = new CategoryNode();  8 JSONObject jsonObject = jsonArray.getJSONObject(i);  9 node_parent.setId(jsonObject.getInt("id")); 10 node_parent.setText(jsonObject.getString("text")); 11 if(jsonObject.has("nodes")){ 12 JSONArray nodes = jsonObject.getJSONArray("nodes"); 13 CategoryNode node = new CategoryNode(); 14 for(int j=0; j<nodes.size(); j++){ 15 if(nodes.getJSONObject(j).has("nodes")){ 16 JSONArray nodes_child = nodes.getJSONObject(j).getJSONArray("nodes"); 17 CategoryNode node_child = new CategoryNode(); 18 node_child.setId(nodes.getJSONObject(j).getInt("id")); 19 node_child.setText(nodes.getJSONObject(j).getString("text")); 20  node_child.setNodes(nodes_child); 21 String cid_child = String.valueOf(nodes.getJSONObject(j).getInt("id")); 22 JSONObject json_child = JSONObject.fromObject(node_child); 23  map_child.put(cid_child, json_child); 24 for(int k=0; k<nodes_child.size(); k++){ 25 if(nodes_child.getJSONObject(k).has("nodes")) { 26 JSONArray nodes_grandchild = nodes_child.getJSONObject(k).getJSONArray("nodes"); 27 CategoryNode node_grandchild = new CategoryNode(); 28 node_grandchild.setId(nodes_child.getJSONObject(k).getInt("id")); 29 node_grandchild.setText(nodes_child.getJSONObject(k).getString("text")); 30  node_grandchild.setNodes(nodes_grandchild); 31 String cid_grandchild = String.valueOf(nodes_child.getJSONObject(k).getInt("id")); 32 JSONObject json = JSONObject.fromObject(node_grandchild); 33  map_grandchild.put(cid_grandchild, json); 34  } 35  } 36  } 37 node.setId(nodes.getJSONObject(i).getInt("id")); 38 node.setText(nodes.getJSONObject(i).getString("text")); 39 node.setNodes(nodes.getJSONObject(i).getJSONArray("nodes")); 40 String cid_child = String.valueOf(nodes.getJSONObject(i).getInt("id")); 41 JSONObject json = JSONObject.fromObject(node); 42  map.put(cid_child, json); 43  } 44 node_parent.setNodes(jsonObject.getJSONArray("nodes")); 45 JSONObject json = JSONObject.fromObject(node_parent); 46 String cid = String.valueOf(node_parent.id); 47  map_parent.put(cid, json); 48 }else{ 49 JSONObject json = JSONObject.fromObject(node_parent); 50 String id = String.valueOf(node_parent.id); 51  map_parent.put(id, json); 52  } 53 }
上面两块代码就是我从json文件取数据并将数据构造成传到前端使js能够解析的数据的过程。。。。CategoryNode是我自己构造的bean,里面是这棵树的参数的定义以及get,set方法。
重点来了~~下面我要讲的是我通过调用接口动态获取json文件需要的信息,并将这些信息按照tree view的格式构造的过程。。。。我的json结构里面包含了id,text,nodes,其中nodes是一个JSONArray,整棵树其实就是一个大的nodes包含了数个小的nodes。因此就需要用到递归,因为是多层结构,且节点不确定是否是孩子节点,我们需要判断,然后使用递归继续调用。。。代码如下:
 1 private List uploadCat(Long pid){
 2         TaobaoClient client = new DefaultTaobaoClient(SERVER_URL, APP_KEY, SECRET);  3 ItemcatsGetRequest req = new ItemcatsGetRequest();  4 req.setFields("cid,name,is_parent");  5  req.setParentCid(pid);  6 JSONArray cat = new JSONArray();  7 List<Map> list = new ArrayList<>();  8 try {  9 ItemcatsGetResponse rsp = client.execute(req); 10 JSONObject body = JSONObject.fromObject(rsp.getBody()); 11 //下面这行是获取接口返回的信息,item_cat是一个JSONArray 12 cat = body.getJSONObject("itemcats_get_response").getJSONObject("item_cats").getJSONArray("item_cat"); 13 14 for(int i=0; i<cat.size(); i++){ 15 Map map = new HashMap(); 16 JSONObject json = new JSONObject(); 17 boolean flag = (boolean) cat.getJSONObject(i).get("is_parent"); 18 //判断是否是父节点,如果是父节点,那么就要给它构造一个nodes 19 if(flag){ 20 map.put("text", cat.getJSONObject(i).getString("name")); 21 cid = cat.getJSONObject(i).getInt("cid"); 22 map.put("id", cid); 23 pid = new Long((long) cid); 24 map.put("nodes", uploadCat(pid)); //这里是递归调用 25 json = JSONObject.fromObject(map); 26 }else{ 27 map.put("text", cat.getJSONObject(i).getString("name")); 28 cid = cat.getJSONObject(i).getInt("cid"); 29 map.put("id", cid); 30 json = JSONObject.fromObject(map); 31  } 32  list.add(json); 33  } 34 }catch (ApiException e){ 35  e.printStackTrace(); 36  } 37 return list; 38 }
最后通过servlet的一些处理,使这棵树能够传到前端页面展示。。。
前端js中加载树:
 1 $("#tmallTree").treeview({
 2                 data: data.result,             //后台传过来的树
 3 selectedBackColor:"#78A5F1", //设置选中节点的颜色  4 highlightSelected: true, //选中节点时高亮显示  5 onhoverColor: "#DFF1FB", //鼠标滑过时节点颜色  6 //下面的代码是设置点击时不用特意点那个“+”号,而是点击整个li标签也可以展开节点  7 onNodeSelected: function(event, data) {  8 if(data.nodes!=null){  9 var select_node = $('#tmallTree').treeview('getSelected'); 10 if(select_node[0].state.expanded){ 11 $('#tmallTree').treeview('collapseNode',select_node); 12 select_node[0].state.selected=false; 13  } 14 else{ 15 $('#tmallTree').treeview('expandNode',select_node); 16 select_node[0].state.selected=false; 17  } 18 }else{ 19 //获取选中节点的id 20 node = $("#tmallTree").treeview('getSelected')[0].id; 21  } 22  } 23 });
最后页面展示出来的效果就如前面的图所示。。。大功告成~~~