由于项目所需,在此安装postgressql 10.3,并记录文档。
系统: CentOS 7
pgsql版本:10.3
首先下载安装包: https://www.postgresql.org/ftp/source/v10.3/ 我是下载的 postgresql-10.3.tar.gz
然后使用ftp5上传到linux中,解压
[root@VM_191_196_centos ~]# tar -zxvf postgresql-10.3.tar.gz
解压之后切换到目录:
[root@VM_191_196_centos ~]# cd postgresql-10.3
执行: ./configure 我们来看一看会报什么错???
[root@VM_191_196_centos postgresql-10.3]# ./configure
我遇到的第一个错误:
configure: error: in `/root/postgresql-10.3':
configure: error: no acceptable C compiler found in $PATH
See `config.log' for more details
是由于缺少C语言的编译在$PATH中,安装gcc即可
[root@VM_191_196_centos postgresql-10.3]# yum -y gcc install
继续执行: ./configure
我又遇到如下错误:
configure: error: readline library not found
If you have readline already installed, see config.log for details on the
failure. It is possible the compiler isn't looking in the proper directory.
Use --without-readline to disable readline support.
原因同样是缺少readline library的库,安装即可:
[root@VM_191_196_centos postgresql-10.3]# yum -y install -y readline-devel
继续执行: ./configure
configure: error: zlib library not found
If you have zlib already installed, see config.log for details on the
failure. It is possible the compiler isn't looking in the proper directory.
Use --without-zlib to disable zlib support.
还是缺少其他的库:zlib 安装即可:
[root@VM_191_196_centos postgresql-10.3]# yum -y install zlib-devel
继续执行: ./configure ,至此,终于不再缺少依赖,第一步完成了。
接下来就是编译了,
[root@VM_191_196_centos postgresql-10.3]# make && make install
等待。。。。直到编译完成
添加postgres用户,并设置给予sudo权限
如果是mini版,需要自行安装sudo命令,然后再授权
1. groupadd postgres    #新增用户组
2. useradd -g postgres postgres    #新增用户
3. passwd postgres    #为用户设置密码
此处参考了: https://blog.csdn.net/xzwspy/article/details/78308484
然后为用户设置sudo权限,编辑文件 vi /etc/sudoers 找到行; root ALL=(ALL) ALL
在其下复制一行,改为:
postgres ALL=(ALL) ALL
创建数据库文件夹:
1. mkdir /usr/local/pgsql/data
2. chown postgres /usr/local/pgsql/data    #设置data文件加属性
3. chmod 700 /usr/local/pgsql/data    #设置data文件夹权限
切换到postgres用户 : su - postgres
初始化数据库(这里一定要切换到postgres用户)
1. /usr/local/pgsql/bin/initdb -D /usr/local/pgsql/data #初始化数据库启动数据库:
2. ./pg_ctl start\stop\restart -D /usr/local/pgsql/data/ #启动\停止\重启数据库 3. /usr/local/pgsql/bin/postgres -D /usr/local/pgsql/data >logfile 2>&1 & #设置日志输出位置
先连接默认的数据库:
[postgres@VM_191_196_centos bin]$ ./psql
如下显示则成功: 使用 \q 退出数据库
psql (10.3)
Type "help" for help.

postgres=# [postgres@VM_191_196_centos bin]$ ./psql
postgres-#
//这里还可以创建自己的数据库,我们将直接跳过,使用连接工具来创建,
4. /usr/local/pgsql/bin/createdb test #创建测试数据库
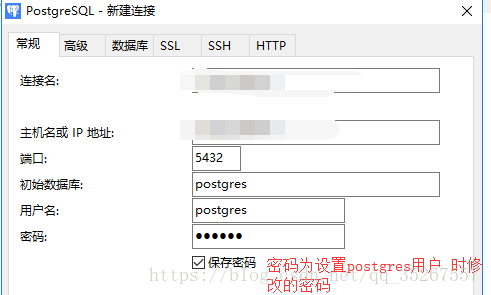
5. /usr/local/pgsql/bin/psql test #启动测试数据库开启远程连接的配置:
修改postgresql.conf
1. listen_addresses = '*'
2. port = 5432
修改pg_hba.conf
# "local" is for Unix domain socket connections only
local   all             all                                  trust
# IPv4 local connections:
host    all             all             0.0.0.0/0            trust
然后重启服务:
防火墙开启端口放行(这里就直接关闭防火墙了)
[postgres@VM_191_196_centos bin]$ sudo systemctl stop firewalld.service
//查看防火墙状态
[postgres@VM_191_196_centos bin]$ sudo systemctl status firewalld.service、
● firewalld.service - firewalld - dynamic firewall daemon
   Loaded: loaded (/usr/lib/systemd/system/firewalld.service; disabled; vendor preset: enabled)
   Active: inactive (dead)
     Docs: man:firewalld(1)
然后使用连姐工具连接:
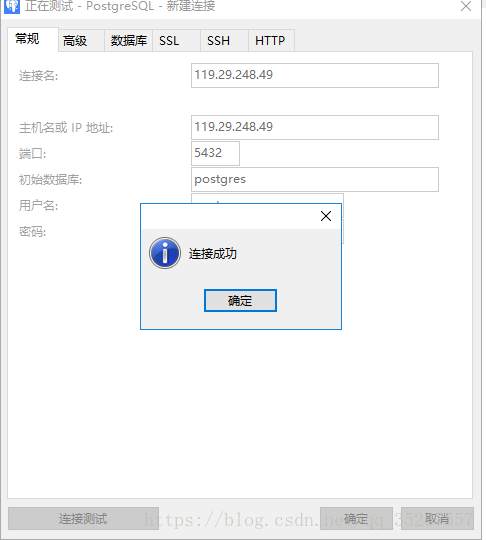
这样,我们就大功告成了,可以直接子啊连接工具里面来操作了。