使用Python编写RSS阅读器(二)
前一节我们介绍了RSS的原理,这一节我们来讨论一下如何使用Python编写图形界面的应用程序。
在Python中有不少图形库,如Tkinter就是Python内置的图形库,不需要另外安装。
这里有Tkinter的一个小例子:
#!/usr/bin/python
# -*- coding: UTF-8 -*-
# 导入Tkinter库
from Tkinter import *
# 创建窗口对象
root = Tk()
# 创建两个列表
li = ['C', 'python', 'php', 'html', 'SQL', 'java']
movie = ['CSS', 'jQuery', 'Bootstrap']
# 创建两个列表组件
listb = Listbox(root)
listb2 = Listbox(root)
# 向第一个列表组件插入数据
for item in li:
    listb.insert(0, item)
# 第二个列表组件插入数据
for item in movie:
    listb2.insert(0, item)
# 将列表组件放置到主窗口中
listb.pack()
listb2.pack()
# 进入消息循环
root.mainloop()
运行结果如下:

实际使用中,有人觉得Tkinter功能不够强大。
所以人们也会使用另外一个常用的图形库,PyQt。
Qt在以前做嵌入式开发时,主要用于制作嵌入式应用的GUI,它的编程语言是C++。而PyQt则是它的Python版本。
下面我将使用PyQt4来编写图形界面应用程序。
一、 在Visual Studio Code中进行Python开发
当你新建第一个后缀名为.py的文件时,VS Code会意识到你想要做Python开发,它会建议你安装一些插件,我们按照建议将这些插件装上。
接下来,需要使用菜单“任务”->“配置默认生成任务”,生成.vscode/tasks.json文件,编辑文件的内容如下:
{
    "version": "2.0.0",
    "tasks": [
        {
            "label": "python",
            "type": "shell",
            "command": "C:/Users/33170/.windows-build-tools/python27/python.exe",
            "args": [
                "${file}"
            ],
            "group": {
                "kind": "build",
                "isDefault": true
            },
            "presentation": {
                "reveal": "silent"
            }
        }
    ]
}
完成上述步骤后,在.py文件中使用快捷键CTRL+SHIFT+B,就可以运行Python了。
在VS Code中进行Python也有pylint语法检查,有强迫症的同学可以在用户配置中加上如下内容,取消部分语法检查:
    "python.linting.pylintArgs": [
        "--disable=C,R,W",
        "--extension-pkg-whitelist=PyQt4.QtGui,PyQt4.QtCore"
    ],
二、PyQt4的安装
PyQt的全部版本在这个地址可以下载到:https://sourceforge.net/projects/pyqt/files/?source=navbar
我下载的是:PyQt4-4.11.3-gpl-Py2.7-Qt4.8.6-x64.exe
在安装过程中,需要选择Python的安装位置,如果你的机子里有多个Python版本,这一步要选对。
PyQt将会安装到python27\Lib\site-packages目录中。
三、简单的示例程序
示例一,一个简单的窗口程序:
#!/usr/bin/python
# -*- coding: UTF-8 -*-

# 一个最简单的窗口程序

import sys
# QtGui模块中包含了基本的GUI组件
from PyQt4.QtGui import *

# 每个PyQt4程序必须创建一个QApplication应用程序对象
# sys.argv是应用程序的命令行参数
app = QApplication(sys.argv)

# QWidget窗口组件是PyQt4中所有用户界面的基类
# 我们使用QWidget默认的构造,没有指定parent。没有parent的窗口组件是一个窗体
widget = QWidget()
# resize()方法调整窗体的大小,宽250像素,高150像素
widget.resize(250, 150)
# 设置窗体标题
widget.setWindowTitle('simple')
# 显示窗体
widget.show()

# 开始应用程序的主事件循环
sys.exit(app.exec_())
运行结果如下:

示例二,带图标的窗口程序:
#!/usr/bin/python
# -*- coding: UTF-8 -*-

# 改变窗口图标

import sys
from PyQt4.QtGui import *


# 创建一个名为IconWindow的类,继承自QWidget类
class IconWindow(QWidget):
    # 构造方法,同样没有指定parent,所以它是窗体
    def __init__(self, parent=None):
        # 调用父类的构造方法
        QWidget.__init__(self, parent)

        # 设置窗体的位置与大小,前两个参数是窗体左上角的坐标,后两个参数是宽高
        self.setGeometry(300, 300, 250, 150)
        # 设置窗体标题
        self.setWindowTitle('Icon')
        # 设置窗体图标
        self.setWindowIcon(QIcon('icons/web.jpg'))


app = QApplication(sys.argv)
iconWin = IconWindow()
iconWin.show()
sys.exit(app.exec_())
运行结果如下:

四、较复杂的示例程序
这里有一个较复杂的示例,我们将使用GridLayout布局来编排界面:
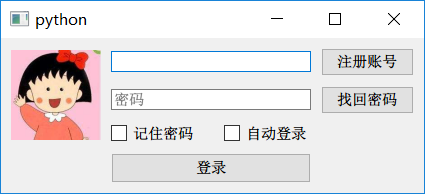
代码如下:
#!/usr/bin/python
# -*- coding: UTF-8 -*-
from PyQt4.QtCore import *
from PyQt4.QtGui import *
import sys


class RegWindow(QWidget):
    def __init__(self, parent=None):
        QWidget.__init__(self, parent)
        # 构建控件
        pImageLabel = QLabel(self)
        pUserLineEdit = QLineEdit(self)
        pPasswordLineEdit = QLineEdit(self)
        pRememberCheckBox = QCheckBox(self)
        pAutoLoginCheckBox = QCheckBox(self)
        pLoginButton = QPushButton(self)
        pRegisterButton = QPushButton(self)
        pForgotButton = QPushButton(self)

        pLoginButton.setFixedHeight(30)
        pUserLineEdit.setFixedWidth(200)

        # 设置头像
        pixmap = QPixmap("icons/logo.jpg")
        pImageLabel.setFixedSize(90, 90)
        pImageLabel.setPixmap(pixmap)
        pImageLabel.setScaledContents(True)

        # 设置文本
        pUserLineEdit.setPlaceholderText(QString(u"QQ号码/手机/邮箱"))
        pPasswordLineEdit.setPlaceholderText(QString(u"密码"))
        pPasswordLineEdit.setEchoMode(QLineEdit.Password)
        pRememberCheckBox.setText(QString(u"记住密码"))
        pAutoLoginCheckBox.setText(QString(u"自动登录"))
        pLoginButton.setText(QString(u"登录"))
        pRegisterButton.setText(QString(u"注册账号"))
        pForgotButton.setText(QString(u"找回密码"))

        pLayout = QGridLayout()
        # 头像
        pLayout.addWidget(pImageLabel, 0, 0, 3, 1)
        # 用户名输入框
        pLayout.addWidget(pUserLineEdit, 0, 1, 1, 2)
        pLayout.addWidget(pRegisterButton, 0, 3)
        # 密码输入框
        pLayout.addWidget(pPasswordLineEdit, 1, 1, 1, 2)
        pLayout.addWidget(pForgotButton, 1, 3)
        # 记住密码
        pLayout.addWidget(pRememberCheckBox, 2, 1, 1, 1,
                          Qt.AlignLeft | Qt.AlignVCenter)
        # 自动登录
        pLayout.addWidget(pAutoLoginCheckBox, 2, 2, 1, 1,
                          Qt.AlignRight | Qt.AlignVCenter)
        # 登录按钮
        pLayout.addWidget(pLoginButton, 3, 1, 1, 2)
        # 设置水平间距
        pLayout.setHorizontalSpacing(10)
        # 设置垂直间距
        pLayout.setVerticalSpacing(10)
        # 设置外间距
        pLayout.setContentsMargins(10, 10, 10, 10)
        self.setLayout(pLayout)


app = QApplication(sys.argv)
regWindow = RegWindow()
regWindow.show()
sys.exit(app.exec_())
在这个示例中,由于界面布局较复杂,所以我们使用了GridLayout(网格布局)。网格布局通过将界面划分为M行N列的网格,并在网格中放入组件,实现布局的目标。
pLayout.addWidget(pUserLineEdit, 0, 1, 1, 2)
这句代码的意思是向网格布局中加入一个组件pUserLineEdit,其后的0, 1表示放在第0行第1列,再后的1, 2表示该组件占用1行2列。
五、PyQt的参考资料
PyQt的模块说明:http://pyqt.sourceforge.net/Docs/PyQt4/modules.html
PyQt的类说明:http://pyqt.sourceforge.net/Docs/PyQt4/classes.html
你也可以参考Qt的学习资料,毕竟只要将C++语法转变为Python语法,示例程序就可以正常运行了。