SMB 文件共享
主要用于给windows共享
安装samba
所使用端口为 139 455d -a student
netstat -antlupe | grep smb
samba的用户为本机真实存在的用户
服务端
yum install samba samba-client samba-common -y 下载samba服务
systemctl start smb
systemctl enable smb
systemctl stop firewalld 关闭火墙
systemctl disable firewalld
useradd westos 添加westos用户
smbpasswd -a student
smbpasswd -a westos 添加smb 用户
pdbedit -L 可以看到smb的添加用户
pdbedit -x student 删除列表里的用户
getsebool -a | grep samba
setsebool -P samba_enable_home_dirs 1 将sebool的端口打开
客户端
yum install samba-client -y
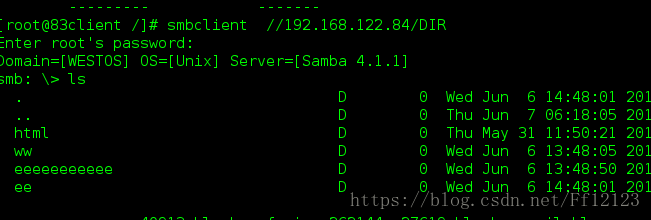
smbclient -L //172.25.254.244
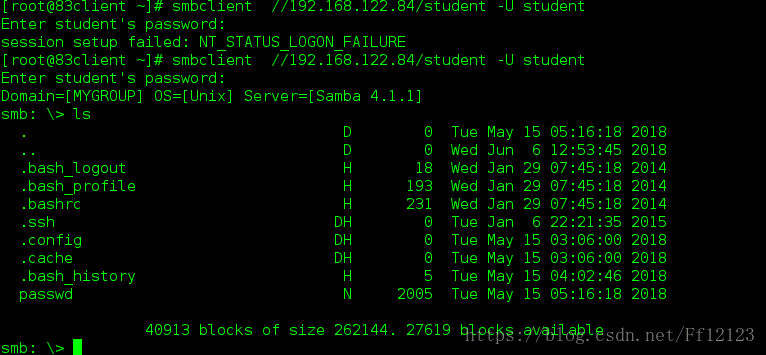
smbclient //172.25.254.244/student -U student 用syudent用户登录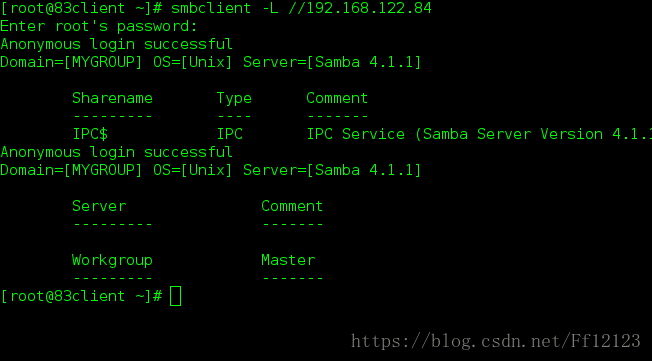
上传文件
在那个目录下面 只能上传当前所在目录下有的东西 mount //172.25.2544.244/student /mnt -o username=student,password=123
或者 直接将//172.25.254.244/student 挂载在/mnt
开机自动挂载 /etc/fstab 这里可以写 但是如果服务端没有启动的话 机器有可能启动不了
vim /etc/rc.d/rc.local 可以在这里编写一个脚本 也可以实现开机自动挂载
mount //172.25.254.244/student /mnt -o username=student,password=123 文件内部编写的
chmod +x /etc/rc.d/rc.local 为其添加执行性权限
umount /mnt/
reboot
df
更改workgroup
    2  rpm -qc samba-common 查看samba的主配置文件
    3  vim /etc/samba/smb.conf

        hosts allow = 172.25.254.44  只允许44 登陆
;       max protocol = SMB2
        workgroup = student  在这里更改他的工作组

    4  systemctl restart smb.service
自己建立目录 以及系统目录 作为 共享文件夹
   6  vim /etc/samba/smb.conf
    7  semanage fcontext -a -t samba_share_t '/westos(/.*)?' 由于selinux处于开启的状态 所以需要更改他的安全上下文 符合samba以达到共享的目的
    8  mkdir /westos
    9  semanage fcontext -a -t samba_share_t '/westos(/.*)?'
   11  semanage fcontext -l | grep  /westos
   12  restorecon -FvvR /westos/ 刷新
   13  vim /etc/samba/smb.conf
   14  setsebool -P samba_export_all_ro on
   15  cd /mnt/
   16  touch file{1..5}
   17  systemctl restart sam
   18  systemctl restart smb.service
   19  cd
   20  ls
   21  cd /
   22  ls
   23  cd westos/
   25  ls
   26  touch file{1..5}
   27  ls
28 history[root@144 ~]# umount /mnt/
[root@144 ~]# mount //172.25.254.244/DIR /mnt -o username=student,password=123[root@144 ~]# cd /mnt/ 为了方便操作将其挂载在mnt下
[root@144 mnt]# ls
file1 file2 file3 file4 file5
[root@144 mnt]# rm -fr file1
[root@144 mnt]# ls
file2 file3 file4 file5
[root@144 mnt]# cd ..
[root@144 /]# umount /mnt/
[root@144 /]# mount //172.25.254.244/DIR /mnt -o username=westos,password=123
[root@144 /]# cd mnt/
[root@144 mnt]# ls
file2 file3 file4 file5
[root@144 mnt]# rm -fr file1
[root@144 mnt]# rm -fr file2
rm: cannot remove ‘file2’: Read-only file system #在服务端本身不允许更改 编写服务端的配置文件即可
[root@144 mnt]# cd ..
[root@144 /]# cd /mnt/
[root@144 mnt]# ls
file2 file3 file4 file5
[root@144 mnt]# ls
file2 file3 file4 file5
[root@144 mnt]# cd ..
[root@144 /]# umount /mnt
[root@144 /]# mount //172.25.254.244/DIR /mnt -o username=student,password=123
[root@144 /]# cd mnt/
[root@144 mnt]# ls
file2 file3 file4 file5
[root@144 mnt]# rm -fr file2
[root@144 mnt]# ls
file3 file4 file5
[root@144 mnt]# ll
total 0
-rw-r--r-- 1 root root 0 Jun 2 02:10 file3
-rw-r--r-- 1 root root 0 Jun 2 02:10 file4
-rw-r--r-- 1 root root 0 Jun 2 02:10 file5
[root@144 mnt]# cd
[root@144 ~]# umount /mnt
[root@144 ~]# ls
anaconda-ks.cfg Documents Music Public Videos
Desktop Downloads Pictures Templates多用户分别挂载
linux 用户
2  cd /mnt
    3  ls
    4  rpm -ql cifs-utils
    5  cifscreds add -u westos 172.25.254.244##使普通用户底下的westos用户通过认证
    6  ls
    7  ll
    8  touch file
    9  touch file8
   10  ll
root 用户
 281  yum install cifs-utils.x86_64 -y
  282  vim /root/smbpass # 在这里写入登陆的用户和密码  文件名任意
  > username=student
  Password=lee
  283  umount /mnt/
  284  df
  mount -o credentials=/root/smbpass,sec=ntlmssp,multiuser //172.25.254.244/DIR /mnt
  288  df
  289  useradd linux
  290  cd /mnt/
  291  ls
  292  touch file2
  293  touch file25
  294  su - linux
  295  history
匿名用户登陆
配置文件中
     map to guest = bad user 映射
   [DIR]
        comment= westos dir
        path = /westos
        writable = yes
        admin users = westos
        guest ok = yes
客户端
323  umount /mnt/
  324  mount //172.25.254.244/DIR /mnt -o username=gusest
  325  df
  326  smbclient //172.25.254.244/DIR
  327  history