NAT:
环境:
三台redhat6.5版本的虚拟机
sever1作为vs (双网卡)
sever2、sever3作为rs
添加好新网卡后让网卡启动
ifconfig eth1 up
ip addr add 172.25.254.166 dev eth1
1.在server1上面配置yum源,具体步骤在上一篇博客有详细说明:DR模式负载均衡配置
2.下载ipvsadm并启动
3.打开内部路由设置:
编辑/etc/sysctl.conf文件,将第七行改为1

4.sysctl -p
5.添加ipvsadm规则
[root@server1: ~]# ipvsadm -A -t 172.25.254.166:80 -s rr
[root@server1: ~]# ipvsadm -a -t 172.25.254.166:80 -r 172.25.66.2:80 -m
[root@server1: ~]# ipvsadm -a -t 172.25.254.166:80 -r 172.25.66.3:80 -m
[root@server1: ~]# ipvsadm -L -n
IP Virtual Server version 1.2.1 (size=4096)
Prot LocalAddress:Port Scheduler Flags
  -> RemoteAddress:Port           Forward Weight ActiveConn InActConn
TCP  172.25.254.166:80 rr
  -> 172.25.66.2:80               Masq    1      0          0
-> 172.25.66.3:80 Masq 1 0 0 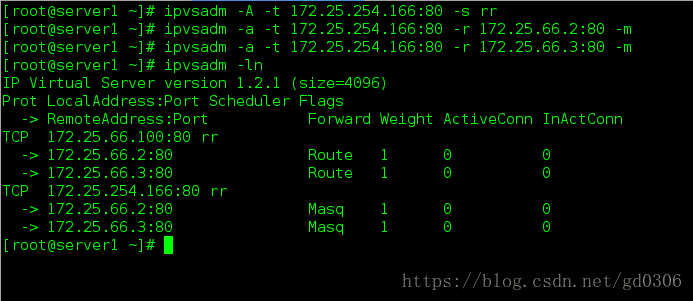
在server2中:
1.下载http服务
2.配置RS的网关指向vs
[root@server2: network-scripts]# cat /etc/sysconfig/network-scripts/ifcfg-eth0
DEVICE="eth0"
BOOTPROTO="static"
ONBOOT="yes"
IPADDR=172.25.66.2
PREFIX=24
GATEWAY=172.25.66.1
DNS1=114.114.114.114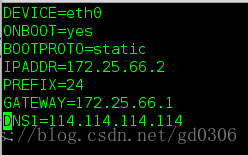
在server3中:
1.下载http服务
2.配置RS的网关指向vs
[root@server3: network-scripts]# cat /etc/sysconfig/network-scripts/ifcfg-eth0
DEVICE="eth0"
BOOTPROTO="static"
ONBOOT="yes"
IPADDR=172.25.66.3
PREFIX=24
GATEWAY=172.25.66.1
DNS1=114.114.114.114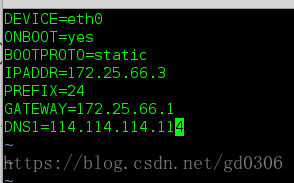
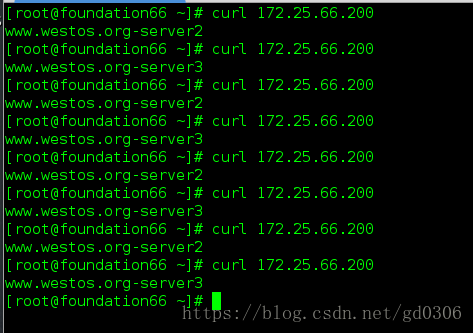
在物理机测试:

TUN模式:
1.设置规则
[root@server1: ~]# ipvsadm -A -t 172.25.66.200:80 -s rr
[root@server1: ~]# ipvsadm -a -t 172.25.66.200:80 -r 172.25.66.2:80 -i
[root@server1: ~]# ipvsadm -a -t 172.25.66.200:80 -r 172.25.66.3:80 -i
[root@server1: ~]# ipvsadm -ln
IP Virtual Server version 1.2.1 (size=4096)
Prot LocalAddress:Port Scheduler Flags
  -> RemoteAddress:Port           Forward Weight ActiveConn InActConn
TCP  172.25.66.200:80 rr
  -> 172.25.66.2:80               Tunnel  1      0          0
-> 172.25.66.3:80 Tunnel 1 0 0 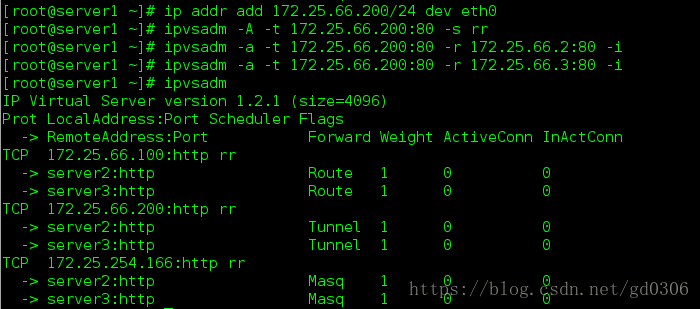
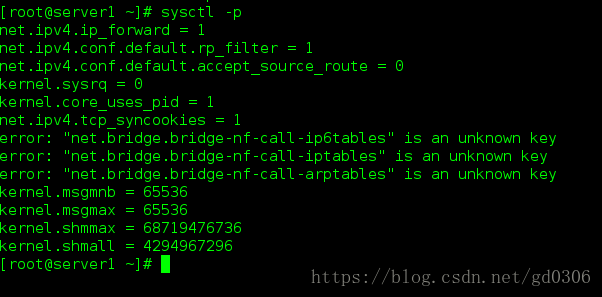
2.禁用rp_filter内核和打开内部路由
[root@server1: ~]# vim /etc/sysctl.conf
7 net.ipv4.ip_forward = 1
10 net.ipv4.conf.default.rp_filter = 0
[root@server1: ~]# sysctl -p
net.ipv4.ip_forward = 1
net.ipv4.conf.default.rp_filter = 0
net.ipv4.conf.default.accept_source_route = 0
kernel.sysrq = 0
kernel.core_uses_pid = 1
net.ipv4.tcp_syncookies = 1
error: "net.bridge.bridge-nf-call-ip6tables" is an unknown key
error: "net.bridge.bridge-nf-call-iptables" is an unknown key
error: "net.bridge.bridge-nf-call-arptables" is an unknown key
kernel.msgmnb = 65536
kernel.msgmax = 65536
kernel.shmmax = 68719476736
kernel.shmall = 4294967296
3.sysctl -p

4.在server2中:
1.安装arptables_jf
因为设置172.25.254.100/24作为vip,不可以和外部通信,所以设用arptables将其的访问全部DROP,出去的包全部转化为本机的ip
具体步骤见上一篇博客:DR模式配置
2.
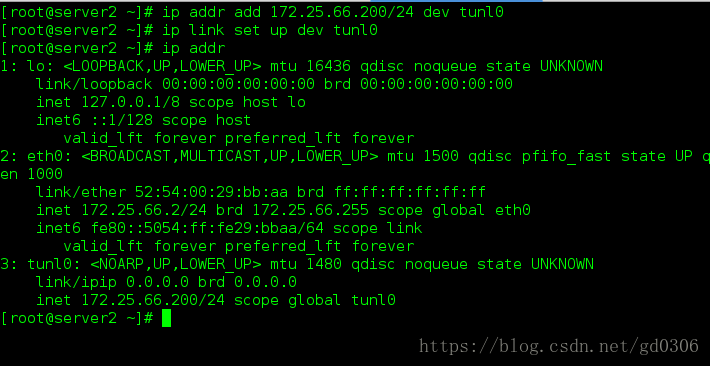
2、添加隧道tun
[root@server2: network-scripts]# ip addr add 172.25.66.200/24 dev tunl0
[root@server2: network-scripts]# ip link set up dev tunl0
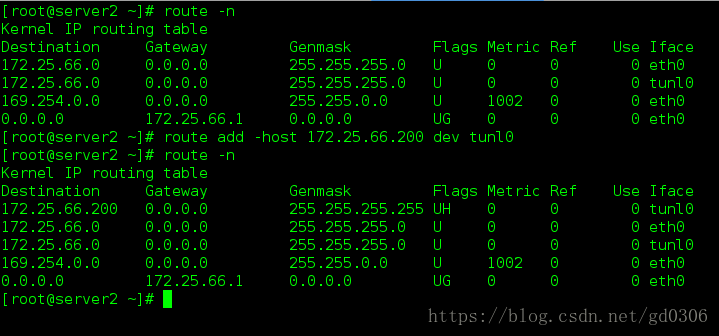
[root@server2: network-scripts]# route -n
Kernel IP routing table
Destination Gateway Genmask Flags Metric Ref Use Iface
172.25.66.0 0.0.0.0 255.255.255.0 U 0 0 0 eth0
172.25.66.0 0.0.0.0 255.255.255.0 U 0 0 0 tunl0
169.254.0.0 0.0.0.0 255.255.0.0 U 1002 0 0 eth0
0.0.0.0 172.25.51.1 0.0.0.0 UG 0 0 0 eth0
[root@server2: network-scripts]# route add -host 172.25.51.100 dev tunl0
[root@server2: network-scripts]# route -n
Kernel IP routing table
Destination Gateway Genmask Flags Metric Ref Use Iface
172.25.66.200 0.0.0.0 255.255.255.255 UH 0 0 0 tunl0
172.25.66.0 0.0.0.0 255.255.255.0 U 0 0 0 eth0
172.25.66.0 0.0.0.0 255.255.255.0 U 0 0 0 tunl0
169.254.0.0 0.0.0.0 255.255.0.0 U 1002 0 0 eth0
0.0.0.0 172.25.66.1 0.0.0.0 UG 0 0 0 eth0
在server3中做与server2中相同的操作
测试
用和vip网关相同的ip主机访问vip,如果访问到的页面有轮询,则负载均衡搭建成功