原文:http://www.itmuch.com/spring-cloud/edgware-new-sleuth-zipkin-mq/
众所周知,Spring Cloud Sleuth有两种方式整合Zipkin:
-
HTTP直连Zipkin方式
-
MQ方式,架构图如下:
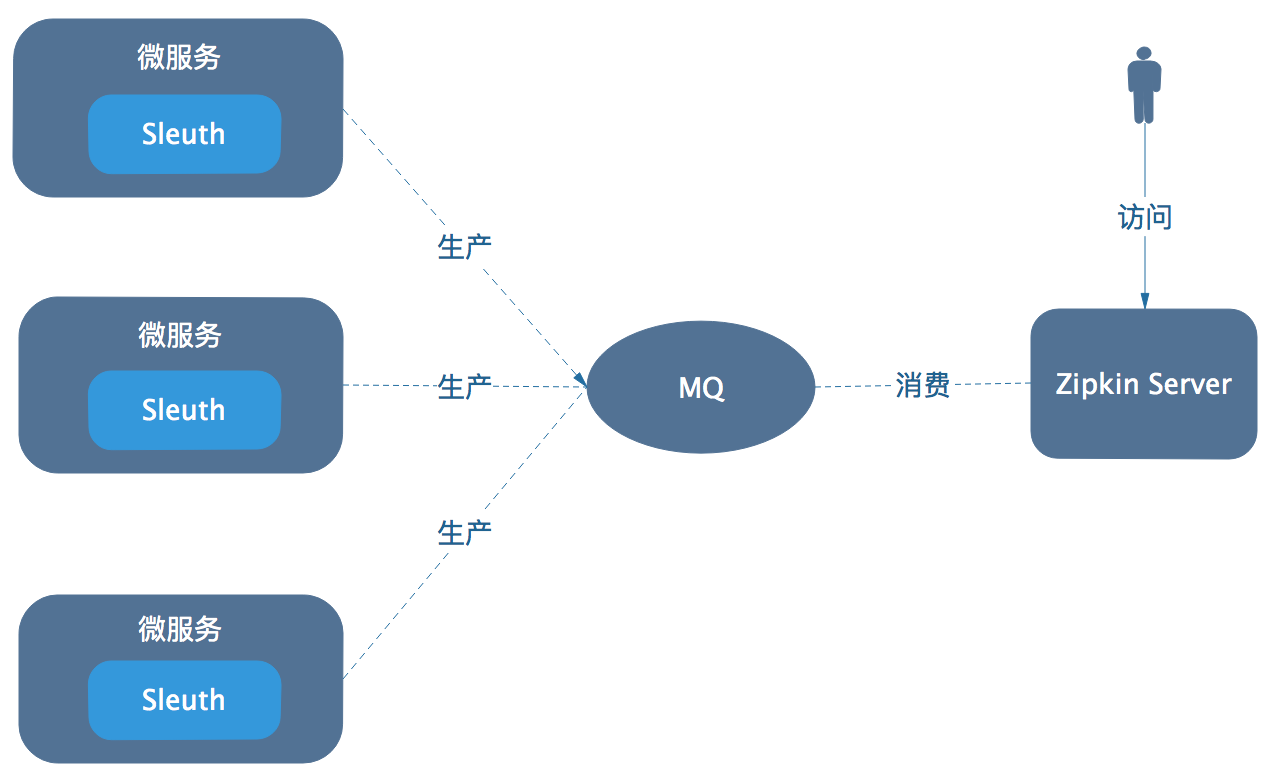
Spring Cloud Edgware及更高版本中,Sleuth使用MQ方式整合Zipkin的玩法发生了巨大改变。本文将贴出新旧版本中Sleuth如何整合Zipkin的具体操作。MQ使用的是RabbitMQ(读者也可使用Kafka)。
Dalston及更低版本
如果您使用Spring Cloud Dalston或更低版本,那么整合步骤如下:
服务器端
-
依赖:
<dependency> <groupId>org.springframework.cloud</groupId> <artifactId>spring-cloud-sleuth-zipkin-stream</artifactId> </dependency> <dependency> <groupId>org.springframework.cloud</groupId> <artifactId>spring-cloud-starter-sleuth</artifactId> </dependency> <dependency> <groupId>org.springframework.cloud</groupId> <artifactId>spring-cloud-stream-binder-rabbit</artifactId> </dependency> <dependency> <groupId>io.zipkin.java</groupId> <artifactId>zipkin-autoconfigure-ui</artifactId> </dependency> -
启动类上添加注解
@EnableZipkinStreamServer。 -
配置:
server:
  port: 9411
spring:
  rabbitmq:
    host: localhost
    port: 5672
    username: guest
    password: guest
微服务端
-
加依赖:
<dependency> <groupId>org.springframework.cloud</groupId> <artifactId>spring-cloud-sleuth-stream</artifactId> </dependency> <dependency> <groupId>org.springframework.cloud</groupId> <artifactId>spring-cloud-starter-sleuth</artifactId> </dependency> <dependency> <groupId>org.springframework.cloud</groupId> <artifactId>spring-cloud-stream-binder-rabbit</artifactId> </dependency> -
配置:
spring:
  rabbitmq:
    host: localhost
    port: 5672
    username: guest
    password: guest
Edgware及更高版本
对于Edgware,以上方式也可使用,但目前已标注为废弃 ,未来将被删除!
从Edgware开始,应如下整合Zipkin——
服务器端
-
依赖:
<dependency> <groupId>io.zipkin.java</groupId> <artifactId>zipkin-autoconfigure-ui</artifactId> </dependency> <dependency> <groupId>io.zipkin.java</groupId> <artifactId>zipkin-server</artifactId> </dependency> <!-- 使用消息的方式收集数据(使用rabbitmq) --> <dependency> <groupId>io.zipkin.java</groupId> <artifactId>zipkin-autoconfigure-collector-rabbitmq</artifactId> <version>2.3.1</version> </dependency> -
启动类上添加
@EnableZipkinServer。 -
配置:
server:
  port: 9411
zipkin:
  collector:
    rabbitmq:
      addresses: localhost:5672
      password: guest
      username: guest
      queue: zipkin
微服务端
-
依赖:
<dependency> <groupId>org.springframework.cloud</groupId> <artifactId>spring-cloud-starter-zipkin</artifactId> </dependency> <dependency> <groupId>org.springframework.amqp</groupId> <artifactId>spring-rabbit</artifactId> </dependency> -
配置:
spring:
  rabbitmq:
    host: localhost
    port: 5672
    username: guest
    password: guest
  zipkin:
    rabbitmq:
      queue: zipkin
对比及分析
对比后不难发现,从Edgware开始,Sleuth基于MQ整合Zipkin更加的简化!不过,改动还是比较大的。官方为什么要做这个改进呢?答案如下——
- Spring Cloud Edgware之前的版本使用
Zipkin 1.x,要想MQ方式收集数据,需整合spring-cloud-sleuth-stream。而在Edgware及更高版本中,使用Zipkin 2.x。Zipkin 2.x本身已支持基于MQ的数据收集方式,故而spring-cloud-sleuth-stream将被废弃! - 两种使用方式不兼容,请读者务必注意!