centos7 部署Elasticsearch并安装head插件实现ES集群的可视化管理
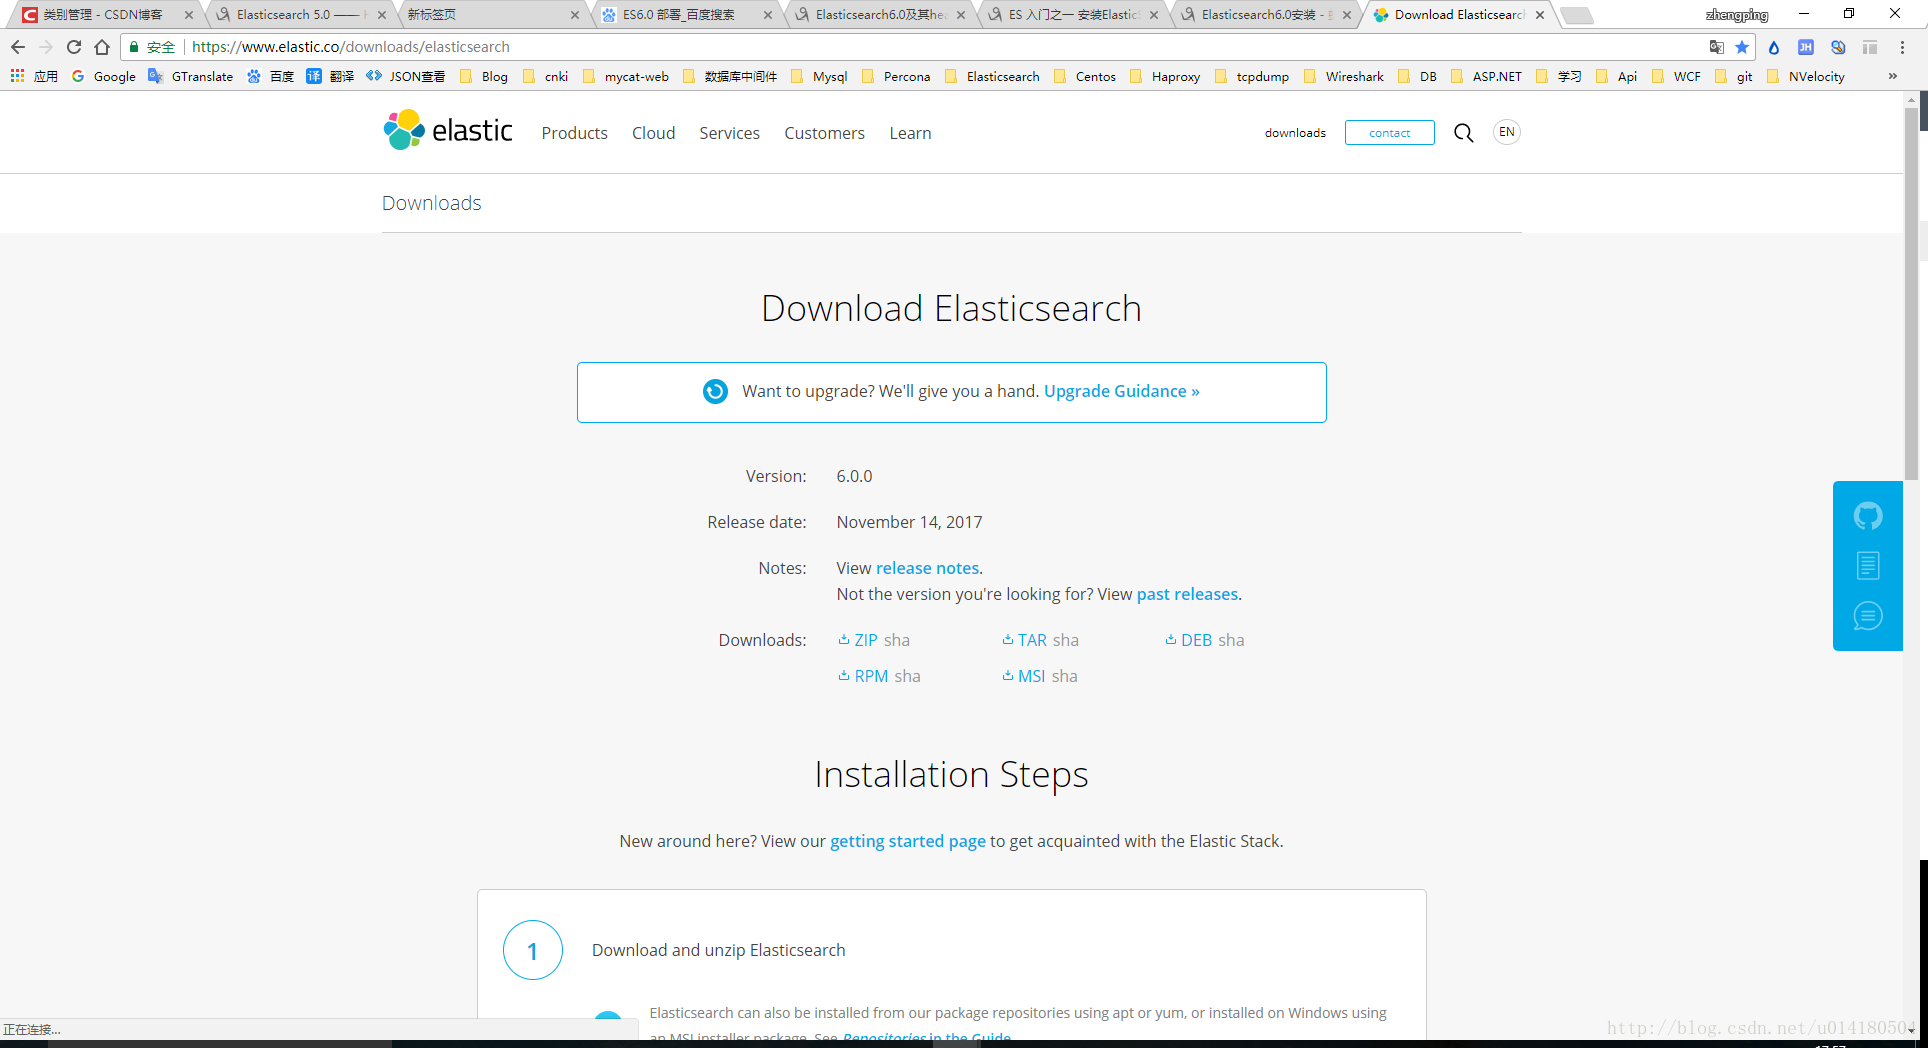
最近看了es的一些介绍想自己动手安装学习下,毕竟不实际运行是不会遇到坑的,嗯,你没看错,全是坑,闲言少叙,直接整体,到ES官网下载
首先机器要安装jdk 1.8+ 具体参考:安装教程
[niezp@localhost elasticsearch-6.0.0]$ tar -vxf elasticsearch-6.0.0.tar.gz内部结构
[niezp@localhost elasticsearch-6.0.0]$ ll
总用量 244
drwxr-xr-x  2 niezp niezp   4096 11月 10 18:42 bin
drwxr-xr-x  2 niezp niezp     75 12月  6 15:39 config
drwxrwxr-x  3 niezp niezp     19 12月  6 11:45 data
-rw-rw-r--  1 niezp niezp  18180 12月  6 15:01 hs_err_pid9395.log
drwxr-xr-x  2 niezp niezp   4096 11月 10 18:42 lib
-rw-r--r--  1 niezp niezp  11358 11月 10 18:39 LICENSE.txt
drwxrwxr-x  2 niezp niezp    286 12月  6 14:21 logs
drwxr-xr-x 14 niezp niezp    251 11月 10 18:42 modules
-rw-rw-r--  1 niezp niezp 193097 11月 10 18:42 NOTICE.txt
drwxr-xr-x  2 niezp niezp      6 12月  6 14:17 plugins
-rw-r--r--  1 niezp niezp   9326 11月 10 18:39 README.textile
[niezp@localhost elasticsearch-6.0.0]$
接下来我们配置 config/elasticsearch.yml文件
# ======================== Elasticsearch Configuration =========================
#
# NOTE: Elasticsearch comes with reasonable defaults for most settings.
#       Before you set out to tweak and tune the configuration, make sure you
#       understand what are you trying to accomplish and the consequences.
#
# The primary way of configuring a node is via this file. This template lists
# the most important settings you may want to configure for a production cluster.
#
# Please consult the documentation for further information on configuration options:
# https://www.elastic.co/guide/en/elasticsearch/reference/index.html
#
# ---------------------------------- Cluster -----------------------------------
#
# Use a descriptive name for your cluster:
#
#cluster.name: my-application
#
# ------------------------------------ Node ------------------------------------
#
# Use a descriptive name for the node:
#
#node.name: node-1
#
# Add custom attributes to the node:
#
#node.attr.rack: r1
#
# ----------------------------------- Paths ------------------------------------
#
# Path to directory where to store the data (separate multiple locations by comma):
#
#path.data: /path/to/data
#
# Path to log files:
#
#path.logs: /path/to/logs
#
# ----------------------------------- Memory -----------------------------------
#
# Lock the memory on startup:
#
#bootstrap.memory_lock: true
#
# Make sure that the heap size is set to about half the memory available
# on the system and that the owner of the process is allowed to use this
# limit.
#
# Elasticsearch performs poorly when the system is swapping the memory.
#
# ---------------------------------- Network -----------------------------------
#
# Set the bind address to a specific IP (IPv4 or IPv6):
#
#network.host: 0.0.0.0
#
# Set a custom port for HTTP:
#
#http.port: 9200
#
# For more information, consult the network module documentation.
#
# --------------------------------- Discovery ----------------------------------
#
# Pass an initial list of hosts to perform discovery when new node is started:
# The default list of hosts is ["127.0.0.1", "[::1]"]
#
#discovery.zen.ping.unicast.hosts: ["host1", "host2"]
#
# Prevent the "split brain" by configuring the majority of nodes (total number of master-eligible nodes / 2 + 1):
#
#discovery.zen.minimum_master_nodes: 3
#
# For more information, consult the zen discovery module documentation.
#
# ---------------------------------- Gateway -----------------------------------
#
# Block initial recovery after a full cluster restart until N nodes are started:
#
#gateway.recover_after_nodes: 3
#
# For more information, consult the gateway module documentation.
#
# ---------------------------------- Various -----------------------------------
#
# Require explicit names when deleting indices:
#
#action.destructive_requires_name: true

# 集群的名字
cluster.name: niezp

# 节点名字
node.name: niezp-master
#是否是master
node.master: true

#ES的监听地址,这样别的机器也可以访问
network.host: 192.168.174.148

# 默认的就好
http.port: 9200

#本机最大允许运行节点个数
node.max_local_storage_nodes: 3

# 增加新的参数,这样head插件可以访问es,解决跨域访问问题
http.cors.enabled: true
http.cors.allow-origin: "*"
这里ES配置就结束了,对没有错,就这么简单
启动ES:
[niezp@localhost elasticsearch-6.0.0]$ ./bin/elasticsearch注意执行目录
看到输出如下信息 started
[2017-12-06T15:20:46,189][INFO ][o.e.e.NodeEnvironment    ] [niezp-master] using [1] data paths, mounts [[/ (rootfs)]], net usable_space [11.2gb], net total_space [36.9gb], types [rootfs]
[2017-12-06T15:20:46,189][INFO ][o.e.e.NodeEnvironment    ] [niezp-master] heap size [495.3mb], compressed ordinary object pointers [true]
[2017-12-06T15:20:46,190][INFO ][o.e.n.Node               ] [niezp-master] node name [niezp-master], node ID [Jena8SthQXiBtzcs5-y0QQ]
[2017-12-06T15:20:46,191][INFO ][o.e.n.Node               ] [niezp-master] version[6.0.0], pid[5031], build[8f0685b/2017-11-10T18:41:22.859Z], OS[Linux/3.10.0-514.el7.x86_64/amd64], JVM[Oracle Corporation/Java HotSpot(TM) 64-Bit Server VM/1.8.0_131/25.131-b11]
[2017-12-06T15:20:46,191][INFO ][o.e.n.Node               ] [niezp-master] JVM arguments [-Xms512M, -Xmx512M, -XX:+UseConcMarkSweepGC, -XX:CMSInitiatingOccupancyFraction=75, -XX:+UseCMSInitiatingOccupancyOnly, -XX:+AlwaysPreTouch, -Xss1m, -Djava.awt.headless=true, -Dfile.encoding=UTF-8, -Djna.nosys=true, -XX:-OmitStackTraceInFastThrow, -Dio.netty.noUnsafe=true, -Dio.netty.noKeySetOptimization=true, -Dio.netty.recycler.maxCapacityPerThread=0, -Dlog4j.shutdownHookEnabled=false, -Dlog4j2.disable.jmx=true, -XX:+HeapDumpOnOutOfMemoryError, -Des.path.home=/home/niezp/ES/elasticsearch-6.0.0, -Des.path.conf=/home/niezp/ES/elasticsearch-6.0.0/config]
[2017-12-06T15:20:47,036][INFO ][o.e.p.PluginsService     ] [niezp-master] loaded module [aggs-matrix-stats]
[2017-12-06T15:20:47,037][INFO ][o.e.p.PluginsService     ] [niezp-master] loaded module [analysis-common]
[2017-12-06T15:20:47,037][INFO ][o.e.p.PluginsService     ] [niezp-master] loaded module [ingest-common]
[2017-12-06T15:20:47,037][INFO ][o.e.p.PluginsService     ] [niezp-master] loaded module [lang-expression]
[2017-12-06T15:20:47,037][INFO ][o.e.p.PluginsService     ] [niezp-master] loaded module [lang-mustache]
[2017-12-06T15:20:47,037][INFO ][o.e.p.PluginsService     ] [niezp-master] loaded module [lang-painless]
[2017-12-06T15:20:47,038][INFO ][o.e.p.PluginsService     ] [niezp-master] loaded module [parent-join]
[2017-12-06T15:20:47,038][INFO ][o.e.p.PluginsService     ] [niezp-master] loaded module [percolator]
[2017-12-06T15:20:47,038][INFO ][o.e.p.PluginsService     ] [niezp-master] loaded module [reindex]
[2017-12-06T15:20:47,038][INFO ][o.e.p.PluginsService     ] [niezp-master] loaded module [repository-url]
[2017-12-06T15:20:47,038][INFO ][o.e.p.PluginsService     ] [niezp-master] loaded module [transport-netty4]
[2017-12-06T15:20:47,038][INFO ][o.e.p.PluginsService     ] [niezp-master] loaded module [tribe]
[2017-12-06T15:20:47,039][INFO ][o.e.p.PluginsService     ] [niezp-master] no plugins loaded
[2017-12-06T15:20:48,519][INFO ][o.e.d.DiscoveryModule    ] [niezp-master] using discovery type [zen]
[2017-12-06T15:20:49,097][INFO ][o.e.n.Node               ] [niezp-master] initialized
[2017-12-06T15:20:49,098][INFO ][o.e.n.Node               ] [niezp-master] starting ...
[2017-12-06T15:20:49,253][INFO ][o.e.t.TransportService   ] [niezp-master] publish_address {127.0.0.1:9300}, bound_addresses {127.0.0.1:9300}
[2017-12-06T15:20:52,347][INFO ][o.e.c.s.MasterService    ] [niezp-master] zen-disco-elected-as-master ([0] nodes joined), reason: new_master {niezp-master}{Jena8SthQXiBtzcs5-y0QQ}{ctySsfBQRp2BgGHXAhj_FQ}{127.0.0.1}{127.0.0.1:9300}
[2017-12-06T15:20:52,356][INFO ][o.e.c.s.ClusterApplierService] [niezp-master] new_master {niezp-master}{Jena8SthQXiBtzcs5-y0QQ}{ctySsfBQRp2BgGHXAhj_FQ}{127.0.0.1}{127.0.0.1:9300}, reason: apply cluster state (from master [master {niezp-master}{Jena8SthQXiBtzcs5-y0QQ}{ctySsfBQRp2BgGHXAhj_FQ}{127.0.0.1}{127.0.0.1:9300} committed version [1] source [zen-disco-elected-as-master ([0] nodes joined)]])
[2017-12-06T15:20:52,375][INFO ][o.e.h.n.Netty4HttpServerTransport] [niezp-master] publish_address {127.0.0.1:9200}, bound_addresses {127.0.0.1:9200}
[2017-12-06T15:20:52,375][INFO ][o.e.n.Node               ] [niezp-master] started
[2017-12-06T15:20:52,419][INFO ][o.e.g.GatewayService     ] [niezp-master] recovered [0] indices into cluster_state
[2017-12-06T15:20:52,375][INFO ][o.e.n.Node] [niezp-master] started 就说明启动成功
打开浏览器访问
#ES的监听地址,这样别的机器也可以访问
network.host: 192.168.174.148
配置过的ip地址加9200端口
{
  "name" : "niezp-master",
  "cluster_name" : "niezp",
  "cluster_uuid" : "q7r5GHy4QsOyN_rKyW1K9A",
  "version" : {
    "number" : "6.0.0",
    "build_hash" : "8f0685b",
    "build_date" : "2017-11-10T18:41:22.859Z",
    "build_snapshot" : false,
    "lucene_version" : "7.0.1",
    "minimum_wire_compatibility_version" : "5.6.0",
    "minimum_index_compatibility_version" : "5.0.0"
  },
  "tagline" : "You Know, for Search"
}
返回如下信息,是不是看着眼熟,name,cluster_name就是我们自定义配置的信息,至此单机节店就安装完了,如果启动报错
[hongdada@localhost bin]$ sh elasticsearch
[2017-11-23T23:25:41,142][INFO ][o.e.n.Node               ] [] initializing ...
[2017-11-23T23:25:41,203][INFO ][o.e.e.NodeEnvironment    ] [l2KjKQB] using [1] data paths, mounts [[/ (rootfs)]], net usable_space [28.4gb], net total_space [35.5gb], types [rootfs]
[2017-11-23T23:25:41,204][INFO ][o.e.e.NodeEnvironment    ] [l2KjKQB] heap size [989.8mb], compressed ordinary object pointers [true]
[2017-11-23T23:25:41,205][INFO ][o.e.n.Node               ] node name [l2KjKQB] derived from node ID [l2KjKQBBSRacQ3kzNB2Qgg]; set [node.name] to override
[2017-11-23T23:25:41,205][INFO ][o.e.n.Node               ] version[6.0.0], pid[9359], build[8f0685b/2017-11-10T18:41:22.859Z], OS[Linux/3.10.0-514.26.2.el7.x86_64/amd64], JVM[Oracle Corporation/Java HotSpot(TM) 64-Bit Server VM/1.8.0_121/25.121-b13]
[2017-11-23T23:25:41,205][INFO ][o.e.n.Node               ] JVM arguments [-Xms1g, -Xmx1g, -XX:+UseConcMarkSweepGC, -XX:CMSInitiatingOccupancyFraction=75, -XX:+UseCMSInitiatingOccupancyOnly, -XX:+AlwaysPreTouch, -Xss1m, -Djava.awt.headless=true, -Dfile.encoding=UTF-8, -Djna.nosys=true, -XX:-OmitStackTraceInFastThrow, -Dio.netty.noUnsafe=true, -Dio.netty.noKeySetOptimization=true, -Dio.netty.recycler.maxCapacityPerThread=0, -Dlog4j.shutdownHookEnabled=false, -Dlog4j2.disable.jmx=true, -XX:+HeapDumpOnOutOfMemoryError, -Des.path.home=/usr/local/elasticsearch/elasticsearch-6.0.0, -Des.path.conf=/usr/local/elasticsearch/elasticsearch-6.0.0/config]
[2017-11-23T23:25:41,852][INFO ][o.e.p.PluginsService     ] [l2KjKQB] loaded module [aggs-matrix-stats]
[2017-11-23T23:25:41,853][INFO ][o.e.p.PluginsService     ] [l2KjKQB] loaded module [analysis-common]
[2017-11-23T23:25:41,853][INFO ][o.e.p.PluginsService     ] [l2KjKQB] loaded module [ingest-common]
[2017-11-23T23:25:41,853][INFO ][o.e.p.PluginsService     ] [l2KjKQB] loaded module [lang-expression]
[2017-11-23T23:25:41,853][INFO ][o.e.p.PluginsService     ] [l2KjKQB] loaded module [lang-mustache]
[2017-11-23T23:25:41,853][INFO ][o.e.p.PluginsService     ] [l2KjKQB] loaded module [lang-painless]
[2017-11-23T23:25:41,853][INFO ][o.e.p.PluginsService     ] [l2KjKQB] loaded module [parent-join]
[2017-11-23T23:25:41,853][INFO ][o.e.p.PluginsService     ] [l2KjKQB] loaded module [percolator]
[2017-11-23T23:25:41,853][INFO ][o.e.p.PluginsService     ] [l2KjKQB] loaded module [reindex]
[2017-11-23T23:25:41,854][INFO ][o.e.p.PluginsService     ] [l2KjKQB] loaded module [repository-url]
[2017-11-23T23:25:41,854][INFO ][o.e.p.PluginsService     ] [l2KjKQB] loaded module [transport-netty4]
[2017-11-23T23:25:41,854][INFO ][o.e.p.PluginsService     ] [l2KjKQB] loaded module [tribe]
[2017-11-23T23:25:41,854][INFO ][o.e.p.PluginsService     ] [l2KjKQB] no plugins loaded
[2017-11-23T23:25:42,794][INFO ][o.e.d.DiscoveryModule    ] [l2KjKQB] using discovery type [zen]
[2017-11-23T23:25:43,151][INFO ][o.e.n.Node               ] initialized
[2017-11-23T23:25:43,151][INFO ][o.e.n.Node               ] [l2KjKQB] starting ...
[2017-11-23T23:25:43,245][INFO ][o.e.t.TransportService   ] [l2KjKQB] publish_address {192.168.1.108:9300}, bound_addresses {[::]:9300}
[2017-11-23T23:25:43,253][INFO ][o.e.b.BootstrapChecks    ] [l2KjKQB] bound or publishing to a non-loopback or non-link-local address, enforcing bootstrap checks
ERROR: [2] bootstrap checks failed
[1]: max file descriptors [4096] for elasticsearch process is too low, increase to at least [65536]
[2]: max virtual memory areas vm.max_map_count [65530] is too low, increase to at least [262144]
[2017-11-23T23:25:43,258][INFO ][o.e.n.Node               ] [l2KjKQB] stopping ...
[2017-11-23T23:25:43,308][INFO ][o.e.n.Node               ] [l2KjKQB] stopped
[2017-11-23T23:25:43,308][INFO ][o.e.n.Node               ] [l2KjKQB] closing ...
[2017-11-23T23:25:43,314][INFO ][o.e.n.Node               ] [l2KjKQB] closed
重点信息
ERROR: [2] bootstrap checks failed
[1]: max file descriptors [4096] for elasticsearch process is too low, increase to at least [65536]
[2]: max virtual memory areas vm.max_map_count [65530] is too low, increase to at least [262144]
这里需要我们修改
1.max file descriptors [4096] for elasticsearch process is too low, increase to at least [65536]

修改/etc/security/limits.conf文件,添加或修改如下行:
*        hard    nofile           65536
*        soft    nofile           65536
2.max virtual memory areas vm.max......

修改 /etc/sysctl.conf 文件,添加如下行:

vm.max_map_count=262144
修改好了以后,调用sysctl -a查看,发现参数并没有变动,要重启才可以。

重启以后,再启动es即可,就可以通过主机ip访问。
如果是内存不足就需要调整内存大小了或者调整config/jvm.options的参数
-Xms1g
-Xmx1g
改为
-Xms512M
-Xmx512M如果还不行就需要扩充内存了。还有很多坑可以参考各种坑
下面说下怎么安装head插件并构成多个节点的集群,这里我们先说安装head插件,可以说我在安装是遇到了很多坑,看了很多博客被误导,废了半天时间,下面来说下:
下载插件:
wget https://github.com/mobz/elasticsearch-head/archive/master.zip由于运行head需要运行node所以也要下载node,具体版本可以参考node
wget https://npm.taobao.org/mirrors/node/latest-v4.x/node-v4.4.7-linux-x64.tar.gz
tar -zxvf node-v4.4.7-linux-x64.tar.gz
增加以下配置:
JAVA_HOME=/home/soft/jdk1.8.0_131
JRE_HOME=/home/soft/jdk1.8.0_131/jre
NODE_HOME=/home/niezp/ES/node-v0.10.28-linux-x64
CLASS_PATH=.:$JAVA_HOME/lib/dt.jar:$JAVA_HOME/lib/tools.jar:$JRE_HOME/lib
PATH=$PATH:$JAVA_HOME/bin:$JRE_HOME/bin:$NODE_HOME/bin
NODE_PATH=$NODE_HOME/lib/node_modules

export JAVA_HOME JRE_HOME NODE_PATH CLASS_PATH PATH NODE_PATH
修改完保存并
source /etc/profile这里遇到了大坑啊,由于ES启动时不建议用root账户的所以我直接用其他的账户登录之后修改,但是不让改没权限,然后我就切换到root修改也source 了,但是在切换回其他账户的时候
echo $NODE_HOME死活是空的,我就纳闷了,在看也修改了,这里就埋下了坑,就直接说解决方案吧,哭死了,必须在用当前账户在 source /etc/profile一次才行,在
echo $NODE_HOME就会输出配置的信息,眼泪啊,不熟悉centos的人
安装grunt
接下来解压下载的master.zip,进入下载的elasticsearch-head-master,
执行
[root@localnode1 elasticsearch-head-master]#npm install -g grunt-cli 接下来检查grunt 安装是否成功
[root@localnode1 elasticsearch-head]# grunt -version
grunt-cli v1.2.0
grunt v0.4.5
输出版本说明成功
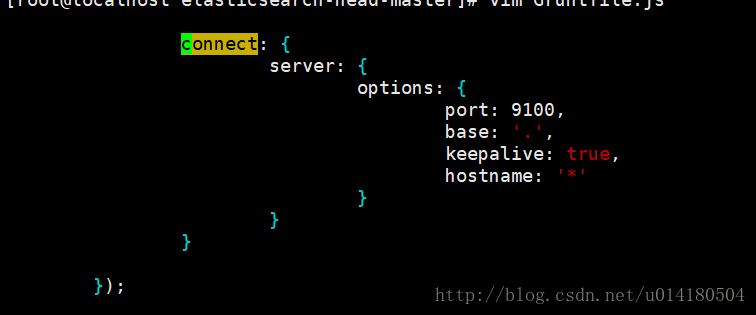
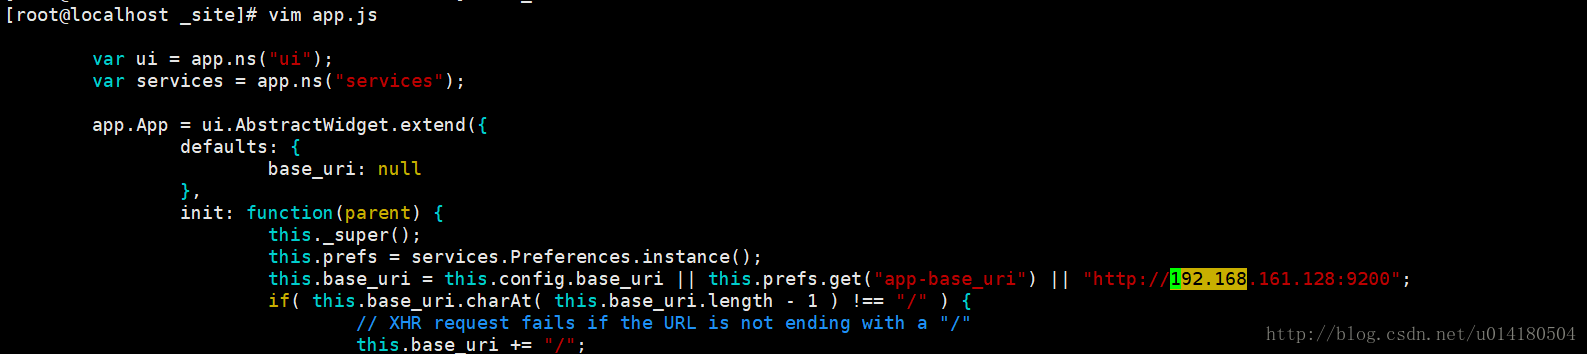
修改head插件源码:
修改服务器监听地址:Gruntfile.js
修改修改连接地址:_site/app.js
在elasticsearch-head-master目录下
[root@localnode1 elasticsearch-head]# npm install
[root@localnode1 elasticsearch-head]# grunt server
启动成功就可以访问127.0.0.1:9100就可以看到如下界面

当然是只有一个节点信息的,具体界面操作就自行学习吧
最后说下集群部署
分别拷贝下载的es文件在三个不同的文件夹下,分别配置config/elasticsearch.yml
实例: ES1文件夹下的配置:
# ======================== Elasticsearch Configuration =========================
#
# NOTE: Elasticsearch comes with reasonable defaults for most settings.
#       Before you set out to tweak and tune the configuration, make sure you
#       understand what are you trying to accomplish and the consequences.
#
# The primary way of configuring a node is via this file. This template lists
# the most important settings you may want to configure for a production cluster.
#
# Please consult the documentation for further information on configuration options:
# https://www.elastic.co/guide/en/elasticsearch/reference/index.html
#
# ---------------------------------- Cluster -----------------------------------
#
# Use a descriptive name for your cluster:
#
#cluster.name: my-application
#
# ------------------------------------ Node ------------------------------------
#
# Use a descriptive name for the node:
#
#node.name: node-1
#
# Add custom attributes to the node:
#
#node.attr.rack: r1
#
# ----------------------------------- Paths ------------------------------------
#
# Path to directory where to store the data (separate multiple locations by comma):
#
#path.data: /path/to/data
#
# Path to log files:
#
#path.logs: /path/to/logs
#
# ----------------------------------- Memory -----------------------------------
#
# Lock the memory on startup:
#
#bootstrap.memory_lock: true
#
# Make sure that the heap size is set to about half the memory available
# on the system and that the owner of the process is allowed to use this
# limit.
#
# Elasticsearch performs poorly when the system is swapping the memory.
#
# ---------------------------------- Network -----------------------------------
#
# Set the bind address to a specific IP (IPv4 or IPv6):
#
#network.host: 0.0.0.0
#
# Set a custom port for HTTP:
#
#http.port: 9200
#
# For more information, consult the network module documentation.
#
# --------------------------------- Discovery ----------------------------------
#
# Pass an initial list of hosts to perform discovery when new node is started:
# The default list of hosts is ["127.0.0.1", "[::1]"]
#
#discovery.zen.ping.unicast.hosts: ["host1", "host2"]
#
# Prevent the "split brain" by configuring the majority of nodes (total number of master-eligible nodes / 2 + 1):
#
#discovery.zen.minimum_master_nodes: 3
#
# For more information, consult the zen discovery module documentation.
#
# ---------------------------------- Gateway -----------------------------------
#
# Block initial recovery after a full cluster restart until N nodes are started:
#
#gateway.recover_after_nodes: 3
#
# For more information, consult the gateway module documentation.
#
# ---------------------------------- Various -----------------------------------
#
# Require explicit names when deleting indices:
#
#action.destructive_requires_name: true

# 集群的名字  必须与其他机器相同
cluster.name: niezp

# 节点名字,必须与其他节点不同
node.name: niezp-slave1

# 修改一下ES的监听地址,这样别的机器也可以访问
network.host: 192.168.174.148

#  不能和其他的节点相同
http.port: 9202
#这里要说下,这里的IP地址就是你的mater es的机器ip地址,比如部署在本机可以下127.0.0.1 别的机器就写别的机器的ip
discovery.zen.ping.unicast.hosts: ["192.168.174.148"]
node.max_local_storage_nodes: 3
# 增加新的参数,这样head插件可以访问es
#http.cors.enabled: true
#http.cors.allow-origin: "*"
实例: ES2文件夹下的配置:
# ======================== Elasticsearch Configuration =========================
#
# NOTE: Elasticsearch comes with reasonable defaults for most settings.
#       Before you set out to tweak and tune the configuration, make sure you
#       understand what are you trying to accomplish and the consequences.
#
# The primary way of configuring a node is via this file. This template lists
# the most important settings you may want to configure for a production cluster.
#
# Please consult the documentation for further information on configuration options:
# https://www.elastic.co/guide/en/elasticsearch/reference/index.html
#
# ---------------------------------- Cluster -----------------------------------
#
# Use a descriptive name for your cluster:
#
#cluster.name: my-application
#
# ------------------------------------ Node ------------------------------------
#
# Use a descriptive name for the node:
#
#node.name: node-1
#
# Add custom attributes to the node:
#
#node.attr.rack: r1
#
# ----------------------------------- Paths ------------------------------------
#
# Path to directory where to store the data (separate multiple locations by comma):
#
#path.data: /path/to/data
#
# Path to log files:
#
#path.logs: /path/to/logs
#
# ----------------------------------- Memory -----------------------------------
#
# Lock the memory on startup:
#
#bootstrap.memory_lock: true
#
# Make sure that the heap size is set to about half the memory available
# on the system and that the owner of the process is allowed to use this
# limit.
#
# Elasticsearch performs poorly when the system is swapping the memory.
#
# ---------------------------------- Network -----------------------------------
#
# Set the bind address to a specific IP (IPv4 or IPv6):
#
#network.host: 0.0.0.0
#
# Set a custom port for HTTP:
#
#http.port: 9200
#
# For more information, consult the network module documentation.
#
# --------------------------------- Discovery ----------------------------------
#
# Pass an initial list of hosts to perform discovery when new node is started:
# The default list of hosts is ["127.0.0.1", "[::1]"]
#
#discovery.zen.ping.unicast.hosts: ["host1", "host2"]
#
# Prevent the "split brain" by configuring the majority of nodes (total number of master-eligible nodes / 2 + 1):
#
#discovery.zen.minimum_master_nodes: 3
#
# For more information, consult the zen discovery module documentation.
#
# ---------------------------------- Gateway -----------------------------------
#
# Block initial recovery after a full cluster restart until N nodes are started:
#
#gateway.recover_after_nodes: 3
#
# For more information, consult the gateway module documentation.
#
# ---------------------------------- Various -----------------------------------
#
# Require explicit names when deleting indices:
#
#action.destructive_requires_name: true

# 集群的名字  必须与其他机器相同
cluster.name: niezp

# 节点名字,必须与其他节点不同
node.name: niezp-slave2

# 修改一下ES的监听地址,这样别的机器也可以访问
network.host: 192.168.174.148

# 不能和其他的节点相同
http.port: 9201
#同实例1说明
discovery.zen.ping.unicast.hosts: ["192.168.174.148"]
node.max_local_storage_nodes: 3
# 增加新的参数,这样head插件可以访问es
#http.cors.enabled: true
#http.cors.allow-origin: "*"
这样启动三个节点之后就能在head中看到如下界面
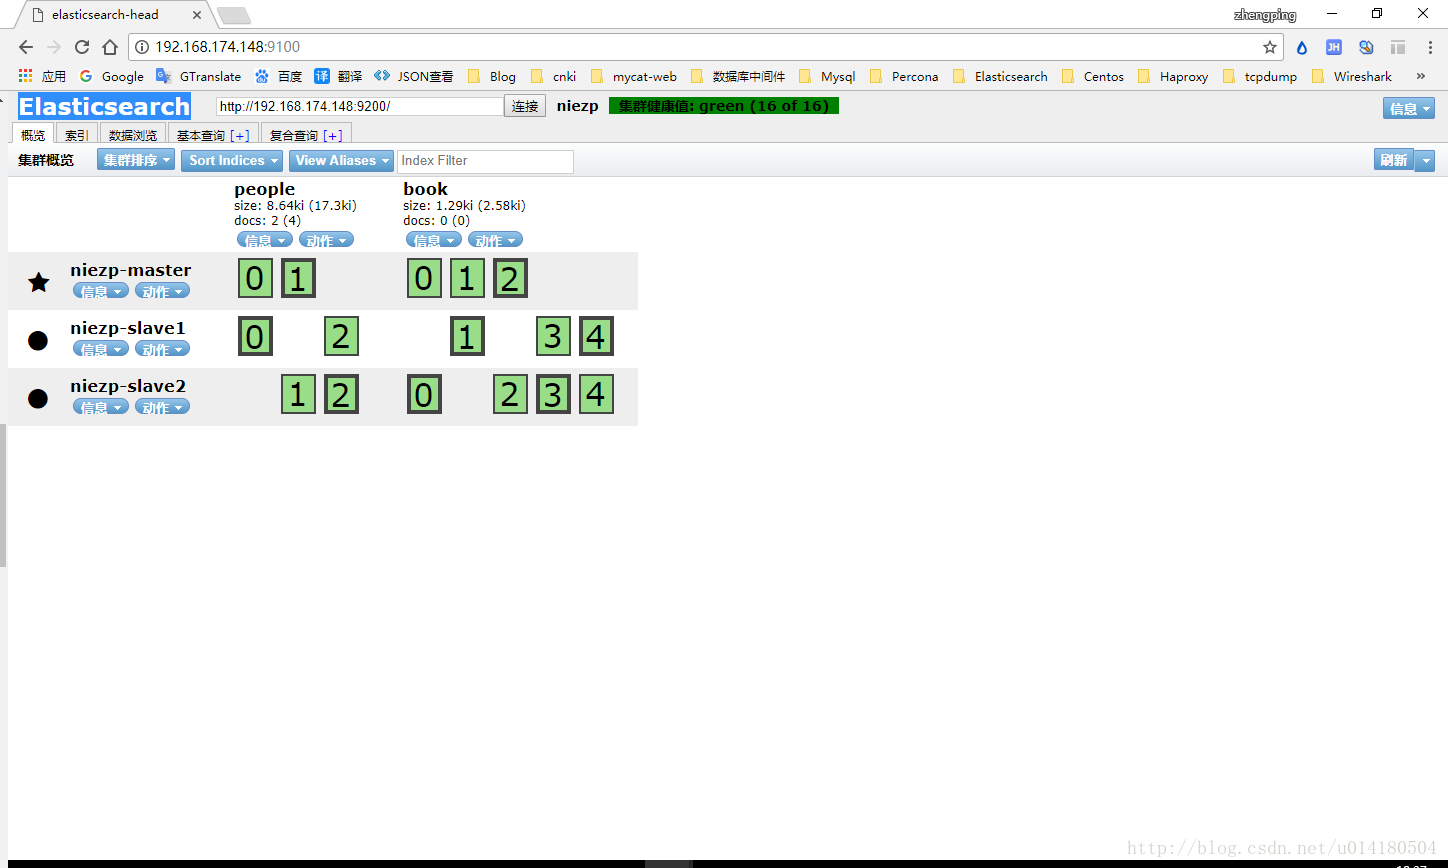
就已经搭建完成了集群