1、下载相关软件
1.1 下载memseg4j-solr
从https://github.com/chenlb/mmseg4j-solr/releases可以找到最新的版本(2.4.0),并且下面指出了其可以适配那些版本的solr(我选择6.3.0)
1.2 下载solr
从http://archive.apache.org/dist/lucene/solr/6.3.0/下载,windows选择solr-6.3.0.zip linux选择solr-6.3.0.tgz
2、linux上安装solr
执行如下命令:
tar -xf solr-6.3.0.tgz
cd solr-6.3.0/bin
./solr start

打开浏览器访问控制台

停止solr
./solr stop
3、练习1(创建云-自动)
3.1 启动solr云
启动云:./solr start -e cloud
单独启动某一个node:./solr start -c
停止云:./solr stop -all
单独停止某一个node:./solr stop -p 8983
对启动和停止命令详情可以使用./solr start -help ./solr stop -help
下面是启动colr云 example的交互界面,可以直接全部按enter键,直到出现成功提示。整个交互过程是说: 创建一个集群,集群包含两个接口,新建了一个连接gettingstarted,在两个节点之间为该连接做两个分片,每个分片有两个拷贝(故障恢复使用的)
[jionsvolk@localhost /home/jionsvolk/proc/solr-6.3.0/bin]$ ./bin/solr start -e cloud
-bash: ./bin/solr: No such file or directory
[jionsvolk@localhost /home/jionsvolk/proc/solr-6.3.0/bin]$ ./solr start -e cloud
Welcome to the SolrCloud example!
This interactive session will help you launch a SolrCloud cluster on your local workstation.
To begin, how many Solr nodes would you like to run in your local cluster? (specify 1-4 nodes) [2]:
Ok, let's start up 2 Solr nodes for your example SolrCloud cluster.
Please enter the port for node1 [8983]:
Please enter the port for node2 [7574]:
Creating Solr home directory /home/jionsvolk/proc/solr-6.3.0/example/cloud/node1/solr
Cloning /home/jionsvolk/proc/solr-6.3.0/example/cloud/node1 into
/home/jionsvolk/proc/solr-6.3.0/example/cloud/node2
Starting up Solr on port 8983 using command:
/home/jionsvolk/proc/solr-6.3.0/bin/solr start -cloud -p 8983 -s "/home/jionsvolk/proc/solr-6.3.0/example/cloud/node1/solr"
Waiting up to 180 seconds to see Solr running on port 8983 [\]
Started Solr server on port 8983 (pid=4329). Happy searching!
Starting up Solr on port 7574 using command:
/home/jionsvolk/proc/solr-6.3.0/bin/solr start -cloud -p 7574 -s "/home/jionsvolk/proc/solr-6.3.0/example/cloud/node2/solr" -z localhost:9983
Waiting up to 180 seconds to see Solr running on port 7574 [\]
Started Solr server on port 7574 (pid=4529). Happy searching!
Now let's create a new collection for indexing documents in your 2-node cluster.
Please provide a name for your new collection: [gettingstarted]
How many shards would you like to split gettingstarted into? [2]
How many replicas per shard would you like to create? [2]
Please choose a configuration for the gettingstarted collection, available options are:
basic_configs, data_driven_schema_configs, or sample_techproducts_configs [data_driven_schema_configs]
Connecting to ZooKeeper at localhost:9983 ...
Uploading /home/jionsvolk/proc/solr-6.3.0/server/solr/configsets/data_driven_schema_configs/conf for config gettingstarted to ZooKeeper at localhost:9983
Creating new collection 'gettingstarted' using command:
http://localhost:8983/solr/admin/collections?action=CREATE&name=gettingstarted&numShards=2&replicationFactor=2&maxShardsPerNode=2&collection.configName=gettingstarted
{
"responseHeader":{
"status":0,
"QTime":8934},
"success":{
"192.168.245.128:7574_solr":{
"responseHeader":{
"status":0,
"QTime":7130},
"core":"gettingstarted_shard1_replica1"},
"192.168.245.128:8983_solr":{
"responseHeader":{
"status":0,
"QTime":7604},
"core":"gettingstarted_shard1_replica2"}}}
Enabling auto soft-commits with maxTime 3 secs using the Config API
POSTing request to Config API: http://localhost:8983/solr/gettingstarted/config
{"set-property":{"updateHandler.autoSoftCommit.maxTime":"3000"}}
Successfully set-property updateHandler.autoSoftCommit.maxTime to 3000
SolrCloud example running, please visit: http://localhost:8983/solr3.2 重启solr云
使用./solr stop -all之后,如果要重启云还有点麻烦,需要一步步的操作,而且要记录下之前的端口,还得知道zookeeper的默认端口规则
./solr start -c -p 8983 -s ../example/cloud/node1/solr
./solr start -c -p 7574 -s ../example/cloud/node2/solr -z localhost:9983
zookeeper的默认端口为第一个接口的端口号+1000,如:9983=8983+1000
3.3 导入测试数据
在solr安装目录下的bin目录中执行命令:
./post -c gettingstarted ../example/exampledocs/*
gettingstarted是连接名字,必须和上面创建的连接名一致
执行完命令以后会打印一堆信息。。。。
/home/jionsvolk/proc/jdk1.8.0_65/bin/java -classpath /home/jionsvolk/proc/solr-6.3.0/dist/solr-core-6.3.0.jar -Dauto=yes -Dc=gettingstarted -Ddata=files org.apache.solr.util.SimplePostTool ../example/exampledocs/books.csv ../example/exampledocs/books.json ../example/exampledocs/gb18030-example.xml ../example/exampledocs/hd.xml ../example/exampledocs/ipod_other.xml ../example/exampledocs/ipod_video.xml ../example/exampledocs/manufacturers.xml ../example/exampledocs/mem.xml ../example/exampledocs/money.xml ../example/exampledocs/monitor2.xml ../example/exampledocs/monitor.xml ../example/exampledocs/more_books.jsonl ../example/exampledocs/mp500.xml ../example/exampledocs/post.jar ../example/exampledocs/sample.html ../example/exampledocs/sd500.xml ../example/exampledocs/solr-word.pdf ../example/exampledocs/solr.xml ../example/exampledocs/test_utf8.sh ../example/exampledocs/utf8-example.xml ../example/exampledocs/vidcard.xml
SimplePostTool version 5.0.0
Posting files to [base] url http://localhost:8983/solr/gettingstarted/update...
Entering auto mode. File endings considered are xml,json,jsonl,csv,pdf,doc,docx,ppt,pptx,xls,xlsx,odt,odp,ods,ott,otp,ots,rtf,htm,html,txt,log
POSTing file books.csv (text/csv) to [base]
POSTing file books.json (application/json) to [base]/json/docs
POSTing file gb18030-example.xml (application/xml) to [base]
POSTing file hd.xml (application/xml) to [base]
POSTing file ipod_other.xml (application/xml) to [base]
POSTing file ipod_video.xml (application/xml) to [base]
POSTing file manufacturers.xml (application/xml) to [base]
POSTing file mem.xml (application/xml) to [base]
POSTing file money.xml (application/xml) to [base]
POSTing file monitor2.xml (application/xml) to [base]
POSTing file monitor.xml (application/xml) to [base]
POSTing file more_books.jsonl (application/json) to [base]/json/docs
POSTing file mp500.xml (application/xml) to [base]
POSTing file post.jar (application/octet-stream) to [base]/extract
POSTing file sample.html (text/html) to [base]/extract
POSTing file sd500.xml (application/xml) to [base]
POSTing file solr-word.pdf (application/pdf) to [base]/extract
POSTing file solr.xml (application/xml) to [base]
POSTing file test_utf8.sh (application/octet-stream) to [base]/extract
POSTing file utf8-example.xml (application/xml) to [base]
POSTing file vidcard.xml (application/xml) to [base]
21 files indexed.
COMMITting Solr index changes to http://localhost:8983/solr/gettingstarted/update...
Time spent: 0:00:10.575
3.4 访问数据
### 1)在控制台访问:
默认不修改任何条件,如下图
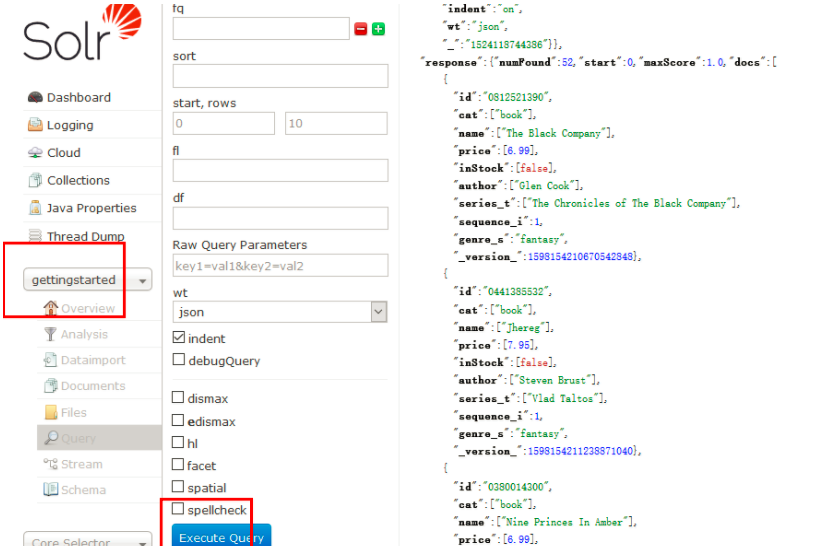
2)在浏览器中访问
http://192.168.245.128:8983/solr/gettingstarted/select?indent=on&q=*:*&wt=json
http://192.168.245.128:8983/solr/gettingstarted/select?indent=on&q=*:*&wt=xml
通过这两种方式其他应用就可以使用httpclient访问solr服务器获得查询结果
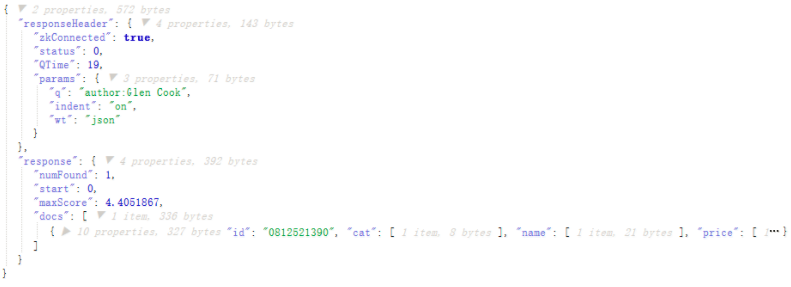
3)简单查询条件
http://192.168.245.128:8983/solr/gettingstarted/select?indent=on&q=author:Glen%20Cook&wt=json
http://192.168.245.128:8983/solr/gettingstarted/select?indent=on&q=\%Glen+20Cook\%22&wt=json
在代码时,如果第一种不行就换第二种
%20:空格的转移符
%22:英文双引号的转移符
意思为:在gettingstarted连接中查询字段为author,值含有Glen Cook的记录,返回结果是json格式
还可以使用*通配符
http://192.168.245.128:8983/solr/gettingstarted/select?indent=on&q=author:*Al*&wt=json
查询的就是所有author字段中包含Al字符串的记录
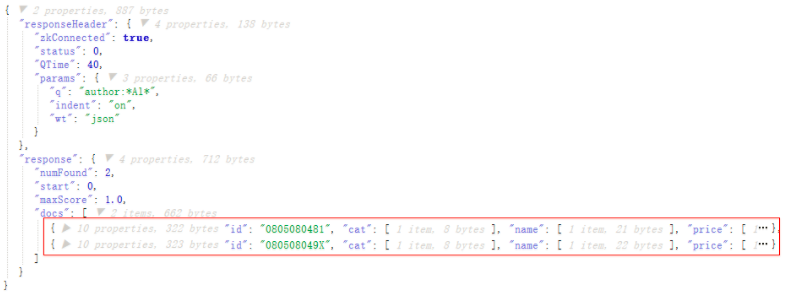
如果不指定字段名称,那么会检索所有字段和查询条件做匹配,然后返回结果,这种模式和搜索引擎就很像了
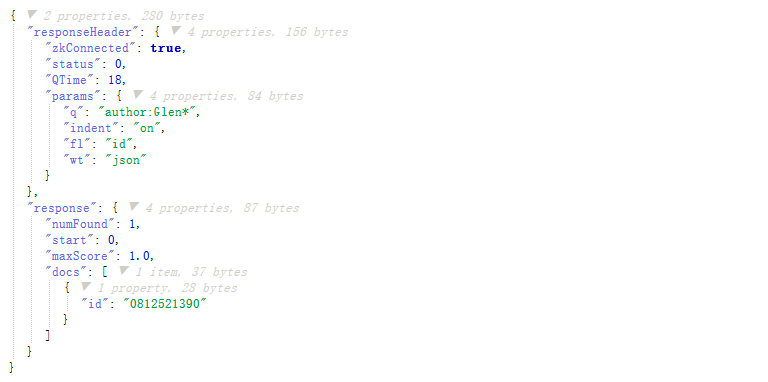
4)定制返回结果
solr默认返回所有字段,也可以指定返回的字段,例如:
http://192.168.245.128:8983/solr/gettingstarted/select?indent=on&q=author:Glen*&wt=json&fl=id
5)组合查询
-
不限定字段组合查询
-
在查询条件中增加关键字或者短语,在其前面加"+",转义后是"%2B",如:
http://192.168.245.128:8983/solr/gettingstarted/select?indent=on&q=%2Bbook%20%2BJhereg&wt=json
意思为查询某个字段值含有book和某个字段值含有Jhereg的记录
-
在查询条件中排出不需要的关键字或者短语,在其前面加"-",如
http://192.168.245.128:8983/solr/gettingstarted/select?indent=on&q=%2Bbook%20-Jhereg&wt=json
意思为查询某个字段值含有book和但所有字段值不含有Jhereg的记录
记住:一定要在多个条件中间加空格进行分隔**
也可以使用*通配符
http://192.168.245.128:8983/solr/gettingstarted/select?indent=on&q=%2BCanon*%20%2Bscanner*&wt=json
意思为查询某个字段值包含book,且某个字段值还包含scanner的记录
-
-
限定字段组合查询
组合方式的语法都一样,聚个例子综合说明一下
http://192.168.245.128:8983/solr/gettingstarted/select?indent=on&q=%2Bname:Canon*%20%2Bcat:scanner*&wt=json
意思为查询字段name的值包含Cannon,且字段cat的值包含scanner的记录
删除链接
bin/solr delete -c techproducts
4、练习2(创建云-手动)
## 4.1 手动创建
./solr create -c films -s 2 -rf 2
利用默认配置文件创建了一个连接为films,它包含两个shard,两个replica
在实际生产中不推荐使用默认配置文件,因为它有一定的局限性
默认配置文件是schemaless(无模式)的,它会根据自己的一套逻辑猜测文档中的字段可能的类型,但是solr可能猜错,如果数据小,那么还可以重新建立索引文件,如果数据量巨大,且之前的原始数据已经找不到,那么将会造成很严重的后果
solr提供了api修改默认schema配置文件,该配置文件不要手工去修改,以免造成不可恢复的故障。
4.2 添加字段
### 1)添加自定义字段
在films的默认配置中添加自定义name字段:
curl -X POST -H 'Content-type:application/json' --data-binary '{"add-field": {"name":"name", "type":"text_general", "multiValued":false, "stored":true}}' http://localhost:8983/solr/films/schema
还可以在浏览器控制台中添加:

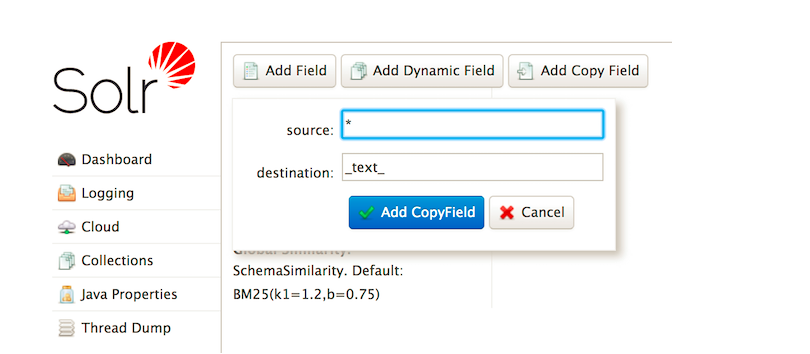
### 2)添加一个复制字段:
复制字段是给其他未设置的字段使用的规则,假如有一个未定义的字段gendor,那么solr在处理的时候就将使用复制字段的定义来操作数据
curl -X POST -H 'Content-type:application/json' --data-binary '{"add-copy-field" : {"source":"*","dest":"_text_"}}' http://localhost:8983/solr/films/schema
还可以在浏览器控制台中添加:
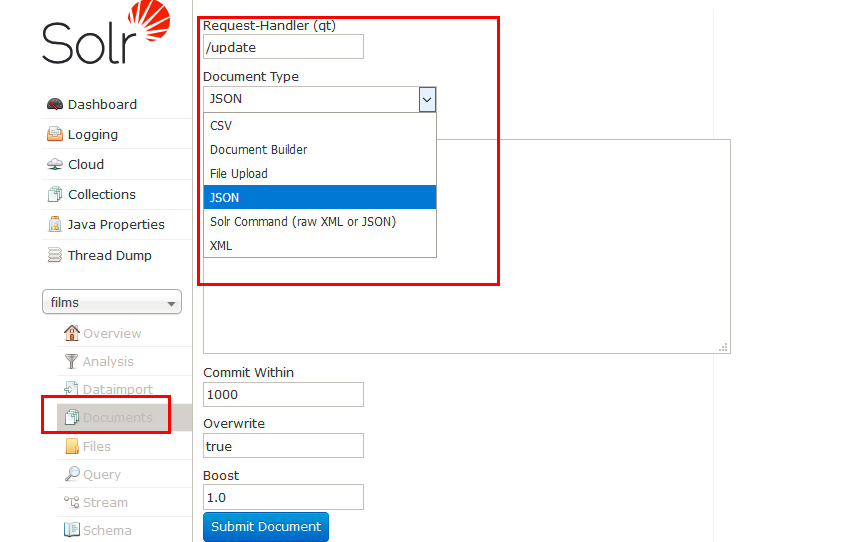
## 4.2 导入数据
命令导入各种数据文件:
./post -c films ../example/films/films.json
./post -c films ../example/films/films.xml
./post -c films ../example/films/films.csv -params "f.genre.split=true&f.directed_by.split=true&f.genre.separator=|&f.directed_by.separator=|"
也可以界面导入各种数据文件:
4.3 Faceting
### 4.3.1 Field-Facets
不知道怎么翻译这个词,感觉该功能很有用,有点类似数据库的group by + count功能
比如要统计字段genre的值在所有文档的genre字段值中出现的次数
命令:
http://192.168.245.128:8983/solr/films/select?q=*:*&rows=0&facet=true&facet.field=genre&wt=json
意思为:查询所有文档中genre字段中所有值分别出现的次数
还可以使用facet.prefix参数过滤返回结果,比如:
http://192.168.245.128:8983/solr/films/select?q=*:*&rows=0&facet=true&facet.field=genre&facet.prefix=D&wt=json
图形界面:
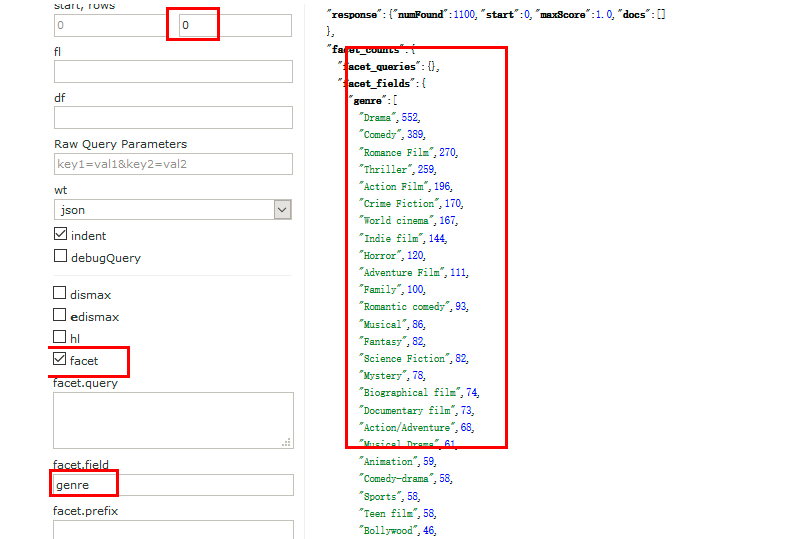
rows一定要设置为0,才会显示出统计结果
前面提到Faceting功能类似于Oracle的group by +count功能,如果在上面的查询参数中加上facet.mincount参数,则就类似于Oracle的group by + count + having count > xxx
http://192.168.245.128:8983/solr/films/select?q=*:*&rows=0&facet=true&facet.field=genre&facet.prefix=D&facet.mincount=50&wt=json
这条语句的意思就是:只返回count>50的结果
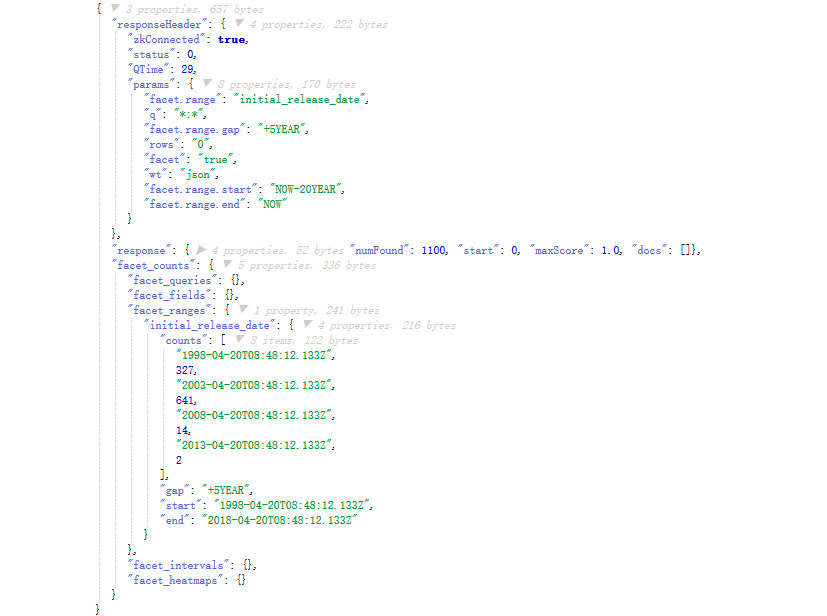
4.3.2 Range-Facets
按范围进行分组计算,计算支持数字和日期两种数据类型
-
日期
时间间隔支持YEAR MONTH DAY HOUR SECONDS MINUTES
命令:(浏览器控制台不支持该种查询):
http://192.168.245.128:8983/solr/films/select?q=*:*&rows=0&facet=true&facet.range=initial_release_date&facet.range.start=NOW-20YEAR&facet.range.end=NOW&facet.range.gap=%2B5YEAR&wt=json
-
数字
举例,命令:
http://192.168.245.128:8983/solr/gettingstarted/select?q=*:*&rows=0&facet=true&facet.range=price&facet.range.start=0&facet.range.end=1000&facet.range.gap=%2B100&wt=json

4.3.3 Pivot (Decision Tree) Faceting
4.3.4 Interval Faceting
4.3.5 Local Parameters for Faceting
5、solrj练习
5.1 查询数据
@Test
public void test1() throws Exception {
final String solrUrl = "http://192.168.245.128:8983/solr";
HttpSolrClient client = new HttpSolrClient(solrUrl);
client.setConnectionTimeout(10000);
client.setSoTimeout(60000);
final Map<String, String> queryParamMap = new HashMap<String, String>();
queryParamMap.put("q", "*:*");
queryParamMap.put("fl", "id, name");
queryParamMap.put("sort", "id asc");
queryParamMap.put("rows", "100");
MapSolrParams queryParams = new MapSolrParams(queryParamMap);
final QueryResponse response = client.query("gettingstarted", queryParams);
final SolrDocumentList documents = response.getResults();
System.out.println("Found " + documents.getNumFound() + " documents");
for(SolrDocument document : documents) {
final String id = (String) document.getFirstValue("id");
final String name = (String) document.getFirstValue("name");
System.out.println("id: " + id + "; name: " + name);
}
}5.2 添加文档到solr
@Test
public void test2() throws Exception {
final String solrUrl = "http://192.168.245.128:8983/solr";
HttpSolrClient client = new HttpSolrClient(solrUrl);
final SolrInputDocument doc = new SolrInputDocument();
doc.addField("id", UUID.randomUUID().toString());
doc.addField("myname", "梅西又当爹了,儿子还叫C罗");
final UpdateResponse updateResponse = client.add("myConn", doc);
//NamedList<?> ns = updateResponse.getResponse();
// Indexed documents must be committed
client.commit("myConn");
}5.3 测试自定义类型的分词结果
因为使用的是solrcould,你在主机上找不到对应的manage-schema.xml文件(如果是非云,那么是schema.xml),需要利用命令从zookeeper中将配置文件down下来
导出配置文件
./solr zk downconfig -z 192.168.245.128:9983 -n myConn -d /home/jionsvolk/proc/solr-6.3.0/conf
--myConn是你自己core或者connection
编辑配置文件
将如下内容添加到manage-schema中
<fieldtype name="textComplex" class="solr.TextField" positionIncrementGap="100">
<analyzer>
<tokenizer class="com.chenlb.mmseg4j.solr.MMSegTokenizerFactory" mode="complex" dicPath="dic"/>
</analyzer>
</fieldtype>
<fieldtype name="textMaxWord" class="solr.TextField" positionIncrementGap="100">
<analyzer>
<tokenizer class="com.chenlb.mmseg4j.solr.MMSegTokenizerFactory" mode="max-word" />
</analyzer>
</fieldtype>
<fieldtype name="textSimple" class="solr.TextField" positionIncrementGap="100">
<analyzer>
<tokenizer class="com.chenlb.mmseg4j.solr.MMSegTokenizerFactory" mode="simple"/>
</analyzer>
</fieldtype>
<!-- myname是document对象中的字段名,表示doc中myname使用textComplex字段类型,该类型使用mmseg4j中文分词器,indexed=true 表示需要建立索引 stored=true 表示需要存储到索引文件中 -->
<field name="myname" type="textComplex" indexed="true" stored="true"></field>
上传配置文件
./solr zk upconfig -z 192.168.245.128:9983 -n myConn -d /home/jionsvolk/proc/solr-6.3.0/conf/conf
测试代码:
@Test
public void test3() throws Exception {
final String solrUrl = "http://192.168.245.128:8983/solr/myConn";
HttpSolrClient client = new HttpSolrClient(solrUrl);
FieldAnalysisRequest request = new FieldAnalysisRequest();
request.addFieldName("myname");// 字段名,随便指定一个支持中文分词的字段
request.setFieldValue("");// 字段值,可以为空字符串,但是需要显式指定此参数
request.setQuery("字段名,随便指定一个支持中文分词的字段");
FieldAnalysisResponse response = request.process(client);
Iterator<AnalysisPhase> it = response.getFieldNameAnalysis("myname").getQueryPhases().iterator();
while(it.hasNext()) {
AnalysisPhase pharse = (AnalysisPhase)it.next();
List<TokenInfo> list = pharse.getTokens();
for (TokenInfo info : list) {
System.out.println(info.getText());
}
}
}测试截图

如果自己的文档字段很多,且都需要索引,可以定义一个动态字段进行匹配,这样就不用再每个字段都在manage-schema中进行定义。
如:
<dynamicField name="*_mytxt" type="textComplex" indexed="true" stored="true"/>
只要你在构造对象的时候,属性名字是以_mytxt结尾,就会按照“textComplex”进行处理