1. 简单模式
1.1 图示
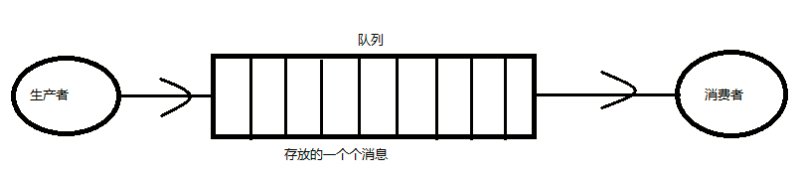
从图上看,和JDK本身一样,生产者往队列添加数据,消费者从队列拿数据,如果业务场景确实这么简单,还可以使用redis的集合来代替,减少整个系统的复杂度,系统越简单问题越少
1.2 测试代码
public class RabbitMQ { Logger logger = LoggerFactory.getLogger(RabbitMQ.class); private ConnectionFactory factory; // 初始化连接工厂 @Before public void init() { factory = new ConnectionFactory(); // 设置相关参数 factory.setHost("192.168.245.128"); factory.setPort(5672); factory.setVirtualHost("/jt"); factory.setUsername("admin"); factory.setPassword("12340101"); } @Test public void simpleSend() throws Exception { // 1.获取连接 Connection conn = factory.newConnection(); // 2.从连接获取信道 Channel channel = conn.createChannel(); // 3.利用channel声明一个队列 /* queue 表示声明的queue对列的名字 durable 表示是否持久化 exclusive 表示当前声明的queue是否被当前信道独占 true:当前连接创建的任何channel都可以连接该queue false:只有当前channel可以连接该queue autoDelete Boolean类型:在最后连接使用完成后,是否删除队列,false arguments 其他声明参数封装到map中传递给mq */ channel.queueDeclare("simple", false, false, false, null); // 4.发送消息 /* exchange 交换机名称,简单模式使用默认交换,该值设置为"" routingkey 当前的消息绑定的routingkey,简单模式下,与队列同名即可 props 消息的属性字段对象,例如BasicProperties,可以设置一个deliveryMode的值0 持久化,1 表示不持久化,durable配合使用 body 消息字符串的byte数组 */ channel.basicPublish("", "simple", null, "简单模式的消息发送".getBytes()); } @Test public void simpleReciever() throws Exception { // 1.获取连接 Connection conn = factory.newConnection(); // 2.获取信道 Channel channel = conn.createChannel(); // 3.绑定队列 channel.queueDeclare("simple", false, false, false, null); // 4.创建一个消费者 QueueingConsumer consumer = new QueueingConsumer(channel); // 5.绑定消费者和队列 channel.basicConsume("simple", consumer); // 6.获取消息 while(true) { Delivery delivery = consumer.nextDelivery(); String msg=new String(delivery.getBody()); System.out.println(msg); } } }
2. 工作模式
2.1 图示
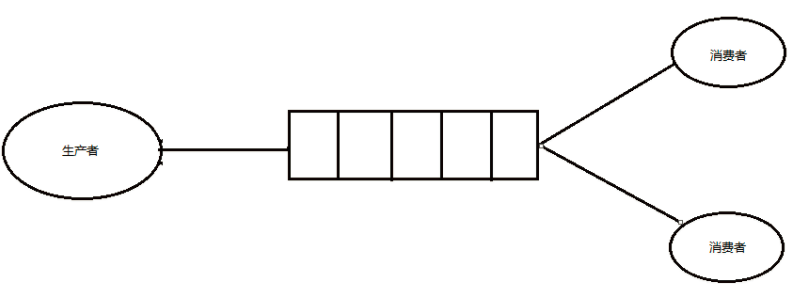
一个队列由多个消费者共享,如果消费者处理速度落后于生产者,可以不断扩充消费,提高消息的处理能力
2.2 测试代码
@Test
    public void workSender() throws Exception{
        Connection conn = factory.newConnection();
        Channel channel = conn.createChannel();
        channel.queueDeclare("work", false, false, false, null);

        for(int i=0;i<100;i++) {
            channel.basicPublish("", "work", null, ("工作模式发送的第 ("+i+") 个消息").getBytes());
        }
    }
    @Test
    public void workReceiver_a() throws Exception{
        Connection conn = factory.newConnection();
        Channel channel = conn.createChannel();
        channel.queueDeclare("work", false, false, false, null);

        channel.basicQos(1);
        QueueingConsumer consumer = new QueueingConsumer(channel);
        //其中第二参数表示消费者接收消息后是否自动返回回执
        channel.basicConsume("work", false, consumer);

        while(true) {
            Delivery delivery = consumer.nextDelivery();
            String msg=new String(delivery.getBody());
            logger.info(msg);
            Thread.sleep(50);
            //手动发送回执
            channel.basicAck(delivery.getEnvelope().getDeliveryTag(), false);
        }
    }
    @Test
    public void workReceiver_b() throws Exception{
        Connection conn = factory.newConnection();
        Channel channel = conn.createChannel();
        channel.queueDeclare("work", false, false, false, null);

        channel.basicQos(1);
        QueueingConsumer consumer = new QueueingConsumer(channel);
        //其中第二参数表示消费者接收消息后是否自动返回回执
        channel.basicConsume("work", false, consumer);

        while(true) {
            Delivery delivery = consumer.nextDelivery();
            String msg=new String(delivery.getBody());
            logger.info(msg);
            Thread.sleep(100);
            //手动发送回执
            channel.basicAck(delivery.getEnvelope().getDeliveryTag(), false);
        }
    }
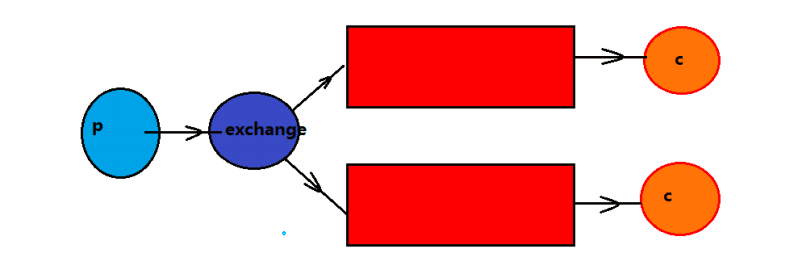
3. 订阅发布模式
3.1 图示

生产者将消息发送交换机,交换机在将消息发给N个队列,消费者连到响应队列取消息即可,此功能比较适合将某单一系统的简单业务数据消息广播给所有接口
3.2 测试代码
@Test public void fanoutSender() throws Exception { Connection conn = factory.newConnection(); Channel channel = conn.createChannel(); // 创建交换机 /* * 参数: * Exchange: 自定义交换机名称,接受端声明交换机的名字需和它保持一致 * type: 交换机类型,取值范围(fanout(订阅/发布),direct(路由模式),topic(主题)) */ channel.exchangeDeclare("fanoutEx", "fanout"); // 发送消息 for (int i = 0; i < 100; i++) { channel.basicPublish("fanoutEx", "", null, ("订阅/发布模式发送的第 (" + i + ") 个消息").getBytes()); } } @Test public void fanoutReceiver() throws Exception { Connection conn = factory.newConnection(); Channel channel = conn.createChannel(); //创建队列 channel.queueDeclare("fanout", false, false, false, null); //创建交换机 channel.exchangeDeclare("fanoutEx", "fanout"); //绑定队列和交换机 channel.queueBind("fanout", "fanoutEx", ""); channel.basicQos(1); //创建消费者 QueueingConsumer consumer = new QueueingConsumer(channel); //绑定消费者和队列 channel.basicConsume("fanout", consumer); //取数据 while(true) { Delivery delivery = consumer.nextDelivery(); logger.info(new String(delivery.getBody())); // 手动发送回执 channel.basicAck(delivery.getEnvelope().getDeliveryTag(), false); } }
4. 路由模式
4.1 图示
4.2 测试代码
@Test public void routingSender() throws Exception { Connection conn = factory.newConnection(); Channel channel = conn.createChannel(); // 创建交换机 /* * 参数: * Exchange: 自定义交换机名称,接受端声明交换机的名字需和它保持一致 * type: 交换机类型,取值范围(fanout(订阅/发布),direct(路由模式),topic(主题)) */ channel.exchangeDeclare("directEx", "direct"); // 发送消息 for (int i = 0; i < 100; i++) { channel.basicPublish("directEx", "receiver_b", null, ("路由模式发送的第 (" + i + ") 个消息").getBytes()); } } @Test public void routingReceiver_a() throws Exception{ Connection conn = factory.newConnection(); Channel channel = conn.createChannel(); //创建队列 channel.queueDeclare("direct_a", false, false, false, null); //创建交换机 channel.exchangeDeclare("directEx", "direct"); //绑定队列和交换机 channel.queueBind("direct_a", "directEx", "receiver_a"); channel.basicQos(1); //创建消费者 QueueingConsumer consumer = new QueueingConsumer(channel); //绑定消费者和队列 channel.basicConsume("direct_a", consumer); //取数据 while(true) { Delivery delivery = consumer.nextDelivery(); logger.info(new String(delivery.getBody())); // 手动发送回执 channel.basicAck(delivery.getEnvelope().getDeliveryTag(), false); } } @Test public void routingReceiver_b() throws Exception{ Connection conn = factory.newConnection(); Channel channel = conn.createChannel(); //创建队列 channel.queueDeclare("direct_b", false, false, false, null); //创建交换机 channel.exchangeDeclare("directEx", "direct"); //绑定队列和交换机 channel.queueBind("direct_b", "directEx", "receiver_b"); channel.basicQos(1); //创建消费者 QueueingConsumer consumer = new QueueingConsumer(channel); //绑定消费者和队列 channel.basicConsume("direct_b", consumer); //取数据 while(true) { Delivery delivery = consumer.nextDelivery(); logger.info(new String(delivery.getBody())); // 手动发送回执 channel.basicAck(delivery.getEnvelope().getDeliveryTag(), false); } }
两个消费者,可以更改生产者的routingKey观察消费者获取数据的变化。从观察结果可以看到,生产者的routingKey和消费者指定的routingKey完全一致,消费者才能拿到消息
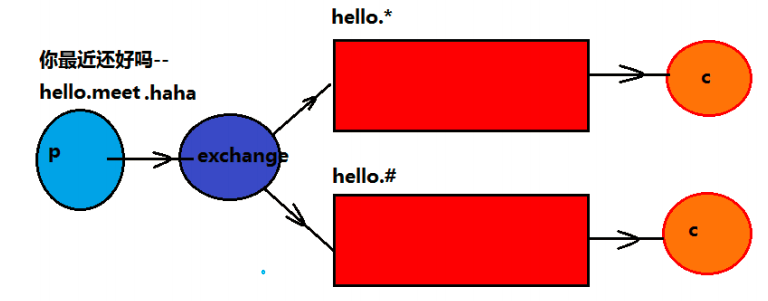
5. 主题模式
5.1 图示
5.2 测试代码
@Test public void topicSender() throws Exception { Connection conn = factory.newConnection(); Channel channel = conn.createChannel(); // 创建交换机 /* * 参数: * Exchange: 自定义交换机名称,接受端声明交换机的名字需和它保持一致 * type: 交换机类型,取值范围(fanout(订阅/发布),direct(路由模式),topic(主题)) */ channel.exchangeDeclare("topicEx", "topic"); // 发送消息 for (int i = 0; i < 100; i++) { channel.basicPublish("topicEx", "acct.save", null, ("主题模式发送的第 (" + i + ") 个消息").getBytes()); } } @Test public void topicReceiver_a() throws Exception{ Connection conn = factory.newConnection(); Channel channel = conn.createChannel(); //创建队列 channel.queueDeclare("topic_a", false, false, false, null); //创建交换机 channel.exchangeDeclare("topicEx", "topic"); //绑定队列和交换机 channel.queueBind("topic_a", "topicEx", "acct.save"); channel.basicQos(1); //创建消费者 QueueingConsumer consumer = new QueueingConsumer(channel); //绑定消费者和队列 channel.basicConsume("topic_a", consumer); //取数据 while(true) { Delivery delivery = consumer.nextDelivery(); logger.info(new String(delivery.getBody())); // 手动发送回执 channel.basicAck(delivery.getEnvelope().getDeliveryTag(), false); } } @Test public void topicReceiver_b() throws Exception{ Connection conn = factory.newConnection(); Channel channel = conn.createChannel(); //创建队列 channel.queueDeclare("topic_b", false, false, false, null); //创建交换机 channel.exchangeDeclare("topicEx", "topic"); //绑定队列和交换机 //channel.queueBind("topic_b", "topicEx", "acct.update"); channel.queueBind("topic_b", "topicEx", "acct.*"); channel.basicQos(1); //创建消费者 QueueingConsumer consumer = new QueueingConsumer(channel); //绑定消费者和队列 channel.basicConsume("topic_b", consumer); //取数据 while(true) { Delivery delivery = consumer.nextDelivery(); logger.info(new String(delivery.getBody())); // 手动发送回执 channel.basicAck(delivery.getEnvelope().getDeliveryTag(), false); } }
主题模式从使用上看,就是支持ANT,用*代表一个词,#代表多个词,否则就是精确匹配,感觉路由模式就是特殊的主题模式(没有使用ANT的通配符),具体原理现在还没去研究,先用起来再说
6. SpringBoot整合
6.1 测试代码
application.properties中新增的配置项
spring.rabbitmq.host=192.168.245.128
spring.rabbitmq.port=5672
spring.rabbitmq.username=acct
spring.rabbitmq.password=acct
spring.rabbitmq.virtualHost=/rbAcct
spring.rabbitmq.publisher-confirms=true
Java代码
RabbitConfigBean:创建交换机、队列、绑定队列与交换机、指定路由值
TestController:模拟生产者发送数据
RabbitClient:模拟消费者拿数据
package com.jv.rabbitmq.config; import org.springframework.amqp.core.Binding; import org.springframework.amqp.core.BindingBuilder; import org.springframework.amqp.core.DirectExchange; import org.springframework.amqp.core.Queue; import org.springframework.context.annotation.Bean; import org.springframework.context.annotation.Configuration; @Configuration public class RabbitConfigBean { //整合rabbitmq的配置,以路由模式为例 //1声明direct类型的交换机 @Bean public DirectExchange defaultExchange(){ return new DirectExchange("testEx"); } //2声明队列 @Bean public Queue queue01(){ return new Queue("testQueue1", true); } //3 绑定交换机与队列的关系,并且指定路由key @Bean public Binding binding01(){ return BindingBuilder.bind(queue01()).to(defaultExchange()). with("hello1"); } @Bean public Queue queue02(){ return new Queue("testQueue2", true); } @Bean public Binding binding02(){ return BindingBuilder.bind(queue02()).to(defaultExchange()). with("hello2"); } }
package com.jv.rabbitmq.controller; import org.springframework.amqp.rabbit.core.RabbitTemplate; import org.springframework.beans.factory.annotation.Autowired; import org.springframework.web.bind.annotation.RequestMapping; import org.springframework.web.bind.annotation.RestController; @RestController public class TestController { @Autowired private RabbitTemplate template; @RequestMapping("/test") public String test() { /* * 在实际开发中,应该把RabbitTemplate注入到Service中,将写数据库等耗时的操作接队列的消费者,提高前台响应速度 * * 当然还需要考虑到业务场景,如果出现临界,数据半天没有入库,其他地方查不到会不会导致投诉等 */ template.convertAndSend("testEx", "hello1", "梅西生了三个男娃儿,巴萨欧冠出局,曼联也出局,靠"); template.convertAndSend("testEx", "hello2", "C罗进球数后来居上,皇马在欧冠差点被尤文翻盘,悬啊"); return "hello world!"; } }
package com.jv.rabbitmq.client; import org.springframework.amqp.rabbit.annotation.RabbitListener; import org.springframework.stereotype.Component; @Component public class RabbitClient { @RabbitListener(queues="testQueue1") public void process01(String msg) throws Exception{ System.out.println("接收到的消息是:"+msg); } @RabbitListener(queues="testQueue2") public void process02(String msg){ System.out.println("接收到的消息是:"+msg); } }
SpringBoot用起来确实很爽,redis\httpclient等第三方工具都进行了封装,只需要配置相关属性,在你的Controller和Service注入特定对象即可操作数据了