博客出处:http://technotif.com/rooting-locked-boot-loader/
When the boot loader is locked, and the manufacturer doesn’t provide a legitimate method to unlock it, you usually need to find a flaw in the device that will serve as an entry point for rooting it.
First you need to identify which type of boot loader lock you have; it can vary depending on the manufacturer, carrier, device variant, or software version within the same device. Sometimes, fastboot access is forbidden but you can still flash using the manufacturer’s proprietary flashing protocol, such as Motorola SBF or Samsung ODIN. Sometimes signature checks on the same device are enforced differently when using fastboot instead of the manufacturer’s proprietary download mode. Signature checking can happen at boot time, at flashing time, or both.
Some locked boot loaders only enforce signature verification on selected partitions; a typical example is having locked boot and recovery partitions. In this case booting a custom kernel or a modified recovery image is not allowed, but you can still modify the system partition. In this scenario, you can perform rooting by editing the system partition of a stock image as described in the “Rooting with an Unlocked Boot Loader” section.
On some devices, where the boot partition is locked and booting a custom kernel is forbidden, it is possible to flash a custom boot image in the recovery partition and boot the system with the custom kernel by booting in recovery mode when powering on the phone. In this case, it is possible to get root access through adb shell by modifying the default.prop file of the custom boot image initrd, as you’ll see in the “Abusing adbd to Get Root” section. On some devices, the stock recovery image allows applying updates signed with the default Android test key. This key is a generic key for packages that do not otherwise specify a key. It is included in the build/target/product/security directory in the AOSP source tree. You can root by applying a custom update package containing the su binary. It is unknown whether the manufacturer has left this on purpose or not, but this is known to work on some Samsung devices with Android 4.0 and stock recovery 3e.
In the worst-case scenario, boot loader restrictions won’t allow you to boot with a partition that fails signature verification. In this case, you have to use other techniques to achieve root access.
Gaining Root on a Booted System
Gaining initial root access on a booted system consists of getting a root shell through an unpatched security flaw in the Android operating system. A rooting method like this is also widely known as a soft root because the attack is almost entirely software based. Usually, a soft root is accomplished through a vulnerability in the Android kernel, a process running as root, a vulnerable program with the set-uid bit set, a symbolic link attack against a file permission bug, or other issues. There are a vast number of possibilities due to the sheer number of areas in which issues could be introduced and types of mistakes programmers could make.
Although root set-uid or set-gid binaries are not common in stock Android, carriers or device manufacturers sometimes introduce them as part of their custom modifications. A typical security flaw in any of these set-uid binaries can lead to privilege escalation and subsequently yield root access.
Another typical scenario is exploiting a security vulnerability in a process running with root privileges. Such an exploit enables you to execute arbitrary code as root.
These exploits are becoming more difficult to develop as Android matures. New mitigation techniques and security hardening features are regularly introduced with new Android releases.
Abusing adbd to Get Root
It is important to understand that the adbd daemon will start running as root and drop its privileges to the shell user (AID_SHELL) unless the system property ro.secure is set to 0. This property is read-only and is usually set to ro.secure=1 by the boot image initrd.
The adbd daemon will also start as root without dropping privileges to shell if the property ro.kernel.qemu is set to 1 (to start adbd running as root on the Android emulator), but this is also a read-only property that will not normally be set on a real device.
Android versions before 4.2 will read the /data/local.prop file on boot and apply any properties set in this file. As of Android 4.2 this file will only be read on non-user builds, if ro.debuggable is set to 1. The /data/local.prop file and the ro.secure and ro.kernel.qemu properties are of key importance for gaining root access.
NAND Locks, Temporary Root, and Permanent Root
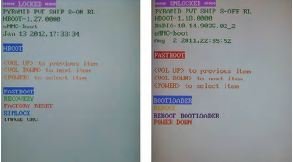
Some HTC devices have a security flag (@secuflag) in the radio Non-Volatile Random Access Memory (NVRAM) which is checked by the device boot loader (HBOOT). When this flag is set to “true” the boot loader displays a “security on” message (S-ON) and a NAND lock is enforced. The NAND lock prevents writing to the system, boot, and recovery partitions. With S-ON, a reboot loses root, and writes on these partitions won’t stick. This makes custom system ROMs, custom kernels, and custom recovery modifications impossible.
It is still possible to gain root access through an exploit for a sufficiently severe vulnerability. However, the NAND lock causes any changes to be lost on reboot. This is known as a temporary root in the Android modding community.
To achieve a permanent root on HTC devices with a NAND lock, one of two things must be done. First, you can disable the security flag in the baseband. Second, you can flash the device with a patched or engineering HBOOT that does not enforce NAND locking. In both cases, the boot loader displays a security off message (S-OFF). Image below shows a locked and unlocked HTC HBOOT.
Before HTC provided the official boot loader unlock procedure in August 2011, a patched HBOOT was the only solution available. This could be accomplished on some devices by unofficial boot loader unlock tools such as AlphaRev (available at http://alpharev.nl/) and Unrevoked (available at http://unrevoked .com/), which later merged into the Revolutionary.io tool (available at http:// revolutionary.io/). Those tools usually combine multiple public or private exploits to be able to flash the patched boot loader and bypass NAND locks. In most cases, reflashing a stock HBOOT re-enables the device security flag (S-ON).
The Unlimited.io exploits available at http://unlimited.io/, such as JuopunutBear, LazyPanda, and DirtyRacun, allow gaining full radio S-OFF on some devices by combining several exploits present in HTC’s Android ROMs and the device’s baseband.
In December 2010, Scott Walker published the gfree exploit available at https:// github.com/tmzt/g2root-kmod/tree/master/scotty2/gfree under the GPL3 license. This exploit disabled the embedded MultiMediaCard (eMMC) protection of the T-Mobile G2. The eMMC memory, which holds the baseband partition, is booted in read-only mode when the bootloader initializes the hardware. The exploit then power-cycles the eMMC chip by using a Linux kernel module and sets the @secuflag to false. Finally, it installs a MultiMediaCard (MMC) block request filter in the kernel to remove the write protection on the hidden radio settings partition.
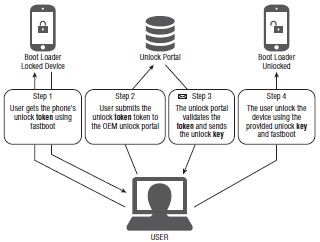
When HTC started its official unlock portal, it provided HBOOT images for some devices which allow the user to unlock the boot loader—and remove NAND locks—in two steps:
- First the user should run the command fastboot oem get_identifier_ token. The boot loader displays a blob that the user should submit to HTC’s unlock portal.
- After submitting the identifier token, the user receives an Unlock_code .bin file unique for his phone. This file is signed with HTC’s private key and should be flashed to the device using the command fastboot flash unlocktoken Unlock_code.bin.
If the Unlock_code.bin file is valid, the phone allows using the standard fastboot flash commands to flash unsigned partition images. Further, it enables booting such unsigned partition images without restrictions. Image below depicts the general workflow for unlocking devices. HTC and Motorola are two OEMs that utilize this type of process.
Other devices, such as some Toshiba tablets, also have NAND locks. For those devices, the locks are enforced by the sealime Loadable Kernel Module, which resides in the boot image initrd. This module is based on SEAndroid and prevents remounting the system partition for writing.
Persisting a Soft Root
When you have a root shell (soft root), achieving permanent root access is straightforward. On phones without NAND locks, you only need write access to the system partition. If the phone has a NAND lock, it should be removed first.
With NAND locks out of the picture, you can simply remount the system partition in read/write mode, place an su binary with set-uid root permissions, and remount it in read-only mode again; optionally, you can install an su wrapper such as SuperUser or SuperSU.
A typical way of automating the process just described is by running the following commands from a host computer connected to an Android device with USB debugging enabled:
adb shell mount -o remount,rw /system
adb adb push su /system/xbin/su
adb shell chown 0.0 /system/xbin/su
adb shell chmod 06755 /system/xbin/su
adb shell mount -o remount,ro /system
adb install Superuser.apk
Another way of retaining persistent root access is by writing a custom recovery into the recovery partition using the dd command on the Android device. This is equivalent to flashing a custom recovery via fastboot or download mode, as described in the “Rooting with an Unlocked Boot Loader” section earlier.
First, you need to identify the location of the recovery partition on the device. For example:
shell@android:/ # ls -l /dev/block/platform/*/by-name/recovery
lrwxrwxrwx root root 2012-11-20 14:53 recovery -> /dev/block/mmcblk0p7
The preceding output shows the recovery partition in this case is located at /dev/block/mmcblk0p7.
You can now push a custom recovery image onto the SD card and write it to the recovery partition:
adb shell push custom-recovery.img /sdcard/
adb shell dd if=/sdcard/custom-recovery.img of=/dev/block/mmcblk0p7
Finally, you need to reboot into the custom recovery and apply the su update package.
adb reboot recovery