通过上一节的讲解呢我们大致对Android测量控件有个初步的了解,而此后呢也有不少盆友Q小窗我问了不少问题,不过其实这些问题大多都不是问题,至于到底是不是问题呢,还要等我研究下究竟可不可以把这些问题归为问题……稍等、我吃个药先。大多数盆友的反应是在对控件测量的具体方法还不是很了解,不过不要着急,上一节的内容就当饭前甜点,接下来我们会用一个例子来说明这一切不是问题的问题,这个例子中的控件呢我称其为SquareLayout,意为方形布局(注:该例子仅作演示,实际应用意义并不大),我们将置于该布局下的所有子元素都强制变为一个正方形~~说起简单,但是如我上一节所说控件的设计要尽可能考虑到所有的可能性才能趋于完美~~但是没有绝对的完美……在5/12时我曾说过不要将自己当作一个coder而要把自己看成一个designer,控件是我们设计出来的而不是敲出来的,在我们code之前就该对这个控件有一个较为perfect的design,考虑到控件的属性设计、行为设计、交互设计等等,这里呢我也对我们的SquareLayout做了一个简单的设计:

非常简单,如上我们所说,SquareLayout内部的子元素都会以正方形的形状显示,我们可以给其定义一个orientation属性来表示子元素排列方式,如上是orientation为横向时的排列方式,而下面则是纵向的排列方式:

指定了排列方式后我们的子元素就会以此为基准排列下去,但是如果子元素超出了父容器的区域怎么办呢?这时我们可以指定两种处理方式:一、不管,任由子元素被父容器的边距裁剪;二、强制被裁剪的子元素舍弃其原有布局重新布局。暂时我们先默认第一种吧。接着看,如果我们的子元素只能是横着一排或竖着一排着实单调,我们可以考虑定义两个属性控制其最大排列个数,比如纵向排列时,我们可以指定一个max_row属性,当排列的行数超过该值时自动换列:

当然我们也可以在子元素横向排列时为其指定max_column属性,当横向排列列数超过该值时自动换行:

仔细想想,当max_column为1时,我们的排列方式其实就是纵向的而当max_row为1时就是横向的,那么我们的orientation属性岂不是成了摆设?会不会呢?留给各位去想。好吧、暂时就先定义这俩属性,光这俩已经够折腾的了,来来来创建我们的布局:
-
/** -
* -
* @author AigeStudio {@link http://blog.csdn.net/aigestudio} -
* @since 2015/1/23 -
* -
*/ -
public class SquareLayout extends ViewGroup { -
private int mMaxRow;// 最大行数 -
private int mMaxColumn;// 最大列数 -
private int mOrientation;// 排列方向 -
public SquareLayout(Context context, AttributeSet attrs) { -
super(context, attrs); -
} -
@Override -
protected void onLayout(boolean changed, int l, int t, int r, int b) { -
} -
}
上一节我们曾说过,要让我们父容器下子元素的margins外边距能够被正确计算,我们必需重写父容器的三个相关方法并返回一个MarginLayoutParams的子类:
-
/** -
* -
* @author AigeStudio {@link http://blog.csdn.net/aigestudio} -
* @since 2015/1/23 -
* -
*/ -
public class SquareLayout extends ViewGroup { -
// 省去各种蛋疼的成员变量………… -
// 省去构造方法………… -
// 省去onLayout方法………… -
@Override -
protected LayoutParams generateDefaultLayoutParams() { -
return new MarginLayoutParams(ViewGroup.LayoutParams.MATCH_PARENT, ViewGroup.LayoutParams.MATCH_PARENT); -
} -
@Override -
protected android.view.ViewGroup.LayoutParams generateLayoutParams(android.view.ViewGroup.LayoutParams p) { -
return new MarginLayoutParams(p); -
} -
@Override -
public android.view.ViewGroup.LayoutParams generateLayoutParams(AttributeSet attrs) { -
return new MarginLayoutParams(getContext(), attrs); -
} -
}
这里我直接返回一个MarginLayoutParams的实例对象,因为我不需要在LayoutParams处理自己的逻辑,单纯地计算margins就没必要去实现一个自定义的MarginLayoutParams子类了,除此之外,你还可以重写checkLayoutParams方法去验证当前所使用的LayoutParams对象是否MarginLayoutParams的一个实例:
-
/** -
* -
* @author AigeStudio {@link http://blog.csdn.net/aigestudio} -
* @since 2015/1/23 -
* -
*/ -
public class SquareLayout extends ViewGroup { -
// 省去各种蛋疼的成员变量………… -
// 省去构造方法………… -
// 省去onLayout方法………… -
// 省去三个屌毛方法…… -
@Override -
protected boolean checkLayoutParams(android.view.ViewGroup.LayoutParams p) { -
return p instanceof MarginLayoutParams; -
} -
}
然后呢我们就要开始对控件进行测量了,首先重写onMeasure方法是肯定的,那么我们就先在onMeasure中先把测量的逻辑处理了先,不过我们还是按部就班一步一步来,先把排列方式搞定:
-
/** -
* -
* @author AigeStudio {@link http://blog.csdn.net/aigestudio} -
* @since 2015/1/23 -
* -
*/ -
public class SquareLayout extends ViewGroup { -
private static final int ORIENTATION_HORIZONTAL = 0, ORIENTATION_VERTICAL = 1;// 排列方向的常量标识值 -
private static final int DEFAULT_MAX_ROW = Integer.MAX_VALUE, DEFAULT_MAX_COLUMN = Integer.MAX_VALUE;// 最大行列默认值 -
private int mMaxRow = DEFAULT_MAX_ROW;// 最大行数 -
private int mMaxColumn = DEFAULT_MAX_COLUMN;// 最大列数 -
private int mOrientation = ORIENTATION_HORIZONTAL;// 排列方向默认横向 -
// 省去构造方法………… -
@SuppressLint("NewApi") -
@Override -
protected void onMeasure(int widthMeasureSpec, int heightMeasureSpec) { -
/* -
* 声明临时变量存储父容器的期望值 -
* 该值应该等于父容器的内边距加上所有子元素的测量宽高和外边距 -
*/ -
int parentDesireWidth = 0; -
int parentDesireHeight = 0; -
// 声明临时变量存储子元素的测量状态 -
int childMeasureState = 0; -
/* -
* 如果父容器内有子元素 -
*/ -
if (getChildCount() > 0) { -
/* -
* 那么就遍历子元素 -
*/ -
for (int i = 0; i < getChildCount(); i++) { -
// 获取对应遍历下标的子元素 -
View child = getChildAt(i); -
/* -
* 如果该子元素没有以“不占用空间”的方式隐藏则表示其需要被测量计算 -
*/ -
if (child.getVisibility() != View.GONE) { -
// 测量子元素并考量其外边距 -
measureChildWithMargins(child, widthMeasureSpec, 0, heightMeasureSpec, 0); -
// 比较子元素测量宽高并比较取其较大值 -
int childMeasureSize = Math.max(child.getMeasuredWidth(), child.getMeasuredHeight()); -
// 重新封装子元素测量规格 -
int childMeasureSpec = MeasureSpec.makeMeasureSpec(childMeasureSize, MeasureSpec.EXACTLY); -
// 重新测量子元素 -
child.measure(childMeasureSpec, childMeasureSpec); -
// 获取子元素布局参数 -
MarginLayoutParams mlp = (MarginLayoutParams) child.getLayoutParams(); -
/* -
* 考量外边距计算子元素实际宽高 -
*/ -
int childActualWidth = child.getMeasuredWidth() + mlp.leftMargin + mlp.rightMargin; -
int childActualHeight = child.getMeasuredHeight() + mlp.topMargin + mlp.bottomMargin; -
/* -
* 如果为横向排列 -
*/ -
if (mOrientation == ORIENTATION_HORIZONTAL) { -
// 累加子元素的实际宽度 -
parentDesireWidth += childActualWidth; -
// 获取子元素中高度最大值 -
parentDesireHeight = Math.max(parentDesireHeight, childActualHeight); -
} -
/* -
* 如果为竖向排列 -
*/ -
else if (mOrientation == ORIENTATION_VERTICAL) { -
// 累加子元素的实际高度 -
parentDesireHeight += childActualHeight; -
// 获取子元素中宽度最大值 -
parentDesireWidth = Math.max(parentDesireWidth, childActualWidth); -
} -
// 合并子元素的测量状态 -
childMeasureState = combineMeasuredStates(childMeasureState, child.getMeasuredState()); -
} -
} -
/* -
* 考量父容器内边距将其累加到期望值 -
*/ -
parentDesireWidth += getPaddingLeft() + getPaddingRight(); -
parentDesireHeight += getPaddingTop() + getPaddingBottom(); -
/* -
* 尝试比较父容器期望值与Android建议的最小值大小并取较大值 -
*/ -
parentDesireWidth = Math.max(parentDesireWidth, getSuggestedMinimumWidth()); -
parentDesireHeight = Math.max(parentDesireHeight, getSuggestedMinimumHeight()); -
} -
// 确定父容器的测量宽高 -
setMeasuredDimension(resolveSizeAndState(parentDesireWidth, widthMeasureSpec, childMeasureState), -
resolveSizeAndState(parentDesireHeight, heightMeasureSpec, childMeasureState << MEASURED_HEIGHT_STATE_SHIFT)); -
} -
// 省去onLayout方法………… -
// 省去四个屌毛方法…… -
}
上面代码注释很清楚,具体的我就不扯了,小窗我的童鞋有一部分问过我上一节中我在确定测量尺寸时候使用的resolveSize方法作用(以下代码源自上一节的CustomLayout):
-
/** -
* -
* @author AigeStudio {@link http://blog.csdn.net/aigestudio} -
* @since 2015/1/15 -
* -
*/ -
public class CustomLayout extends ViewGroup { -
// 省去N多代码 -
@Override -
protected void onMeasure(int widthMeasureSpec, int heightMeasureSpec) { -
// 省省省……………… -
// 设置最终测量值 -
setMeasuredDimension(resolveSize(parentDesireWidth, widthMeasureSpec), resolveSize(parentDesireHeight, heightMeasureSpec)); -
} -
// 省去N+1多代码 -
}
那么这个resolveSize方法其实是View提供给我们解算尺寸大小的一个工具方法,其具体实现在API 11后交由另一个方法resolveSizeAndState也就是我们这一节例子所用到的去处理:
-
public static int resolveSize(int size, int measureSpec) { -
return resolveSizeAndState(size, measureSpec, 0) & MEASURED_SIZE_MASK; -
}
而这个resolveSizeAndState方法具体实现其实跟我们上一节开头解算Bitmap尺寸的逻辑类似:
-
public static int resolveSizeAndState(int size, int measureSpec, int childMeasuredState) { -
int result = size; -
int specMode = MeasureSpec.getMode(measureSpec); -
int specSize = MeasureSpec.getSize(measureSpec); -
switch (specMode) { -
case MeasureSpec.UNSPECIFIED: -
result = size; -
break; -
case MeasureSpec.AT_MOST: -
if (specSize < size) { -
result = specSize | MEASURED_STATE_TOO_SMALL; -
} else { -
result = size; -
} -
break; -
case MeasureSpec.EXACTLY: -
result = specSize; -
break; -
} -
return result | (childMeasuredState&MEASURED_STATE_MASK); -
}
是不是很类似呢?如果没看过我上一节的内容,可以回头去阅读一下自定义控件其实很简单7/12,与我们不同的是这个方法多了一个childMeasuredState参数,而上面例子我们在具体测量时也引入了一个childMeasureState临时变量的计算,那么这个值的作用是什么呢?有何意义呢?说到这里不得不提API 11后引入的几个标识位:

这些标识位上面的代码中我们都有用到,而官方文档对其作用的说明也是模棱两可,源码里的运用也不明朗,比如说我们看其它几个与其相关的几个方法:
-
public final int getMeasuredWidth() { -
return mMeasuredWidth & MEASURED_SIZE_MASK; -
} -
public final int getMeasuredHeight() { -
return mMeasuredHeight & MEASURED_SIZE_MASK; -
} -
public final int getMeasuredState() { -
return (mMeasuredWidth&MEASURED_STATE_MASK) -
| ((mMeasuredHeight>>MEASURED_HEIGHT_STATE_SHIFT) -
& (MEASURED_STATE_MASK>>MEASURED_HEIGHT_STATE_SHIFT)); -
}
这里大家注意getMeasuredWidth和getMeasuredHeight这两个我们用来获取控件测量宽高的方法,在其之中对其做了一个按位与的运算,然后才把这个测量值返回给我们,也就是说这个mMeasuredWidth和mMeasuredHeight里面应该还封装了些什么对吧,那么我们来看其赋值,其赋值是在setMeasuredDimension方法下进行的:
-
protected final void setMeasuredDimension(int measuredWidth, int measuredHeight) { -
// 省去无关代码…… -
mMeasuredWidth = measuredWidth; -
mMeasuredHeight = measuredHeight; -
// 省去一行代码…… -
}
也就是说当我们给控件设置最终测量尺寸时这个值就直接被赋予给了mMeasuredWidth和mMeasuredHeight这两个成员变量……看到这里很多朋友蛋疼了,那有啥区别和意义呢?我们尝试来翻翻系统自带控件关于它的处理,其中TextView没有涉及到这个参数的应用,而ImageView里则有:
-
@Override -
protected void onMeasure(int widthMeasureSpec, int heightMeasureSpec) { -
// 省去海量代码………… -
widthSize = resolveSizeAndState(w, widthMeasureSpec, 0); -
heightSize = resolveSizeAndState(h, heightMeasureSpec, 0); -
// 省去一点代码………… -
}
在ImageView的onMeasure方法中使用resolveSizeAndState再次对计算得出的宽高进行解算,而这里的第三个参数直接传的0,也就是不作任何处理~~~~~~~~蛋疼!真蛋疼,以前寡人也曾纠结过一段时间,后来在stackoverflow在找到两个比较靠谱的答案:

大概意思就是当控件的测量尺寸比其父容器大时将会设置MEASURED_STATE_TOO_SMALL这个二进制值,而另一个stackoverflow的回答就更官方了:
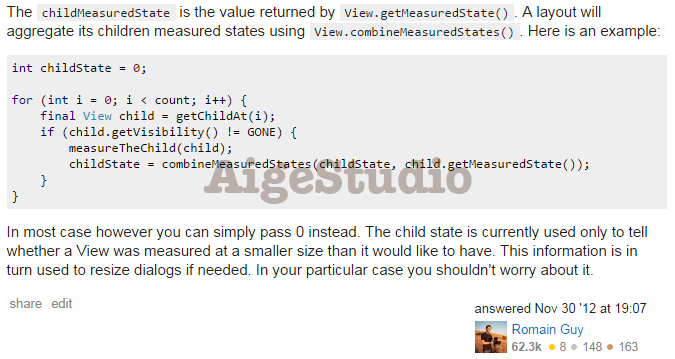
注意右下角的用户名和头像,你就知道为什么这个回答有权威性了,鄙人是他脑残粉。来我们好好翻一下Romain这段话的意思:“childMeasuredState这个值呢由View.getMeasuredState()这个方法返回,一个布局(或者按我的说法父容器)通过View.combineMeasuredStates()这个方法来统计其子元素的测量状态。在大多数情况下你可以简单地只传递0作为参数值,而子元素状态值目前的作用只是用来告诉父容器在对其进行测量得出的测量值比它自身想要的尺寸要小,如果有必要的话一个对话框将会根据这个原因来重新校正它的尺寸。”So、可以看出,测量状态对谷歌官方而言也还算个测试性的功能,具体鄙人也没有找到很好的例证,如果大家谁找到了其具体的使用方法可以分享一下,这里我们还是就按照谷歌官方的建议依葫芦画瓢。好了这个问题就先到这里为止,我们继续看,在测量子元素尺寸时我分了两种情况:
-
/* -
* 如果为横向排列 -
*/ -
if (mOrientation == ORIENTATION_HORIZONTAL) { -
// 累加子元素的实际宽度 -
parentDesireWidth += childActualWidth; -
// 获取子元素中高度最大值 -
parentDesireHeight = Math.max(parentDesireHeight, childActualHeight); -
} -
/* -
* 如果为竖向排列 -
*/ -
else if (mOrientation == ORIENTATION_VERTICAL) { -
// 累加子元素的实际高度 -
parentDesireHeight += childActualHeight; -
// 获取子元素中宽度最大值 -
parentDesireWidth = Math.max(parentDesireWidth, childActualWidth); -
}
如果为横/竖向排列,那么我们应该统计各个子元素的宽/高,而高/宽呢则不需要统计,我们取其最高/最宽的那个子元素的值即可,注意在上一节的处理中我们并没有这样去做哦!不知道大家发现没~~~好了,onMeasure方法的逻辑就是这样,如果你觉得好长,那么恭喜你,这只是我们的第一步,尔后还有几个参数的处理~~~~~这时候你如果运行会发现什么都没有,因为onMeasure方法的作用仅仅是测量的一步,按照官方的说法,Android对Viewgroup的测量由两方面构成:一是对父容器和子元素大小尺寸的测量主要体现在onMeasure方法,二是对父容器的子元素在其区域内的定位主要体现在onLayout方法。也就是会说,即便我们完成了测量但没告诉儿子们该出现在哪的话也不会有任何显示效果,OK,现在我们来看看onLayout方法的逻辑处理:
-
/** -
* -
* @author AigeStudio {@link http://blog.csdn.net/aigestudio} -
* @since 2015/1/23 -
* -
*/ -
public class SquareLayout extends ViewGroup { -
private static final int ORIENTATION_HORIZONTAL = 0, ORIENTATION_VERTICAL = 1;// 排列方向的常量标识值 -
private static final int DEFAULT_MAX_ROW = Integer.MAX_VALUE, DEFAULT_MAX_COLUMN = Integer.MAX_VALUE;// 最大行列默认值 -
private int mMaxRow = DEFAULT_MAX_ROW;// 最大行数 -
private int mMaxColumn = DEFAULT_MAX_COLUMN;// 最大列数 -
private int mOrientation = ORIENTATION_HORIZONTAL;// 排列方向默认横向 -
// 省去构造方法………… -
// 省去上面已经给过的onMeasure方法………… -
@Override -
protected void onLayout(boolean changed, int l, int t, int r, int b) { -
/* -
* 如果父容器下有子元素 -
*/ -
if (getChildCount() > 0) { -
// 声明临时变量存储宽高倍增值 -
int multi = 0; -
/* -
* 遍历子元素 -
*/ -
for (int i = 0; i < getChildCount(); i++) { -
// 获取对应遍历下标的子元素 -
View child = getChildAt(i); -
/* -
* 如果该子元素没有以“不占用空间”的方式隐藏则表示其需要被测量计算 -
*/ -
if (child.getVisibility() != View.GONE) { -
// 获取子元素布局参数 -
MarginLayoutParams mlp = (MarginLayoutParams) child.getLayoutParams(); -
// 获取控件尺寸 -
int childActualSize = child.getMeasuredWidth();// child.getMeasuredHeight() -
/* -
* 如果为横向排列 -
*/ -
if (mOrientation == ORIENTATION_HORIZONTAL) { -
// 确定子元素左上、右下坐标 -
child.layout(getPaddingLeft() + mlp.leftMargin + multi, getPaddingTop() + mlp.topMargin, childActualSize + getPaddingLeft() -
+ mlp.leftMargin + multi, childActualSize + getPaddingTop() + mlp.topMargin); -
// 累加倍增值 -
multi += childActualSize + mlp.leftMargin + mlp.rightMargin; -
} -
/* -
* 如果为竖向排列 -
*/ -
else if (mOrientation == ORIENTATION_VERTICAL) { -
// 确定子元素左上、右下坐标 -
child.layout(getPaddingLeft() + mlp.leftMargin, getPaddingTop() + mlp.topMargin + multi, childActualSize + getPaddingLeft() -
+ mlp.leftMargin, childActualSize + getPaddingTop() + mlp.topMargin + multi); -
// 累加倍增值 -
multi += childActualSize + mlp.topMargin + mlp.bottomMargin; -
} -
} -
} -
} -
} -
// 省去四个屌毛方法…… -
}
比起对onMeasure方法的逻辑处理,onLayout方法相对简单,主要是在对子元素layout的地方需要我们一点计算思维,也不是很复杂,哥相信你能懂,毕竟注释如此清楚,来我们尝试用一下我们的布局:
-
<LinearLayout xmlns:android="http://schemas.android.com/apk/res/android" -
android:layout_width="match_parent" -
android:layout_height="match_parent" -
android:layout_gravity="center" -
android:background="#ffffff" > -
<com.aigestudio.customviewdemo.views.SquareLayout -
android:layout_width="match_parent" -
android:layout_height="wrap_content" -
android:paddingLeft="5dp" -
android:paddingTop="12dp" -
android:layout_margin="5dp" -
android:paddingRight="7dp" -
android:paddingBottom="20dp" -
android:layout_gravity="center" -
android:background="#679135" > -
<Button -
android:layout_width="wrap_content" -
android:layout_height="wrap_content" -
android:background="#125793" -
android:text="tomorrow" -
android:textSize="24sp" -
android:textStyle="bold" -
android:typeface="serif" /> -
<Button -
android:layout_width="50dp" -
android:layout_height="100dp" -
android:layout_marginBottom="5dp" -
android:layout_marginLeft="10dp" -
android:layout_marginRight="20dp" -
android:layout_marginTop="30dp" -
android:background="#495287" -
android:text="AigeStudio" /> -
<ImageView -
android:layout_width="wrap_content" -
android:layout_height="wrap_content" -
android:layout_marginBottom="50dp" -
android:layout_marginLeft="5dp" -
android:layout_marginRight="20dp" -
android:layout_marginTop="15dp" -
android:background="#976234" -
android:scaleType="centerCrop" -
android:src="@drawable/lovestory_little" /> -
<Button -
android:layout_width="wrap_content" -
android:layout_height="wrap_content" -
android:background="#594342" -
android:text="AigeStudio" /> -
<Button -
android:layout_width="wrap_content" -
android:layout_height="wrap_content" -
android:background="#961315" -
android:text="AigeStudio" /> -
</com.aigestudio.customviewdemo.views.SquareLayout> -
</LinearLayout>

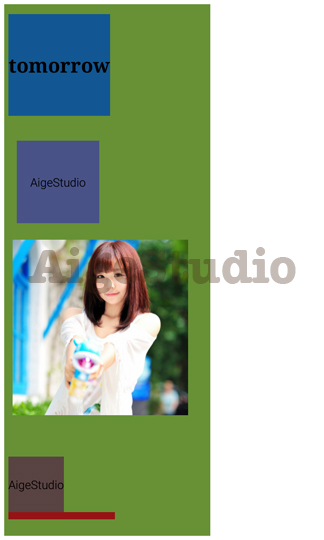
下面是运行后显示的效果:

将排列方式改为纵向排列:
private int mOrientation = ORIENTATION_VERTICAL;// 排列方向默认横向再来瞅瞅ADT的显示效果:

在运行看看:
看样子目测还是很完美,不过这只是我们伟大的第一步而已!如我多次强调,控件的测量一定要尽可能地考虑到所有因素,这样你的控件才能立于N次不倒的暴力测试中,现在开始我们的第二步,max_row和max_column属性的计算:
-
/** -
* -
* @author AigeStudio {@link http://blog.csdn.net/aigestudio} -
* @since 2015/1/23 -
* -
*/ -
public class SquareLayout extends ViewGroup { -
private static final int ORIENTATION_HORIZONTAL = 0, ORIENTATION_VERTICAL = 1;// 排列方向的常量标识值 -
private static final int DEFAULT_MAX_ROW = Integer.MAX_VALUE, DEFAULT_MAX_COLUMN = Integer.MAX_VALUE;// 最大行列默认值 -
private int mMaxRow = DEFAULT_MAX_ROW;// 最大行数 -
private int mMaxColumn = DEFAULT_MAX_COLUMN;// 最大列数 -
private int mOrientation = ORIENTATION_HORIZONTAL;// 排列方向默认横向 -
public SquareLayout(Context context, AttributeSet attrs) { -
super(context, attrs); -
// 初始化最大行列数 -
mMaxRow = mMaxColumn = 2; -
} -
// 省去onMeasure方法………… -
// 省去onLayout方法………… -
// 省去四个屌毛方法…… -
}
首先呢在构造方法内初始化我们的最大行列数,不然我们可不可能造出Integer.MAX_VALUE这么多的子元素~~~~~
-
// 初始化最大行列数 -
mMaxRow = mMaxColumn = 2;
我们的SquareLayout中有5个子元素,那么这里就暂定我们的最大行列均为2好了,首先来看看onMeasure方法的逻辑处理,变动较大我先贴代码好了:
-
/** -
* -
* @author AigeStudio {@link http://blog.csdn.net/aigestudio} -
* @since 2015/1/23 -
* -
*/ -
public class SquareLayout extends ViewGroup { -
private static final int ORIENTATION_HORIZONTAL = 0, ORIENTATION_VERTICAL = 1;// 排列方向的常量标识值 -
private static final int DEFAULT_MAX_ROW = Integer.MAX_VALUE, DEFAULT_MAX_COLUMN = Integer.MAX_VALUE;// 最大行列默认值 -
private int mMaxRow = DEFAULT_MAX_ROW;// 最大行数 -
private int mMaxColumn = DEFAULT_MAX_COLUMN;// 最大列数 -
private int mOrientation = ORIENTATION_HORIZONTAL;// 排列方向默认横向 -
// 省去构造方法………… -
@SuppressLint("NewApi") -
@Override -
protected void onMeasure(int widthMeasureSpec, int heightMeasureSpec) { -
/* -
* 声明临时变量存储父容器的期望值 -
* 该值应该等于父容器的内边距加上所有子元素的测量宽高和外边距 -
*/ -
int parentDesireWidth = 0; -
int parentDesireHeight = 0; -
// 声明临时变量存储子元素的测量状态 -
int childMeasureState = 0; -
/* -
* 如果父容器内有子元素 -
*/ -
if (getChildCount() > 0) { -
// 声明两个一维数组存储子元素宽高数据 -
int[] childWidths = new int[getChildCount()]; -
int[] childHeights = new int[getChildCount()]; -
/* -
* 那么就遍历子元素 -
*/ -
for (int i = 0; i < getChildCount(); i++) { -
// 获取对应遍历下标的子元素 -
View child = getChildAt(i); -
/* -
* 如果该子元素没有以“不占用空间”的方式隐藏则表示其需要被测量计算 -
*/ -
if (child.getVisibility() != View.GONE) { -
// 测量子元素并考量其外边距 -
measureChildWithMargins(child, widthMeasureSpec, 0, heightMeasureSpec, 0); -
// 比较子元素测量宽高并比较取其较大值 -
int childMeasureSize = Math.max(child.getMeasuredWidth(), child.getMeasuredHeight()); -
// 重新封装子元素测量规格 -
int childMeasureSpec = MeasureSpec.makeMeasureSpec(childMeasureSize, MeasureSpec.EXACTLY); -
// 重新测量子元素 -
child.measure(childMeasureSpec, childMeasureSpec); -
// 获取子元素布局参数 -
MarginLayoutParams mlp = (MarginLayoutParams) child.getLayoutParams(); -
/* -
* 考量外边距计算子元素实际宽高并将数据存入数组 -
*/ -
childWidths[i] = child.getMeasuredWidth() + mlp.leftMargin + mlp.rightMargin; -
childHeights[i] = child.getMeasuredHeight() + mlp.topMargin + mlp.bottomMargin; -
// 合并子元素的测量状态 -
childMeasureState = combineMeasuredStates(childMeasureState, child.getMeasuredState()); -
} -
} -
// 声明临时变量存储行/列宽高 -
int indexMultiWidth = 0, indexMultiHeight = 0; -
/* -
* 如果为横向排列 -
*/ -
if (mOrientation == ORIENTATION_HORIZONTAL) { -
/* -
* 如果子元素数量大于限定值则进行折行计算 -
*/ -
if (getChildCount() > mMaxColumn) { -
// 计算产生的行数 -
int row = getChildCount() / mMaxColumn; -
// 计算余数 -
int remainder = getChildCount() % mMaxColumn; -
// 声明临时变量存储子元素宽高数组下标值 -
int index = 0; -
/* -
* 遍历数组计算父容器期望宽高值 -
*/ -
for (int x = 0; x < row; x++) { -
for (int y = 0; y < mMaxColumn; y++) { -
// 单行宽度累加 -
indexMultiWidth += childWidths[index]; -
// 单行高度取最大值 -
indexMultiHeight = Math.max(indexMultiHeight, childHeights[index++]); -
} -
// 每一行遍历完后将该行宽度与上一行宽度比较取最大值 -
parentDesireWidth = Math.max(parentDesireWidth, indexMultiWidth); -
// 每一行遍历完后累加各行高度 -
parentDesireHeight += indexMultiHeight; -
// 重置参数 -
indexMultiWidth = indexMultiHeight = 0; -
} -
/* -
* 如果有余数表示有子元素未能占据一行 -
*/ -
if (remainder != 0) { -
/* -
* 遍历剩下的这些子元素将其宽高计算到父容器期望值 -
*/ -
for (int i = getChildCount() - remainder; i < getChildCount(); i++) { -
indexMultiWidth += childWidths[i]; -
indexMultiHeight = Math.max(indexMultiHeight, childHeights[i]); -
} -
parentDesireWidth = Math.max(parentDesireWidth, indexMultiWidth); -
parentDesireHeight += indexMultiHeight; -
indexMultiWidth = indexMultiHeight = 0; -
} -
} -
/* -
* 如果子元素数量还没有限制值大那么直接计算即可不须折行 -
*/ -
else { -
for (int i = 0; i < getChildCount(); i++) { -
// 累加子元素的实际高度 -
parentDesireHeight += childHeights[i]; -
// 获取子元素中宽度最大值 -
parentDesireWidth = Math.max(parentDesireWidth, childWidths[i]); -
} -
} -
} -
/* -
* 如果为竖向排列 -
*/ -
else if (mOrientation == ORIENTATION_VERTICAL) { -
if (getChildCount() > mMaxRow) { -
int column = getChildCount() / mMaxRow; -
int remainder = getChildCount() % mMaxRow; -
int index = 0; -
for (int x = 0; x < column; x++) { -
for (int y = 0; y < mMaxRow; y++) { -
indexMultiHeight += childHeights[index]; -
indexMultiWidth = Math.max(indexMultiWidth, childWidths[index++]); -
} -
parentDesireHeight = Math.max(parentDesireHeight, indexMultiHeight); -
parentDesireWidth += indexMultiWidth; -
indexMultiWidth = indexMultiHeight = 0; -
} -
if (remainder != 0) { -
for (int i = getChildCount() - remainder; i < getChildCount(); i++) { -
indexMultiHeight += childHeights[i]; -
indexMultiWidth = Math.max(indexMultiHeight, childWidths[i]); -
} -
parentDesireHeight = Math.max(parentDesireHeight, indexMultiHeight); -
parentDesireWidth += indexMultiWidth; -
indexMultiWidth = indexMultiHeight = 0; -
} -
} else { -
for (int i = 0; i < getChildCount(); i++) { -
// 累加子元素的实际宽度 -
parentDesireWidth += childWidths[i]; -
// 获取子元素中高度最大值 -
parentDesireHeight = Math.max(parentDesireHeight, childHeights[i]); -
} -
} -
} -
/* -
* 考量父容器内边距将其累加到期望值 -
*/ -
parentDesireWidth += getPaddingLeft() + getPaddingRight(); -
parentDesireHeight += getPaddingTop() + getPaddingBottom(); -
/* -
* 尝试比较父容器期望值与Android建议的最小值大小并取较大值 -
*/ -
parentDesireWidth = Math.max(parentDesireWidth, getSuggestedMinimumWidth()); -
parentDesireHeight = Math.max(parentDesireHeight, getSuggestedMinimumHeight()); -
} -
// 确定父容器的测量宽高 -
setMeasuredDimension(resolveSizeAndState(parentDesireWidth, widthMeasureSpec, childMeasureState), -
resolveSizeAndState(parentDesireHeight, heightMeasureSpec, childMeasureState << MEASURED_HEIGHT_STATE_SHIFT)); -
} -
// 省去onLayout方法………… -
// 省去四个屌毛方法…… -
}
逻辑计算变动较大,首先在遍历子元素时我没有直接对横纵向排列进行计算而是先用两个数组将子元素的宽高存储起来:
-
@SuppressLint("NewApi") -
@Override -
protected void onMeasure(int widthMeasureSpec, int heightMeasureSpec) { -
// 省去几行代码………… -
/* -
* 如果父容器内有子元素 -
*/ -
if (getChildCount() > 0) { -
// 声明两个一维数组存储子元素宽高数据 -
int[] childWidths = new int[getChildCount()]; -
int[] childHeights = new int[getChildCount()]; -
/* -
* 那么就遍历子元素 -
*/ -
for (int i = 0; i < getChildCount(); i++) { -
// 省省省…… -
/* -
* 如果该子元素没有以“不占用空间”的方式隐藏则表示其需要被测量计算 -
*/ -
if (child.getVisibility() != View.GONE) { -
// 省去N行代码…… -
/* -
* 考量外边距计算子元素实际宽高并将数据存入数组 -
*/ -
childWidths[i] = child.getMeasuredWidth() + mlp.leftMargin + mlp.rightMargin; -
childHeights[i] = child.getMeasuredHeight() + mlp.topMargin + mlp.bottomMargin; -
// 省去一行代码…… -
} -
} -
// 声明临时变量存储行/列宽高 -
int indexMultiWidth = 0, indexMultiHeight = 0; -
// 省去无数行代码…………………… -
} -
// 省去一行代码…… -
}
然后上面还声明两个临时变量indexMultiWidth和indexMultiHeight用来分别存储单行/列的宽高并将该行计算后的结果累加到父容器的期望值,这里我们就看看横向排列的逻辑:
-
/* -
* 如果为横向排列 -
*/ -
if (mOrientation == ORIENTATION_HORIZONTAL) { -
/* -
* 如果子元素数量大于限定值则进行折行计算 -
*/ -
if (getChildCount() > mMaxColumn) { -
// 计算产生的行数 -
int row = getChildCount() / mMaxColumn; -
// 计算余数 -
int remainder = getChildCount() % mMaxColumn; -
// 声明临时变量存储子元素宽高数组下标值 -
int index = 0; -
/* -
* 遍历数组计算父容器期望宽高值 -
*/ -
for (int x = 0; x < row; x++) { -
for (int y = 0; y < mMaxColumn; y++) { -
// 单行宽度累加 -
indexMultiWidth += childWidths[index]; -
// 单行高度取最大值 -
indexMultiHeight = Math.max(indexMultiHeight, childHeights[index++]); -
} -
// 每一行遍历完后将该行宽度与上一行宽度比较取最大值 -
parentDesireWidth = Math.max(parentDesireWidth, indexMultiWidth); -
// 每一行遍历完后累加各行高度 -
parentDesireHeight += indexMultiHeight; -
// 重置参数 -
indexMultiWidth = indexMultiHeight = 0; -
} -
/* -
* 如果有余数表示有子元素未能占据一行 -
*/ -
if (remainder != 0) { -
/* -
* 遍历剩下的这些子元素将其宽高计算到父容器期望值 -
*/ -
for (int i = getChildCount() - remainder; i < getChildCount(); i++) { -
indexMultiWidth += childWidths[i]; -
indexMultiHeight = Math.max(indexMultiHeight, childHeights[i]); -
} -
parentDesireWidth = Math.max(parentDesireWidth, indexMultiWidth); -
parentDesireHeight += indexMultiHeight; -
indexMultiWidth = indexMultiHeight = 0; -
} -
} -
/* -
* 如果子元素数量还没有限制值大那么直接计算即可不须折行 -
*/ -
else { -
for (int i = 0; i < getChildCount(); i++) { -
// 累加子元素的实际高度 -
parentDesireHeight += childHeights[i]; -
// 获取子元素中宽度最大值 -
parentDesireWidth = Math.max(parentDesireWidth, childWidths[i]); -
} -
} -
}
计算我分了两种情况,子元素数量如果小于我们的限定值,例如我们布局下只有2个子元素,而我们的限定值为3,这时候就没必要计算折行,而另一种情况则是子元素数量大于我们的限定值,例如我们的布局下有7个子元素而我们的限定值为3,这时当我们横向排列到第三个子元素后就得折行了,在新的一行开始排列,在这种情况下,我们先计算了能被整除的子元素数:例如7/3为2余1,也就意味着我们此时能排满的只有两行,而多出来的那一行只有一个子元素,分别计算两种情况累加结果就OK了。纵向排列类似不说了,这里我逻辑比较臃肿,但是可以让大家很好理解,如果你Math好可以简化很多逻辑,不说了,既然onMeasure方法改动了,那么我们的onLayout方法也得跟上时代的步伐才行:
-
/** -
* -
* @author AigeStudio {@link http://blog.csdn.net/aigestudio} -
* @since 2015/1/23 -
* -
*/ -
public class SquareLayout extends ViewGroup { -
private static final int ORIENTATION_HORIZONTAL = 0, ORIENTATION_VERTICAL = 1;// 排列方向的常量标识值 -
private static final int DEFAULT_MAX_ROW = Integer.MAX_VALUE, DEFAULT_MAX_COLUMN = Integer.MAX_VALUE;// 最大行列默认值 -
private int mMaxRow = DEFAULT_MAX_ROW;// 最大行数 -
private int mMaxColumn = DEFAULT_MAX_COLUMN;// 最大列数 -
private int mOrientation = ORIENTATION_HORIZONTAL;// 排列方向默认横向 -
// 省去构造方法………… -
// 省去上面已经给过的onMeasure方法………… -
@Override -
protected void onLayout(boolean changed, int l, int t, int r, int b) { -
/* -
* 如果父容器下有子元素 -
*/ -
if (getChildCount() > 0) { -
// 声明临时变量存储宽高倍增值 -
int multi = 0; -
// 指数倍增值 -
int indexMulti = 1; -
// 声明临时变量存储行/列宽高 -
int indexMultiWidth = 0, indexMultiHeight = 0; -
// 声明临时变量存储行/列临时宽高 -
int tempHeight = 0, tempWidth = 0; -
/* -
* 遍历子元素 -
*/ -
for (int i = 0; i < getChildCount(); i++) { -
// 获取对应遍历下标的子元素 -
View child = getChildAt(i); -
/* -
* 如果该子元素没有以“不占用空间”的方式隐藏则表示其需要被测量计算 -
*/ -
if (child.getVisibility() != View.GONE) { -
// 获取子元素布局参数 -
MarginLayoutParams mlp = (MarginLayoutParams) child.getLayoutParams(); -
// 获取控件尺寸 -
int childActualSize = child.getMeasuredWidth();// child.getMeasuredHeight() -
/* -
* 如果为横向排列 -
*/ -
if (mOrientation == ORIENTATION_HORIZONTAL) { -
/* -
* 如果子元素数量比限定值大 -
*/ -
if (getChildCount() > mMaxColumn) { -
/* -
* 根据当前子元素进行布局 -
*/ -
if (i < mMaxColumn * indexMulti) { -
child.layout(getPaddingLeft() + mlp.leftMargin + indexMultiWidth, getPaddingTop() + mlp.topMargin + indexMultiHeight, -
childActualSize + getPaddingLeft() + mlp.leftMargin + indexMultiWidth, childActualSize + getPaddingTop() -
+ mlp.topMargin + indexMultiHeight); -
indexMultiWidth += childActualSize + mlp.leftMargin + mlp.rightMargin; -
tempHeight = Math.max(tempHeight, childActualSize) + mlp.topMargin + mlp.bottomMargin; -
/* -
* 如果下一次遍历到的子元素下标值大于限定值 -
*/ -
if (i + 1 >= mMaxColumn * indexMulti) { -
// 那么累加高度到高度倍增值 -
indexMultiHeight += tempHeight; -
// 重置宽度倍增值 -
indexMultiWidth = 0; -
// 增加指数倍增值 -
indexMulti++; -
} -
} -
} else { -
// 确定子元素左上、右下坐标 -
child.layout(getPaddingLeft() + mlp.leftMargin + multi, getPaddingTop() + mlp.topMargin, childActualSize -
+ getPaddingLeft() + mlp.leftMargin + multi, childActualSize + getPaddingTop() + mlp.topMargin); -
// 累加倍增值 -
multi += childActualSize + mlp.leftMargin + mlp.rightMargin; -
} -
} -
/* -
* 如果为竖向排列 -
*/ -
else if (mOrientation == ORIENTATION_VERTICAL) { -
if (getChildCount() > mMaxRow) { -
if (i < mMaxRow * indexMulti) { -
child.layout(getPaddingLeft() + mlp.leftMargin + indexMultiWidth, getPaddingTop() + mlp.topMargin + indexMultiHeight, -
childActualSize + getPaddingLeft() + mlp.leftMargin + indexMultiWidth, childActualSize + getPaddingTop() -
+ mlp.topMargin + indexMultiHeight); -
indexMultiHeight += childActualSize + mlp.topMargin + mlp.bottomMargin; -
tempWidth = Math.max(tempWidth, childActualSize) + mlp.leftMargin + mlp.rightMargin; -
if (i + 1 >= mMaxRow * indexMulti) { -
indexMultiWidth += tempWidth; -
indexMultiHeight = 0; -
indexMulti++; -
} -
} -
} else { -
// 确定子元素左上、右下坐标 -
child.layout(getPaddingLeft() + mlp.leftMargin, getPaddingTop() + mlp.topMargin + multi, childActualSize -
+ getPaddingLeft() + mlp.leftMargin, childActualSize + getPaddingTop() + mlp.topMargin + multi); -
// 累加倍增值 -
multi += childActualSize + mlp.topMargin + mlp.bottomMargin; -
} -
} -
} -
} -
} -
} -
// 省去四个屌毛方法…… -
}
onLayout方法就不具体说了,其实现要比onMeasure方法简单,我们稍微更改下布局文件尽可能地测试多种情况:
-
<LinearLayout xmlns:android="http://schemas.android.com/apk/res/android" -
android:layout_width="match_parent" -
android:layout_height="match_parent" -
android:layout_gravity="center" -
android:background="#ffffff" > -
<com.aigestudio.customviewdemo.views.SquareLayout -
android:layout_width="wrap_content" -
android:layout_height="wrap_content" -
android:layout_gravity="center" -
android:layout_margin="5dp" -
android:background="#679135" -
android:paddingBottom="20dp" -
android:paddingLeft="5dp" -
android:paddingRight="7dp" -
android:paddingTop="12dp" > -
<Button -
android:layout_width="wrap_content" -
android:layout_height="wrap_content" -
android:background="#125793" -
android:text="tomorrow" -
android:textSize="24sp" -
android:textStyle="bold" -
android:typeface="serif" /> -
<Button -
android:layout_width="50dp" -
android:layout_height="100dp" -
android:layout_marginBottom="5dp" -
android:layout_marginLeft="10dp" -
android:layout_marginRight="20dp" -
android:layout_marginTop="30dp" -
android:background="#495287" -
android:text="AigeStudio" /> -
<LinearLayout -
android:layout_width="wrap_content" -
android:layout_height="wrap_content" -
android:layout_marginBottom="50dp" -
android:layout_marginLeft="5dp" -
android:layout_marginRight="20dp" -
android:layout_marginTop="15dp" -
android:background="#976234" > -
<ImageView -
android:layout_width="wrap_content" -
android:layout_height="wrap_content" -
android:scaleType="centerCrop" -
android:src="@drawable/lovestory_little" /> -
</LinearLayout> -
<Button -
android:layout_width="wrap_content" -
android:layout_height="wrap_content" -
android:background="#594342" -
android:text="AigeStudio" /> -
<Button -
android:layout_width="wrap_content" -
android:layout_height="wrap_content" -
android:background="#961315" -
android:text="Welcome AigeStudio" /> -
</com.aigestudio.customviewdemo.views.SquareLayout> -
</LinearLayout>
下面看看ADT中的直接显示效果:
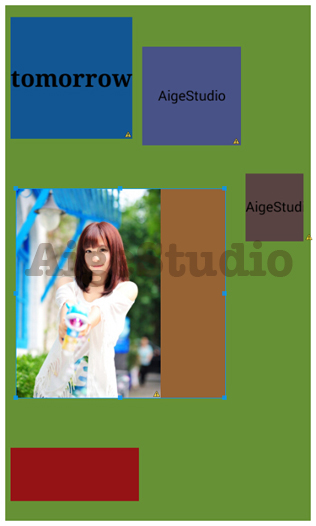
运行后的显示效果:

换成纵向排列看看:

运行后的效果:

尝试更改下纵向排列时的限制值:
-
// 初始化最大行列数 -
mMaxRow = 2; -
mMaxColumn =3;
直接看运行效果:

表示暂时木有发现什么大问题,OK,这两个属性值的实现就到这里,虽然只有两个属性值 = = TMD实在是菊紧啊,可想而知LinearLayout等布局这么多属性控制是有多蛋疼了么,不过如我文章开头所说,我们的这个自定义布局实用意义不大,主要还是给大家演示了解下自定义布局是有多么蛋疼、啊不……是由多么复杂,像系统自带的那些布局控件都是经过N多update版本才有今天,即便如此,依然还有很多BUG,不过大多不会影响实际使用我们也可以很好地解决,所以,再次强调、控件的测量是一个极为严谨缜密的过程,稍有不慎你的控件便到处都会是说不出的BUG~~~~~上一节我们为了能让我们的自定义布局能对外边距进行计算,我们定义了一个内部类LayoutParams继承于MarginLayoutParams但是其中什么也没做,而这一节呢我们没有定义这么一个内部类而是直接返回MarginLayoutParams的实例,我们之所以能从布局参数中获取到外边距的属性值,比如:
-
// 获取子元素布局参数 -
MarginLayoutParams mlp = (MarginLayoutParams) child.getLayoutParams();
然后各种
-
mlp.leftMargin -
mlp.topMargin -
mlp.rightMargin -
mlp.bottomMargin
是因为在MarginLayoutParams中已经为我们定义好了这些参数,具体代码就不贴了,如果我们定义了自己的布局,我们也可以去定义自己的布局参数,比如我们在其中定义子元素在布局中的对其方式:
-
/** -
* -
* @author AigeStudio {@link http://blog.csdn.net/aigestudio} -
* @since 2015/1/23 -
* -
*/ -
public class SquareLayout extends ViewGroup { -
// 省去无数代码………… -
public static class LayoutParams extends MarginLayoutParams { -
public int mGravity;// 对齐方式 -
public LayoutParams(MarginLayoutParams source) { -
super(source); -
} -
public LayoutParams(android.view.ViewGroup.LayoutParams source) { -
super(source); -
} -
public LayoutParams(Context c, AttributeSet attrs) { -
super(c, attrs); -
} -
public LayoutParams(int width, int height) { -
super(width, height); -
} -
} -
}
然后呢我们就要修改那四个屌毛方法返回我们自己定义的LayoutParams:
-
/** -
* -
* @author AigeStudio {@link http://blog.csdn.net/aigestudio} -
* @since 2015/1/23 -
* -
*/ -
public class SquareLayout extends ViewGroup { -
// 省去无数代码………… -
@Override -
protected LayoutParams generateDefaultLayoutParams() { -
return new LayoutParams(ViewGroup.LayoutParams.MATCH_PARENT, ViewGroup.LayoutParams.MATCH_PARENT); -
} -
@Override -
protected android.view.ViewGroup.LayoutParams generateLayoutParams(android.view.ViewGroup.LayoutParams p) { -
return new LayoutParams(p); -
} -
@Override -
public android.view.ViewGroup.LayoutParams generateLayoutParams(AttributeSet attrs) { -
return new LayoutParams(getContext(), attrs); -
} -
@Override -
protected boolean checkLayoutParams(android.view.ViewGroup.LayoutParams p) { -
return p instanceof LayoutParams; -
} -
// 省去LayoutParams的定义………… -
}
然后你就可以通过其获取这个对其方式的值:
-
// 获取子元素布局参数 -
LayoutParams mlp = (LayoutParams) child.getLayoutParams(); -
if (mlp.mGravity == xxxxxxx) { -
……………………………………………………………… -
}
用法跟margin类似,那么我们如何为该变量赋值呢?方法多种多样,可以写死可以直接调用赋值,这里我们来看另外的一种方式:通过xml在布局文件中直接设置其属性值,我们在使用xml进行布局时经常会使用这样的方式指定属性值:
-
android:layout_width="wrap_content" -
android:layout_height="wrap_content" -
android:background="#125793" -
android:text="tomorrow" -
android:textSize="24sp" -
android:textStyle="bold" -
android:typeface="serif"
使用起来灰常方便,而这里我们也可以自定义属于自己的xml属性,方法非常非常简单,首先需要我们在declare-styleable标签下定义我们的各类属性:
-
<!-- http://blog.csdn.net/aigestudio --> -
<declare-styleable name="SquareLayout"> -
<attr name="my_gravity" format="enum"> -
<enum name="left" value="0" /> -
<enum name="right" value="1" /> -
<enum name="center" value="2" /> -
<enum name="top" value="3" /> -
<enum name="bottom" value="4" /> -
</attr> -
</declare-styleable>
一般情况下,declare-styleable的定义存放在values/attr.xml文件中,属性定义好了我们就该在布局中使用这些属性,使用方法也很简单,比如我们在SquareLayout的Button中应用my_gravity属性:
-
<Button -
xmlns:aigestudio="http://schemas.android.com/apk/res/com.aigestudio.customviewdemo" -
aigestudio:my_gravity="left" />
在使用自定义属性前声明我们包内的命名空间即可,你可以直接写在布局文件的根布局下,命名空间的声明有两种写法,上面是其一,其格式如下:
xmlns:你想要的名字="http://schemas.android.com/apk/res/完整包名"第二种方式如果你是用的是Studio,IDE则会提示你使用该方式:
xmlns:你想要的名字="http://schemas.android.com/apk/res-auto"都可以,最后就是从xml中获取这些属性了,我们可以直接简单地通过带有AttributeSet对象的构造方法来获取:
-
/** -
* -
* @author AigeStudio {@link http://blog.csdn.net/aigestudio} -
* @since 2015/1/23 -
* -
*/ -
public class SquareLayout extends ViewGroup { -
// 省去无数代码………… -
public static class LayoutParams extends MarginLayoutParams { -
public int mGravity;// 对齐方式 -
public LayoutParams(MarginLayoutParams source) { -
super(source); -
} -
public LayoutParams(android.view.ViewGroup.LayoutParams source) { -
super(source); -
} -
public LayoutParams(Context c, AttributeSet attrs) { -
super(c, attrs); -
/* -
* 获取xml对应属性 -
*/ -
TypedArray a = c.obtainStyledAttributes(attrs, R.styleable.SquareLayout); -
mGravity = a.getInt(R.styleable.SquareLayout_my_gravity, 0); -
} -
public LayoutParams(int width, int height) { -
super(width, height); -
} -
} -
}
通过Context的obtainStyledAttributes方法注入AttributeSet对象和我们资源文件中定义的declare-styleable属性获取一个TypedArray对象,我们通过这个TypedArray对象各种相应的方法来获取参数值,本来呢我之前写了很长的篇幅来给大家介绍这其中的过程,后来发现实在太繁琐太多干脆删了重写旨在教会大家如何用即可。Android支持如下十种不同类型的属性定义:
-
<!-- http://blog.csdn.net/aigestudio --> -
<declare-styleable name="AttrView"> -
<!-- 引用资源 --> -
<attr name="image" format="reference" /> -
<!-- 颜色 --> -
<attr name="text_color" format="color" /> -
<!-- 布尔值 --> -
<attr name="text_display" format="boolean" /> -
<!-- 尺寸大小 --> -
<attr name="temp1" format="dimension" /> -
<!-- 浮点值 --> -
<attr name="temp2" format="float" /> -
<!-- 整型值 --> -
<attr name="temp3" format="integer" /> -
<!-- 字符串 --> -
<attr name="text" format="string" /> -
<!-- 百分比 --> -
<attr name="alpha" format="fraction" /> -
<!-- 枚举 --> -
<attr name="text_align" format="integer"> -
<enum name="left" value="0" /> -
<enum name="right" value="1" /> -
<enum name="center" value="2" /> -
</attr> -
<!-- 位运算 --> -
<attr name="text_optimize" format="integer"> -
<flag name="anti" value="0x001" /> -
<flag name="dither" value="0x002" /> -
<flag name="linear" value="0x004" /> -
</attr> -
</declare-styleable>
name都是我乱取的不要在意,主要看后面的format,这些类型都很好理解,它们在TypedArray中都有各种对应或重载的方法,比如获取color的getColor方法,上面我们获取int的getInt等等,这里对大家来说比较新颖的是fraction百分比这个类型,其在TypedArray的对应方法如下:
getFraction(int index, int base, int pbase, float defValue)第一个参数很好理解表示我们定义的属性资源ID,最后一个参数呢也和前面的getInt类似,主要是这第二、三个参数,其作用是分开来的,当我们在xml中使用百分比属性时有两种写法,一种是标准的10%而另一种是带p的10%p:
-
aigestudio:alpha="10%" -
aigestudio:alpha="10%p"
当属性值为10%的时候base参数起作用,我们此时获取的参数值就等于(10% * base),而pbase参数则无效,同理当属性值为10%p时参数值就等于(10% * pbase)而base无效,Just it。还有两个比较类似的类型:枚举和位运算,这两个类型也很好理解,枚举嘛就是从众多的选项中选一个,而位运算则可以选多个并通过“|”组合各种结果:
aigestudio:text_optimize="anti|dither"这种写法相信大家也很常见,比如layout_gravity属性就可以以类似的方式多选,这种方式有一个好处就是我们不用在属性声明中定义太多的值,上面的text_optimize属性只有三个对应值,但是在code中我们可以以位运算的方式组合这三个参数值:
-
/* -
* 画笔优化的标识位们 -
*/ -
private static final int OPTIMIZE_ANTI = 0x001, OPTIMIZE_DITHER = 0x002, OPTIMIZE_LINEAR = 0x004, OPTIMIZE_ANTI_DITHER = 0x003, OPTIMIZE_ANTI_LINEAR = 0x005, OPTIMIZE_DITHER_LINEAR = 0x006, OPTIMIZE_ALL = 0x007;
通过三个参数值的位运算我们实质上就得到了7种不同的结果,Just it。xml属性值的定义不难不多用几次就会就不多说了,上面呢我们通过自定义的属性mGravity来尝试定义子元素相对于父容器的对其方式,而事实上Android提供给我们一个简便的方法去计算这玩意,Android定义了Gravity类来实现我们对对其方式的计算,其中定义了大量的常量值定义不同对其方式,比如什么左对齐、右对齐、水平居中乱七八糟的等等,也提供了多个方法来实现计算,使用方式呢也不难,比如上面的布局参数我们换成如下方式:
-
/** -
* -
* @author AigeStudio {@link http://blog.csdn.net/aigestudio} -
* @since 2015/1/23 -
* -
*/ -
public class SquareLayout extends ViewGroup { -
// 省去无数代码………… -
public static class LayoutParams extends MarginLayoutParams { -
public int mGravity = Gravity.LEFT | Gravity.RIGHT;// 对齐方式 -
// 省去没变的代码………… -
} -
}
而在我们的xml属性定义中则可以直接使用android:layout_gravity这样的name而无需定义类型值:
-
<declare-styleable name="SquareLayout"> -
<attr name="android:layout_gravity" /> -
</declare-styleable>
这样则表示我们的属性使用的Android自带的标签,之后我们只需根据布局文件中layout_gravity属性的值调用Gravity类下的方法去计算对齐方式则可,Gravity类下的方法很好用,为什么这么说呢?因为其可以说是无关布局的,拿最简单的一个来说:
public static void apply(int gravity, int w, int h, Rect container, Rect outRect)第一个参数表示我们的对其方式值,第二三个参数呢则表示我们要对齐的元素,这里通俗地说就是我们父容器下的子元素,而container参数表示的则是我们父容器的矩形区域,最后一个参数是接收计算后子元素位置区域的矩形对象,随便new个传进去就行,可见apply方式是根据矩形区域来计算对其方式的,所以说非常好用,我们只需在onLayout方法中确定出父容器的矩形区域就可以轻松地计算出子元素根据对其方式出现在父容器中的矩形区域,这一个过程留给大家自行尝试,我就不多说了,TMD说的太多,又忘了上一节的那个问题了、肏!!!!好吧,下一节再说那个问题,哦!对了,还有一个擦边球的东西忘了讲,在Android很多的布局控件中都会重写这么一个方法:
-
@Override -
public boolean shouldDelayChildPressedState() { -
return false; -
}
并且都会一致地返回false,其作用是告诉framework我们当前的布局不是一个滚动的布局,我们这里的自定义布局控件也重写了该方法~~~好好了了,不讲了,这节就到此为止