SpringBoot之安装RabbitMQ(踩坑)及RabbitMQ原理和使用详解
安装RabbitMQ
安装环境centos7 + RabbitMQ 3.7.7 + OTP 21.0 Source File
1.安装erlang:
(1).下载: http://www.erlang.org/downloads
(2).安装依赖yum install ncurses-devel
(3).解压tar xf otp_src_21.0.tar.gz
(4).安装目录./configure –prefix=/usr/local/erlang –without-javac
(5)编译make
(6)安装make install
(7)验证安装是否成功
cd /usr/local/erlang/bin/
执行./erl
2.安装rabbitmq
rabbitmq解压即可用
(1)解压xz -d rabbitmq-server-generic-unix-3.7.7.tar.xz
tar xf rabbitmq-server-generic-unix-3.7.7.tar
(2)安装依赖:
    yum install python -y
    yum install xmlto -y
    yum install python-simplejson -y
(3)启动:
cd rabbitmq/sbin/
./rabbitmq-server
正常到这里就完成安装了,但是我的并没有,报错了
踩坑(报错四部曲)
(1)启动报错啊
显示./rabbitmq-server:行85: erl: 未找到命令
解决办法执行
vim /etc/profile
在文件中添加:
ERL_HOME=/usr/local/erlang
export PATH=$PATH:$ERL_HOME/bin
(2)再启动还报错
显示错误如下:
Error description:
    init:do_boot/3
    init:start_em/1
    rabbit:start_it/1 line 450
    rabbit:broker_start/0 line 324
    rabbit_plugins:prepare_plugins/1 line 289
    rabbit_plugins:ensure_dependencies/1 line 263
throw:{error,{missing_dependencies,[crypto,ssl],
                                   [amqp10_client,cowboy,cowlib,rabbitmq_aws,
                                    rabbitmq_management,
                                    rabbitmq_management_agent,rabbitmq_shovel,
                                    rabbitmq_trust_store]}}
解决方法:
应该是缺少依赖,openssl的两个包
看一下自己的Linux下有没有
which openssl
我的里面是有的,显示
/usr/bin/openssl
看一下版本
openssl version
版本有点老,可能是这个原因。
重新安装spenssl
https://www.openssl.org/source/
安装的话就找个教程就完事了
(3)安装完再启动还报错
错误信息:
c
 /usr/local/openssl/bin/openssl: error while loading shared libraries: libssl.so.1.1: cannot open shared object file: No such file or directory
其实就是找不到libssl.so.1.1
可以做一个软连接
假如你的libssl.so.1.1 文件在/usr/local/openssl/lib/下面,可以这样做
ln -s /usr/local/openssl/lib/libssl.so.1.1 /usr/lib64/libssl.so.1.1
ln -s /usr/local/openssl/lib/libcrypto.so.1.1 /usr/lib64/libcrypto.so.1.1
完成后看一下当前版本
openssl version
显示OpenSSL 1.1.0g 2 Nov 2017
然后重启一般就可以了
(4)还报错,和2一样的错误
然而我的还是还是不行,怎么办,重装erlang,
然后启动rabbitmq就好使了。
会看到log
tail -f /usr/local/rabbitmq/var/log/rabbitmq/[email protected]
看一下启动起来没有,一般是在5672端口启动的,可以看一下5672端口有没有在监听
netstat -nap | grep 5672
也可以执行
ps -ef | gerp rabbitmq
看RabbitMQ相关的服务有没有启动
关闭RabbitMQ
./rabbitmqctl stop
把rabbitmq-server 写到环境变量中
vim /etc/profile
在文件中写入
export PATH=$PATH:/usr/local/ruby/bin:/usr/local/erlang/bin:/usr/local/rabbitmq/sbin
怎么让RabbitMQ在后台运行:
./rabbitmq-server -detached
RabbitMQ基本原理
讲解基础概念的前面,我们先来整体构造一个结构图,这样会方便们更好地去理解RabbitMQ的基本原理。
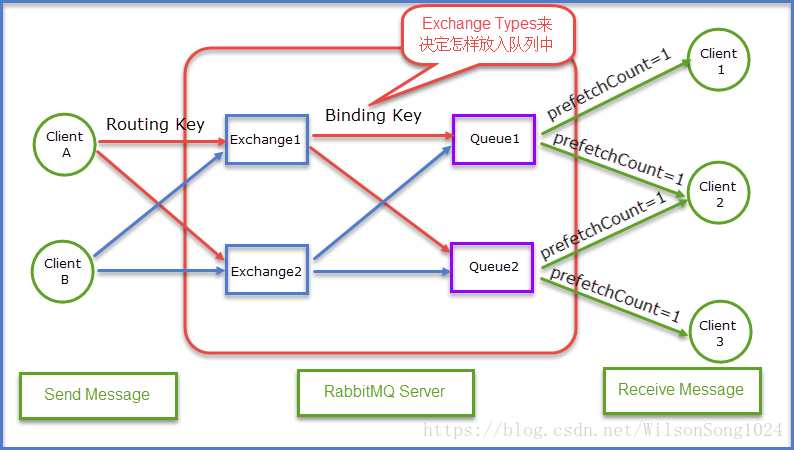
通过上面这张应用相结合的结构图既能够清晰的看清楚整体的send Message到Receive Message的一个大致的流程。当然上面有很多名词都相比还没有介绍到,不要着急接下来我们就开始对其进行详细的讲解。
Queue
Queue(队列)RabbitMQ的作用是存储消息,队列的特性是先进先出。上图可以清晰地看到Client A和Client B是生产者,生产者生产消息最终被送到RabbitMQ的内部对象Queue中去,而消费者则是从Queue队列中取出数据。可以简化成表示为:
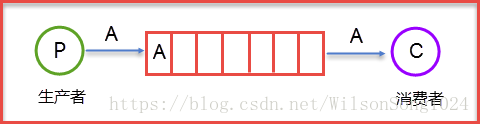
生产者Send Message “A”被传送到Queue中,消费者发现消息队列Queue中有订阅的消息,就会将这条消息A读取出来进行一些列的业务操作。这里只是一个消费正对应一个队列Queue,也可以多个消费者订阅同一个队列Queue,当然这里就会将Queue里面的消息平分给其他的消费者,但是会存在一个一个问题就是如果每个消息的处理时间不同,就会导致某些消费者一直在忙碌中,而有的消费者处理完了消息后一直处于空闲状态,因为前面已经提及到了Queue会平分这些消息给相应的消费者。这里我们就可以使用prefetchCount来限制每次发送给消费者消息的个数。详情见下图所示:
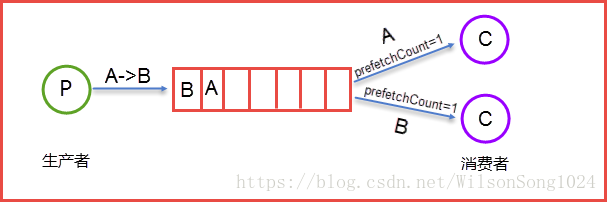
这里的prefetchCount=1是指每次从Queue中发送一条消息来。等消费者处理完这条消息后Queue会再发送一条消息给消费者。
Exchange
我们在开篇的时候就留了一个坑,就是那个应用结构图里面,消费者Client A和消费者Client B是如何知道我发送的消息是给Queue1还是给Queue2,有没有过这个问题,那么我们就来解开这个面纱,看看到底是个什么构造。首先明确一点就是生产者产生的消息并不是直接发送给消息队列Queue的,而是要经过Exchange(交换器),由Exchange再将消息路由到一个或多个Queue,当然这里还会对不符合路由规则的消息进行丢弃掉,这里指的是后续要谈到的Exchange Type。那么Exchange是怎样将消息准确的推送到对应的Queue的呢?那么这里的功劳最大的当属Binding,RabbitMQ是通过Binding将Exchange和Queue链接在一起,这样Exchange就知道如何将消息准确的推送到Queue中去。简单示意图如下所示:
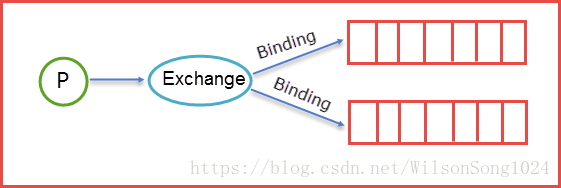
在绑定(Binding)Exchange和Queue的同时,一般会指定一个Binding Key,生产者将消息发送给Exchange的时候,一般会产生一个Routing Key,当Routing Key和Binding Key对应上的时候,消息就会发送到对应的Queue中去。那么Exchange有四种类型,不同的类型有着不同的策略。也就是表明不同的类型将决定绑定的Queue不同,换言之就是说生产者发送了一个消息,Routing Key的规则是A,那么生产者会将Routing Key=A的消息推送到Exchange中,这时候Exchange中会有自己的规则,对应的规则去筛选生产者发来的消息,如果能够对应上Exchange的内部规则就将消息推送到对应的Queue中去。那么接下来就来详细讲解下Exchange里面类型。
Exchange Type
fanout
fanout类型的Exchange路由规则非常简单,它会把所有发送到该Exchange的消息路由到所有与它绑定的Queue中。
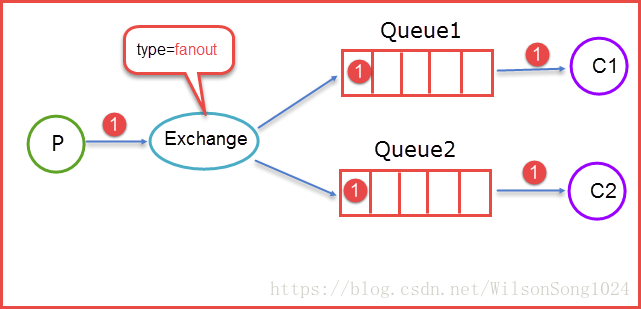
上图所示,生产者(P)生产消息1将消息1推送到Exchange,由于Exchange Type=fanout这时候会遵循fanout的规则将消息推送到所有与它绑定Queue,也就是图上的两个Queue最后两个消费者消费。
direct
direct类型的Exchange路由规则也很简单,它会把消息路由到那些binding key与routing key完全匹配的Queue中
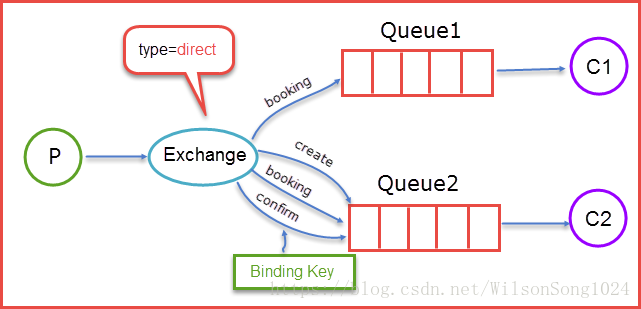
当生产者(P)发送消息时Rotuing key=booking时,这时候将消息传送给Exchange,Exchange获取到生产者发送过来消息后,会根据自身的规则进行与匹配相应的Queue,这时发现Queue1和Queue2都符合,就会将消息传送给这两个队列,如果我们以Rotuing key=create和Rotuing key=confirm发送消息时,这时消息只会被推送到Queue2队列中,其他Routing Key的消息将会被丢弃。
topic
前面提到的direct规则是严格意义上的匹配,换言之Routing Key必须与Binding Key相匹配的时候才将消息传送给Queue,那么topic这个规则就是模糊匹配,可以通过通配符满足一部分规则就可以传送。它的约定是:
- routing key为一个句点号“. ”分隔的字符串(我们将被句点号“. ”分隔开的每一段独立的字符串称为一个单词),如“stock.usd.nyse”、“nyse.vmw”、“quick.orange.rabbit”
- binding key与routing key一样也是句点号“. ”分隔的字符串
- binding key中可以存在两种特殊字符“”与“#”,用于做模糊匹配,其中“”用于匹配一个单词,“#”用于匹配多个单词(可以是零个)

当生产者发送消息Routing Key=F.C.E的时候,这时候只满足Queue1,所以会被路由到Queue中,如果Routing Key=A.C.E这时候会被同是路由到Queue1和Queue2中,如果Routing Key=A.F.B时,这里只会发送一条消息到Queue2中。
headers
headers类型的Exchange不依赖于routing key与binding key的匹配规则来路由消息,而是根据发送的消息内容中的headers属性进行匹配。
在绑定Queue与Exchange时指定一组键值对;当消息发送到Exchange时,RabbitMQ会取到该消息的headers(也是一个键值对的形式),对比其中的键值对是否完全匹配Queue与Exchange绑定时指定的键值对;如果完全匹配则消息会路由到该Queue,否则不会路由到该Queue。
该类型的Exchange没有用到过(不过也应该很有用武之地),所以不做介绍。
总结成表格:
| 类型名称 | 类型描述 |
|---|---|
| Fandout | 把所有发送到该Exchange的消息路由到所有与它绑定的Queue中 |
| Direct | Routing Key==Binding Key |
| Topic | 模糊匹配 |
| Headers | Exchange不依赖于routing key与binding key的匹配规则来路由消息,而是根据发送的消息内容中的headers属性进行匹配。 |
Binding
所谓绑定就是将一个特定的 Exchange 和一个特定的 Queue 绑定起来。Exchange 和Queue的绑定可以是多对多的关系。
通信过程
假设P1和C1注册了相同的Broker,Exchange和Queue。P1发送的消息最终会被C1消费。基本的通信流程大概如下所示:
- P1生产消息,发送给服务器端的Exchange
- Exchange收到消息,根据ROUTINKEY,将消息转发给匹配的Queue1
- Queue1收到消息,将消息发送给订阅者C1
- C1收到消息,发送ACK给队列确认收到消息
- Queue1收到ACK,删除队列中缓存的此条消息
Consumer收到消息时需要显式的向rabbit broker发送basic.ack消息或者consumer订阅消息时设置auto_ack参数为true。在通信过程中,队列对ACK的处理有以下几种情况:
- 如果consumer接收了消息,发送ack,rabbitmq会删除队列中这个消息,发送另一条消息给consumer。
- 如果cosumer接受了消息, 但在发送ack之前断开连接,rabbitmq会认为这条消息没有被deliver,在consumer在次连接的时候,这条消息会被redeliver。
- 如果consumer接受了消息,但是程序中有bug,忘记了ack,rabbitmq不会重复发送消息。
- rabbitmq2.0.0和之后的版本支持consumer reject某条(类)消息,可以通过设置requeue参数中的reject为true达到目地,那么rabbitmq将会把消息发送给下一个注册的consumer。
SpringBoot集成RabbitMQ
(1)添加依赖
 <!--rabbitmq-->
    <dependency>
      <groupId>org.springframework.boot</groupId>
      <artifactId>spring-boot-starter-amqp</artifactId>
    </dependency>
(2)添加配置
#rabbitmq
spring.rabbitmq.host=192.168.78.133
spring.rabbitmq.port=5672
spring.rabbitmq.username=guest
spring.rabbitmq.password=guest
spring.rabbitmq.virtual-host=/
#消费者数量
#消费者队列的数量
spring.rabbitmq.listener.simple.concurrency= 10
spring.rabbitmq.listener.simple.max-concurrency= 10
#消费者每次从队列获取的消息数量
spring.rabbitmq.listener.simple.prefetch= 1
#消费者自动启动
spring.rabbitmq.listener.simple.auto-startup=true
#消费失败,自动重新入队
spring.rabbitmq.listener.simple.default-requeue-rejected= true
#启用发送重试
#队列的发送者,队列满了就重置
spring.rabbitmq.template.retry.enabled=true
spring.rabbitmq.template.retry.initial-interval=1000
spring.rabbitmq.template.retry.max-attempts=3
spring.rabbitmq.template.retry.max-interval=10000
spring.rabbitmq.template.retry.multiplier=1.0
配置去这里找:
https://docs.spring.io/spring-boot/docs/2.0.4.RELEASE/reference/htmlsingle/
配置完成之后,RabbitMQ有4种交换机模式,下面分别实现下。
4种交换机模式实现
Direct、Topic、Fanout和Headers模式的实现如下:
(1)初始化队列
package com.springboot.SecKill.rabbitmq;

import org.springframework.amqp.core.*;
import org.springframework.context.annotation.Bean;
import org.springframework.context.annotation.Configuration;
import org.springframework.retry.annotation.Backoff;

import java.util.HashMap;
import java.util.Map;

/**
 * rabbitMQ配置初始化
 * @author WilsonSong
 * @date 2018/8/8
 */
@Configuration
public class MQConfig {

    public static final String QUEUE = "queue";
    public static final String TOPIC_QUEUE1 = "topic.queue1";
    public static final String TOPIC_QUEUE2 = "topic.queue2";
    public static final String FANOUT_QUEUE1 = "fanout.queue1";
    public static final String FANOUT_QUEUE2 = "fanout.queue2";
    public static final String HEADERS_QUEUE = "headers.queue";
    public static final String TOPIC_EXCHANGE = "topicExchange";
    public static final String FANOUT_EXCHANGE = "fanoutExchange";
    public static final String HEADERS_EXCHANGE = "headersExchange";

    /**
     * Direct 交换机模式
     */
    //队列
    @Bean
    public Queue queue() {
        return new Queue(QUEUE,true);
    }

    /**
     * Topic 交换机模式
     */
    @Bean
    public Queue topicQueue1(){
        return new Queue(TOPIC_QUEUE1,true);
    }
    @Bean
    public Queue topicQueue2(){
        return new Queue(TOPIC_QUEUE2,true);
    }
    @Bean
    public TopicExchange topicExchange(){
        return new TopicExchange(TOPIC_EXCHANGE);
    }
    /**
     * 绑定Exchange和queue
     */
    @Bean
    public Binding topicBinding1(){
        return BindingBuilder.bind(topicQueue1()).to(topicExchange()).with("topic.key1");
    }
    @Bean
    public Binding topicBinding2(){
        return BindingBuilder.bind(topicQueue2()).to(topicExchange()).with("topic.#"); //# 通配符,代表多个单词
    }

    /**
     * Fanout模式 交换机Exchange
     */
    @Bean
    public Queue fanoutQueue1(){
        return new Queue(FANOUT_QUEUE1,true);
    }
    @Bean
    public Queue fanoutQueue2(){
        return new Queue(FANOUT_QUEUE2,true);
    }
    @Bean
    public FanoutExchange fanoutExchange(){
        return new FanoutExchange(FANOUT_EXCHANGE);
    }
    @Bean
    public Binding fanoutBinding1(){
        return BindingBuilder.bind(fanoutQueue1()).to(fanoutExchange());
    }

    @Bean
    public Binding fanoutBinding2(){
        return BindingBuilder.bind(fanoutQueue2()).to(fanoutExchange());
    }

    /**
     * Header模式 交换机Exchange
     */
    @Bean
    public HeadersExchange headersExchange(){
        return new HeadersExchange(HEADERS_EXCHANGE);
    }
    @Bean
    public Queue headersQueue(){
        return new Queue(HEADERS_QUEUE,true);
    }
    @Bean
    public Binding headersBinding(){
        Map<String, Object> map = new HashMap<>();
        map.put("header1","value1");
        map.put("header2","value2");
        return BindingBuilder.bind(headersQueue()).to(headersExchange()).whereAll(map).match();
    }
}
(2)消息发送者
package com.springboot.SecKill.rabbitmq;

import com.springboot.SecKill.redis.RedisService;
import org.slf4j.Logger;
import org.slf4j.LoggerFactory;
import org.springframework.amqp.core.AmqpTemplate;
import org.springframework.amqp.core.Message;
import org.springframework.amqp.core.MessageProperties;
import org.springframework.beans.factory.annotation.Autowired;
import org.springframework.stereotype.Service;

/**
 * @author WilsonSong
 * @date 2018/8/8
 */
@Service
public class MQSender {

    private static final Logger logger = LoggerFactory.getLogger(MQReceiver.class);

    @Autowired
    AmqpTemplate amqpTemplate;

    /**
     * Direct 交换机模式
     */
    //消息发送到队列
    public void send(Object message){

        String msg = RedisService.Bean2String(message);
        logger.info("send topic message: " + msg);
        amqpTemplate.convertAndSend(MQConfig.QUEUE, msg);
    }

    /**
     * Topic 交换机模式
     */
    public void sendTopic(Object message){
        String msg = RedisService.Bean2String(message);
        logger.info("send topic message: " + msg);
        amqpTemplate.convertAndSend(MQConfig.TOPIC_EXCHANGE,"topic.key1",msg+"1");
        amqpTemplate.convertAndSend(MQConfig.TOPIC_EXCHANGE,"topic.key2",msg+"1");
    }

    /**
     * Fanout模式 交换机Exchange
     */
    public void sendFanout(Object message){
        String msg = RedisService.Bean2String(message);
        logger.info("send fanout message: " + msg);
        amqpTemplate.convertAndSend(MQConfig.FANOUT_EXCHANGE,"",msg+"1");
    }

    /**
     * Header模式 交换机Exchange
     *"header1","value1"要与队列初始化的时候一样
     */
    public void sendHeaders(Object message){
        String msg = RedisService.Bean2String(message);
        logger.info("send headers message: " + msg);
        MessageProperties properties = new MessageProperties();
        properties.setHeader("header1","value1");
        properties.setHeader("header2","value2");
        Message obj = new Message(msg.getBytes(),properties);
        amqpTemplate.convertAndSend(MQConfig.HEADERS_EXCHANGE,"",obj);
    }


}
(3)消息接收
package com.springboot.SecKill.rabbitmq;

import org.slf4j.Logger;
import org.slf4j.LoggerFactory;
import org.springframework.amqp.rabbit.annotation.RabbitListener;
import org.springframework.stereotype.Service;

/**
 * @author WilsonSong
 * @date 2018/8/8
 */
@Service
public class MQReceiver {

    private static final Logger logger = LoggerFactory.getLogger(MQReceiver.class);

    /**
     * Direct 交换机模式
     */
    @RabbitListener(queues = MQConfig.QUEUE)
    public void receive(String message){
        logger.info("receive message" + message);
    }

    /**
     * Topic 交换机模式
     */
    @RabbitListener(queues = MQConfig.TOPIC_QUEUE1)
    public void receiveTopic1(String message){
        logger.info("receive topic queue1 message: " + message);
    }

    @RabbitListener(queues = MQConfig.TOPIC_QUEUE2)
    public void receiveTopic2(String message){
        logger.info("receive topic queue2 message: " + message);
    }

    /**
     * Fanout模式 交换机Exchange
     */
    @RabbitListener(queues = MQConfig.FANOUT_QUEUE1)
    public void receiveFanout1(String message){
        logger.info("receive fanout queue1 message: " + message);
    }

    @RabbitListener(queues = MQConfig.FANOUT_QUEUE2)
    public void receiveFanout2(String message){
        logger.info("receive fanout queue2 message: " + message);
    }

    /**
     * Header模式 交换机Exchange
     */
    @RabbitListener(queues = MQConfig.HEADERS_QUEUE)
    public void receiveFanout2(byte[] message){
        logger.info("receive headers queue message: " + new String(message));
    }
}
启动程序,报错了
Caused by: com.rabbitmq.client.AuthenticationFailureException: ACCESS_REFUSED - Login was refused using authentication mechanism PLAIN. For details see the broker logfile.其实就是拒绝我们访问啊,因为我们定义的时候就是默认的用户名和密码
spring.rabbitmq.username=guest
spring.rabbitmq.password=guest
为什么默认的是这俩?
看一下rabbitMQ的变量定义就知道了:
/**
     * Login user to authenticate to the broker.
     */
    private String username = "guest";

    /**
     * Login to authenticate against the broker.
     */
    private String password = "guest";
怎么改呢?
官网这么说的
“guest” user can only connect via localhost
By default, the guest user is prohibited from connecting to the broker remotely; it can only connect over a loopback interface (i.e. localhost). This applies both to AMQP 0-9-1 and to any other protocols enabled via plugins. Any other users you create will not (by default) be restricted in this way.
The recommended way to address this in production systems is to create a new user or set of users with the permissions to access the necessary virtual hosts. This can be done using CLI tools, HTTP API or definitions import.
This is configured via the loopback_users item in the configuration file.
If you wish to allow the guest user to connect from a remote host, you should set the loopback_users configuration to none. A complete RabbitMQ config file which does this would look like:
loopback_users = none
Or, in the classic config file format (rabbitmq.config):
[{rabbit, [{loopback_users, []}]}].
其实第二种就是在usr/local/rabbitmq/etc/rabbitmq下新建rabbitmq.config文件,添加
[{rabbit, [{loopback_users, []}]}].
重启rabbitmq在运行程序就可以了