一:自定义开发代码部分
//情况1:程序之前处于关闭状态,刚启动应用程序
- (BOOL)application:(UIApplication )application didFinishLaunchingWithOptions:(NSDictionary )launchOptions {
// 程序在死亡状态(杀掉进程),再次启动,收到推送通知,跳转至对应页面
if ([launchOptions objectForKey:UIApplicationLaunchOptionsRemoteNotificationKey]) {
NSDictionary * userInfo = [launchOptions objectForKey:UIApplicationLaunchOptionsRemoteNotificationKey];
self.notificationUserInfo = userInfo;
// 这里延迟1秒 否则不执行跳转
[self performSelector:@selector(skipToMessageCenter) withObject:nil afterDelay:1];
}
return YES;
}
//情况2:程序在未死亡状态,通知到来,会执行此代理,这里做跳转就好
- (void)application:(UIApplication )application didReceiveRemoteNotification:(NSDictionary )userInfo {
if (application.applicationState == UIApplicationStateActive) {
if(![[User sharedInstance] isRefuseJPush]){
}
} else if (application.applicationState == UIApplicationStateInactive) {
if(![[User sharedInstance] isRefuseJPush]){
}
MessageModel * messageModel = [[MessageModel alloc] initWithNoticeDic:userInfo];
// BOOL isSaveSuccess = [[CustomMessageRepository alloc] insertCustomMessage:messageModel];
// if (isSaveSuccess) {
// NSLog(@”缓存通知成功!”);
// }else{
// NSLog(@”缓存通知失败!”);
// }
MessageToSpecificViewController * messageToSpecificViewController = [[MessageToSpecificViewController alloc] init];
[messageToSpecificViewController messageFromViewController:self.rootViewController toSpecificViewControllerWithMessage:messageModel];
}
[self gainUserInfoDicWithDic:userInfo];
[APService handleRemoteNotification:userInfo];
}
-(void)skipToMessageCenter {
dispatch_async(dispatch_get_main_queue(), ^{
// 根据通知内容,跳转至不同页面
MessageModel * messageModel = [[MessageModel alloc] initWithNoticeDic:self.notificationUserInfo];
MessageToSpecificViewController * messageToSpecificViewController = [[MessageToSpecificViewController alloc] init];
[messageToSpecificViewController messageFromViewController:self.rootViewController toSpecificViewControllerWithMessage:messageModel];
});
}
二:远程推送应用配置过程
创建支持远程推送功能的App ID
申请开发者证书,并选中刚刚创建的App ID
下载CER文件,并导入钥匙串管理
申请发布证书,并选中刚刚创建的App ID
下载CER文件,并导入钥匙串管理
检查App ID,确认证书已经指定
远程推送应用程序开发过程
新建应用程序
指定AppID,在developer.apple.com上设置的AppID
ifdef __IPHONE_8_0
// 注册接收通知的类型
UIUserNotificationSettings *settings = [UIUserNotificationSettings settingsForTypes:UIUserNotificationTypeAlert | UIUserNotificationTypeBadge | UIUserNotificationTypeSound categories:nil];
[application registerUserNotificationSettings:settings];
// 注册允许接收远程推送通知
[application registerForRemoteNotifications];
else
// 如果是iOS7.0,使用以下方法注册
[application registerForRemoteNotificationTypes:UIUserNotificationTypeAlert | UIUserNotificationTypeBadge | UIUserNotificationTypeSound];
endif
// 当得到苹果的APNs服务器返回的DeviceToken就会被调用
// 7040f7d5 5a974598 c5cf31b5 3e340b39 68affd25 122f0ce1 3f315226 396c2e5b
- (void)application:(UIApplication )application didRegisterForRemoteNotificationsWithDeviceToken:(NSData )deviceToken {
NSLog(@”deviceToken是:%@”, deviceToken);
}
// 接收到远程通知,触发方法和本地通知一致
- (void)application:(UIApplication )application didReceiveRemoteNotification:(NSDictionary )userInfo {
NSLog(@”%@”, userInfo);
}
* 使用后台的远程消息推送
1> 在Capabilities中打开远程推送通知
2> 实现代理方法
- (void)application:(UIApplication )application didReceiveRemoteNotification:(NSDictionary )userInfo fetchCompletionHandler:(void (^)(UIBackgroundFetchResult))completionHandler
远程消息数据格式:
{“aps” : {“content-available” : 1},”content-id” : 42}
执行completionHandler有两个目的
1> 系统会估量App消耗的电量,并根据传递的UIBackgroundFetchResult 参数记录新数据是否可用
2> 调用完成的处理代码时,应用的界面缩略图会自动更新
注意:接收到远程通知到执行完网络请求之间的时间不能超过30秒
if (userInfo) {
int contentId = [userInfo[@”content-id”] intValue];
ViewController vc = (ViewController )application.keyWindow.rootViewController;
[vc loadDataWithContentID:contentId completion:^(NSArray *dataList) {
vc.dataList = dataList;
NSLog(@”刷新数据结束”);
completionHandler(UIBackgroundFetchResultNewData);
}];
} else {
completionHandler(UIBackgroundFetchResultNoData);
}
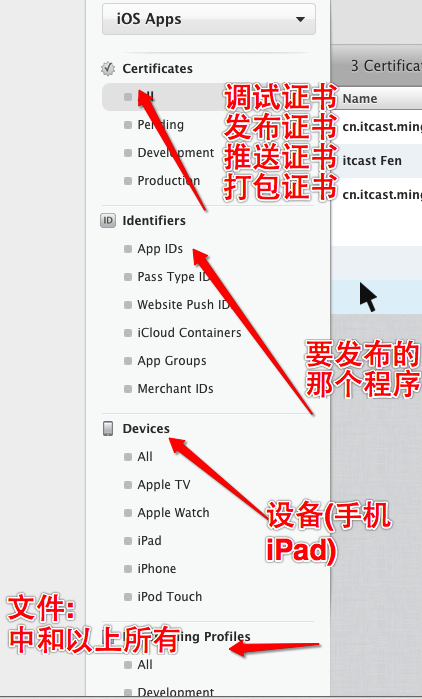
三、证书相关