一、序
只要是Java Web的开发者,相信没有不知道大名鼎鼎的Spring框架的。作为一个优秀的开源框架,Spring包含9大组件,如果想要通过源码去理解每一个组件,复杂度和所花费的时间都容易让人望而却步——笔者平时习惯阅读源码,但是在学习Spring这种级别的框架面前显然不是一个好选择。但是问题又来了,不阅读源码,如何深入理解Spring呢?笔者在搜索学习资料的时候在github找到了一个优秀的repo——https://github.com/code4craft/tiny-spring,通过参考其思路,自己动手实现一个简化版的Spring框架(这里只实现核心IOC部分,后续会有文章实现其他部分)。本文假设读者已经对Spring有了大致的理解,不会花太多篇幅介绍Spring,重点在实现上。
二、设计
首先花几分钟简单看一下Spring3.x的架构,虽然现在Spring都5.x了,但是我们现在是理解核心思路,看以前版本的架构图反而更清晰,下图转自网络:
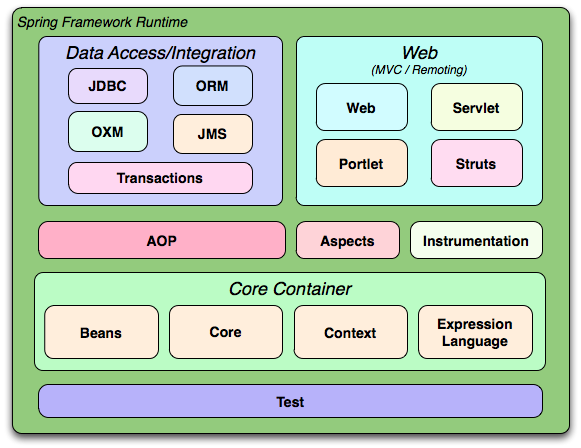
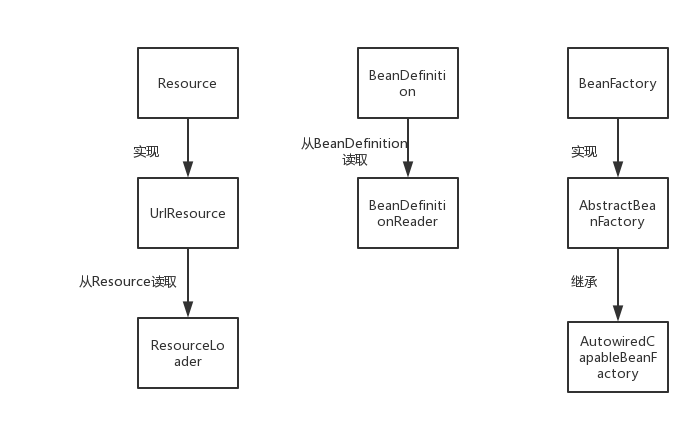
Spring含有十几个组件,核心的只有3个——Core,Context和Bean,那么这次我们就实现相对来说比较重要的Bean和Core,Context主要是一个起封装功能的作用,影响不大,放到以后完善。首先设计好我们的架构,首先我们需要一个Resource来存储我们需要的Bean信息来源和链接到我们需要的类,也需要一个BeanDefiinition对Bean进行描述和操作,还需要有一个BeanFactory来管理Bean。为了职责分明,再添加一个ResourceLoader对Resource存储的Bean信息进行读取,以及一个对BeanDefinition进行读取的BeanDefinitionReader,大致如下图:
三、实现
1、首先写Resource接口,只规定了一个通过流获取资源getInputStream()方法,方便实现不同的获取资源的方式:
1 package com.joe.io;
2
3 import java.io.InputStream;
4
5 public interface Resource {
6     InputStream getInputStream() throws Exception;
7 }
2、通过具体的类UrlResource实现Resource接口:
 1 package com.joe.io;
 2
 3 import java.io.InputStream;
 4 import java.net.URL;
 5 import java.net.URLConnection;
 6
 7 public class UrlResource implements Resource {
 8
 9     private URL url;
10
11     public UrlResource(URL url) {
12         this.url = url;
13     }
14
15     public InputStream getInputStream() throws Exception {
16         URLConnection urlConnection = url.openConnection();
17         urlConnection.connect();
18         return urlConnection.getInputStream();
19     }
20 }
这里底层用了java.net包的URL以及相关类去操作资源的获取,核心方法就一个getInputStream(),这里通过URLConnection去获取资源,读者想了解底层细节可以自行google。那么作为入参的URL是由谁传入的呢?自然是我们接下来要介绍的ResourceLoader。
3、负责读取Resource的资源加载器ResourceLoader类:
 1 package com.joe.io;
 2
 3 import java.net.URL;
 4
 5 public class ResourceLoader {
 6
 7     public Resource getResource(String location) {
 8         URL url = this.getClass().getClassLoader().getResource(location);
 9         return new UrlResource(url);
10     }
11 }
这里很清晰地看到,getResource()方法把接收到的String作为参数,通过获取当前的类加载器,调用ClassLoader.getResource(String location)方法将返回的URL传递给我们的Resource(同上,ClassLoader相关api原理和本文关系不大,想学习的读者的自行google),至此资源加载器的功能就完成了。
4、描述Bean的BeanDefinition类:
 1 package com.joe;
 2
 3 public class BeanDefinition {
 4     private Object bean;// 对象实例
 5
 6     private Class beanClass;//bean的类型
 7
 8     private String beanClassName;//类名
 9
10     private PropertyValues propertyValues;
11
12     public Object getBean() {
13         return bean;
14     }
15
16     public void setBean(Object bean) {
17         this.bean = bean;
18     }
19
20     public Class getBeanClass() {
21         return beanClass;
22     }
23
24     public void setBeanClass(Class beanClass) {
25         this.beanClass = beanClass;
26     }
27
28     public String getBeanClassName() {
29         return beanClassName;
30     }
31
32     public void setBeanClassName(String beanClassName) {
33         this.beanClassName = beanClassName;
34         try {
35             this.beanClass = Class.forName(beanClassName);
36         } catch (ClassNotFoundException e) {
37             e.printStackTrace();
38         }
39     }
40
41     public PropertyValues getPropertyValues() {
42         if (propertyValues == null) {
43             propertyValues = new PropertyValues();
44         }
45         return propertyValues;
46     }
47
48     public void setPropertyValues(PropertyValues propertyValues) {
49         this.propertyValues = propertyValues;
50     }
51 }
BeanDefinition为了对Bean进行描述和初始化,所以需要持有以下变量:
1) Object bean,用来存储Bean,也就是具体的对象实例;
2) Class beanClass,用来存储bean的Class类型;
3) Class beanClassName,用来存储bean的具体类名;
4) PropertyValues propertyValues,用来随着bean一起注入IOC容器的类变量。
前三个变量没什么好说的,PropertyValues主要用来存储类变量,我们稍后对其进行实现。
5、定义好了描述Bean,为了职责分明,我们还需要对一个其进行读取的BeanDefinitonReader接口:
1 package com.joe;
2
3 public interface BeanDefinitionReader {
4     void loadBeanDefinitions(String location) throws Exception;
5 }
定义一个方法供IOC容器在初始化的时候从location指定的位置进行资源以及Bean的加载,在这里我们只实现xml加载方式。
6、AbstractBeanDefinitionReader,在我们实现具体的通过xml进行Bean加载器之前,为了通用性(实际场景,不可能只通过xml去解析Bean资源),我们实现一个抽象的Bean加载器类:
 1 package com.joe;
 2
 3 import java.util.HashMap;
 4 import java.util.Map;
 5
 6 import com.joe.io.ResourceLoader;
 7
 8 public abstract class AbstractBeanDefinitionReader implements BeanDefinitionReader {
 9
10     private Map<String, BeanDefinition> registry;
11
12     private ResourceLoader resourceLoader;
13
14     public AbstractBeanDefinitionReader(ResourceLoader resourceLoader) {
15         this.registry = new HashMap<String, BeanDefinition>();
16         this.resourceLoader = resourceLoader;
17     }
18
19     public Map<String, BeanDefinition> getRegistry() {
20         return registry;
21     }
22
23     public ResourceLoader getResourceLoader() {
24         return resourceLoader;
25     }
26 }
抽象类除了持有Map<String, BeanDefinition>以方便Bean的注册外,还持有一个我们之前实现的资源加载器ResourceLoader,稍后介绍资源加载器的作用。
7、XmlBeanDefinitionReader,这部分内容涉及比较多的细节,比如dom解析文件节点等操作,可以选择性跳过,理解思路即可:
 1 package com.joe.xml;
 2
 3 import java.io.InputStream;
 4
 5 import javax.xml.parsers.DocumentBuilder;
 6 import javax.xml.parsers.DocumentBuilderFactory;
 7
 8 import org.w3c.dom.Document;
 9 import org.w3c.dom.Element;
10 import org.w3c.dom.Node;
11 import org.w3c.dom.NodeList;
12
13 import com.joe.AbstractBeanDefinitionReader;
14 import com.joe.BeanDefinition;
15 import com.joe.BeanReference;
16 import com.joe.PropertyValue;
17 import com.joe.io.ResourceLoader;
18
19 public class XmlBeanDefinitionReader extends AbstractBeanDefinitionReader {
20
21     public XmlBeanDefinitionReader(ResourceLoader resourceLoader) {
22         super(resourceLoader);
23     }
24
25     public void loadBeanDefinitions(String location) throws Exception {
26         InputStream inputStream = getResourceLoader().getResource(location).getInputStream();
27         doLoadBeanDefinitions(inputStream);
28     }
29
30     protected void doLoadBeanDefinitions(InputStream inputStream) throws Exception {
31         DocumentBuilderFactory factory = DocumentBuilderFactory.newInstance();
32         DocumentBuilder docBuilder = factory.newDocumentBuilder();
33         Document doc = docBuilder.parse(inputStream);
34         // 解析bean
35         registerBeanDefinitions(doc);
36         inputStream.close();
37     }
38
39     public void registerBeanDefinitions(Document doc) {
40         Element root = doc.getDocumentElement();
41
42         parseBeanDefinitions(root);
43     }
44
45     protected void parseBeanDefinitions(Element root) {
46         NodeList nl = root.getChildNodes();
47         for (int i = 0; i < nl.getLength(); i++) {
48             Node node = nl.item(i);
49             if (node instanceof Element) {
50                 Element ele = (Element) node;
51                 processBeanDefinition(ele);
52             }
53         }
54     }
55
56     protected void processBeanDefinition(Element ele) {
57         String name = ele.getAttribute("id");
58         String className = ele.getAttribute("class");
59         BeanDefinition beanDefinition = new BeanDefinition();
60         processProperty(ele, beanDefinition);
61         beanDefinition.setBeanClassName(className);
62         getRegistry().put(name, beanDefinition);
63     }
64
65     private void processProperty(Element ele, BeanDefinition beanDefinition) {
66         NodeList propertyNode = ele.getElementsByTagName("property");
67         for (int i = 0; i < propertyNode.getLength(); i++) {
68             Node node = propertyNode.item(i);
69             if (node instanceof Element) {
70                 Element propertyEle = (Element) node;
71                 String name = propertyEle.getAttribute("name");
72                 String value = propertyEle.getAttribute("value");
73                 if (value != null && value.length() > 0) {
74                     beanDefinition.getPropertyValues().addPropertyValue(new PropertyValue(name, value));
75                 } else {
76                     String ref = propertyEle.getAttribute("ref");
77                     if (ref == null || ref.length() == 0) {
78                         throw new IllegalArgumentException("Configuration problem: <property> element for property '"
79                                 + name + "' must specify a ref or value");
80                     }
81                     BeanReference beanReference = new BeanReference(ref);
82                     beanDefinition.getPropertyValues().addPropertyValue(new PropertyValue(name, beanReference));
83                 }
84             }
85         }
86     }
87 }
这个代码稍微多点,大致上就干了这么几件事:
1)加载xml:初始化时,把指定的xml文件(这里是xml,也可以是其他资源)加载进IOC容器,转化成流inputStream后存储到org.w3c.dom.Document,这里用到的org.w3c包里的对象比较多,分别有Document,Element,Node等。谁负责加载呢?自然就是我们之前定义的资源加载器ResourceLoader了,这时候,之前提到的抽象资源加载器类AbstractBeanDefinitionReader持有的ResourceLoader就发挥作用了,正是通过这个ResourceLoader完成一系列上述操作,忘了的读者可以回去看其实现。
2)获取xml中的各个节点:由1中获取到的Document对象中获得其Element元素,Element描述了xml文件的各个定义bean的节点,也可以说是一个Element代表了一个xml中bean相关的标签,形如<bean id="...", class="...">以及其包括的内容。
3)注入bean:对各个Element元素遍历,获取标签中定义为id和class的内容,存储为name和className,name在5中讲解,className为完整描述了包路径的类名。
4)注入类变量:针对每个Element创建一个BeanDefinition,遍历Element包含的所有<property>标签(此标签定义了类变量),获取到类变量名以及希望注入的值,添加到BeanDefinition持有的PropertyValues中去。如果类变量是引用类型,则进行另外的处理,这里就不展开讲了,有兴趣的读者自行阅读源码。
5)初始化BeanDefiniton部分属性:完成变量的注入后,我们对BeanDefinition持有的其他类变量进行初始化,这里就用到3)中存储的类名name,通过Class.forName(name)获取到其类型,这样BeanDefiniton的beanClassName和beanClass也得到了初始化(还有bean的初始化呢?请带着疑问接着看下去),这里把name和BeanDefiniton注册到抽象资源加载器类AbstractBeanDefinitionReader持有的Map中。至此,资源加载器初始化完成,可以供bean工厂获取了。那么接下来要实现的自然是bean工厂。
8、BeanFactory接口:
 1 package com.joe.factory;
 2
 3 import com.joe.BeanDefinition;
 4
 5 public interface BeanFactory {
 6
 7     Object getBean(String name);
 8
 9     void registerBeanDefinition(String name, BeanDefinition beanDefinition) throws Exception;
10 }
一个获取Bean的getBean(),一个负责从资源加载器中获取并注册Bean的registerBeanDefinition()。
9、同样的考虑了通用性,实现了其抽象类:
 1 package com.joe.factory;
 2
 3 import java.util.concurrent.ConcurrentHashMap;
 4
 5 import com.joe.BeanDefinition;
 6
 7 public abstract class AbstractBeanFactory implements BeanFactory {
 8
 9     private ConcurrentHashMap<String, BeanDefinition> beanDefinitionMap = new ConcurrentHashMap<String, BeanDefinition>();
10
11     public Object getBean(String name) {
12         return beanDefinitionMap.get(name).getBean();
13     }
14
15     public void registerBeanDefinition(String name,
16             BeanDefinition beanDefinition) throws Exception {
17         // 何时设置beanDefinition的其他属性beanClass,beanClassName?——在BeanDefinitionReader加载xml文件的时候set(初始化的时候)
18         //测试用例指定要获取的beanClassName
19         Object bean = doCreateBean(beanDefinition);//beanDefinition.getBeanClass().newInstance()
20         beanDefinition.setBean(bean);
21         beanDefinitionMap.put(name, beanDefinition);
22     }
23
24     abstract Object doCreateBean(BeanDefinition beanDefinition) throws Exception;
25
26 }
抽象类持有负责存储注册bean的ConcurrentHashMap,关于ConcurrentHashMap的内容也不展开了,读者自行google关于它的内容。这个map的键为String的类名,值为BeanDefinition对象。这里创建类实例(交给实现类实现doCreateBean()去做),并且设置到BeanDefiniton中,至此,BeanDefiniton的所有属性都初始化完毕。可以注册到BeanDefinition工厂中了,beanDefinitonMap.put()方法注册完成后,bean工厂的初始化也正式宣告完成,可以等待代码获取bean了(工厂可以正式开始量产“对象”)。
10、AutowiredCapableBenafactory,第9中提到的如何创建类实例,我们通过实现doCreateBean()自行决定如何创建:
 1 package com.joe.factory;
 2
 3 import java.lang.reflect.*;
 4
 5 import com.joe.*;
 6
 7 public class AutowiredCapableBeanFactory extends AbstractBeanFactory {
 8
 9     @Override
10     Object doCreateBean(BeanDefinition beanDefinition) throws Exception {
11         Object bean = beanDefinition.getBeanClass().newInstance();
12         beanDefinition.setBean(bean);
13         applyPropertyValues(bean, beanDefinition);
14         return bean;
15     }
16
17     void applyPropertyValues(Object bean, BeanDefinition mdb) throws Exception {
18         for (PropertyValue propertyValue : mdb.getPropertyValues().getPropertyValues()) {
19             Field field = bean.getClass().getDeclaredField(propertyValue.getName());
20             field.setAccessible(true);
21             field.set(bean, propertyValue.getValue());
22         }
23     }
24
25 }
doCreateBena通过反射相关API创建实例bean,并设置给BeanDefiniton的bean属性,然后通过遍历BeanDefiniton的变量ProperyValues,还是通过反射,为变量设置从xml文件注入的值(回忆下刚刚资源加载器从如何从xml解析各个节点元素的值)。
11、之前提到用于描述类变量的PropertyValues和PropertyValue,注意两者的差别,两者配合使用,联系比较紧密,就两个类一起贴出来了。
package com.joe;

import java.util.ArrayList;
import java.util.List;

public class PropertyValues {

    private final List<PropertyValue> propertyValueList = new ArrayList<PropertyValue>();

    public PropertyValues() {}

    public void addPropertyValue(PropertyValue pv) {
        this.propertyValueList.add(pv);
    }

    public List<PropertyValue> getPropertyValues() {
        return this.propertyValueList;
    }
}


package com.joe;

public class PropertyValue {

    private final String name;

    public String getName() {
        return name;
    }

    public Object getValue() {
        return value;
    }

    private final Object value;

    public PropertyValue(String name, Object value) {
        this.name = name;
        this.value = value;
    }
}
12、为了读者能跑通UnitTest,也给出相关的其他类以及xml文件。
用于注入引用类型变量的BeanReference实现:
 1 package com.joe;
 2
 3 public class BeanReference {
 4
 5     private String name;
 6
 7     private Object bean;
 8
 9     public BeanReference(String name) {
10         this.name = name;
11     }
12
13     public String getName() {
14         return name;
15     }
16
17     public void setName(String name) {
18         this.name = name;
19     }
20
21     public Object getBean() {
22         return bean;
23     }
24
25     public void setBean(Object bean) {
26         this.bean = bean;
27     }
28 }
xml文件:
 1 <?xml version="1.0" encoding="UTF-8"?>
 2 <beans xmlns="http://www.springframework.org/schema/beans"
 3        xmlns:xsi="http://www.w3.org/2001/XMLSchema-instance" xmlns:aop="http://www.springframework.org/schema/aop"
 4        xmlns:tx="http://www.springframework.org/schema/tx" xmlns:context="http://www.springframework.org/schema/context"
 5        xsi:schemaLocation="
 6     http://www.springframework.org/schema/beans http://www.springframework.org/schema/beans/spring-beans-2.5.xsd
 7     http://www.springframework.org/schema/aop http://www.springframework.org/schema/aop/spring-aop-2.5.xsd
 8     http://www.springframework.org/schema/tx http://www.springframework.org/schema/tx/spring-tx-2.5.xsd
 9     http://www.springframework.org/schema/context http://www.springframework.org/schema/context/spring-context-2.5.xsd">
10
11     <bean id="helloWorldService" class="com.joe.HelloWorldServiceImpl">
12         <property name="text" value="Hello Joe"></property>
13     </bean>
14
15 </beans>
13:单元测试文件:
测试类BeanFactoryTest:
 1 package com.joe;
 2
 3 import static org.junit.Assert.*;
 4
 5 import java.util.Map;
 6
 7 import org.junit.Test;
 8
 9 import com.joe.factory.AbstractBeanFactory;
10 import com.joe.factory.AutowiredCapableBeanFactory;
11 import com.joe.io.ResourceLoader;
12 import com.joe.xml.XmlBeanDefinitionReader;
13
14 public class BeanFactoryTest {
15
16     @Test
17     public void test() throws Exception {
18         //初始化......
19         XmlBeanDefinitionReader xmlBeanDefinitionReader = new XmlBeanDefinitionReader(new ResourceLoader());
20         xmlBeanDefinitionReader.loadBeanDefinitions("tinyioc.xml");
21
22         AbstractBeanFactory beanFactory = new AutowiredCapableBeanFactory();
23         for (Map.Entry<String, BeanDefinition> beanDefinitionEntry : xmlBeanDefinitionReader.getRegistry().entrySet()) {
24             beanFactory.registerBeanDefinition(beanDefinitionEntry.getKey(), beanDefinitionEntry.getValue());
25         }
26         //初始化完毕,获取想要的bean
27         HelloWorldService helloWorldService = (HelloWorldService)beanFactory.getBean("helloWorldService");
28         helloWorldService.helloWorld();
29     }
30
31 }
测试用服务类以及其接口(一起贴出来了):
package com.joe;
public class HelloWorldServiceImpl implements HelloWorldService {

    private String text;

    public void setText(String text) {
        this.text = text;
    }

    @Override
    public void helloWorld() {
        System.out.println(text);
    }

}


package com.joe;
public interface HelloWorldService {

    void helloWorld();
}
四、总结
Spring作为一个通用的Web框架,其代码组织方式非常值得我们借鉴。接口、抽象类、实现类之间都很好的体现了开闭原则,各个类职责清晰,可以说是工厂模式,模板方法等等设计模式的一个很好的实践。这个简化版Spring,代码量虽然不大,但是也正因为这样,更适合新手理解和实践。