在搜集日志的过程中,日志文件的个数及日志文件需要不断的追加。flume1.6中,可以使用tail -f可以解决不断追加的文件,但是由于日志文件的个数是变化的,不可能只产生一个文件。所以tail -f就已经不能解决这个搜集日志的问题。
需求:
需要能够监控不断增加的文件,并且单个文件也是不断追加的
解决办法:
这时候flume1.7就产生了,很好的通过 TAILDIRl解决了这个问题。TAILDIRl可以监控一个目录下的文件。
官网地址:http://flume.apache.org/FlumeUserGuide.html
官网文档截图:

上面加粗为常用属性。
这里我们只使用了下面两个属性
a1.sources.source1.filegroups.f1 = /data/aboutyunlog/.*log.*
a1.sources.source1.type = TAILDIR
一、Flume安装
1. 压缩安装包
?
| 1 2 |
tar -zxvf ~ /jar/apache-flume-1 .7.0-bin. tar .gz -C /data mv /data/apache-flume-1 .7.0-bin/ /data/flume-1 .7.0 # 重命名 |
2. 配置环境变量
?
| 1 2 |
echo -e "export FLUME_HOME=/data/flume-1.7.0nexport PATH=$FLUME_HOME/bin:$PATH" >> ~/.bashrc source ~/.bashrc |
3. 配置flume
?
| 1 2 |
cp flume- env .sh.template flume- env .sh修改JAVA_HOME export JAVA_HOME= /data/jdk1 .8.0_111 |
4. 验证安装
?
| 1 |
flume-ng version |

二、Flume使用
一个agent由source、channel、sink组成。这儿我们使用Spooling Directory Source、File Channel、Kafka Sink。
1. 单节点的agent
1) 增加配置文件
?
| 1 2 |
cd $FLUME_HOME /conf vim single_agent.conf |
将以下内容拷贝进去
?
| 01 02 03 04 05 06 07 08 09 10 11 12 13 14 15 16 17 18 19 20 21 22 23 24 25 26 27 28 29 30 31 |
# agent的名称为a1 a1.sources = source1 a1.channels = channel1 a1.sinks = sink1 # set source #a1.sources.source1.type = spooldir a1.sources.source1. type = TAILDIR a1.sources.source1.filegroups = f1 a1.sources.source1.filegroups.f1 = /data/aboutyunlog/ .*log.* #a1.sources.source1.spoolDir=/data/aboutyunlog a1sources.source1.fileHeader = flase # set sink a1.sinks.sink1. type = org.apache.flume.sink.kafka.KafkaSink #a1.sinks.sink1.kafka.bootstrap.servers = master:9092,slave1:9092,slave2:9092 a1.sinks.sink1.brokerList= master:9092,slave1:9092,slave2:9092 a1.sinks.sink1.topic= aboutyunlog a1.sinks.sink1.kafka.flumeBatchSize = 20 a1.sinks.sink1.kafka.producer.acks = 1 a1.sinks.sink1.kafka.producer.linger.ms = 1 a1.sinks.sink1.kafka.producer.compression. type = snappy # set channel a1.channels.channel1. type = file a1.channels.channel1.checkpointDir = /data/flume_data/checkpoint a1.channels.channel1.dataDirs= /data/flume_data/data # bind a1.sources.source1.channels = channel1 a1.sinks.sink1.channel = channel1 |
2. 创建所需文件
?
| 1 2 3 |
mkdir -p /data/aboutyunlog mkdir -p /data/flume_data/checkpoint mkdir -p /data/flume_data/data |
3. 查看kafka现有的topic
?
| 1 |
kafka-topics.sh --zookeeper master:2181,slave1:2181,slave2:2181 --list |
4. 在kafka上创建名为aboutyunlog的topic
?
| 1 |
kafka-topics.sh --zookeeper master:2181,slave1:2181,slave2:2181 --create --topic aboutyunlog --replication-factor 1 --partitions 3 |
5. 启动flume
?
| 1 |
flume-ng agent --conf- file /data/flume-1 .6.0 /conf/single_agent .conf --name a1 -Dflume.root.logger=INFO,console |
启动过程中控制台会输出很多日志。
6. 创建一个kafka的consumer
?
| 1 |
kafka-console-consumer.sh --zookeeper master:2181,slave1:2181,slave2:2181 --topic aboutyunlog --from-beginning |
这条命令的意思是说创建aboutyunlog这个topic下的消费者,消费时从最开始的一条信息开始消费。
上图说明该消费者创建成功,由于本地/data/aboutyunlog目录下没有新文件加入,造成aboutyunlog这个topic没有信息输入,所以消费者没有得到一条信息。
7. 添加文件到flume source目录
?
| 1 2 |
echo -e "this is a test file! n[url]http://www.aboutyun.com20170820[/url]" mv log.1 /data/aboutyunlog/ |
为:echo -e "this is a test file! nhttp://www.aboutyun.com20170820">log.1
再次执行
?
| 1 |
echo -e "this is a test file! n[url]http://www.aboutyun.com20170820[/url]" >log.2 |

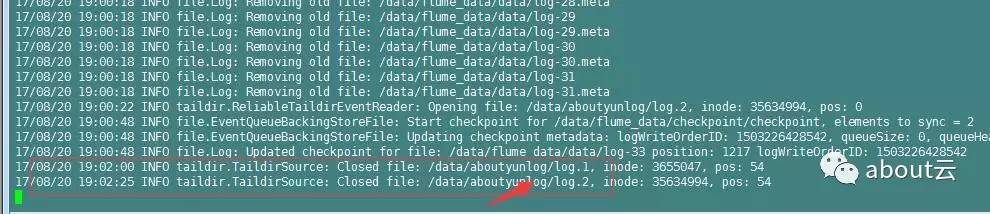
然后我们看到
master上
注意:需要通过xshell链接两个master。也就是打开两个master界面
8. 再次查看kafka consumer
切换到创建kafka consumer的shell界面,会看到我们log.1中文件的内容被打印在屏幕上。

上图说明我们已经成功使用flume监控/data/aboutyunlog目录,并将监控目录中的内容发送到kafka的aboutyunlog主题中。
注意:如果使用flume1.6会找不到类。
?
| 01 02 03 04 05 06 07 08 09 10 11 12 13 14 15 16 17 18 19 20 21 22 23 |
17 /08/17 19:21:08 ERROR node.PollingPropertiesFileConfigurationProvider: Failed to load configuration data. Exception follows. org.apache.flume.FlumeException: Unable to load source type : TAILDIR, class: TAILDIR at org.apache.flume. source .DefaultSourceFactory.getClass(DefaultSourceFactory.java:69) at org.apache.flume. source .DefaultSourceFactory.create(DefaultSourceFactory.java:42) at org.apache.flume.node.AbstractConfigurationProvider.loadSources(AbstractConfigurationProvider.java:322) at org.apache.flume.node.AbstractConfigurationProvider.getConfiguration(AbstractConfigurationProvider.java:97) at org.apache.flume.node.PollingPropertiesFileConfigurationProvider$FileWatcherRunnable.run(PollingPropertiesFileConfigurationProvider.java:140) at java.util.concurrent.Executors$RunnableAdapter.call(Executors.java:511) at java.util.concurrent.FutureTask.runAndReset(FutureTask.java:308) at java.util.concurrent.ScheduledThreadPoolExecutor$ScheduledFutureTask.access$301(ScheduledThreadPoolExecutor.java:180) at java.util.concurrent.ScheduledThreadPoolExecutor$ScheduledFutureTask.run(ScheduledThreadPoolExecutor.java:294) at java.util.concurrent.ThreadPoolExecutor.runWorker(ThreadPoolExecutor.java:1142) at java.util.concurrent.ThreadPoolExecutor$Worker.run(ThreadPoolExecutor.java:617) at java.lang.Thread.run(Thread.java:745) Caused by: java.lang.ClassNotFoundException: TAILDIR at java.net.URLClassLoader.findClass(URLClassLoader.java:381) at java.lang.ClassLoader.loadClass(ClassLoader.java:424) at sun.misc.Launcher$AppClassLoader.loadClass(Launcher.java:331) at java.lang.ClassLoader.loadClass(ClassLoader.java:357) at java.lang.Class.forName0(Native Method) at java.lang.Class.forName(Class.java:264) at org.apache.flume. source .DefaultSourceFactory.getClass(DefaultSourceFactory.java:67) |