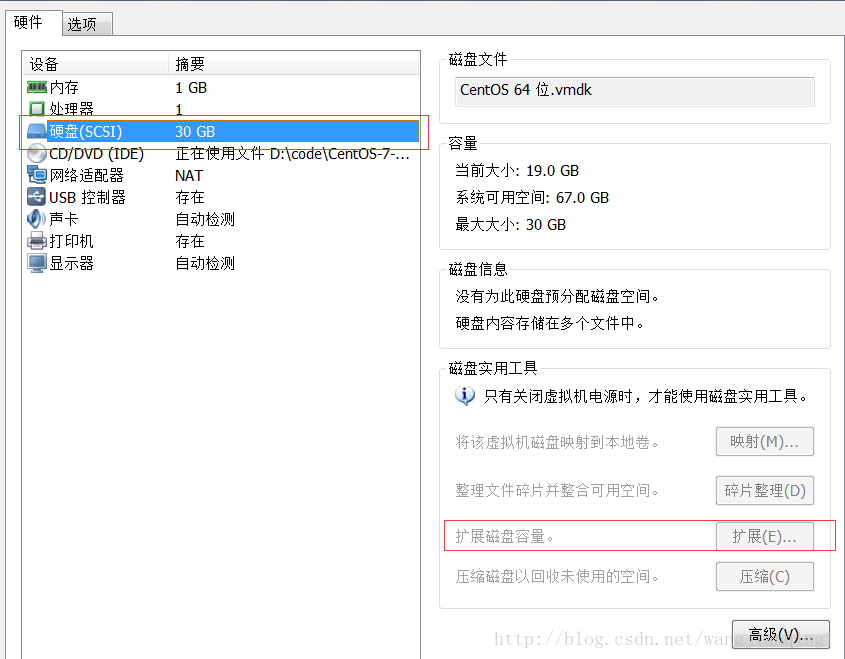
一、虚拟机上先扩展分区
二、centos系统root登入,新建分区
2.1 【fdisk -l】 最大分区为/dev/sda2,说明新创建的分区将会是sda3(在后面的步骤会进行选择)
2.2 输入【fdisk /dev/sda】
2.2.1命令行提示下输入【m】
2.2.2输入命令【n】添加新分区。
2.2.3输入命令【p】创建主分区。
2.2.4输入【回车】,选择默认
2.2.5输入【回车】,选择默认
2.2.6输入【w】,保持修改
2.3 输入【reboot】 重启linux,必须reboot,否则/dev/sda3无法格式化。
2.4 这时在/dev/目录下,才能看到了新的分区比如/dev/sda3
三、扩展/dev/mapper/centos-root
3.1.创建pv(给刚刚新建的分区 /dev/sda3)
|
1
2
|
[root@localhost ~]
# pvcreate /dev/sda3
Physical volume
"/dev/sda3"
successfully created
|
3.2.把pv加入vg中,相当于扩充vg的大小
先使用vgs查看vg组
|
1
2
3
|
[root@localhost ~]
# vgs
VG
#PV #LV #SN Attr VSize VFree
centos 1 2 0 wz--n- 19.51g 40.00m<br>
|
扩展vg,使用vgextend命令
|
1
2
|
[root@localhost ~]
# vgextend centos /dev/sda3
Volume group
"centos"
successfully extended
|
3.3.我们成功把vg卷扩展了,在用vgs查看一下
|
1
2
3
4
5
6
7
|
[root@localhost ~]
# vgs
VG
#PV #LV #SN Attr VSize VFree
centos 2 2 0 wz--n- 39.50g 20.04g
[root@localhost ~]
# lvs
LV VG Attr LSize Pool Origin Data% Meta% Move Log Cpy%Sync Convert
root centos -wi-ao---- 17.47g
swap centos -wi-ao---- 2.00g 虽然我们把vg扩展了,但是lv还没有扩展
|
3.4.扩展lv,使用lvextend命令
|
1
2
3
|
[root@localhost ~]
# lvextend -L +20G /dev/mapper/centos-root
Size of logical volume centos
/root
changed from 17.47 GiB (4472 extents) to 37.47 GiB (9592 extents).
Logical volume root successfully resized.
|
查看lv大小
|
1
2
3
4
|
[root@localhost ~]
# lvs
LV VG Attr LSize Pool Origin Data% Meta% Move Log Cpy%Sync Convert
root centos -wi-ao---- 37.47g
swap centos -wi-ao---- 2.00g
|
查看df -h中变化没有
|
1
2
3
4
5
6
7
8
9
|
[root@localhost ~]
# df -h
文件系统 容量 已用 可用 已用% 挂载点
/dev/mapper/centos-root
18G 1.1G 17G 6% /
devtmpfs 479M 0 479M 0%
/dev
tmpfs 489M 0 489M 0%
/dev/shm
tmpfs 489M 6.7M 483M 2%
/run
tmpfs 489M 0 489M 0%
/sys/fs/cgroup
/dev/sda1
497M 125M 373M 25%
/boot
tmpfs 98M 0 98M 0%
/run/user/0
<br><br>没有变化。
|
那么我们要使用[root@localhost ~]# xfs_growfs /dev/mapper/centos-root 命令使系统重新读取大小
|
1
2
3
4
5
6
7
8
9
10
11
|
[root@localhost ~]
# xfs_growfs /dev/mapper/centos-root
meta-data=
/dev/mapper/centos-root
isize=256 agcount=4, agsize=1144832 blks
= sectsz=512 attr=2, projid32bit=1
= crc=0 finobt=0
data = bsize=4096 blocks=4579328, imaxpct=25
= sunit=0 swidth=0 blks
naming =version 2 bsize=4096 ascii-ci=0 ftype=0
log =internal bsize=4096 blocks=2560, version=2
= sectsz=512 sunit=0 blks, lazy-count=1
realtime =none extsz=4096 blocks=0, rtextents=0
data blocks changed from 4579328 to 9822208
|
再使用df -h查看
|
1
2
3
4
5
6
7
8
9
|
[root@localhost ~]
# df -h
文件系统 容量 已用 可用 已用% 挂载点
/dev/mapper/centos-root
38G 1.1G 37G 3% /
devtmpfs 479M 0 479M 0%
/dev
tmpfs 489M 0 489M 0%
/dev/shm
tmpfs 489M 6.7M 483M 2%
/run
tmpfs 489M 0 489M 0%
/sys/fs/cgroup
/dev/sda1
497M 125M 373M 25%
/boot
tmpfs 98M 0 98M 0%
/run/user/0
|
到这里我们就成功扩展了。