Istio通过对serviceMesh中的每个pod注入sidecar,来实现无侵入式的服务治理能力。其中,sidecar的注入是其能力实现的重要一环(本文主要介绍在kubernetes集群中的注入方式)。sidecar注入有两种方式,一是通过创建webhook资源,利用k8s的webhook能力实现pod的自动注入,二是通过istioctl工具,对yaml文件进行手动注入。在这里对这两种方式进行简单介绍。
一、webhook自动注入:
a) 准备条件:
i. 自动注入功能需要kubernetes 1.9或更高版本;
ii. kubernetes环境需支持MutatingAdmissionWebhook;
$ kubectl api-versions | grep admissionregistration
admissionregistration.k8s.io/v1beta1
iii. 需要在kube-apiserver的启动参数中加入;
--admission-control=MutatingAdmissionWebhook,ValidatingAdmissionWebhook
iv. 确保master到node容器网络通信正常。
b) 自动注入控制:
i. 可通过在sidecar-injector的configmap中设置policy=disabled字段来设置是否启用自动注入(此处为全局控制是否启用自动注入功能);
$ kubectl get cm istio-sidecar-injector -nistio-system
apiVersion: v1

kind: ConfigMap

metadata:

  name: istio-sidecar-injector

  namespace: istio-system

data:

  config: |-

    policy: enabled     //enabeld为开启,disabeld为关闭
ii. 为需要自动注入的namespace打上标签istio-injection: enabled(此处为ns级别的自动注入控制)。
$ kubectl get namespace -L istio-injection

NAME           STATUS    AGE       ISTIO-INJECTION

default        Active    1h

istio-system   Active    1h

kube-public    Active    1h

kube-system    Active    1h

$ kubectl label namespace default istio-injection=enabled

namespace "default" labeled

$ kubectl get namespace -L istio-injection

NAME           STATUS    AGE       ISTIO-INJECTION

default        Active    1h        enabled

istio-system   Active    1h

kube-public    Active    1h

kube-system    Active    1h
iii. 同时也可以在deployment中通过设置annotation,sidecar.istio.io/inject=true来控制pod级别的自动注入。
apiVersion: extensions/v1beta1

kind: Deployment

metadata:
name: test
spec:
replicas: 1
template:
metadata:

      annotations:

        sidecar.istio.io/inject: “true”
// true为启用自动注入,false为关闭自动注入
c) 定义webhook参数文件MutatingWebhookConfiguration,格式如下(在helm包的sidecarInject中)。
这里的语义就是,监听具有istio-injection: enabled的label的namespace下的pod资源,当发生rules(CREATE POD)的动作时,则调用services(istio-sidecar-injector.istio-system的/inject接口)。
apiVersion: admissionregistration.k8s.io/v1beta1
kind: MutatingWebhookConfiguration
metadata:
name: istio-sidecar-injector
namespace: {{ .Release.Namespace }}
labels:
app: istio-sidecar-injector
webhooks:
- name: sidecar-injector.istio.io
clientConfig:
service:
name: istio-sidecar-injector
namespace: {{ .Release.Namespace }}
path: "/inject"
caBundle: ""
rules:
- operations: [ "CREATE" ]
apiGroups: [""]
apiVersions: ["v1"]
resources: ["pods"]
failurePolicy: Fail
namespaceSelector:
matchLabels:
istio-injection: enabled
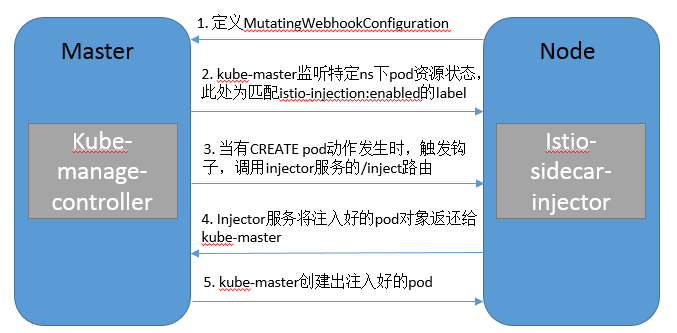
d) webhook工作流程图
e) 介绍了自动注入的注意事项与原理,终于可以测试下自动注入的结果了。
i. 首先安装Istio控制面,确保sidecar-inject安装完成;
$ kubectl get po -nistio-system | grep sidecar-injector

istio-sidecar-injector-5fb5999bf8-59k79          1/1       Running   0          1d
ii. 部署一个简单的测试deploy,此处我们以nginx为例;
$ kubectl get po | grep nginx

nginx-v1-74c674fbd5-fl9bh         1/1       Running   0          22s
iii. 我们用步骤b).II中的方式为default的namespace打上自动注入标签,删除pod,观察pod状态,可以看到pod的容器数由1变为2;
$ kubectl get po | grep nginx

nginx-v1-54fbccf6fd-ff4k2         2/2       Running       0          4s

nginx-v1-74c674fbd5-fl9bh         1/1       Terminating   0          5m
iv. 可以看到sidecar容器已经注入成功,我们看下pod的描述信息,观察下自动注入做了什么。可以看到,自动注入向pod中插入了一个初始化容器istio-init和一个sidecar容器istio-proxy(详细参数可以参考configmap:istio-sidecar-injector);
$ kubectl describe po nginx-v1-54fbccf6fd-ff4k2

Name:           nginx-v1-54fbccf6fd-ff4k2

Namespace:      default

Status:         Running


...


Init Containers:

  istio-init:

    Container ID:  docker://96951306e214594d0c1e550f732a81781287f79f0e5a3262455f38535d42d61f

    Image:         istio/proxy_init:0.8.0


...


Containers:

  container-0:

    Container ID:   docker://237781c7ce1e8c1f49f68047142ce1738822bafbe504f836f51873cbb1ac1f5d

    Image:          nginx:1.12-alpine-perl

    Port:           80/TCP

    State:          Running


...


  istio-proxy:

    Container ID:  docker://7208d32552918a5853fd56171bdbab3de3ae734242d23b140f6e5c2a1a4bce64

    Image:         istio/proxyv2:0.8.0

    Args:

      proxy

      sidecar

      --configPath

      /etc/istio/proxy

      --binaryPath

      /usr/local/bin/envoy

      --serviceCluster

      nginx


...
二、istioctl手动注入:
a) 下载istioctl工具并拷贝至环境,链接https://github.com/istio/istio/releases/ ;
b) 将istioctl二进制拷贝至/usr/local/bin目录下
mv -f istioctl /usr/local/bin
c) 安装Istio控制面,确认注入相关configmap已创建成功
$ kubectl get cm -n istio-system | grep istio-sidecar-injector

istio-sidecar-injector                  1         15h
d) 准备需要注入的文件test.yaml
e) 执行istioctl会在原始内容的基础上加入sidecar的配置内容,并输出到控制台。
$ istioctl kube-inject -f test.yaml
f) 将istioctl处理之后的内容部署到kubernetes上
$kubectl apply -f <(istioctl kube-inject -f test.yaml)
g) 可以通过k8s命令查看pod详细内容
$kubectl describe pod test-c9f4b55c7-np4cf
三、总结:
这里更推荐自动注入的方式来实现sidecar的注入,可以通过在deployment的annotation中加入对应的key来实现自动注入的控制。自动注入实现的逻辑并不复杂,主要是对k8s中webhook的使用,以及通过模板,向deployment中注入相应的container资源等
https://console.huaweicloud.com/cce2.0/?region=cn-north-1#/app/istio/istioPublicBeta