基础知识
屏幕尺寸、屏幕分辨率、屏幕像素密度
1、屏幕尺寸是指屏幕对角线的长度。单位是英寸,1英寸=2.54厘米。
2、屏幕分辨率是指在横纵向上的像素点数,单位是px,1px=1像素点,一般是纵向像素横向像素,如1280×720。
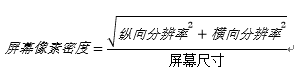
3、屏幕像素密度是指每英寸上的像素点数,单位是dpi(dot per inch),像素密度和屏幕尺寸和屏幕分辨率有关。
dip、dp、sp、dpi、px、in、pt
1、dip或dp(device independent pixels,设备独立像素):以160dpi为基准,1dp=1px。
2、sp(scaled pixels):可以根据文字大小首选项自动进行缩放。
3、dpi(dots per inch,密度):屏幕像素密度的单位,屏幕每英寸所包含的像素数。
4、px(pixels,像素):物理上的绝对单位。
5、in(inch,英寸):一英寸=2.54cm。
6、pt(磅):一磅=1/72英寸。
mdpi、hdpi、xdpi、xxdpi、xxxdpi
| 密度分类 | 密度值范围 | 代表分辨率 | 图标尺寸 | 图片比例 |
|---|---|---|---|---|
| mdpi | 120~160dpi | 320x480px | 48x48px | 1 |
| hdpi | 160~240dpi | 480x800px | 72x72px | 1.5 |
| xhdpi | 240~320dpi | 720x1280px | 96x96px | 2 |
| xxhdpi | 320~480dpi | 1080x1920px | 144x144px | 3 |
| xxxhdpi | 480~640dpi | 1440x2560px | 192x192px | 4 |
实战
获取屏幕的数据
// 获取DisplayMetrics实例
DisplayMetrics dm = context.getResources().getDisplayMetrics();

// 屏幕高的像素个数
int heightPixels = dm.heightPixels;
// 屏幕宽的像素个数
int widthPixels = dm.widthPixels;

// 屏幕密度:每英寸所含的像素的个数
int densityDpi = dm.densityDpi;
// 屏幕密度:densityDpi/160
float density = dm.density;
dp与px相互转换
/**
 * 转换工具类
 */
public class ConvertUtil {

    /**
     * dp转换成px
     *
     * @param context 上下文
     * @param value   多少dp
     * @return 返回转换后等于多少px
     */
    public static int dp2px(Context context, float value) {

        // 获取屏幕的密度:density = densityDpi/160
        final float scale = context.getResources().getDisplayMetrics().density;
        // dp转换成px,value*density
        // + 0.5f是为了四舍五入转换成int类型
        return (int) (value * scale + 0.5f);
    }

    public static int px2dp(Context context, float value) {

        final float scale = context.getResources().getDisplayMetrics().density;
        // px转换成dp,value/density
        return (int) (value / scale + 0.5f);
    }
}
注意:因为分辨率不一样,所以不能用px;因为屏幕宽度不一样,所以要小心的用dp。
解决方案
一、支持各种屏幕尺寸
1、使用wrap_content、math_parent、weight
wrap_content:根据控件的内容设置控件的尺寸
math_parent:根据父控件的尺寸大小设置控件的尺寸
weight:权重,在线性布局中可以使用weight属性设置控件所占的比例
<LinearLayout xmlns:android="http://schemas.android.com/apk/res/android"
android:layout_width="match_parent"
android:layout_height="match_parent"
android:orientation="horizontal">
<TextView
      android:layout_width="80dp"
      android:layout_height="80dp"
      android:layout_weight="0"
      android:background="#028330"/>
<TextView
      android:layout_width="wrap_content"
      android:layout_height="80dp"
      android:text="new reader"
      android:textSize="22sp"
      android:layout_weight="1"/>
<TextView
      android:layout_width="160dp"
      android:layout_height="80dp"
      android:text="Politics"
      android:textSize="18sp"
      android:layout_weight="0"
      android:background="#028330"/>
</LinearLayout>
实现下图所显示的效果:当屏幕尺寸改变时,new reader控件两边的控件大小不变,new reader控件会占完剩余的空间。

android:layout_weight
公式:所占宽度=原来宽度+剩余空间所占百分比的宽度
2、使用相对布局,禁用绝对布局
简单的布局一般都使用线性布局,而略微复杂点的布局,我们使用相对布局,大多数时候,我们都是使用这两种布局的嵌套。我们使用相对布局的原因是,相对布局能在各种尺寸的屏幕上保持控件间的相对位置。
3、使用限定符
一、使用尺寸限定符
当我们要在大屏幕上显示不同的布局,就要使用large限定符。例如,在宽的屏幕左边显示列表右边显示列表项的详细信息,在一般宽度的屏幕只显示列表,不显示列表项的详细信息,我们就可以使用large限定符。
单面板:res/layout/activity_qualifier.xml
<FrameLayout xmlns:android="http://schemas.android.com/apk/res/android"
              android:layout_width="match_parent"
              android:layout_height="match_parent">

    <fragment
        android:id="@+id/news_title_fragment"
        android:name="com.jun.androidexample.qualifier.NewsTitleFragment"
        android:layout_width="match_parent"
        android:layout_height="match_parent"/>
</FrameLayout>
双面板:res/layout-large/activity_qualifier.xml
<LinearLayout xmlns:android="http://schemas.android.com/apk/res/android"
              android:layout_width="match_parent"
              android:layout_height="match_parent">

    <fragment
        android:id="@+id/news_title_fragment"
        android:name="com.jun.androidexample.qualifier.NewsTitleFragment"
        android:layout_width="0dp"
        android:layout_height="match_parent"
        android:layout_weight="1"/>

    <FrameLayout
        android:id="@+id/news_content_layout"
        android:layout_width="0dp"
        android:layout_height="match_parent"
        android:layout_weight="3">

        <fragment
            android:id="@+id/news_content_fragment"
            android:name="com.jun.androidexample.qualifier.NewsContentFragment"
            android:layout_width="match_parent"
            android:layout_height="match_parent"/>
    </FrameLayout>
</LinearLayout>
如果这个程序运行在屏幕尺寸大于7inch的设备上,系统就会加载res/layout-large/main.xml 而不是res/layout/main.xml,在小于7inch的设备上就会加载res/layout/main.xml。
注意:这种通过large限定符分辨屏幕尺寸的方法,只适用于android3.2之前。在android3.2之后,为了更精确地分辨屏幕尺寸大小,Google推出了最小宽度限定符。
二、使用最小宽度限定符
最小宽度限定符的使用和large基本一致,只是使用了具体的宽度限定。
单面板:res/layout/activity_qualifier.xml
<FrameLayout xmlns:android="http://schemas.android.com/apk/res/android"
              android:layout_width="match_parent"
              android:layout_height="match_parent">

    <fragment
        android:id="@+id/news_title_fragment"
        android:name="com.jun.androidexample.qualifier.NewsTitleFragment"
        android:layout_width="match_parent"
        android:layout_height="match_parent"/>
</FrameLayout>
双面板:res/layout-sw600dp/activity_qualifier.xml,Small Width最小宽度
<LinearLayout xmlns:android="http://schemas.android.com/apk/res/android"
              android:layout_width="match_parent"
              android:layout_height="match_parent">

    <fragment
        android:id="@+id/news_title_fragment"
        android:name="com.jun.androidexample.qualifier.NewsTitleFragment"
        android:layout_width="0dp"
        android:layout_height="match_parent"
        android:layout_weight="1"/>

    <FrameLayout
        android:id="@+id/news_content_layout"
        android:layout_width="0dp"
        android:layout_height="match_parent"
        android:layout_weight="3">

        <fragment
            android:id="@+id/news_content_fragment"
            android:name="com.jun.androidexample.qualifier.NewsContentFragment"
            android:layout_width="match_parent"
            android:layout_height="match_parent"/>
    </FrameLayout>
</LinearLayout>
这就要求我们维护两个相同功能的文件,为了避免繁琐操作,我们就要使用布局别名。
三、使用布局别名
单面板:res/layout/activity_qualifier.xml
双面板:res/layout-large/activity_qualifier.xml
双面板:res/layout-sw600dp/activity_qualifier.xml
因为双面板的布局一样,所以为了方便管理使用以下2个文件代替上面的3个文件。
单面板:res/layout/activity_qualifier_onepane.xml
双面板:res/layout/activity_qualifier_twopanes.xml
然后创建如下3个文件
默认布局,单面板:res/values/layout.xml
<resources>
    <item name="activity_qualifier" type="layout">@layout/activity_qualifier_onepane</item>
</resources>
Android3.2之前的大屏布局,双面板:res/values-large/layout.xml
<resources>
    <item name="activity_qualifier" type="layout">@layout/activity_qualifier_twopanes</item>
</resources>
Android3.2之后的大于600dp屏布局,双面板:res/values-sw600dp/layout.xml
<resources>
    <item name="activity_qualifier" type="layout">@layout/activity_qualifier_twopanes</item>
</resources>
这样无论是哪一种名字都叫activity_qualifier。
记得将之前创建的res/layout-large和res/layout-sw600dp
双面板:res/layout-large/activity_qualifier.xml
双面板:res/layout-sw600dp/activity_qualifier.xml,Small Width最小宽度
都删掉,因为已经不需要了。
四、使用屏幕方向限定符
res/values-port/layout.xml,纵向,单面板
<resources>
    <item name="activity_qualifier" type="layout">@layout/activity_qualifier_onepane</item>
</resources>
res/values-land/layout.xml,横向,双面板
<resources>
    <item name="activity_qualifier" type="layout">@layout/activity_qualifier_twopanes</item>
</resources>
4、使用自动拉伸位图
.9.png格式图片
二、支持各种屏幕密度
1、统一划分
统一划分解决分辨率不一致,宽高不一致的问题。把需要适配的手机屏幕的宽度像素均分为320份,高度像素均分为480份。使用我们写好的程序自动生成资源values-×文件夹,里面包含lay_x.xml和lay_y.xml,分别对应宽度和高度的像素。
在Eclipse中运行如下代码自动生成需要的文件
/**
 * 将所有不同分辨率的屏幕都分成480x320
 */
public class MakeXml {

    // 生成文件存放的地址是C:\layoutRoot
    private final static String rootPath = "C:\\layoutRoot\\values-{0}x{1}\\";

    // 分成480x320
    private final static float dw = 320f;
    private final static float dh = 480f;

    private final static String WTemplate = "<dimen name=\"x{0}\">{1}px</dimen>\n";
    private final static String HTemplate = "<dimen name=\"y{0}\">{1}px</dimen>\n";

    public static void main(String[] args) {
        setResolution();
    }

    // 设置需要适配的不同屏幕的分辨率
    public static void setResolution(){
        makeString(320, 480);
        makeString(480, 800);
        makeString(480, 854);
        makeString(540, 960);
        makeString(600, 1024);
        makeString(720, 1184);
        makeString(720, 1196);
        makeString(720, 1280);
        makeString(768, 1024);
        makeString(800, 1280);
        makeString(1080, 1812);
        makeString(1080, 1920);
        makeString(1440, 2560);
    }

    public static void makeString(int w, int h) {

        StringBuffer sb = new StringBuffer();
        sb.append("<?xml version=\"1.0\" encoding=\"utf-8\"?>\n");
        sb.append("<resources>");
        float cellw = w / dw;
        for (int i = 1; i < 320; i++) {
            sb.append(WTemplate.replace("{0}", i + "").replace("{1}",
                    change(cellw * i) + ""));
        }
        sb.append(WTemplate.replace("{0}", "320").replace("{1}", w + ""));
        sb.append("</resources>");

        StringBuffer sb2 = new StringBuffer();
        sb2.append("<?xml version=\"1.0\" encoding=\"utf-8\"?>\n");
        sb2.append("<resources>");
        float cellh = h / dh;
        for (int i = 1; i < 480; i++) {
            sb2.append(HTemplate.replace("{0}", i + "").replace("{1}",
                    change(cellh * i) + ""));
        }
        sb2.append(HTemplate.replace("{0}", "480").replace("{1}", h + ""));
        sb2.append("</resources>");

        String path = rootPath.replace("{0}", h + "").replace("{1}", w + "");
        File rootFile = new File(path);
        if (!rootFile.exists()) {
            rootFile.mkdirs();
        }
        File layxFile = new File(path + "lay_x.xml");
        File layyFile = new File(path + "lay_y.xml");
        try {
            PrintWriter pw = new PrintWriter(new FileOutputStream(layxFile));
            pw.print(sb.toString());
            pw.close();
            pw = new PrintWriter(new FileOutputStream(layyFile));
            pw.print(sb2.toString());
            pw.close();
        } catch (FileNotFoundException e) {
            e.printStackTrace();
        }

    }

    public static float change(float a) {
        int temp = (int) (a * 100);
        return temp / 100f;
    }
}
将C:\layoutRoot目录下的文件拷贝到Android Studio中app/src/main/res/目录下
使用示例:
<Button
    android:background="#abd123"
    android:layout_width="@dimen/x160"
    android:layout_height="@dimen/y240"/>
宽和高都是屏幕的一半
2、提供备用位图
针对不同分辨率的屏幕提供不同分辨率的位图
res/drawable-mdpi
res/drawable-hdpi
res/drawable-xhdpi
res/drawable-xxhdpi
res/drawable-xxxhdpi
如果只提供一张位图就应该放置在应对分辨率的文件夹中
三、实施自适应用户界面流程
1、确定当前布局
boolean isTwoPane;
// 能找到news_content_layout就是双页否则就是单页
View view = getActivity().findViewById(R.id.news_content_layout);
if (view != null && view.getVisibility() == View.VISIBLE) {
    isTwoPane = true;
} else {
    isTwoPane = false;
}
2、根据当前布局做出响应
在单面板模式下,用户点击了新闻标题,我们要打开一个新的Activity来显示新闻详细信息;在双面板模式下,用户点击了新闻标题,我们要在右边面板上显示详细信息。
Percent Support Library(百分比布局库)
添加依赖
compile 'com.android.support:percent:23.3.0'