Spring Boot 概述 ---------------------------------------------------------------------------------********************************--------------------------------------------------------------------
Spring Boot介绍:
Spring Boot的目的在于创建和启动新的基于Spring框架的项目,Spring Boot会选择最适合的Spring子项目和第三方开源库进行整合,大部分Spring Boot应用只需要很少的配置就可以快速的运行起开。
Spring Boot是伴随着Spring4.0诞生的。(4.0开始才可以使用)
Spring Boot提供了一种快速Spring的方式。
Spring Boot的优点:
1:基于Spring的开发提供更快的入门体验
2:创建可以独立运行的Spring应用
3:直接嵌入tomcat或jetty服务器,无需打包成war文件(java-jar xxx.jar)
4:提供推荐的POM文件(starter)来简化Maven配置
5:尽可能的根据项目依赖来自动配置Spring框架
6:提供可以直接在生产环境中使用的功能,如性能指标、应用信息和应用健康检查(基础应用,还达不到生产级别)
7:开箱即用,没有代码生成,也无需XML配置。同时也可以修改默认值来满足特定需求(约定优于配置)
8:其他大量的项目都基于Spring Boot之上,如Spring Cloud
总结一下就是:
1:Spring Boot使编码变的简单
2:Spring Boot使配置变的简单
3:Spring Boot使部署变的简单
4:Spring Boot使监控变的简单
Spring Boot的缺点:
1:依赖太多,随便一个Spring Boot应用都有好几十M(pom文件父标签引入了过多无用的jar)
2:缺少服务的注册和发现等解决方案
3:缺少监控集成方案,安全管理方案
4:中文文档和资料太少且不够深入
Spring Boot的应用场景
1:spring能应用的场景
2:java web应用
3:微服务
spring的发展: ---------------------------------------------------------------------------------********************************--------------------------------------------------------------------
Spring的发展:
1.x:都是通过xml的方式配置bean,随着项目的不断扩大,需要将xml配置进行分类,随之就会有很多的xml文件
2.x:随着jdk1.5,2.x可以使用注解对bean进行声明和注入,减少了xml配置文件,简化了项目开发
3.x到4.x:从3.x开始提供了java配置方式,使用java配置方式可以更好地理解你配置的bean,在4.0开始spring boot推荐使用java的配置方式
Spring容器:基于注解的方式创建和管理bean
Spring的Java配置方式是通过 @Configuration 和 @Bean 这两个注解实现的:
1:@Configuration 作用于类上,相当于一个xml配置文件
2:@Bean 作用于方法上,相当于xml配置中的<bean>
示例:
启动类:
main(){
//获取spring工厂对象
AnnotationConfigApplicationContext context = new AnnotationConfigApplicationContext(MyConfig.class); //参数为一个配置类类对象
//从容器中获取这个bean
context.getBean(MyBean.class);//根据类型
context.getBean(“createBean”);//根据名字 默认是方法名 也可以自定义名字
context.close();
}
配置类:MyConfig 类名加注解-@Configuration
@Configuration //通过该注解来表明该类是一个spring的配置类,相当于一个xml
@ComponentScan(basePackages = "com.xxx.xxx.xxx")//配置扫描包
@PropertySource(value= {"classpath:jdbc.properties"})//读取外部配置文件
public class MyConfig{
@Value("${jdbc.url}") //@Value读取配置文件的值
private String jdbcUrl
@Bean //如需要自定义bean名称---@Bean("xxx")
@Scope("prototype") //spring默认是单例的 如需设置非单例加次注解即可
public MyBean createBean(){
return new MyBean();
}
或者通过FactoryBean工厂也可以
}
Bean对象:MyBean
public class MyBean{
pass;
}
那在实战中到底怎么使用这玩意:
1:读取外部的资源配置文件
通过@PropertySource可以指定读取的配置文件,通过@Value注解获取值,具体用法
@Configuration //通过该注解来表明该类是一个Spring的配置,相当于一个xml文件
@ComponentScan(basePackages = "cn.itcast.springboot.javaconfig") //配置扫描包
@PropertySource(value= {"classpath:jdbc.properties"})
public class SpringConfig {
@Value("${jdbc.url}")
private String jdbcUrl;
@Bean // 通过该注解来表明是一个Bean对象,相当于xml中的<bean>
public UserDAO getUserDAO(){
return new UserDAO(); // 直接new对象做演示
}
}
1.1:如何配置多个配置文件?
@PropertySource(value= {"classpath:jdbc.properties","xxx.xxx","ccc.ccc"})
1.2: 如果配置的配置文件不存在会怎么样
@PropertySource(value= {"classpath:jdbc.properties"},ignoreResourceNotFound = true) //设置配置文件不存在即忽略
2:配置数据库连接池
@Value("${jdbc.url}")
private String jdbcUrl;
@Value("${jdbc.driverClassName}")
private String jdbcDriverClassName;
@Value("${jdbc.username}")
private String jdbcUsername;
@Value("${jdbc.password}")
private String jdbcPassword;
@Bean(destroyMethod = "close")
public DataSource dataSource() {
BoneCPDataSource boneCPDataSource = new BoneCPDataSource();
// 数据库驱动
boneCPDataSource.setDriverClass(jdbcDriverClassName);
// 相应驱动的jdbcUrl
boneCPDataSource.setJdbcUrl(jdbcUrl);
// 数据库的用户名
boneCPDataSource.setUsername(jdbcUsername);
// 数据库的密码
boneCPDataSource.setPassword(jdbcUsername);
// 检查数据库连接池中空闲连接的间隔时间,单位是分,默认值:240,如果要取消则设置为0
boneCPDataSource.setIdleConnectionTestPeriodInMinutes(60);
// 连接池中未使用的链接最大存活时间,单位是分,默认值:60,如果要永远存活设置为0
boneCPDataSource.setIdleMaxAgeInMinutes(30);
// 每个分区最大的连接数
boneCPDataSource.setMaxConnectionsPerPartition(100);
// 每个分区最小的连接数
boneCPDataSource.setMinConnectionsPerPartition(5);
return boneCPDataSource;
}
Spring Boot 快速入门 感受一下再说---------------------------------------------------------------------------------********************************--------------------------------------------------------------------
注:或者可以去spring.start.io直接生成项目
1:设置spring boot的parent
Spring boot的项目必须要将parent设置为spring boot的parent,该parent包含了大量默认的配置,大大简化了我们的开发。
这也是为什么spring boot项目太大 jar太多 也许很多jar你都根本没有用到
<parent>
<groupId>org.springframework.boot</groupId>
<artifactId>spring-boot-starter-parent</artifactId>
<version>1.5.2.RELEASE</version>
</parent>
2:导入spring boot的web支持
<dependency>
<groupId>org.springframework.boot</groupId>
<artifactId>spring-boot-starter-web</artifactId>
</dependency>
3:添加Spring boot的插件
<plugin>
<groupId>org.springframework.boot</groupId>
<artifactId>spring-boot-maven-plugin</artifactId>
</plugin>
4:编写第一个Spring Boot的应用
@Controller
@SpringBootApplication
@Configuration
public class HelloApplication {
@RequestMapping("hello")
@ResponseBody
public String hello(){
return "hello world!";
}
public static void main(String[] args) {
SpringApplication.run(HelloApplication.class, args);
}
}
代码说明:
1:@SpringBootApplication:Spring Boot项目的核心注解,主要目的是开启自动配置,这个启动类必须和其他包同级或者在其他包上级。
2:@Configuration:这是一个配置Spring的配置类;
3:@Controller:标明这是一个SpringMVC的Controller控制器;
5:启动main方法即可
6:测试:localhost:8080/hello 端口号默认8080 get到了么
Spring Boot 的核心---------------------------------------------------------------------------------********************************--------------------------------------------------------------------
1:入口类和@SpringBootApplication
Spring Boot的项目一般都会有*Application的入口类,这个类名无所谓的,重点是这个类放置的位置要注意,入口类中会有main方法,这是一个标准的Java应用程序的入口方法。
@SpringBootApplication注解是Spring Boot的核心注解,它其实是一个组合注解:
//----------------------------------------------------------------------
@Target(ElementType.TYPE)
@Retention(RetentionPolicy.RUNTIME)
@Documented
@Inherited
@SpringBootConfiguration
//----------------------------------------------------------------------
@SpringBootConfiguration继承自@Configuration,二者功能也一致,标注当前类是配置类,
并会将当前类内声明的一个或多个以@Bean注解标记的方法的实例纳入到srping容器中,并且实例名就是方法名。
//----------------------------------------------------------------------
@EnableAutoConfiguration
//----------------------------------------------------------------------
@EnableAutoConfiguration的作用启动自动的配置,@EnableAutoConfiguration注解的意思就是Springboot根据你添加的jar包来配置你项目的默认配置,
比如根据spring-boot-starter-web ,来判断你的项目是否需要添加了webmvc和tomcat,就会自动的帮你配置web项目中所需要的默认配置。
//----------------------------------------------------------------------
@ComponentScan(excludeFilters = {
@Filter(type = FilterType.CUSTOM, classes = TypeExcludeFilter.class),
@Filter(type = FilterType.CUSTOM, classes = AutoConfigurationExcludeFilter.class) })
//----------------------------------------------------------------------
@ComponentScan,扫描当前包及其子包下被@Component,@Controller,@Service,@Repository注解标记的类并纳入到spring容器中进行管理。这也就是启动类放置位置的原因
//----------------------------------------------------------------------
//----------------------------------------------------------------------
2:关闭自动配置--例如关闭redis的自动配置 一般不用吧这玩意
@SpringBootApplication(exclude = RedisAutoConfiguration.class)
3:自定义Banner 也就是spring boot的启动图案 更没人闲的蛋疼玩这个
1:http://patorjk.com/software/taag/#p=display&h=3&v=3&f=4Max&t=itcast%20Spring%20Boot
2:拷贝生成的字符到一个文本文件中,并且将该文件命名为banner.txt
3:将banner.txt拷贝到项目的resources目录中:
4:重启就好
如果不想看到任何的banner,也是可以将其关闭的:
SpringApplication app = new SpringApplication(xxApplication.class);
app.setBannerMode(Banner.mode.OFF); //关闭banner
APP.RUN(agrs);
4: * 全局配置文件 收录一些常用配置 每一个自动装配的配置都有一个自己对应的配置类 ps:org.springframework.boot.autoconfigure.data.redis.RedisProperties.java
Spring Boot项目使用一个全局的配置文件application.properties 或者是 application.yml,在resources目录下或者类路径下的/config下,一般我们放到resources下。
参数配置不一定要写在application.properties里面,可以在application.properties里面配置指定自定义配置文件名称和位置:(但是无论怎么配置,spring-boot都会读取加载application.properties文件)
spring.config.name=自定义的配置文件名称
spring.config.location=配置文件位置(可以是classpath或者有效url)
也可以通过在自定义类上设置@PropertySource注解指定读取某个配置文件
1:server相关
server.address=xxx.xxx.xx.xxx //服务器绑定ip地址,多网卡时可以指定
server.port=xxx //指定端口 setver.port = 0 表示自动扫面获取一个可用的端口,随机的。
server.error.path=/error //错误页,指定发生错误时,跳转的URL --> BasicErrorController
server.session-timeout=60 //session最大超时时间(分钟),默认为30分钟
ssl的安全访问配置
server.port=8443
server.ssl.key-store=classpath:keystore.jks
server.ssl.key-store-password=secret
server.ssl.key-password=another-secret
2:开发/测试/生产环境配置
spring.profiles.active=xxxx //该系统变量可以指明要使用的配置文件,一般应用于多环境配置分离,如生产环境(production),开发环境(development),测试环境(test)等,可以自定义,
如开发环境配置文件为application-dev.properties,则spring.profiles.active=dev,在启动时会加载application-dev.properties配置文件。
3:Banner 就是内几个字母等信息
banner.location=xxx.txt //可以自定义输出信息的位置
banner.charset=utf-8 //指定编码格式
spring.main.banner-mode=console/off //banner图开启或者打印模式
4:数据源相关 配置数据源相关 使用阿里巴巴的 druid 数据源
spring.datasource.url=jdbc:mysql://localhost:3306/leecx //驱动url
spring.datasource.username=root //用户名
spring.datasource.password=root //密码
spring.datasource.driver-class-name=com.mysql.jdbc.Driver //驱动
spring.datasource.druid.initial-size=1 //当连接池启动的时候创建的初始连接数量
spring.datasource.druid.min-idle=1 //最小空闲连接数,如果0的话,表示不创建
spring.datasource.druid.max-active=20 //最大连接数数,如果为0的话,表示无限制
spring.datasource.druid.test-on-borrow=true //申请连接时执行validationQuery检测连接是否有效,做了这个配置会降低性能。
spring.datasource.druid.stat-view-servlet.allow=true //监控相关
5:MongoDB数据源配置(引入spring-boot-starter-data-mongodb自动集成)
spring.data.mongodb.host=xxx //默认localhost
spring.data.mongodb.port=xxx //默认27017
spring.data.mongodb.database=xx //数据库
spring.data.mongodb.username=xx //数据库用户名
spring.data.mongodb.password=xx //数据库用户密码
上述参数还可以用一个代替:(上述参数不可与该参数同时使用)
spring.data.mongodb.uri=mongodb://localhost:27017/test
如果有密码:
mongodb://username:password@localhost:27017/dbname
6:Redis配置(引入spring-boot-starter-data-redis自动集成)
spring.redis.database=1 //Redis数据库索引(默认为0)
spring.redis.host=192.168.1.191 //Redis服务器地址
spring.redis.port=6379 //Redis服务器连接端口
spring.redis.password= //Redis服务器连接密码(默认为空)
spring.redis.pool.max-active=1000 //连接池最大连接数(使用负值表示没有限制
spring.redis.pool.max-wait=-1 //连接池最大阻塞等待时间(使用负值表示没有限制)
spring.redis.pool.max-idle=10 //连接池中的最大空闲连接
spring.redis.pool.min-idle=2 //连接池中的最小空闲连接
spring.redis.timeout=0 //连接超时时间(毫秒)
6:Mybatis 配置
mybatis.type-aliases-package=com.imooc.pojo //实体类包所在位置 起别名
mybatis.mapper-locations=classpath:mapper/*.xml //mapper映射xml文件的所在路径
# 分页插件配置
pagehelper.helperDialect=mysql
pagehelper.reasonable=true
pagehelper.supportMethodsArguments=true
pagehelper.params=count=countSql
//还有其他的写法 也可以使用注解式
#MyBatis
Mybais_config_file=mybatis-config.xml
mapper_path=/mapper/**.xml
model_package=com.cyou.model
7:Tomcat 配置
server.tomcat.max-threads=250 //tomcat最大线程数, 默认为200
server.tomcat.uri-encoding=UTF-8 //tomcat的URI编码
server.tomcat.basedir=H:/springboot-tomcat-tmp //存放Tomcat的日志、Dump等文件的临时文件夹,默认为系统的tmp文件夹
server.tomcat.access-log-enabled=true //打开Tomcat的Access日志,并可以设置日志格式的方法:
server.tomcat.access-log-pattern=
server.tomcat.accesslog.directory= //创建日志文件的目录
logging.path=H:/springboot-tomcat-tmp //日志文件目录
logging.file=myapp.log //日志文件名称,默认为spring.log
logging.level.org.springframework=DEBUG //设置日志级别
8:thymeleaf 配置
spring.thymeleaf.prefix=classpath:/templates/
spring.thymeleaf.suffix=.html
spring.thymeleaf.mode=HTML5
spring.thymeleaf.encoding=UTF-8
spring.thymeleaf.content-type=text/html
# 关闭缓存, 即时刷新, 上线生产环境需要改为true
spring.thymeleaf.cache=false
9:freemarker 静态资源配置
#设定ftl文件路径
spring.freemarker.template-loader-path=classpath:/templates
# 关闭缓存, 即时刷新, 上线生产环境需要改为true
spring.freemarker.cache=false
spring.freemarker.charset=UTF-8
spring.freemarker.check-template-location=true
spring.freemarker.content-type=text/html
spring.freemarker.expose-request-attributes=true
spring.freemarker.expose-session-attributes=true
spring.freemarker.request-context-attribute=request
spring.freemarker.suffix=.ftl
9:设定静态文件路径,js,css等
spring.mvc.static-path-pattern=/static/**
10:配置i18n 资源文件,供thymeleaf 读取
spring.messages.basename=i18n/messages
spring.messages.cache-seconds=3600
spring.messages.encoding=UTF-8
11:热部署
spring.devtools.restart.enabled=true //热部署生效
spring.devtools.restart.additional-paths=src/main/java //设置重启的目录,添加那个目录的文件需要restart
# 为mybatis设置,生产环境可删除
restart.include.mapper=/mapper-[\\w-\\.]+jar
restart.include.pagehelper=/pagehelper-[\\w-\\.]+jar
#排除那个目录的文件不需要restart
#spring.devtools.restart.exclude=static/**,public/**
#classpath目录下的WEB-INF文件夹内容修改不重启
#spring.devtools.restart.exclude=WEB-INF/**
12: RabbitMQ配置
spring.rabbitmq.host=127.0.0.1
spring.rabbitmq.port=5671
spring.rabbitmq.host=kr
spring.rabbitmq.host=kr
spring.rabbitmq.host=/kr
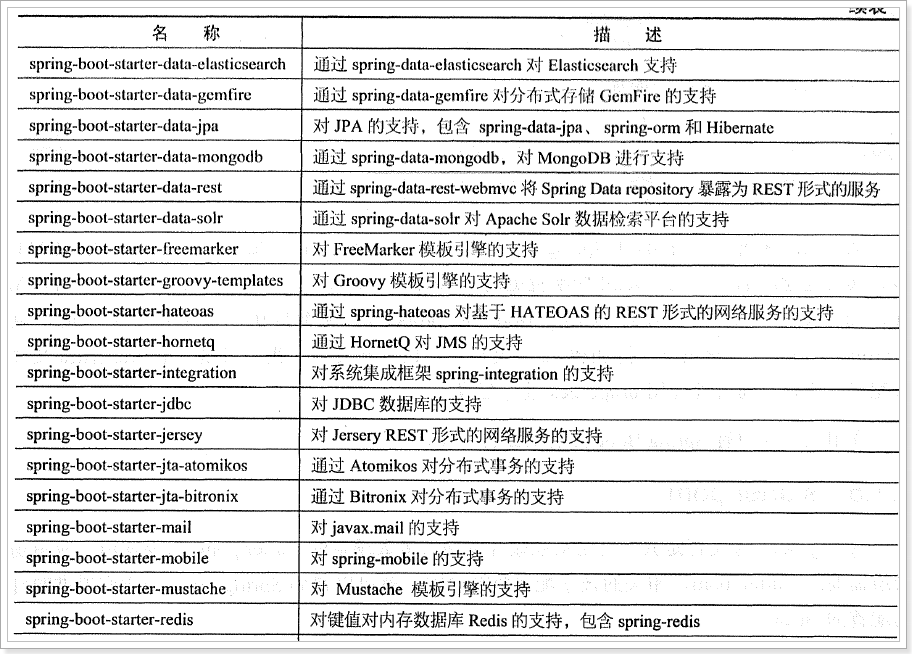
5: starter pom
Spring boot 为我们提供了简化企业级开发绝大多数常见的starter pom,只要使用了应用场景所需要的starter pom,相关的技术配置将会消除,就可以得到Spring boot为我们提供的自动配置的Bean.

	6:xml配置文件
		Spring Boot提倡零配置,但是在实际项目中可不一定,当你必要要用的时候提供了@ImportResource来加载配置,例如
			@ImportResource("classpath:xxx.xml")

spring boot的常用注解 ---------------------------------------------------------------------------------********************************--------------------------------------------------------------------
	@Value:配置文件的注入,如果你需要读取配置文件的值只需要加@Value(“${属性名}”)
	@Component:
	@ConfigurationProperties(prefix = "girl"):设置配置文件的组信息,对象的形式
	@Controller:处理http请求
	@RestController:@ResponseBody+@Controller
	@RequestMapping:配置url映射   @RequestMapping(value = {"/say","shuo"},method = RequestMethod.GET)
	@PathVariable:获取url中的数据   /{xxx}
	@RequestParam:获取请求参数的值  ?传递  可设置默认值 是否必须等
	@GetMapping || @PostMapping:组合注解
	@PropertySource(value = "classpath:test.properties")  //自定义配置文件
	1:使用@Valid表单验证
        @MIn(value="18" message="未成年你。。。")
        @Valid : 表示你要验证那个对象
        验证完成后会将验证结果封装进BindingResult对象
    2:aop
       @Pointcut("execution(* com.cyou.controller..*.*(..))") 注解表达式提取 此注解注释的方法体不会执行
       @Before("log()")
       @After("log()")
       @AfterReturning(pointcut = "log()",returning = "object")  获取切面方法执行结果
    3:异常处理
        自定义异常处理类
        @ControllerAdvice :类注解
        @ExceptionHandler(value = Exception.class) :方法注解 并封装 返回信息


spring boot整合jdbcTempleates ---------------------------------------------------------------------------------********************************--------------------------------------------------------------------
	1:引入依赖:
		1:在pom文件引入spring-boot-starter-jdbc的依赖
			<dependency>
				<groupId>org.springframework.boot</groupId>
				<artifactId>spring-boot-starter-jdbc</artifactId>
			</dependency>
		2:引入mysql连接类和连接池:
			<dependency>
				<groupId>mysql</groupId>
				<artifactId>mysql-connector-java</artifactId>
			<scope>runtime</scope>
			</dependency>
			<dependency>
					<groupId>com.alibaba</groupId>
					<artifactId>druid</artifactId>
					<version>1.0.29</version>
			</dependency>
		3:开启web
			<dependency>
				<groupId>org.springframework.boot</groupId>
				<artifactId>spring-boot-starter-web</artifactId>
			</dependency>
	2:配置相关文件
		在application.properties文件配置mysql的驱动类,数据库地址,数据库账号、密码信息。
		spring.datasource.driver-class-name=com.mysql.jdbc.Driver
		spring.datasource.url=jdbc:mysql://localhost:3306/test
		spring.datasource.username=root
		spring.datasource.password=123456
	源码下载:https://github.com/forezp/SpringBootLearning

spring boot整合JPA ---------------------------------------------------------------------------------********************************--------------------------------------------------------------------
	1:引入依赖:
		1:添加spring-boot-starter-jdbc依赖:
			<dependency>
				<groupId>org.springframework.boot</groupId>
				<artifactId>spring-boot-starter-data-jpa
				</artifactId>
			</dependency>
		2:添加mysql连接类和连接池类:
			<dependency>
				<groupId>mysql</groupId>
				<artifactId>mysql-connector-java</artifactId>
				<scope>runtime</scope>
			</dependency>
	2:配置相关文件
		spring:
		  datasource:
			driver-class-name: com.mysql.jdbc.Driver
			url: jdbc:mysql://localhost:3306/test?useUnicode=true&characterEncoding=utf8&characterSetResults=utf8
			username: root
			password: 123456

		  jpa:
			hibernate:
			  ddl-auto: update  # 第一次简表create  后面用update
			show-sql: true
	源码下载:https://github.com/forezp/SpringBootLearning

spring boot整合mybatis ---------------------------------------------------------------------------------********************************--------------------------------------------------------------------
	1:引入依赖:
		1:添加mybatis-spring-boot-starter依赖:
			<dependency>
				<groupId>org.mybatis.spring.boot</groupId>
				<artifactId>mybatis-spring-boot-starter<artifactId>
				<version>1.3.0</version>
			</dependency>
		2:引入数据库连接依赖:
			<dependency>
				<groupId>mysql</groupId>
				<artifactId>mysql-connector-java</artifactId>
				<scope>runtime</scope>
			</dependency>
			<dependency>
				<groupId>com.alibaba</groupId>
				<artifactId>druid</artifactId>
				<version>1.0.29</version>
			</dependency>
	2:配置相关文件
		spring.datasource.url=jdbc:mysql://localhost:3306/test
		spring.datasource.username=root
		spring.datasource.password=123456
		spring.datasource.driver-class-name=com.mysql.jdbc.Driver
	源码下载:https://github.com/forezp/SpringBootLearning	 //注解式mybatis

springboot开启声明式事务---------------------------------------------------------------------------------********************************--------------------------------------------------------------------
	springboot 开启事物很简单,只需要加一行注解就可以了,前提你用的是jdbctemplate, jpa, mybatis,这种常见的orm。
	@Transactional,声明事务,并设计一个转账方法,用户1减10块,用户2加10块。在用户1减10 ,之后,抛出异常,即用户2加10块钱不能执行,当加注解@Transactional之后,两个人的钱都没有增减。
	当不加@Transactional,用户1减了10,用户2没有增加,即没有操作用户2 的数据。可见@Transactional注解开启了事物。
	源码下载:https://github.com/forezp/SpringBootLearning

springboot 整合mongodb---------------------------------------------------------------------------------********************************--------------------------------------------------------------------
	1:引入依赖:
		1:在pom文件引入spring-boot-starter-data-mongodb依赖:
			<dependency>
				<groupId>org.springframework.boot</groupId>
				<artifactId>spring-boot-starter-data-mongodb</artifactId>
			</dependency>
	2:配置相关文件
		1:如果mongodb端口是默认端口,并且没有设置密码,可不配置,sprinboot会开启默认的。
			spring.data.mongodb.uri=mongodb://localhost:27017/springboot-db
		2:mongodb设置了密码,这样配置
			spring.data.mongodb.uri=mongodb://name:pass@localhost:27017/dbname
	源码下载:https://github.com/forezp/SpringBootLearning

springboot 整合Redis---------------------------------------------------------------------------------********************************--------------------------------------------------------------------
	1:引入依赖:
		1:在pom文件中添加redis依赖:
			<dependency>
				<groupId>org.springframework.boot</groupId>
				<artifactId>spring-boot-starter-data-redis</artifactId>
			</dependency>
	2:配置相关文件
		配置数据源:
			spring.redis.host=localhost
			spring.redis.port=6379
			#spring.redis.password=
			spring.redis.database=1
			spring.redis.pool.max-active=8
			spring.redis.pool.max-wait=-1
			spring.redis.pool.max-idle=500
			spring.redis.pool.min-idle=0
			spring.redis.timeout=0
	源码下载:https://github.com/forezp/SpringBootLearning

springboot 整合RabbitMQ---------------------------------------------------------------------------------********************************--------------------------------------------------------------------
	1:http://www.rabbitmq.com/download.html 下载rabbitmq
	   mac  brew install rabbitmq下载 rabbitmq-server开启服务
	2:引入依赖:
		<dependency>
            <groupId>org.springframework.boot</groupId>
            <artifactId>spring-boot-starter-amqp</artifactId>
        </dependency>
	源码下载:https://github.com/forezp/SpringBootLearning
	参考资料:https://spring.io/guides/gs/messaging-rabbitmq/