1、NFS介绍
- NFS服务全称是NetWork File System:网络文件系统,最早有sun公司开发的,4.0版本由Netapp公司开发,是基于RPC远程过程调用(Remote Procedure Call)协议的服务
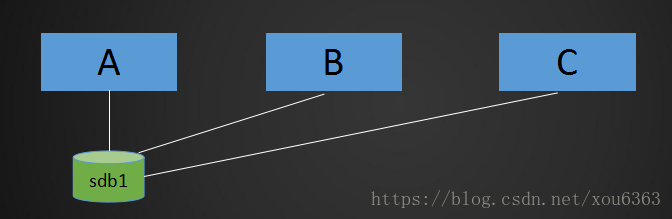
- 应用场景:A,B,C三台机器上需要被访问到的文件是一样的,A共享数据出来,B和C分别取挂载A共享的数据目录,从而B和C访问到的数据和A上的一致。
NFS原理图
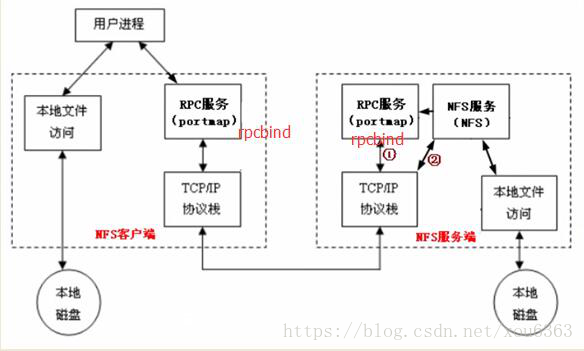
- 服务端需要启动一个NFS服务,服务端要想给客户端提供服务,需要借助RPC协议,RPC协议是由rpcbind服务所实现的;在centos 5或者之前的版本叫portmap服务,centos6及之后的版本叫rpcbind服务,这两个都是一个服务,最终实现了RPC协议的通信,NFS服务默认不会监听任何端口(启动服务,但不会监听端口),最终监听端口,实现RPC通信的过程是由rpcbind服务产生的RPC协议实现的,RPC协议 默认监听 的 端口是111 端口;
- 整个流程为:服务端的NFS服务监听一个端口通过RPC协议监听的端口,再去告诉客户端RPC协议,然后NFS客户端通过本机的RPC端口回传数据信息到服务端NFS监听的端口,最终实现通信
2、NFS服务端安装配置
- 准备两台虚拟机,一台作为服务端,一台作为客户端。
- 服务端:IP:192.168.222.110,安装安装nfs-utils、rpcbind;
[root@aminglinux ~]# yum install -y nfs-utils rpcbind
- 编辑配置文件: /etc/exports
[root@aminglinux ~]# vim /etc/exports

/home/nfstestdir     192.168.222.0/24(rw,sync,all_squash,anonuid=1000,anongid=1000)
- 启动NFS服务,启动服务前需要先创建目录,并设置权限777;
[root@aminglinux ~]# mkdir /home/nfstestdir
[root@aminglinux ~]# chmod 777 /home/nfstestdir/
- 启动rpcbind服务;启动nfs;设置开机启动nfs;
[root@aminglinux ~]# systemctl start rpcbind
[root@aminglinux ~]# systemctl start nfs
[root@aminglinux ~]# systemctl enable nfs
Created symlink from /etc/systemd/system/multi-user.target.wants/nfs-server.service to /usr/lib/systemd/system/nfs-server.service.
- 查看服务
[root@aminglinux ~]# netstat -lntp
Active Internet connections (only servers)
Proto Recv-Q Send-Q Local Address           Foreign Address         State       PID/Program name
tcp        0      0 0.0.0.0:111             0.0.0.0:*               LISTEN      1549/rpcbind
tcp        0      0 0.0.0.0:20048           0.0.0.0:*               LISTEN      1580/rpc.mountd
tcp        0      0 0.0.0.0:22              0.0.0.0:*               LISTEN      930/sshd
tcp        0      0 0.0.0.0:38329           0.0.0.0:*               LISTEN      -
tcp        0      0 127.0.0.1:25            0.0.0.0:*               LISTEN      1131/master
tcp        0      0 0.0.0.0:42267           0.0.0.0:*               LISTEN      1567/rpc.statd
tcp        0      0 0.0.0.0:2049            0.0.0.0:*               LISTEN      -
tcp6       0      0 :::111                  :::*                    LISTEN      1549/rpcbind
tcp6       0      0 :::20048                :::*                    LISTEN      1580/rpc.mountd
tcp6       0      0 :::22                   :::*                    LISTEN      930/sshd
tcp6       0      0 ::1:25                  :::*                    LISTEN      1131/master
tcp6       0      0 :::44669                :::*                    LISTEN      -
tcp6       0      0 :::59232                :::*                    LISTEN      1567/rpc.statd
tcp6       0      0 :::2049                 :::*                    LISTEN      -
tcp6       0      0 :::3306                 :::*                    LISTEN      1089/mysqld
[root@aminglinux ~]# ps aux |grep rpc
rpc       1549  0.0  0.1  65000  1420 ?        Ss   14:51   0:00 /sbin/rpcbind -w
rpcuser   1567  0.0  0.1  42420  1752 ?        Ss   14:51   0:00 /usr/sbin/rpc.statd
root      1574  0.0  0.0      0     0 ?        S<   14:51   0:00 [rpciod]
root      1580  0.0  0.0  42608   944 ?        Ss   14:51   0:00 /usr/sbin/rpc.mountd
root      1587  0.0  0.0  43860   544 ?        Ss   14:51   0:00 /usr/sbin/rpc.idmapd
root      1636  0.0  0.0 112720   984 pts/0    S+   14:53   0:00 grep --color=auto rpc
- 客户端:IP:192.168.222.111,安装安装nfs-utils
[root@localhost ~]# yum install -y nfs-utils
- 启动rpcbind服务;并查看服务是否启动;
[root@localhost ~]# systemctl start rpcbind
[root@localhost ~]# netstat -lntp
Active Internet connections (only servers)
Proto Recv-Q Send-Q Local Address           Foreign Address         State       PID/Program name
tcp        0      0 0.0.0.0:111             0.0.0.0:*               LISTEN      2071/rpcbind
tcp        0      0 0.0.0.0:22              0.0.0.0:*               LISTEN      1031/sshd
tcp        0      0 127.0.0.1:25            0.0.0.0:*               LISTEN      1140/master
tcp6       0      0 :::111                  :::*                    LISTEN      2071/rpcbind
tcp6       0      0 :::22                   :::*                    LISTEN      1031/sshd
tcp6       0      0 ::1:25                  :::*                    LISTEN      1140/master
[root@localhost ~]# ps aux |grep rpc
rpc       2071  0.0  0.1  64956  1048 ?        Ss   14:55   0:00 /sbin/rpcbind -w
root      2074  0.0  0.0 112676   984 pts/0    S+   14:56   0:00 grep --color=auto rpc
- systemctl disable nfs 关闭开机启动 3、NFS挂载配置选项
- rw 读写
- ro 只读
- sync 同步模式,内存数据实时写入磁盘,相应的就会降低磁盘效率
- async 非同步模式,它会每隔一段时间才会将数据刷新到磁盘
- 优势:能够保证磁盘的效率
- 劣势:万一断电,就会有可能丢失一部门数据
no_root_squash 客户端挂载NFS共享目录后,root用户不受约束,权限很大
NFS,要想在客户端上去使用服务端上共享的目录,需要去把它挂载到客户端上的一个挂载点,那就跟本地上的目录是一样的,在操作本地的目录时候,肯定会有一些权限设置,如果加上no_root_squash,这样root用户去共享目录下读写文件的时候,就不会受到限制(就相当于root用户在本地上读写)
root_squash 与上面选项相对,客户端上的root用户收到约束,被限定成某个普通用户
all_squash 客户端上所有用户(包括root用户)在使用NFS共享目录时都被限定为一个普通用户
anonuid/anongid 和上面几个选项搭配使用,定义被限定用户的uid和gid
编辑配置文件: /etc/exports
[root@aminglinux ~]# vim /etc/exports

/home/nfstestdir     192.168.222.0/24(rw,sync,all_squash,anonuid=1000,anongid=1000)

#rw 读写;ro 只读
#sync 同步模式,内存数据实时写入磁盘
#async 非同步模式
#no_root_squash 客户端挂载NFS服务后,root用户不受约束,权限很大
#root_squash 与上面选项相对,客户端上的root用户受到约束,被限定成某个普通用户
#all_squash 客户端上所有用户在使用NFS共享目录时都被限定为一个普通用户
#anonuid/anongid 和上面几个选项搭配使用,定义被限定用户的uid和gid
客户端连接服务端:showmount -e 192.168.222.110 //查看在NFS服务端是否有权限
此时如果报错:可能有以下原因
- 服务端的nfs服务没启动
- 网络不通,可以telnet一下
- 服务端和客户端的防火墙、selinux其中一个没有关闭:systemctl stop firewall setenforce 0
[root@localhost ~]# showmount -e 192.168.222.110
Export list for 192.168.222.110:
/home/nfstestdir 192.168.222.0/24
- 挂载服务端共享的目录:/home/nfstestdir
[root@localhost ~]# mount -t nfs 192.168.222.110:/home/nfstestdir /mnt/
[root@localhost ~]# df -h    //查看是否挂载成功
文件系统                          容量  已用  可用 已用% 挂载点
/dev/mapper/centos-root            18G 1002M   17G    6% /
devtmpfs                          482M     0  482M    0% /dev
tmpfs                             493M     0  493M    0% /dev/shm
tmpfs                             493M  6.8M  486M    2% /run
tmpfs                             493M     0  493M    0% /sys/fs/cgroup
/dev/sda1                         197M  103M   95M   53% /boot
tmpfs                              99M     0   99M    0% /run/user/0
192.168.222.110:/home/nfstestdir   18G  6.7G   12G   38% /mnt
- 客户端创建文件测试
[root@localhost ~]# cd /mnt/
[root@localhost mnt]# ls
[root@localhost mnt]# touch nfstest.txt
[root@localhost mnt]# ll
总用量 0
-rw-r--r--. 1 1000 1000 0 7月  15 15:22 nfstest.txt
- 服务端可以查看到创建的测试文件
[root@aminglinux ~]# ll /home/nfstestdir/
总用量 0
-rw-r--r-- 1 mysql mysql 0 7月  15 15:22 nfstest.txt
- 注:在/etc/exports文件中的/home/nfstestdir 192.168.222.0/24(rw,sync,all_squash,anonuid=1000,anongid=1000) ,其中ip与(rw之间不能有空格, 否则客户端挂载的目录会变成只读..
4、exportfs命令
当我们修改nfs的配置文件exports后,需要重新启动nfs服务才能让配置文件生效。但是很多情况下nfs的客户端还挂载着服务端的共享目录,如果重启就会影响客户端的使用。
如果把客户端卸载,再修改配置文件,再重启nfs,客户端再重新挂载,客户端很多的情况下,这样操作会很繁琐。
我们可以使用exportfs命令,可以不用卸载客户端和nfs服务不停止的情况下,重载配置文件。
exportfs命令常用选项:
-a:表示全部挂载或者全部卸载
-r:表示重新挂载
-u:表示卸载某一个目录
-v:表示显示共享目录
在服务端上修改配置文件:增加共享目录/tmp/
[root@aminglinux ~]# vim /etc/exports

/home/nfstestdir     192.168.222.0/24(rw,sync,all_squash,anonuid=1000,anongid=1000)
/tmp/ 192.168.222.110(rw,sync,no_root_squash)
- 重新加载配置文件:exportfs -arv
[root@aminglinux ~]# exportfs -arv
exporting 192.168.222.110:/tmp  共享目录/tmp/已增加
exporting 192.168.222.0/24:/home/nfstestdir
- 客户端查看共享目录:showmount -e 192.168.222.110
[root@localhost mnt]# showmount -e 192.168.222.110
Export list for 192.168.222.110:
/home/nfstestdir 192.168.222.0/24
/tmp             192.168.222.110
5、NFS客户端问题
- NFS4通常有这个问题:客户端挂载共享目录后,不管是root用户还是系统普通用户,在共享目录里创建目录和文件时的主和组都是nobody
- 解决方法1、客户端挂载目录时,加上-o和nfsvers=3
[root@localhost mnt]# monunt -t nfs -o nfsvers=3 192.168.222.110:/tmp/ /mnt/
如果目录已经挂载,而又不想卸载,执行:
[root@localhost mnt]# monunt -t nfs -o remount,nfsvers=3 192.168.222.110:/tmp/ /mnt/
- 解决方案2、修改服务端和客户端的配置文件,然后再重启rpcidmapd服务
[root@aminglinux ~]# vim /etc/idmapd.conf

[General]
#Verbosity = 0
# The following should be set to the local NFSv4 domain name
# The default is the host's DNS domain name.
#Domain = local.domain.edu  改成Domain = xxx.com