【bean配置】
在XML文件中通过bean节点来配置bean
1 <!--
2        配置bean
3        class: bean的全类名,通过反射的方式在IOC容器中创建bean,所以要求bean中必须有无参的构造器。
4        id:标识容器中的bean,id唯一。
5 -->
6    <bean id="helloWorld" class="com.hk.beans.HelloWorld">
7        <property name="name" value="Spring"></property>
8    </bean>
id:bean的名称。
--在IOC容器中必须是唯一的。
--若id没有指定,Spring自动将对应类名作为bean的名字。
--id可以指定多个名字,名字之间可用逗号,分号,或空格分隔。
【注】:
当bean中不存在无参构造器,存在有参构造器时,运行程序,会出现以下错误:

【Spring容器】
--ApplicationContext代表容器,但实际上它是一个接口。
--在Spring IOC容器读取bean配置创建bean实例之前,必须对它进行实例化。只有在容器实例化后,才可以从IOC容器中获取bean实例并使用。
--Spring提供了两种类型的IOC容器实现。
(1)BeanFactory:IOC容器的基本实现。
(2)ApplicationContext:提供了更多的高级特性。是BeanFactory的子接口。
BeanFactory是Spring框架的基础设施,面向Spring本身;
ApplicationContext面向使用Spring框架的开发者,几乎所有的应用场合都直接使用ApplicationContext而非底层的BeanFactory。
无论使用何种方式,配置文件是相同的。
【ApplicationContext】
1.ApplicationContext的主要实现类:
--ClassPathXmlApplicationContext:从类路径下加载配置文件。
--FileSystemXmlApplicationContext:从文件系统中加载配置文件。
2.ConfigurableApplicationContext(子接口)扩展于ApplicationContext,新增加两个主要方法:refresh()和close(),让ApplicationContext具有启动、刷新和关闭上下文的能力。
3.ApplicationContext在初始化上下文的时候就实例化所有单例的bean。
4.WebApplicationContext是专门为WEB应用而准备的,它允许从相对于WEB根目录的路径中完成初始化工作。
【从IOC容器中获取bean】
1.调用ApplicationContext的getBean()方法。该方法是在ApplicationContext的父接口BeanFactory中定义实现的。
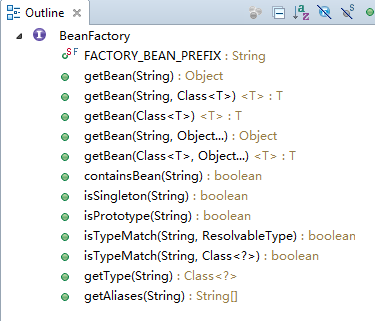
由图中可知,还可以由类型获取bean。
1 ApplicationContext ctx = new ClassPathXmlApplicationContext("applicationContext.xml");
2 HelloWorld helloWorld = ctx.getBean(HelloWorld.class);
缺点!!:如果在IOC容器中此类型不唯一(有两个或以上相同类型的bean时),会出错。
---小结:
1 //2. 从IOC容器中获取Bean实例
2 //方式一:利用id定位到IOC容器中的bean
3 //HelloWorld helloWorld = (HelloWorld) ctx.getBean("helloWorld");
4 //方式二:利用类型返回IOC容器中的bean,但要求IOC容器中必须只能有一个该类型的bean
5 HelloWorld helloWorld = ctx.getBean(HelloWorld.class);
【依赖注入的方式】
Spring支持3种依赖注入的方式:
--属性输入
--构造器注入
--工厂方式(很少使用,不推荐)
1.属性注入
(1)概述:属性注入即通过setter方法注入Bean的属性值或以来的对象。
(2)属性注入使用<property>元素,使用name属性指定Bean的属性名称,value属性或<value>子节点指定属性值。
(3)属性注入是实际应用中最常用到的注入方式。
1    <bean id="helloWorld" class="com.hk.beans.HelloWorld">
2        <property name="name" value="Spring"></property>
3    </bean>
2.构造方法注入
(1)通过构造方法注入Bean的属性值或依赖的对象,它保证了Bean实例在实例化后就可以使用。
(2)构造器注入在<constructor-arg>元素里声明属性,<constructor-arg>中没有name属性。
Car.java:
 1 package com.hk.beans;
 2
 3 public class Car {
 4     private String brand;
 5     private String corp;
 6     private double price;
 7     private int maxSpeed;
 8
 9     public Car(String brand, String corp, double price) {
10         super();
11         this.brand = brand;
12         this.corp = corp;
13         this.price = price;
14     }
15
16     @Override
17     public String toString() {
18         return "Car [brand=" + brand + ", corp=" + corp + ", price=" + price
19                 + ", maxSpeed=" + maxSpeed + "]";
20     }
21
22     public Car(String brand, String corp, int maxSpeed) {
23         super();
24         this.brand = brand;
25         this.corp = corp;
26         this.maxSpeed = maxSpeed;
27     }
28 }
配置文件代码:
 1 <!-- 通过构造方法来配置bean的属性 -->
 2    <bean id="car" class="com.hk.beans.Car">
 3       <constructor-arg value="BWM" index="0"></constructor-arg>
 4       <constructor-arg value="ShangHai" index="1"></constructor-arg>
 5       <constructor-arg value="100000" type="double"></constructor-arg>
 6    </bean>
 7
 8    <!-- 使用构造器注入属性值可以指定参数的位置和参数的类型!以区分重载的构造器! -->
 9    <bean id="car2" class="com.hk.beans.Car">
10       <constructor-arg value="bieke" type="java.lang.String"></constructor-arg>
11       <constructor-arg value="BeiJing" type="java.lang.String"></constructor-arg>
12       <constructor-arg value="150" type="int"></constructor-arg>
13    </bean>
(测试)Main.java:
1         ApplicationContext ctx = new ClassPathXmlApplicationContext("applicationContext.xml");
2
3         Car car = (Car) ctx.getBean("car");
4         System.out.println(car);
5
6         car = (Car) ctx.getBean("car2");
7         System.out.println(car);
运行结果;
