1 概述
我们都知道使用SpringBoot的强大功能之一就是能够进行自动配置。可以利用自己的自动配置功能来实现对Redis和MongoDB等的自动配置。那么SpringBoot的自动配置是怎么实现的呢?现在我们就从程序启动的入口来看看自动配置的具体实现。
2 实现详解
首先我们来看程序启动类。
@SpringBootApplication
public class Application {

	public static void main(String[] args) {
		SpringApplication.run(Application.class, args);
	}
}
从上面的源码我们看出,程序启动类比较关键的一个注解是@SpringBootApplication,针对这个注解的详细情况请看下面的内容。
@Target({ElementType.TYPE})
@Retention(RetentionPolicy.RUNTIME)
@Documented
@Inherited
@SpringBootConfiguration
@EnableAutoConfiguration
@ComponentScan(
    excludeFilters = {@Filter(
    type = FilterType.CUSTOM,
    classes = {TypeExcludeFilter.class}
), @Filter(
    type = FilterType.CUSTOM,
    classes = {AutoConfigurationExcludeFilter.class}
)}
)
public @interface SpringBootApplication {
    @AliasFor(
        annotation = EnableAutoConfiguration.class
    )
    Class<?>[] exclude() default {};

    @AliasFor(
        annotation = EnableAutoConfiguration.class
    )
    String[] excludeName() default {};

    @AliasFor(
        annotation = ComponentScan.class,
        attribute = "basePackages"
    )
    String[] scanBasePackages() default {};

    @AliasFor(
        annotation = ComponentScan.class,
        attribute = "basePackageClasses"
    )
    Class<?>[] scanBasePackageClasses() default {};
}
针对这个注解我们可以看见上面比较有用的注解其实就只有三个,我们将分别来看这三个注解的作用。
(1)ComponentScan
这个注解的作用其实就是自动扫描并加载符合要求的类来生成bean添加进入Spring容器中,比如被@Component和@Repository修饰的类。
(2)SpringBootConfiguration
这个注解我们查看他的源码可以看见其实它就相当于是一个Configuration注解。
(3)EnableAutoConfiguration
这是一个最重要的注解了,自动配置就是依靠这个注解来实现的。所以下面我们就通过这个注解来查看自动配置的实现过程。
@Target({ElementType.TYPE})
@Retention(RetentionPolicy.RUNTIME)
@Documented
@Inherited
@AutoConfigurationPackage
@Import({AutoConfigurationImportSelector.class})
public @interface EnableAutoConfiguration {
    String ENABLED_OVERRIDE_PROPERTY = "spring.boot.enableautoconfiguration";

    Class<?>[] exclude() default {};

    String[] excludeName() default {};
}
在上面我们可以看见一个@Import操作,其实这个操作的主要作用就是引入配置类(注意这个配置类是否被@Configuraion修饰效果相同)。效果和我们平时使用的@Configuration修饰配置类,并且这个配置类被扫描到是相同的。
我们再来查看一下AutoConfigurationImportSelector这个类到底干了什么,为什么一引入进来就可以实现这么多功能的自动配置。
查看AutoConfigurationImportSelector的源码,我们可以看见最关键的一个方法是实现ImportSelector的方法,如下:
public String[] selectImports(AnnotationMetadata annotationMetadata) {
        if (!this.isEnabled(annotationMetadata)) {
            return NO_IMPORTS;
        } else {
            try {
                AutoConfigurationMetadata autoConfigurationMetadata = AutoConfigurationMetadataLoader.loadMetadata(this.beanClassLoader);
                AnnotationAttributes attributes = this.getAttributes(annotationMetadata);

                //获取需要进行自动配置的配置类全名
                List<String> configurations = this.getCandidateConfigurations(annotationMetadata, attributes);
                configurations = this.removeDuplicates(configurations);
                configurations = this.sort(configurations, autoConfigurationMetadata);
                Set<String> exclusions = this.getExclusions(annotationMetadata, attributes);
                this.checkExcludedClasses(configurations, exclusions);
                configurations.removeAll(exclusions);
                configurations = this.filter(configurations, autoConfigurationMetadata);
                this.fireAutoConfigurationImportEvents(configurations, exclusions);
                return StringUtils.toStringArray(configurations);
            } catch (IOException var6) {
                throw new IllegalStateException(var6);
            }
        }
    }
上面的方法其实主要的操作就是获得需要进行自动配置的配置类全名(包括包)。
protected List<String> getCandidateConfigurations(AnnotationMetadata metadata, AnnotationAttributes attributes) {

        /**
         * 获取自动配置的类全名,这里就借助于Spring框架原有的一个工具类:SpringFactoriesLoader的
         * 支持 ,这里传入的参数第一个其实就是Enable***的类名,第二个就是类加载器的,这里可以空。
         */
        List<String> configurations =
        SpringFactoriesLoader.loadFactoryNames(this.getSpringFactoriesLoaderFactoryClass(), this.getBeanClassLoader());
        Assert.notEmpty(configurations, "No auto configuration classes found in META-INF/spring.factories. If you are using a custom packaging, make sure that file is correct.");
        return configurations;
    }


protected Class<?> getSpringFactoriesLoaderFactoryClass() {
        return EnableAutoConfiguration.class;
    }
接下来,我们再来看一看loadFactoryNames方法干了什么呢?
public static List<String> loadFactoryNames(Class<?> factoryClass, @Nullable ClassLoader classLoader) {
        String factoryClassName = factoryClass.getName();
        return (List)loadSpringFactories(classLoader).getOrDefault(factoryClassName, Collections.emptyList());
    }

    private static Map<String, List<String>> loadSpringFactories(@Nullable ClassLoader classLoader) {
        MultiValueMap<String, String> result = (MultiValueMap)cache.get(classLoader);
        if (result != null) {
            return result;
        } else {
            try {
                Enumeration<URL> urls = classLoader != null ? classLoader.getResources("META-INF/spring.factories") : ClassLoader.getSystemResources("META-INF/spring.factories");
                LinkedMultiValueMap result = new LinkedMultiValueMap();

                while(urls.hasMoreElements()) {
                    URL url = (URL)urls.nextElement();
                    UrlResource resource = new UrlResource(url);
                    Properties properties = PropertiesLoaderUtils.loadProperties(resource);
                    Iterator var6 = properties.entrySet().iterator();

                    while(var6.hasNext()) {
                        Entry<?, ?> entry = (Entry)var6.next();
                        List<String> factoryClassNames = Arrays.asList(StringUtils.commaDelimitedListToStringArray((String)entry.getValue()));
                        result.addAll((String)entry.getKey(), factoryClassNames);
                    }
                }

                cache.put(classLoader, result);
                return result;
            } catch (IOException var9) {
                throw new IllegalArgumentException("Unable to load factories from location [META-INF/spring.factories]", var9);
            }
        }
    }
这里的主要作用其实就是从resources的META-INF/spring.factories根据Enable****的类全名为key获取到所有的需要自动配置的类,然后加载并进行自动配置。
我们查看一下spring.factories文件,
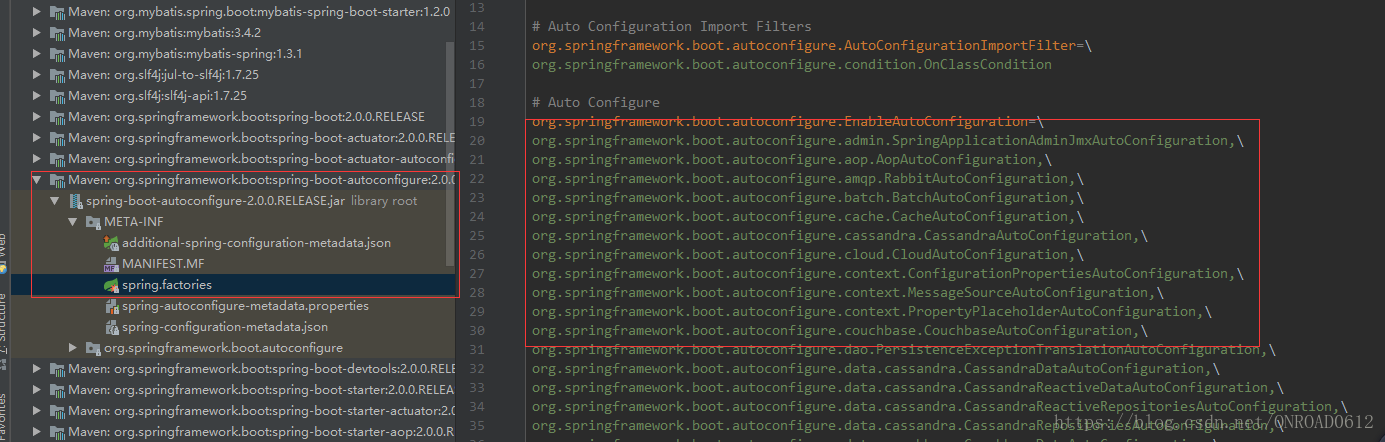
通过这个文件我们就可以查看到Springboot目前支持哪些自动配置功能,如果点进去相应的Configuration还能够通过查看properties了解到相应的配置属性。
上面就是对自动配置实现的简单总结,在接下来的文章中我将模仿SpringBoot的自动配置来自己实现一个自动配置功能。