推荐贝塞尔曲线详解视频---贝塞尔曲线详解
一 。什么是贝塞尔曲线
贝赛尔曲线又称为贝兹曲线、贝济埃曲线,是应用于二维图像应用程序的数学曲线。
二 。贝塞尔曲线计算公式

三 。贝塞尔曲线图解


一阶贝塞尔曲线是条直线,贝塞尔点从P0到P1。


二阶贝塞尔曲线(图中红色的线)是个曲线,绘制过程如下:P0与P1之间有个绿色的点(我们设为X1),P1与P2之间也有个绿色的点(我们设为X2),图中绿色的线(X1与X2的连线)有个黑色的点(我们设为X3),P0到X1的距离等于P1到X2的距离等于X1到X3的距离,也就是图中t时刻的值,曲线就是t时刻贝塞尔点从P0到P2的移动过程。


三阶贝赛尔曲线绘制过程如下:P0与P1之间有个绿色的点(我们设为X1),P1与P2之间也有个绿色的点(我们设为X2),P2到P3之间也有个绿色的点(我们设为X3),X1与X2的连线(绿色的线)中蓝色的点(我们设为X4),X2与X3的连线(绿色的线)中蓝色的点(我们设为X5),X4与X5的连线(蓝色的线)中黑色的点(我们设为X6),P0到X1的距离等于P1到X2的距离等于P2到X3的距离等于X1到X4的距离等于X2到X5的距离等于X4到X6的距离,也就是图中t的值,曲线就是贝塞尔点从P0到P3的移动过程。


四节、五阶曲线乃至以上绘制原理都是一样的,不断地从线中取出长度为t的点,点与点连线再取出长度为t的点,直至最后剩下一条线,而这条线是不断的移动的,曲线就是t时刻贝塞尔点在这条线中移动的轨迹。
下面是贝赛尔曲线详细效果图

四 。1~3阶贝赛尔曲线代码实现
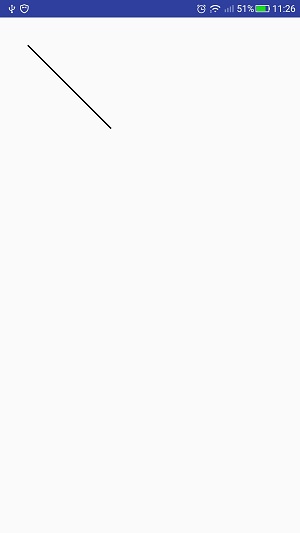
① 一阶贝塞尔曲线
public class TextLine extends View {

    private Paint mPaint = new Paint(Paint.ANTI_ALIAS_FLAG);
    private Path mPath = new Path();

    public TextLine(Context context) {
        this(context, null);
    }

    public TextLine(Context context, @Nullable AttributeSet attrs) {
        this(context, attrs, 0);
    }

    public TextLine(Context context, @Nullable AttributeSet attrs, int defStyleAttr) {
        this(context, attrs, defStyleAttr, 0);
    }

    public TextLine(Context context, @Nullable AttributeSet attrs, int defStyleAttr, int defStyleRes) {
        super(context, attrs, defStyleAttr, defStyleRes);

        init();
    }

    private void init() {
        Paint paint = new Paint();
        paint.setAntiAlias(true);
        paint.setDither(true);
        paint.setStyle(Paint.Style.STROKE);
        paint.setStrokeWidth(5);
        mPaint = paint;

        //一阶贝赛尔曲线
        Path path = new Path();
        path.moveTo(100, 100);
        path.lineTo(400, 400);

        mPath = path;
    }

    @Override
    protected void onDraw(Canvas canvas) {
        super.onDraw(canvas);

        canvas.drawPath(mPath, mPaint);
    }
}
一阶贝赛尔曲线是条直线,起始点P0(100,100),终点P1(400,400)。
② 二阶贝赛尔曲线
 //一阶贝赛尔曲线
        Path path = new Path();
        path.moveTo(100, 100);
        path.lineTo(400, 400);
        //二阶贝塞尔曲线
        path.quadTo(700, 100, 800, 400);

mPath = path; /**
* Add a quadratic bezier from the last point, approaching control point
* (x1,y1), and ending at (x2,y2). If no moveTo() call has been made for
* this contour, the first point is automatically set to (0,0).
*
* @param x1 The x-coordinate of the control point on a quadratic curve
* @param y1 The y-coordinate of the control point on a quadratic curve
* @param x2 The x-coordinate of the end point on a quadratic curve
* @param y2 The y-coordinate of the end point on a quadratic curve
*/
public void quadTo(float x1, float y1, float x2, float y2) {
isSimplePath = false;
nQuadTo(mNativePath, x1, y1, x2, y2);
}二阶贝赛尔曲线还有个实现方法
 //二阶贝塞尔曲线,和下面表达不同
//        path.quadTo(700, 100, 800, 400);
        //相对的实现,不用考虑运算
        path.rQuadTo(300, -300, 400, 0);
这两句代码实现效果是一样的,rQuadTo()方法中前两个参数(300,-300)是P1(700,100)与P0(400,400)的相差距离,后两个参数(400,0)是P2(800,400)与P0(400,400)的相差距离。我们可以看下源码
 /**
     * Same as quadTo, but the coordinates are considered relative to the last
     * point on this contour. If there is no previous point, then a moveTo(0,0)
     * is inserted automatically.
     *
     * @param dx1 The amount to add to the x-coordinate of the last point on
     *            this contour, for the control point of a quadratic curve
     * @param dy1 The amount to add to the y-coordinate of the last point on
     *            this contour, for the control point of a quadratic curve
     * @param dx2 The amount to add to the x-coordinate of the last point on
     *            this contour, for the end point of a quadratic curve
     * @param dy2 The amount to add to the y-coordinate of the last point on
     *            this contour, for the end point of a quadratic curve
     */
    public void rQuadTo(float dx1, float dy1, float dx2, float dy2) {
        isSimplePath = false;
        nRQuadTo(mNativePath, dx1, dy1, dx2, dy2);
    }
源码注释中可以看到,这个方法是类似于quadTo()方法的,只不过它的参数是P1与P2相对于最后一个点P0(400,400)的差值,如果没有最后一个点,就设置为(0,0)。
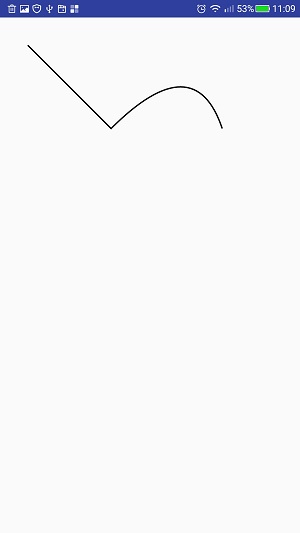
我们可以看到图中二阶贝塞尔曲线向上弯曲的最高的的Y轴坐标是在控制点P1(700,100)的Y轴坐标的下面,我们可以通过第三部分的二阶曲线图了解其实现的原因。
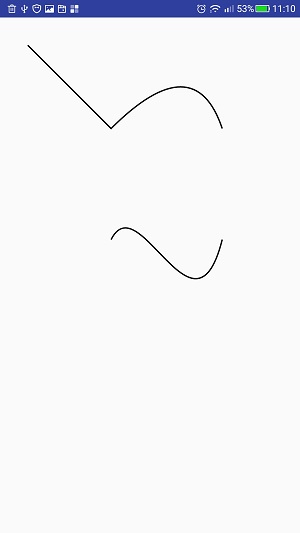
③ 三阶贝赛尔曲线
   //一阶贝赛尔曲线
        Path path = new Path();
        path.moveTo(100, 100);
        path.lineTo(400, 400);

        //二阶贝塞尔曲线,和下面表达不同
        path.quadTo(700, 100, 800, 400);
        //相对的实现,不用考虑运算
//        path.rQuadTo(300, -300, 400, 0);
        path.moveTo(400, 800);
        //三阶贝赛尔曲线
        path.cubicTo(500,600,700,1200,800,800);
        mPath = path;
三阶贝塞尔曲线实现方法cubicTo()方法中前两个参数(500,600)和中间两个参数(700,1200)为控制点P1、P2的坐标,最后两个参数(800,800)为终点P3的坐标 ,我们可以看下源码
/**
     * Add a cubic bezier from the last point, approaching control points
     * (x1,y1) and (x2,y2), and ending at (x3,y3). If no moveTo() call has been
     * made for this contour, the first point is automatically set to (0,0).
     *
     * @param x1 The x-coordinate of the 1st control point on a cubic curve
     * @param y1 The y-coordinate of the 1st control point on a cubic curve
     * @param x2 The x-coordinate of the 2nd control point on a cubic curve
     * @param y2 The y-coordinate of the 2nd control point on a cubic curve
     * @param x3 The x-coordinate of the end point on a cubic curve
     * @param y3 The y-coordinate of the end point on a cubic curve
     */
    public void cubicTo(float x1, float y1, float x2, float y2,
                        float x3, float y3) {
        isSimplePath = false;
        nCubicTo(mNativePath, x1, y1, x2, y2, x3, y3);
    }
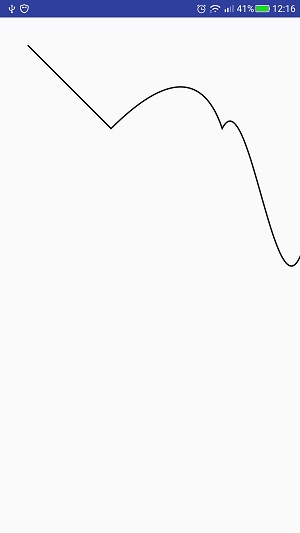
如果我们不通过moveTo()方法更改P0坐标,代码如下
 //一阶贝赛尔曲线
        Path path = new Path();
        path.moveTo(100, 100);
        path.lineTo(400, 400);

        //二阶贝塞尔曲线,和下面表达不同
        path.quadTo(700, 100, 800, 400);
        //相对的实现,不用考虑运算
//        path.rQuadTo(300, -300, 400, 0);
//        path.moveTo(400, 800);
        //三阶贝赛尔曲线
        path.cubicTo(900,200,1000,1200,1100,800);
        mPath = path;
改写参数,三阶贝塞尔曲线起始点P0坐标就为二阶贝塞尔曲线终点坐标(800,400)
三阶贝塞尔曲线也有个相似的实现方法
 //三阶贝赛尔曲线
//        path.cubicTo(500,600,700,1200,800,800);
        path.rCubicTo(100, -200, 300, 400, 400, 0);
        mPath = path;
rCubicTo()方法中前两个参数(100,-200)是P1(500,600)与P0(400,800)的相差距离,中间两个参数(300,400)是P2(700,1200)与P0(400,800)的相差距离,后面两个参数(400,0)是P3(800,800)与P0(400,800)的相差距离,我们看下源码
  /**
     * Same as cubicTo, but the coordinates are considered relative to the
     * current point on this contour. If there is no previous point, then a
     * moveTo(0,0) is inserted automatically.
     */
    public void rCubicTo(float x1, float y1, float x2, float y2,
                         float x3, float y3) {
        isSimplePath = false;
        nRCubicTo(mNativePath, x1, y1, x2, y2, x3, y3);
}五 。四阶及以上贝赛尔曲线代码实现
因为Android只提供了1~3阶贝赛尔曲线代码实现方法,四阶及其以上用到的情况很少,所以想实现四阶及其以上贝赛尔曲线,我们得通过代码一步一步的实现。
public class BezierView extends View {

    private Path mPath = new Path();
    private Paint mPaint = new Paint(Paint.ANTI_ALIAS_FLAG);

    public BezierView(Context context) {
        this(context, null);
    }

    public BezierView(Context context, @Nullable AttributeSet attrs) {
        this(context, attrs, 0);
    }

    public BezierView(Context context, @Nullable AttributeSet attrs, int defStyleAttr) {
        this(context, attrs, defStyleAttr, 0);
    }

    public BezierView(Context context, @Nullable AttributeSet attrs, int defStyleAttr, int defStyleRes) {
        super(context, attrs, defStyleAttr, defStyleRes);

        init();
    }

    private void init() {
        //初始化画笔
        Paint paint = new Paint();
        paint.setAntiAlias(true);
        paint.setDither(true);
        paint.setStyle(Paint.Style.STROKE);
        paint.setStrokeWidth(5);
        mPaint = paint;

        initBezier();
    }

    /**
     * 初始化贝塞尔曲线4阶及以上
     */
    private void initBezier() {
        //(0,0)、(300,300)、(200,700)、(500,500)、(700,1200)
        float[] xPoints = new float[]{0, 300, 200, 500, 700};
        float[] yPoints = new float[]{0, 300, 700, 1200, 200};

        Path path = new Path();
        //fps为组成贝赛尔曲线的点的个数
        int fps = 30;
        for (int i = 0; i <= fps; i++) {
            //进度
            float progress = i / (float) fps;
            float x = calculateBezier(progress, xPoints);
            float y = calculateBezier(progress, yPoints);
            //使用连接的方式,当x、y变动足够小的情况下,就是平滑曲线
            path.lineTo(x, y);
        }
        mPath = path;
    }

    /**
     * 计算某时刻的贝塞尔所处的值(x或y)
     *
     * @param t      时间、进度(0~1)
     * @param values 贝塞尔点的集合 (x或y)
     * @return 当期t时刻贝塞尔所处的点
     */
    private float calculateBezier(float t, float... values) {
        //采用双重for循环
        final int len = values.length;
        for (int i = len - 1; i > 0; i--) {
            //外层
            for (int j = 0; j < i; j++) {
                values[j] = values[j] + (values[j + 1] - values[j]) * t;
            }
        }

        //运算时结果保存在第一位,所以我们返回第一位
        return values[0];
    }

    @Override
    protected void onDraw(Canvas canvas) {
        super.onDraw(canvas);

        canvas.drawPath(mPath, mPaint);
    }
}
通过代码我们可以发现,我们在initBezier()方法中设置了P0~P4五个点,是一个四阶的贝赛尔曲线,因为贝塞尔曲线是由一个个贝塞尔点连线组成的,所以我们先设置贝塞尔点的个数fps为30,calculateBezier()方法采用双层for循环,主要是计算t时刻,贝塞尔点x或y的坐标,然后在for循环内通过这个方法得到贝塞尔点的坐标,再将每个贝塞尔点连线。

我们最上面有一系列的点,相邻两个点两两运算,将运算得到的值存到前面一个点上(两个点相比较而言在前面的一个点),这时候将少掉一位,然后依次运算,最后得到一个点,这个点就是贝塞尔点。calculateBezier()方法i循环为外层循环,j为内层循环,通过--i不断地循环,然后当i=0时,外层循环结束,但j已经计算了最后一次,得到value【0】,也就是最后的返回值。
下面我们设置不同的fps值,如下图:
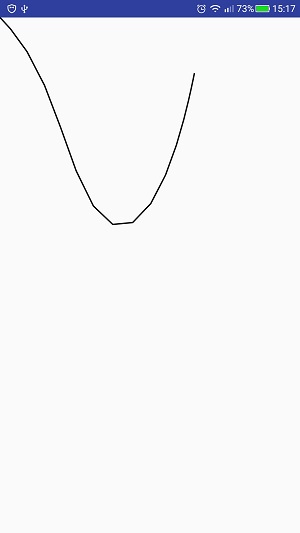
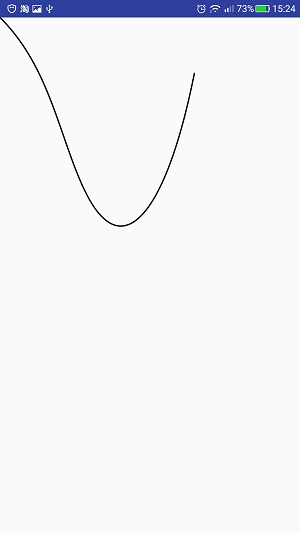
fps=30 fps=3000
下面我们验证一下我们的代码是否正确。
我们再用Android自带方法实现一个三阶贝赛尔曲线
private Path mSrcPath = new Path(); /**
* 初始化贝塞尔曲线4阶及以上
*/
private void initBezier() {
//(0,0)、(300,300)、(200,700)、(500,500)、(700,1200)
float[] xPoints = new float[]{0, 200, 500, 700};
float[] yPoints = new float[]{0, 700, 1200, 200};
Path path = new Path();
//fps为组成贝赛尔曲线的点的个数
int fps = 3000;
for (int i = 0; i <= fps; i++) {
//进度
float progress = i / (float) fps;
float x = calculateBezier(progress, xPoints);
float y = calculateBezier(progress, yPoints);
//使用连接的方式,当x、y变动足够小的情况下,就是平滑曲线
path.lineTo(x, y);
}
mPath = path;
//三阶贝赛尔曲线
mSrcPath.moveTo(100,0);
mSrcPath.cubicTo(300, 700, 600, 1200, 800, 200);
} @Override
protected void onDraw(Canvas canvas) {
super.onDraw(canvas);
mPaint.setColor(Color.BLACK);
canvas.drawPath(mPath, mPaint);
mPaint.setColor(Color.BLUE);
canvas.drawPath(mSrcPath, mPaint);
}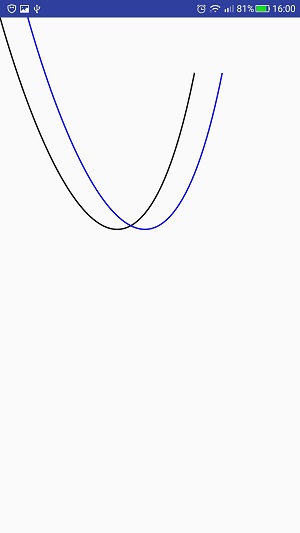
我们可以看到两条曲线一模一样,我们的代码也就是正确的。如果我们想要实现五阶、六阶及其以上,我们只要在initBezier()方法里面加入相应点的坐标即可。