版权声明:本文为博主原创文章,未经博主允许不得转载。 https://blog.csdn.net/jianghuiyun/article/details/77971583
准备四台机子:
主机1
192.168.2.3
主机2
192.168.2.4
从机1
192.168.2.5
从机2
192.168.2.6
1、关闭四台机子的防火墙:
service iptables stopvi /ect/hosts
192.168.2.3 rocketmq-nameserver1
192.168.2.3 rocketmq-master1
192.168.2.4 rocketmq-nameserver2
192.168.2.4 rocketmq-master2
192.168.2.5 rocketmq-nameserver3
192.168.2.5 rocketmq-master1-slave
192.168.2.6 rocketmq-nameserver4
192.168.2.6 rocketmq-master2-slaveservice network restart
4、上传rocketmq的包,然后解压并修改文件夹名称,创建软连接:
tar -zxvf alibaba-rocketmq-3.2.6.tar.gz -C /usr/local/
mv alibaba-rocketmq-3.2.6 alibaba-rocketmq
ln -s rocketmq -> alibaba-rocketmq/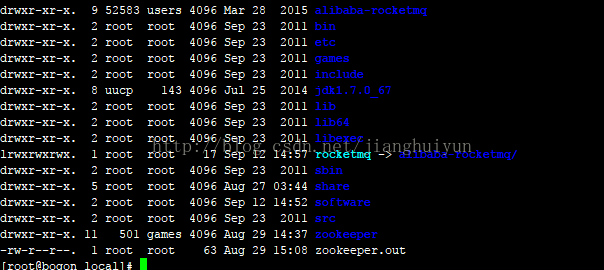
5、为四台机子创建存储文件夹:
mkdir /usr/local/rocketmq/store
mkdir /usr/local/rocketmq/store/commitlog
mkdir /usr/local/rocketmq/store/consumequeue
mkdir /usr/local/rocketmq/store/index
cd /usr/local/alibaba-rocketmq-3.2.6/conf/2m-2s-async

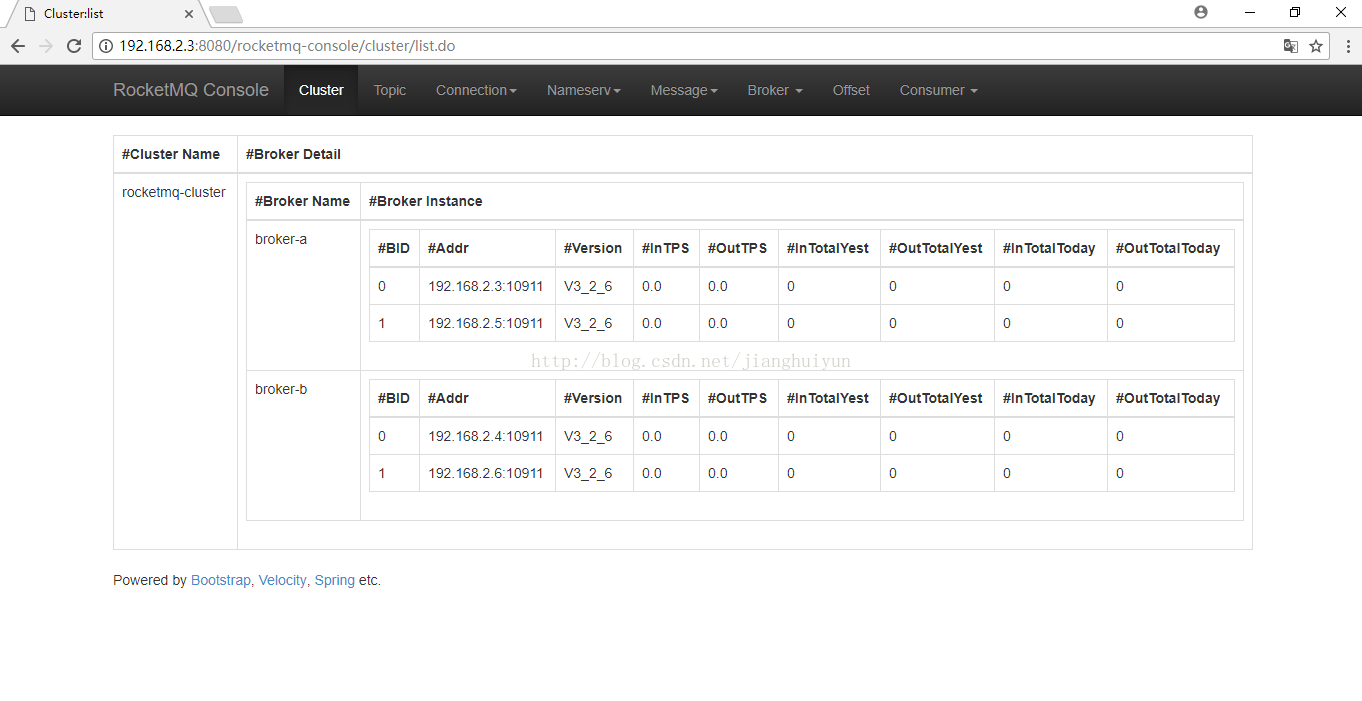
vim broker-a.properties#所属集群名字
brokerClusterName=rocketmq-cluster
#broker名字,注意此处不同的配置文件填写的不一样
brokerName=broker-a
#0 表示 Master,>0 表示 Slave
brokerId=0
#nameServer地址,分号分割
namesrvAddr=rocketmq-nameserver1:9876;rocketmq-nameserver2:9876;rocketmq-nameserver3:9876;rocketmq-nameserver4:9876
#在发送消息时,自动创建服务器不存在的topic,默认创建的队列数
defaultTopicQueueNums=4
#是否允许 Broker 自动创建Topic,建议线下开启,线上关闭
autoCreateTopicEnable=true
#是否允许 Broker 自动创建订阅组,建议线下开启,线上关闭
autoCreateSubscriptionGroup=true
#Broker 对外服务的监听端口
listenPort=10911
#删除文件时间点,默认凌晨 4点
deleteWhen=04
#文件保留时间,默认 48 小时
fileReservedTime=120
#commitLog每个文件的大小默认1G
mapedFileSizeCommitLog=1073741824
#ConsumeQueue每个文件默认存30W条,根据业务情况调整
mapedFileSizeConsumeQueue=300000
#destroyMapedFileIntervalForcibly=120000
#redeleteHangedFileInterval=120000
#检测物理文件磁盘空间
diskMaxUsedSpaceRatio=88
#存储路径
storePathRootDir=/usr/local/rocketmq/store
#commitLog 存储路径
storePathCommitLog=/usr/local/rocketmq/store/commitlog
#消费队列存储路径存储路径
storePathConsumeQueue=/usr/local/rocketmq/store/consumequeue
#消息索引存储路径
storePathIndex=/usr/local/rocketmq/store/index
#checkpoint 文件存储路径
storeCheckpoint=/usr/local/rocketmq/store/checkpoint
#abort 文件存储路径
abortFile=/usr/local/rocketmq/store/abort
#限制的消息大小
maxMessageSize=65536
#flushCommitLogLeastPages=4
#flushConsumeQueueLeastPages=2
#flushCommitLogThoroughInterval=10000
#flushConsumeQueueThoroughInterval=60000vim broker-a-s.properties#所属集群名字
brokerClusterName=rocketmq-cluster
#broker名字,注意此处不同的配置文件填写的不一样
brokerName=broker-a
#0 表示 Master,>0 表示 Slave
brokerId=1
#nameServer地址,分号分割
namesrvAddr=rocketmq-nameserver1:9876;rocketmq-nameserver2:9876;rocketmq-nameserver3:9876;rocketmq-nameserver4:9876
#在发送消息时,自动创建服务器不存在的topic,默认创建的队列数
defaultTopicQueueNums=4
#是否允许 Broker 自动创建Topic,建议线下开启,线上关闭
autoCreateTopicEnable=true
#是否允许 Broker 自动创建订阅组,建议线下开启,线上关闭
autoCreateSubscriptionGroup=true
#Broker 对外服务的监听端口
listenPort=10911
#删除文件时间点,默认凌晨 4点
deleteWhen=04
#文件保留时间,默认 48 小时
fileReservedTime=120
#commitLog每个文件的大小默认1G
mapedFileSizeCommitLog=1073741824
#ConsumeQueue每个文件默认存30W条,根据业务情况调整
mapedFileSizeConsumeQueue=300000
#destroyMapedFileIntervalForcibly=120000
#redeleteHangedFileInterval=120000
#检测物理文件磁盘空间
diskMaxUsedSpaceRatio=88
#存储路径
storePathRootDir=/usr/local/rocketmq/store
#commitLog 存储路径
storePathCommitLog=/usr/local/rocketmq/store/commitlog
#消费队列存储路径存储路径
storePathConsumeQueue=/usr/local/rocketmq/store/consumequeue
#消息索引存储路径
storePathIndex=/usr/local/rocketmq/store/index
#checkpoint 文件存储路径
storeCheckpoint=/usr/local/rocketmq/store/checkpoint
#abort 文件存储路径
abortFile=/usr/local/rocketmq/store/abort
#限制的消息大小
maxMessageSize=65536
#flushCommitLogLeastPages=4
#flushConsumeQueueLeastPages=2
#flushCommitLogThoroughInterval=10000
#flushConsumeQueueThoroughInterval=60000
#Broker 的角色
#- ASYNC_MASTER 异步复制Master
#- SYNC_MASTER 同步双写Master
#- SLAVE
brokerRole=SLAVE
#刷盘方式 #- ASYNC_FLUSH 异步刷盘 #- SYNC_FLUSH 同步刷盘
flushDiskType=ASYNC_FLUSH
#checkTransactionMessageEnable=false
#发消息线程池数量 #sendMessageThreadPoolNums=128 #拉消息线程池数量 #pullMessageThreadPoolNums=128vim broker-b.properties#所属集群名字
brokerClusterName=rocketmq-cluster
#broker名字,注意此处不同的配置文件填写的不一样
brokerName=broker-b
#0 表示 Master,>0 表示 Slave
brokerId=0
#nameServer地址,分号分割
namesrvAddr=rocketmq-nameserver1:9876;rocketmq-nameserver2:9876;rocketmq-nameserver3:9876;rocketmq-nameserver4:9876
#在发送消息时,自动创建服务器不存在的topic,默认创建的队列数
defaultTopicQueueNums=4
#是否允许 Broker 自动创建Topic,建议线下开启,线上关闭
autoCreateTopicEnable=true
#是否允许 Broker 自动创建订阅组,建议线下开启,线上关闭
autoCreateSubscriptionGroup=true
#Broker 对外服务的监听端口
listenPort=10911
#删除文件时间点,默认凌晨 4点
deleteWhen=04
#文件保留时间,默认 48 小时
fileReservedTime=120
#commitLog每个文件的大小默认1G
mapedFileSizeCommitLog=1073741824
#ConsumeQueue每个文件默认存30W条,根据业务情况调整
mapedFileSizeConsumeQueue=300000
#destroyMapedFileIntervalForcibly=120000
#redeleteHangedFileInterval=120000
#检测物理文件磁盘空间
diskMaxUsedSpaceRatio=88
#存储路径
storePathRootDir=/usr/local/rocketmq/store
#commitLog 存储路径
storePathCommitLog=/usr/local/rocketmq/store/commitlog
#消费队列存储路径存储路径
storePathConsumeQueue=/usr/local/rocketmq/store/consumequeue
#消息索引存储路径
storePathIndex=/usr/local/rocketmq/store/index
#checkpoint 文件存储路径
storeCheckpoint=/usr/local/rocketmq/store/checkpoint
#abort 文件存储路径
abortFile=/usr/local/rocketmq/store/abort
#限制的消息大小
maxMessageSize=65536
#flushCommitLogLeastPages=4
#flushConsumeQueueLeastPages=2
#flushCommitLogThoroughInterval=10000
#flushConsumeQueueThoroughInterval=60000
#Broker 的角色
#- ASYNC_MASTER 异步复制Master
#- SYNC_MASTER 同步双写Master
#- SLAVE
brokerRole=ASYNC_MASTER
#刷盘方式 #- ASYNC_FLUSH 异步刷盘 #- SYNC_FLUSH 同步刷盘
flushDiskType=ASYNC_FLUSH
#checkTransactionMessageEnable=false
#发消息线程池数量 #sendMessageThreadPoolNums=128 #拉消息线程池数量 #pullMessageThreadPoolNums=128vim broker-b-s.properties#所属集群名字
brokerClusterName=rocketmq-cluster
#broker名字,注意此处不同的配置文件填写的不一样
brokerName=broker-b
#0 表示 Master,>0 表示 Slave
brokerId=1
#nameServer地址,分号分割
namesrvAddr=rocketmq-nameserver1:9876;rocketmq-nameserver2:9876;rocketmq-nameserver3:9876;rocketmq-nameserver4:9876
#在发送消息时,自动创建服务器不存在的topic,默认创建的队列数
defaultTopicQueueNums=4
#是否允许 Broker 自动创建Topic,建议线下开启,线上关闭
autoCreateTopicEnable=true
#是否允许 Broker 自动创建订阅组,建议线下开启,线上关闭
autoCreateSubscriptionGroup=true
#Broker 对外服务的监听端口
listenPort=10911
#删除文件时间点,默认凌晨 4点
deleteWhen=04
#文件保留时间,默认 48 小时
fileReservedTime=120
#commitLog每个文件的大小默认1G
mapedFileSizeCommitLog=1073741824
#ConsumeQueue每个文件默认存30W条,根据业务情况调整
mapedFileSizeConsumeQueue=300000
#destroyMapedFileIntervalForcibly=120000
#redeleteHangedFileInterval=120000
#检测物理文件磁盘空间
diskMaxUsedSpaceRatio=88
#存储路径
storePathRootDir=/usr/local/rocketmq/store
#commitLog 存储路径
storePathCommitLog=/usr/local/rocketmq/store/commitlog
#消费队列存储路径存储路径
storePathConsumeQueue=/usr/local/rocketmq/store/consumequeue
#消息索引存储路径
storePathIndex=/usr/local/rocketmq/store/index
#checkpoint 文件存储路径
storeCheckpoint=/usr/local/rocketmq/store/checkpoint
#abort 文件存储路径
abortFile=/usr/local/rocketmq/store/abort
#限制的消息大小
maxMessageSize=65536
#flushCommitLogLeastPages=4
#flushConsumeQueueLeastPages=2
#flushCommitLogThoroughInterval=10000
#flushConsumeQueueThoroughInterval=60000
#Broker 的角色
#- ASYNC_MASTER 异步复制Master
#- SYNC_MASTER 同步双写Master
#- SLAVE
brokerRole=SLAVE
#刷盘方式 #- ASYNC_FLUSH 异步刷盘 #- SYNC_FLUSH 同步刷盘
flushDiskType=ASYNC_FLUSH
#checkTransactionMessageEnable=false
#发消息线程池数量 #sendMessageThreadPoolNums=128 #拉消息线程池数量 #pullMessageThreadPoolNums=128mkdir -p /usr/local/rocketmq/logs
cd /usr/local/rocketmq/conf && sed -i 's#${user.home}#/usr/local/rocketmq#g' *.xmlvim /usr/local/rocketmq/bin/runbroker.sh
vim /usr/local/rocketmq/bin/runserver.
9、启动四台机子nameserver:
cd /usr/local/rocketmq/bin
nohup sh mqnamesrv &
主机1:
nohup sh mqbroker -c /usr/local/rocketmq/conf/2m-2s-async/broker-a.properties >/dev/null 2>&1 &
主机2:
nohup sh mqbroker -c /usr/local/rocketmq/conf/2m-2s-async/broker-b.properties >/dev/null 2>&1 &hup sh mqbroker -c /usr/local/rocketmq/conf/2m-2s-async/broker-a-s.properties >/dev/null 2>&1 &nohup sh mqbroker -c /usr/local/rocketmq/conf/2m-2s-async/broker-a-s.properties >/dev/null 2>&1 &