Openvpn
https://www.aliyun.com/jiaocheng/139375.html
OpenVPN简介
VPN替代昂贵的专线用以在开放的Internet上实现了一个虚拟的网络,该虚拟网络本身在不安全的真实网络上对数据提供安全保护。
OpenVPN实现了一个灵活的VPN,和通过修改协议栈而实现的基于IPSec的VPN相比,OpenVPN有以下的优点:
1. OpenVPN无需对协议栈进行任何修改,无需专门的策略来解决VPN数据穿越NAT的问题,因此可在现有的网络进行规划;
2. OpenVPN使用虚拟网卡和路由进行虚拟网络的构建,配置十分方便;
3. OpenVPN使用SSL协议对虚拟网络提供保护,从而实现“专用”,而SSL提供了丰富灵活的安全特性;
4. OpenVPN的push模式可以最大限度简化客户端配置,服务器和客户端可以不必花费太多的精力来使得两端一致。
OpenVPN实际上是虚拟网卡设备,TCP/IP网络技术,路由技术,SSL结合而成的一个应用,前三者构建了虚拟网络—隧道连接的网络,最后SSL保证了虚拟网络通信的安全—隧道通信的认证和加密,因此使用OpenVPN的过程基本就是对上述四方面进行配置的过程
环境:多伦多的腾讯云
老板要求手机访问国外的网站即可;
gcc g++ [gcc g++为系统需要的编译工具]
lzo库 [Lzo库的功能是对虚拟链路进行压缩]
openssl [囊括了主要的密码算法、常用的密钥和证书封装管理功能以及SSL协议]
注意: OpenVPN GUI for windows 的版本要和 OpenVPN Server 的版本配套.
http://bbs.bdkyr.com/forum.php?mod=viewthread&tid=386&page=1&extra=#pid1126
安装依赖包:
yum -y install wget gcc-c++ openssl openssl-devel gcc
安装lzo:
http://www.oberhumer.com/opensource/lzo/download/
wget http://www.oberhumer.com/opensource/lzo/download/lzo-2.06.tar.gz
tar -zxvf lzo-2.06.tar.gz
cd lzo-2.06
./configure
make && make install

安装openvpn:
wget http://swupdate.openvpn.org/community/releases/openvpn-2.2.2.tar.gz
tar zxvf openvpn-2.2.2.tar.gz
cd openvpn-2.2.2
./configure --with-lzo-headers=/usr/local/include/ --with-lzo-lib=/usr/local/lib
make && make install

查看是否有openvpn命令:
[root@VM_192_223_centos openvpn-2.2.2]# which openvpn
/usr/local/sbin/openvpn

到此安装部分完毕!
配置openvpn server端
建立证书:
[root@VM_192_223_centos openvpn-2.2.2]# cd easy-rsa/2.0/
[root@VM_192_223_centos 2.0]# ls vars
vars
[root@VM_192_223_centos 2.0]# cp vars vars.bak
[root@svn 2.0]# vim vars #自定义修改如下内容。随意填下就行,这个就是生成证书时需要用到的信息......
export KEY_COUNTRY="GJ"
export KEY_PROVINCE="SF"
export KEY_CITY="chengshi"
export KEY_ORG="zhuzhi"
export KEY_EMAIL="[email protected]"
export KEY_NAME=vpnname
export KEY_OU=danwei
#注释
KEY_COUNTRY定义所在的国家。 (必须是两个字节)
KEY_PROVINCE定义所在的省份。 (必须是两个字节)
KEY_CITY定义所在的城市。
KEY_ORG定义所在的组织。
KEY_EMAIL定义邮箱地址。
KEY_OU定义所在的单位。
KEY_NAME定义openvpn服务器的名称。
#以上就是vars配置文件的全部内容,有关vars配置文件的使用,我们也可以系统的默认配置。
使文件生效:
[root@VM_192_223_centos 2.0]# source vars
NOTE: If you run ./clean-all, I will be doing a rm -rf on /usr/local/src/openvpn-2.2.2/easy-rsa/2.0/keys
[root@VM_192_223_centos 2.0]# ./clean-all
生成ca证书,生成根证书ca.crt和根密钥ca.key(一路按回车即可),因为vars文件已经在上面自定义默认的变量值;服务端和客户端共用一个ca证书,但是用各自的密钥
[root@VM_124_128_centos 2.0]# ./build-ca
Generating a 1024 bit RSA private key
......++++++
......................................................................++++++
writing new private key to 'ca.key'
-----
You are about to be asked to enter information that will be incorporated
into your certificate request.
What you are about to enter is what is called a Distinguished Name or a DN.
There are quite a few fields but you can leave some blank
For some fields there will be a default value,
If you enter '.', the field will be left blank.
-----
Country Name (2 letter code) [CN]:
State or Province Name (full name) [BJ]:
Locality Name (eg, city) [Beijing]:
Organization Name (eg, company) [cjk]:
Organizational Unit Name (eg, section) [cjk]:
Common Name (eg, your name or your server's hostname) [CN]:cjk
Name [cjk]:
Email Address [[email protected]]:
#官方提示:Common Name必须要填写,根据实测不填也可;
查看keys下有木有生成这几个文件,.crt是证书,key是密钥
[root@VM_192_223_centos 2.0]# ll keys/
total 12
-rw-r--r-- 1 root root 1216 Mar 31 15:28 ca.crt
-rw------- 1 root root 916 Mar 31 15:28 ca.key
-rw-r--r-- 1 root root 0 Mar 31 15:27 index.txt
-rw-r--r-- 1 root root 3 Mar 31 15:27 serial
为服务端生成证书和密钥(一路按回车,密码和名字要写,直到提示需要输入y/n时,输入y再按回车,一共两次)
[root@VM_124_128_centos 2.0]# ./build-key-server server
Generating a 1024 bit RSA private key
.....................++++++
...............................++++++
writing new private key to 'server.key'
-----
You are about to be asked to enter information that will be incorporated
into your certificate request.
What you are about to enter is what is called a Distinguished Name or a DN.
There are quite a few fields but you can leave some blank
For some fields there will be a default value,
If you enter '.', the field will be left blank.
-----
Country Name (2 letter code) [CN]:
State or Province Name (full name) [BJ]:
Locality Name (eg, city) [Beijing]:
Organization Name (eg, company) [cjk]:
Organizational Unit Name (eg, section) [cjk]:
Common Name (eg, your name or your server's hostname) [server]:server 这里要写
Name [cjk]:
Email Address [[email protected]]:
Please enter the following 'extra' attributes
to be sent with your certificate request
A challenge password []:123456
An optional company name []:cjk
Using configuration from /usr/local/src/openvpn-2.2.2/easy-rsa/2.0/openssl-1.0.0.cnf
Check that the request matches the signature
Signature ok
The Subject's Distinguished Name is as follows
countryName :PRINTABLE:'CN'
stateOrProvinceName :PRINTABLE:'BJ'
localityName :PRINTABLE:'Beijing'
organizationName :PRINTABLE:'cjk'
organizationalUnitName:PRINTABLE:'cjk'
commonName :PRINTABLE:'server'
name :PRINTABLE:'cjk'
emailAddress :IA5STRING:'[email protected]'
Certificate is to be certified until Mar 30 10:18:38 2028 GMT (3650 days)
Sign the certificate? [y/n]:y
1 out of 1 certificate requests certified, commit? [y/n]y
Write out database with 1 new entries
Data Base Updated
为客户端生成证书和密钥(一路按回车,直到提示需要输入y/n时,输入y再按回车,一共两次)。需要多个客户端的多生成几个就是,这种用./build-key来创建的用户在拨号的时候不用密码,如果用密码登陆则用./build-key-pass来生成,这里我们分别生成两个test和lee
[root@VM_124_128_centos 2.0]# ./build-key test
Generating a 1024 bit RSA private key
.......................................................................++++++
...++++++
writing new private key to 'test.key'
-----
You are about to be asked to enter information that will be incorporated
into your certificate request.
What you are about to enter is what is called a Distinguished Name or a DN.
There are quite a few fields but you can leave some blank
For some fields there will be a default value,
If you enter '.', the field will be left blank.
-----
Country Name (2 letter code) [CN]:
State or Province Name (full name) [BJ]:
Locality Name (eg, city) [Beijing]:
Organization Name (eg, company) [cjk]:
Organizational Unit Name (eg, section) [cjk]:
Common Name (eg, your name or your server's hostname) [test]:test
Name [cjk]:
Email Address [[email protected]]:
Please enter the following 'extra' attributes
to be sent with your certificate request
A challenge password []:123456
An optional company name []:cjk
Using configuration from /usr/local/src/openvpn-2.2.2/easy-rsa/2.0/openssl-1.0.0.cnf
Check that the request matches the signature
Signature ok
The Subject's Distinguished Name is as follows
countryName :PRINTABLE:'CN'
stateOrProvinceName :PRINTABLE:'BJ'
localityName :PRINTABLE:'Beijing'
organizationName :PRINTABLE:'cjk'
organizationalUnitName:PRINTABLE:'cjk'
commonName :PRINTABLE:'test'
name :PRINTABLE:'cjk'
emailAddress :IA5STRING:'[email protected]'
Certificate is to be certified until Mar 30 10:27:25 2028 GMT (3650 days)
Sign the certificate? [y/n]:y
1 out of 1 certificate requests certified, commit? [y/n]y
Write out database with 1 new entries
Data Base Updated
创建客户端vpn拨号密码登录的用户lee,这里第一次提示连续输入两次密码就是你登陆VPN的密码,所以一定要填
[root@VM_124_128_centos 2.0]# ./build-key-pass lee
Generating a 1024 bit RSA private key
...............++++++
.++++++
writing new private key to 'lee.key'
Enter PEM pass phrase: #这里输入的密码不可见就是拨号登陆密码,一定要填
Verifying - Enter PEM pass phrase:
-----
You are about to be asked to enter information that will be incorporated
into your certificate request.
What you are about to enter is what is called a Distinguished Name or a DN.
There are quite a few fields but you can leave some blank
For some fields there will be a default value,
If you enter '.', the field will be left blank.
-----
Country Name (2 letter code) [CN]:
State or Province Name (full name) [BJ]:
Locality Name (eg, city) [Beijing]:
Organization Name (eg, company) [cjk]:
Organizational Unit Name (eg, section) [cjk]:
Common Name (eg, your name or your server's hostname) [lee]:lee # 这里可以不写
Name [cjk]:
Email Address [[email protected]]:
Please enter the following 'extra' attributes
to be sent with your certificate request
A challenge password []:123456 #这里的密码还是一个发送证书请求的时候用
An optional company name []:cjk
Using configuration from /usr/local/src/openvpn-2.2.2/easy-rsa/2.0/openssl-1.0.0.cnf
Check that the request matches the signature
Signature ok
The Subject's Distinguished Name is as follows
countryName :PRINTABLE:'CN'
stateOrProvinceName :PRINTABLE:'BJ'
localityName :PRINTABLE:'Beijing'
organizationName :PRINTABLE:'cjk'
organizationalUnitName:PRINTABLE:'cjk'
commonName :PRINTABLE:'lee'
name :PRINTABLE:'cjk'
emailAddress :IA5STRING:'[email protected]'
Certificate is to be certified until Mar 30 10:38:03 2028 GMT (3650 days)
Sign the certificate? [y/n]:y
1 out of 1 certificate requests certified, commit? [y/n]y
Write out database with 1 new entries
Data Base Updated
创建迪菲·赫尔曼密钥
用于进行传输密钥交换时用到的交换协议文件,dh文件:(这个很重要)
[root@VM_192_223_centos 2.0]# ./build-dh
Generating DH parameters, 1024 bit long safe prime, generator 2
This is going to take a long time
.........+..+.........................+.......................................................................++*++*++*
生成ta.key文件(防DDos攻击、UDP淹没等恶意攻击)
[root@VM_192_223_centos 2.0]# openvpn --genkey --secret keys/ta.key
查看最终生成的文件:
[root@VM_124_128_centos 2.0]# ll keys/
total 88
-rw-r--r-- 1 root root 3931 Apr 2 18:18 01.pem
-rw-r--r-- 1 root root 3808 Apr 2 18:27 02.pem
-rw-r--r-- 1 root root 3807 Apr 2 18:38 03.pem
-rw-r--r-- 1 root root 1269 Apr 2 18:13 ca.crt
-rw------- 1 root root 916 Apr 2 18:13 ca.key
-rw-r--r-- 1 root root 245 Apr 2 18:42 dh1024.pem
-rw-r--r-- 1 root root 334 Apr 2 18:38 index.txt
-rw-r--r-- 1 root root 21 Apr 2 18:38 index.txt.attr
-rw-r--r-- 1 root root 21 Apr 2 18:27 index.txt.attr.old
-rw-r--r-- 1 root root 224 Apr 2 18:27 index.txt.old
-rw-r--r-- 1 root root 3807 Apr 2 18:38 lee.crt
-rw-r--r-- 1 root root 753 Apr 2 18:38 lee.csr
-rw------- 1 root root 1041 Apr 2 18:38 lee.key
-rw-r--r-- 1 root root 3 Apr 2 18:38 serial
-rw-r--r-- 1 root root 3 Apr 2 18:27 serial.old
-rw-r--r-- 1 root root 3931 Apr 2 18:18 server.crt
-rw-r--r-- 1 root root 757 Apr 2 18:18 server.csr
-rw------- 1 root root 920 Apr 2 18:18 server.key
-rw------- 1 root root 636 Apr 2 18:46 ta.key
-rw-r--r-- 1 root root 3808 Apr 2 18:27 test.crt
-rw-r--r-- 1 root root 753 Apr 2 18:27 test.csr
-rw------- 1 root root 916 Apr 2 18:27 test.key
OPENVPN常用命令详解:
vars脚本是用来创建环境变量的,设置所需要的变量脚本。
clean-all脚本是创建生成ca证书及秘钥文件所需要的文件及目录。
build-ca脚本生成ca证书
build-key-server脚本是生成服务端证书和秘钥
build-key脚本是生成客户端证书和秘钥
build-key-pass脚本是生成客户端用密码拨号的证书和秘钥
build-dh脚本是生成Diffie-Hellman文件
创建一个存放配置文件的目录
[root@VM_192_223_centos 2.0]# mkdir /etc/openvpn
[root@VM_192_223_centos 2.0]# cp -ap keys/ /etc/openvpn/
[root@VM_192_223_centos 2.0]# cp ../../sample-config-files/{server.conf,client.conf} /etc/openvpn/
[root@VM_192_223_centos sample-config-files]# yum -y install tree
[root@VM_124_128_centos sample-config-files]# tree /etc/openvpn/
/etc/openvpn/
|-- client.conf
|-- keys
| |-- 01.pem
| |-- 02.pem
| |-- 03.pem
| |-- ca.crt
| |-- ca.key
| |-- dh1024.pem
| |-- index.txt
| |-- index.txt.attr
| |-- index.txt.attr.old
| |-- index.txt.old
| |-- lee.crt
| |-- lee.csr
| |-- lee.key
| |-- serial
| |-- serial.old
| |-- server.crt
| |-- server.csr
| |-- server.key
| |-- ta.key
| |-- test.crt
| |-- test.csr
| `-- test.key
`-- server.conf
1 directory, 24 files
配置openvpn的server.conf文件:
[root@VM_192_223_centos sample-config-files]# cd /etc/openvpn/
[root@VM_192_223_centos openvpn]# vim server.conf
local 10.212.192.223 #申明本机使用的IP地址(服务端内网地址),也可以不说明
port 1194 #默认1194
proto udp #默认udp,推荐使用udp,如果使用HTTP Proxy,必须使用tcp协议
dev tun #路由模式
ca /etc/openvpn/keys/ca.crt #ca证书存放位置
cert /etc/openvpn/keys/server.crt #服务端证书存放位置
key /etc/openvpn/keys/server.key #服务端可以文件存放位置
dh /etc/openvpn/keys/dh1024.pem #dh文件存放位置
server 10.8.0.0 255.255.255.0 #服务端分配给客户端的地址,这个一般不需要改
push "route 10.0.0.0 255.255.255.0" #VPNserver所在的内网网段如果有多个就要写多个段,此命令实际作用是在VPN客户端本地生成
push "redirect-gateway def1 bypass-dhcp" #目的是在所有客户端的默认网关都将重定向到VPN,这将导致诸如web浏览器、DNS查询等所有客户端流量都经过这里
push "dhcp-option DNS 202.106.0.20" #推送一些通用DNS,当然也可已加上服务器上的DNS
push "dhcp-option DNS 8.8.8.8" #同上
ifconfig-pool-persist ipp.txt
keepalive 10 120 #10秒检测一次,120秒断开
comp-lzo #加载压缩文件
persist-key #重启VPN还保持上一次使用的私钥
persist-tun #重启VPN还保持自动连接状态
status openvpn-status.log #vpn状态日志
verb 3 #日志文件冗余
client-to-client #客户端和客户端能否通信
duplicate-cn #允许多个客户端使用同一个账号连接
log /var/log/openvpn.log #日志存放位置
注意:为什么上面要用udp协议:因国内(中国),政策问题,开源Openvpn正常情况下已经不能使用了,应政府要求全面封杀VPN服务,网络运营商已经对各式VPN软件进行了管制,已经试过无法快速链接,100次能有1次连接成功,一直重置TCP链接。
防火墙配置(这一条至关重要,通过配置nat将vpn网段IP转发到server内网):
iptables -t nat -A POSTROUTING -s 10.8.0.0/24 -j SNAT --to-source 49.51.9.203
iptables -t nat -A POSTROUTING -s 10.8.0.0/24 -o eth0 -j MASQUERADE
#把所有10.8.0.0网段的数据包SNAT成由MASQUERADE(ip伪装)会自动读取eth0现在的ip地址然后做SNAT(源地址转换)发出去,这样就实现了很好的动态SNAT地址转换
iptables -A INPUT -p UDP --dport 1194 -j ACCEPT
#允许访问udp协议的1194端口
iptables -t nat -A POSTROUTING -j MASQUERADE
#所有从这台机器送出的包都会被伪装
iptables -A INPUT -m state --state ESTABLISHED,RELATED -j ACCEPT
#允许已建立的或相关连的通行
service iptables save
service iptables restart
开启内核转发功能:
编辑/etc/sysctl.conf配置文件echo "1">/proc/sys/net/ipv4/ip_forward或者用如下命令执行
[root@VM_192_223_centos openvpn]#
sed -i 's/net.ipv4.ip_forward = 0/net.ipv4.ip_forward = 1/g' /etc/sysctl.conf
使sysctl配置文件生效
[root@VM_192_223_centos openvpn]# sysctl -p
注意:腾讯云的sysctl.conf默认为空,需要从/etc/sysctl.conf.first导入
实际上国内腾讯云生产案例只有如下两条即可:
1: sed -i 's/net.ipv4.ip_forward = 0/net.ipv4.ip_forward = 1/g' /etc/sysctl.conf
sysctl -p
2: iptables -t nat -A POSTROUTING -j MASQUERADE
service iptables save
service iptables restart
#清除iptables规则:
iptables -F -t nat
iptables -X -t nat
selinux可以关闭也可以不关,如果测试失败可以关闭在测试。
[root@VM_192_223_centos openvpn]# setenforce 0
启动VPN:
[root@VM_192_223_centos openvpn]#
/usr/local/sbin/openvpn --config /etc/openvpn/server.conf
查看端口:
[root@VM_124_128_centos ~]# netstat -nltpu |grep vpn
tcp 0 0 10.105.124.128:1194 0.0.0.0:* LISTEN 29956/openvpn
将OpenVPN加入开机自启动
需要将OpenVPN加入开机自启动
方法一:
将启动命令加入到/etc/rc.local
echo “/usr/local/sbin/openvpn --config /etc/openvpn/server.conf>/dev/null &”>>/etc/rc.local
方法二:
利用sample-scripts下面的脚本
cp /usr/local/src/openvpn-2.2.2/sample-scripts/openvpn.init /etc/init.d/openvpn
chkconfig openvpn on
chkconfig --list openvpn
openvpn 0:off 1:off 2:on 3:on 4:on 5:on 6:off
一般我习惯用方法二:
如果/etc/init.d/openvpt start启动失败要先
Pkill openvpn
再启动
如果提示/etc/init.d/openvpn: line 94: [: =: unary operator expected
就打开/etc/init.d/openvpt把94行的[]改成[[]]
有时候仍会出现启动失败的情况:参考如下文件有多余的删掉即可:
启动成功之后会生成一个虚拟网卡tun0
[root@VM_124_128_centos ~]# ip a
1: lo: <LOOPBACK,UP,LOWER_UP> mtu 65536 qdisc noqueue state UNKNOWN
link/loopback 00:00:00:00:00:00 brd 00:00:00:00:00:00
inet 127.0.0.1/8 scope host lo
2: eth0: <BROADCAST,MULTICAST,UP,LOWER_UP> mtu 1500 qdisc mq state UP qlen 1000
link/ether 52:54:00:0c:ec:e0 brd ff:ff:ff:ff:ff:ff
inet 10.105.124.128/18 brd 10.105.127.255 scope global eth0
3: tun0: <POINTOPOINT,MULTICAST,NOARP,UP,LOWER_UP> mtu 1500 qdisc pfifo_fast state UNKNOWN qlen 100
link/[65534]
inet 10.8.0.1 peer 10.8.0.2/32 scope global tun0

修改客户端配置:
[root@VM_124_128_centos keys]# cd ..
[root@VM_124_128_centos openvpn]# cp client.conf client.conf.bak
[root@VM_124_128_centos openvpn]# vim client.conf
client
dev tun
proto tcp
remote 49.51.9.203 1194 #客户端必须是网外ip
resolv-retry infinite
nobind
persist-key
persist-tun
ca ca.crt
cert test.crt
key test.key
ns-cert-type server
comp-lzo
verb 3
然后修改后缀:
[root@VM_124_128_centos openvpn]# mv client.conf test.ovpn
Windows客户端安装和配置:
openvpn-2.2.2-install.exe网上下载客户端软件


将客户端需要的文件下载到客户端安装vpn的路径下
[root@VM_192_223_centos keys]# sz -y ca.crt test.crt test.key test.ovpn

结果就是:
客户端拨号:


双击打开,在桌面的右下角有一个对准右键选择上面的connect


最下面有个successful就表示连接成功
图标变绿了,说明测试成功了。

#本地ping通vpn服务器的内网也说明连接成功.
PS:按照同样的方法还可以创建多个客户端秘钥。
分配了一个10.8.0.6的地址。
#同时本地windows客户端也能ping通openvpn服务器的内网;

测试vpn:
本地浏览器输入ip就会显示多伦多的位置:

openvpn搭建完成.
如果我们有多个客户端,可以多生成几个客户端证书。
生成新的客户端,需要先执行命令. ./vars,然后执行./build-key client-name
例如:source vars
./build-key user02
如果不想让那个客户端登录,可以吊销他的证书。
吊销证书之后还需要在服务端的配置文件里指定一下crl.pem,因为吊销的用户crl.pem都写在这里文件里
#crl-verify /etc/openvpn/easy-rsa/keys/crl.pem
吊销客户端证书,需要先执行命令. ./vars 然后执行 ./revoke-full client-name
例如:. ./vars
./revoke-full user2
广义VPN
说实话,VPN就是一种信息隔离机制,这么说来,不说L2TP,IPSec等,VLAN在LAN中也算是一种VPN,PPPoE 在ISP的LAN中也是一种VPN。只要保证你的网络数据不被窃听,不被篡改,保证这些的底层基础设施都是VPN。所以不要指望能为VPN下一个统一的定义。
上面是以Linux作为服务器windows作为客户端连接的案例;
下面演示以Windows作为服务器Linux作为客户端的操作.
环境:
腾讯云Windows 2012 R2 安装配置openvpn服务端
CentOS 7 安装配置 OpenVPN 客户端
服务端安装:
Windows版openvpn官方下载地址:https://openvpn.net/index.php/open-source/downloads.html

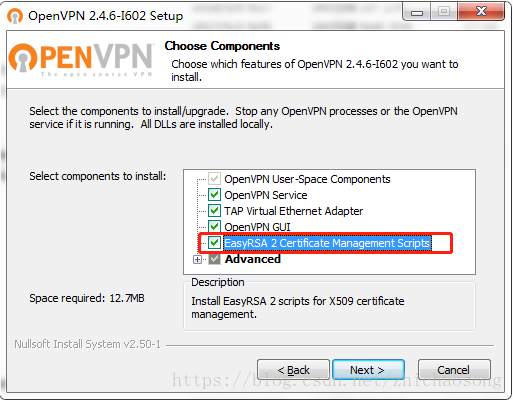
安装
① 注意勾选 EasyRSA 2 Certificate Management Scripts,后面生成密钥用
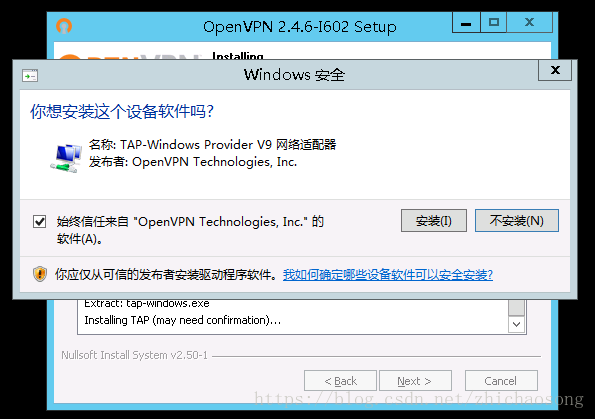
② 同意安装 TAP-Windows Provider V9 网络适配器
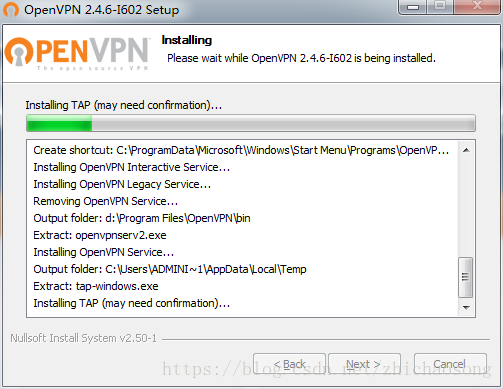
③ 完成安装
配置OpenVPN
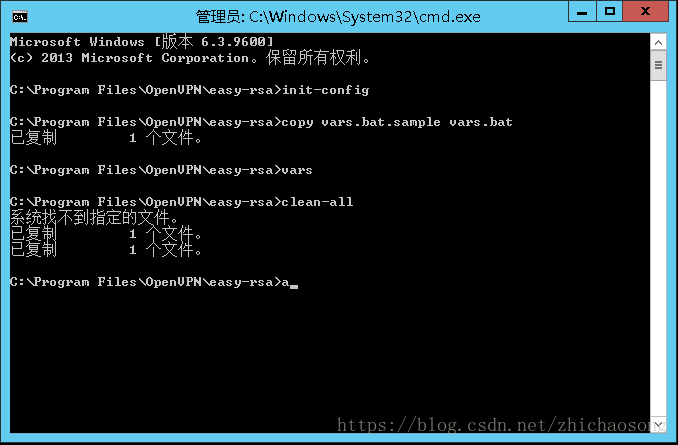
初始化
从我的电脑找到并进入OpenVPN安装目录,进入 easy-rsa 文件夹,导航栏直接输入 cmd 即可打开命令提示符界面
依次执行如下命令完成初始化工作:
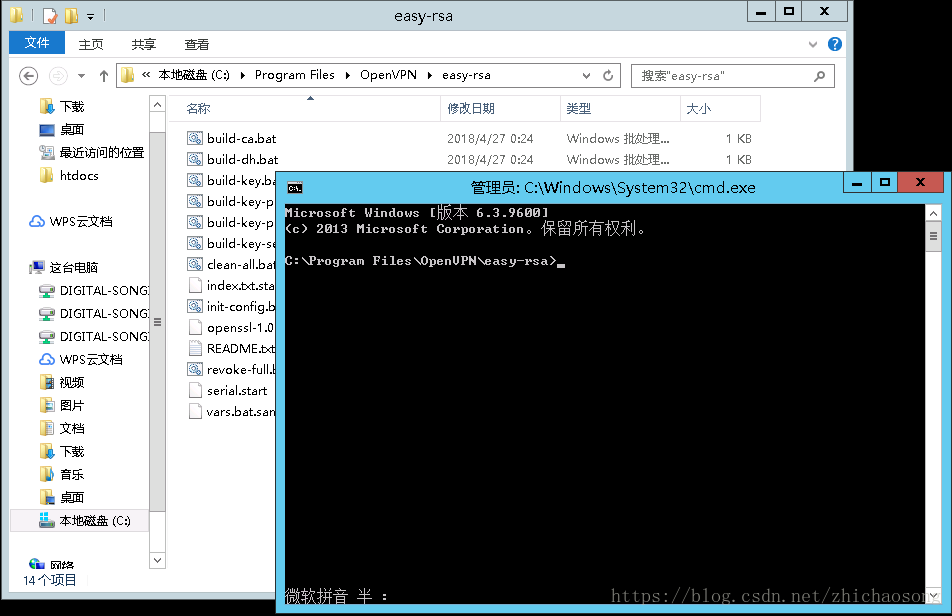
> init-config
> vars
> clean-all
第一次执行clean-all时,提示”系统找不到指定的文件”是正常的,不用管它。该命令会删除掉之前生成的所有证书和密钥文件,以避免与之后全新生成的证书和密钥发生冲突。
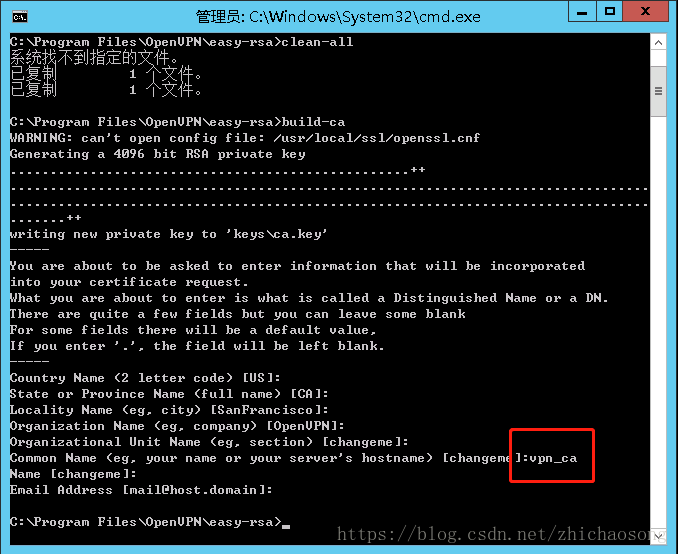
生成CA根证书密钥对
# 执行命令build-ca来生成CA根证书密钥对。
> build-ca
如下图所示,除了build-ca命令外,其他输入主要用于设置根证书的签名信息,包括国家、省、市、组织名称、单位名称、通用名、名称、邮箱地址等,请根据个人需要自行输入。输入框前面”[]”中的内容表示默认值,如果你不输入、直接按回车,则表示使用默认值;如果你输入”.”则表示该字段信息留空。其中Common Name(通用名称)比较重要,相当于我们常说的”账号”(此处设为vpn_ca)
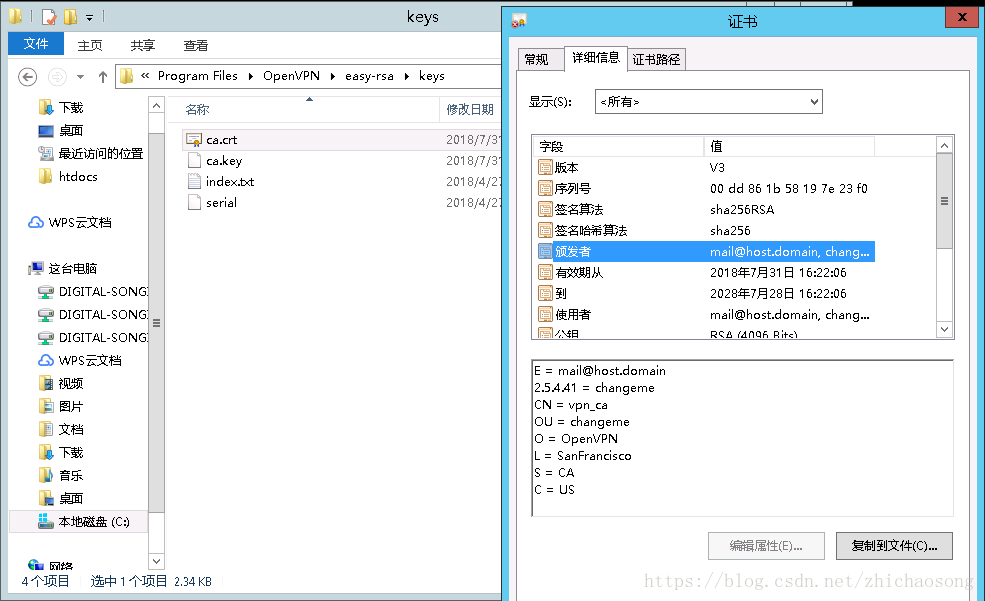
此时,我们就可以在证书存放目录中看到生成的CA证书和私钥文件了。双击该证书,我们还可以看到刚才输入的相关信息。
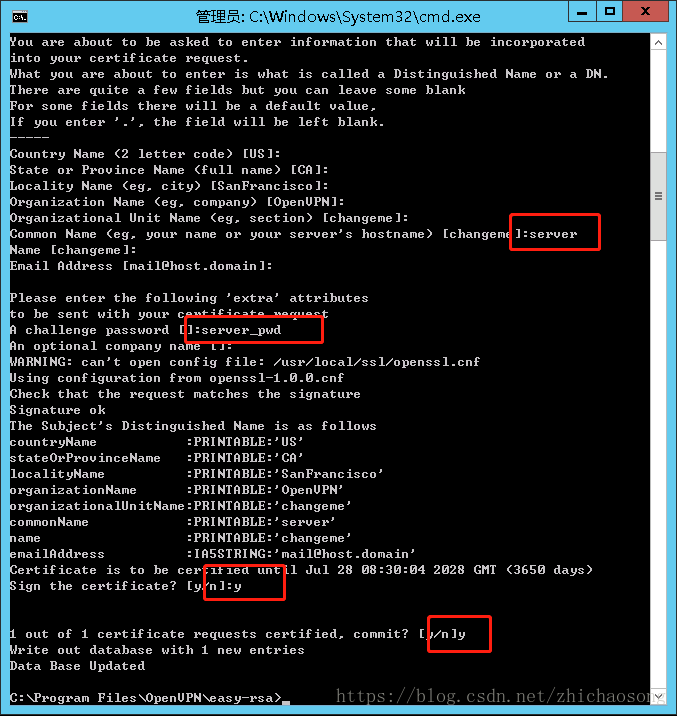
创建服务器端证书
# 使用命令build-key-server server来创建服务器端证书和私钥
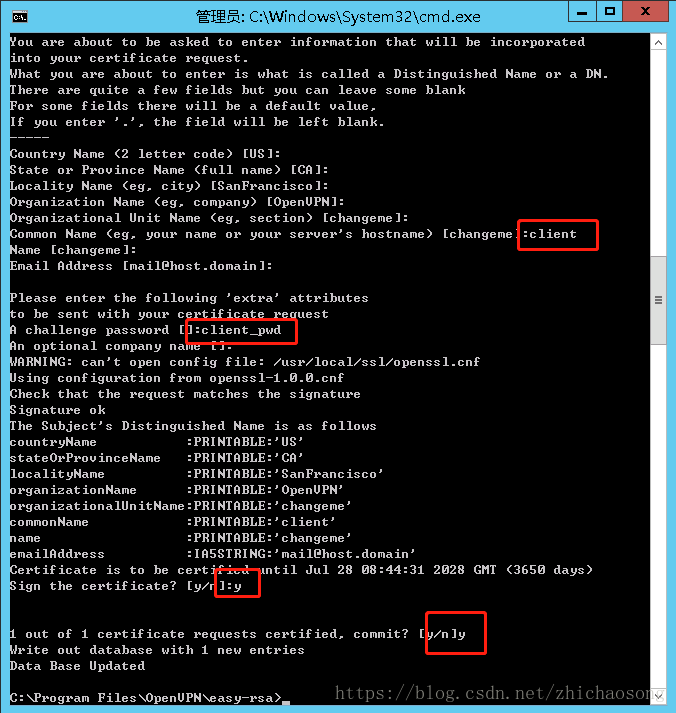
> build-key-server server整个创建过程与前面创建CA根证书的流程比较类似,我们只需要注意Comman Name的参数值为”server”并随后设置相应的密码(这里设为”server_pwd”,一般不会用到密码),最后输入两次”y”进行确认即可。
Common Name 必须填,且不能与执行 build-dh 时相同,否则会报:failed to update database
TXT_DB error number 2找不到 C:\Program Files\OpenVPN\easy-rsa\keys*.old
创建客户端证书
# build-key <clientName> 创建客户端证书和私钥
# 例如build-key client1、build-key client2
> build-key client
创建客户端证书的流程和创建服务器端证书的流程完全一致,只需要注意Common Name字段即可,我们这里设置为client,密码client_pwd
如果以后还想要创建新的客户端,只需要先执行vars命令,再执行build-key clientName命令即可(每次打开新的命令提示符窗口,都必须先执行vars命令,才能执行其他命令)。
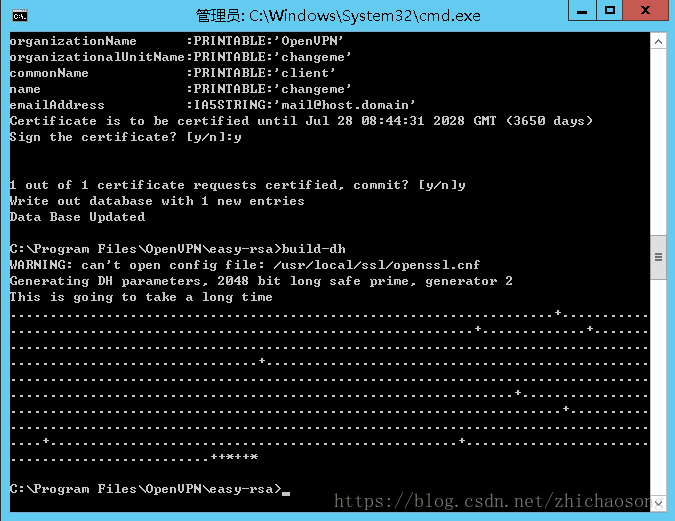
创建迪菲·赫尔曼交换密钥
# 为OpenVPN的服务器端创建迪菲·赫尔曼交换密钥
# 迪菲·赫尔曼交换密钥是一种安全协议,用以对数据进行加密
> build-dh
到这里我们的证书和密钥的创建操作就基本上完成了
开启OpenVPN-Server
拷贝证书
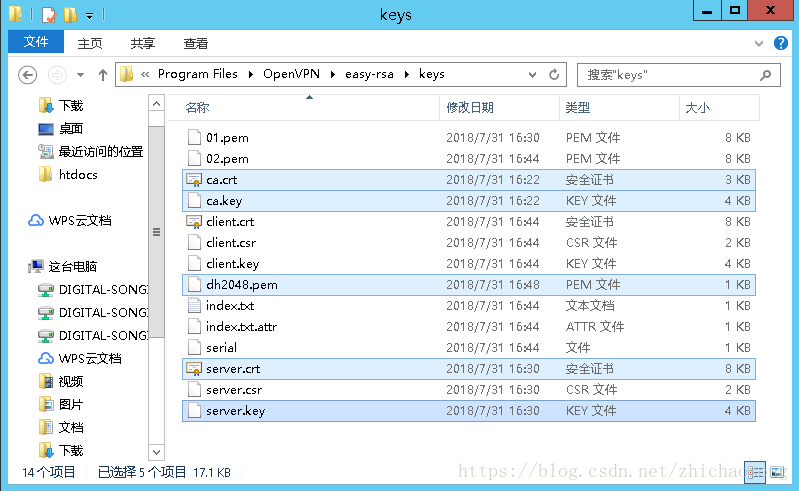
从easy-rsa/keys目录中拷贝出服务器端和客户端所需的文件,分别将其放在自己的OpenVPN安装路径/config目录中。
其中,服务器端需要用到的文件有:
- ca.crt
- ca.key
- dh2048.pem (如果最初的变量KEY_SIZE设为1024,这里就是dh1024.pem)
- server.crt
- server.key
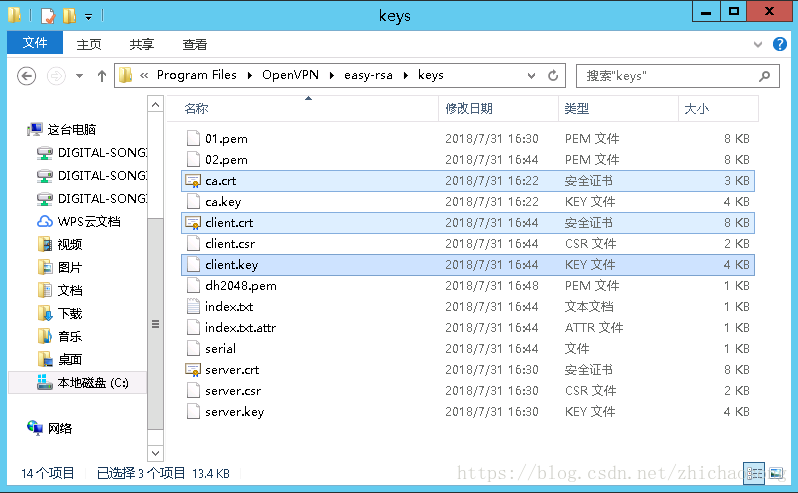
客户端client需要用到的文件有:
- ca.crt
- client.crt
- client.key (名称client根据个人设置可能有所不同)
拷贝配置文件
我们还需要在config目录中各自放置一个配置文件,服务器端的配置文件名为server.ovpn,客户端的配置文件为client.ovpn。
这两个配置文件该如何编写呢?OpenVPN已经在sample-config目录中为我们提供了相关的示例文件server.ovpn和client.ovpn,并且配置文件中的每个配置选项均有详细的英文说明(配置文件中”#”或”;”开头的均为注释内容)。
实际上,将两个模板文件中与IP地址有关的配置修改一下,就可以直接拿来使用。
- server.ovpn的详细配置
我们只需要改一行,把 tls-auth 这一行用分号注释掉即可
local 192.168.1.101   #指定监听的本机IP(因为有些计算机具备多个IP地址),该命令是可选的,默认监听所有IP地址。
port 1194             #指定监听的本机端口号
proto udp             #指定采用的传输协议,可以选择tcp或udp
dev tun               #指定创建的通信隧道类型,可选tun或tap
ca ca.crt             #指定CA证书的文件路径
cert server.crt       #指定服务器端的证书文件路径
key server.key        #指定服务器端的私钥文件路径
dh dh1024.pem         #指定迪菲赫尔曼参数的文件路径
server 10.8.0.0 255.255.255.0   #指定虚拟局域网占用的IP地址段和子网掩码,此处配置的服务器自身占用10.0.0.1。
ifconfig-pool-persist ipp.txt   #服务器自动给客户端分配IP后,客户端下次连接时,仍然采用上次的IP地址(第一次分配的IP保存在ipp.txt中,下一次分配其中保存的IP)。
;tls-auth ta.key 0     #开启TLS-auth,使用ta.key防御攻击。服务器端的第二个参数值为0,客户端的为1。
keepalive 10 120      #每10秒ping一次,连接超时时间设为120秒。
comp-lzo              #开启VPN连接压缩,如果服务器端开启,客户端也必须开启
client-to-client      #允许客户端与客户端相连接,默认情况下客户端只能与服务器相连接
persist-key
persist-tun           #持久化选项可以尽量避免访问在重启时由于用户权限降低而无法访问的某些资源。
status openvpn-status.log    #指定记录OpenVPN状态的日志文件路径
verb 3 #指定日志文件的记录详细级别,可选0-9,等级越高日志内容越详细- client.ovpn的详细配置
我们也只需要改 2 行即可:
① remote my-server-1 1194 这一行把 my-server-1 换成刚刚服务器的地址
② tls-auth 这一行用分号注释掉
client         #指定当前VPN是客户端
dev tun        #必须与服务器端的保持一致
proto udp      #必须与服务器端的保持一致
remote 192.168.1.101 1194      #指定连接的远程服务器的实际IP地址和端口号
resolv-retry infinite    #断线自动重新连接,在网络不稳定的情况下(例如:笔记本电脑无线网络)非常有用。
nobind         #不绑定特定的本地端口号
persist-key
persist-tun
ca ca.crt      #指定CA证书的文件路径
cert client.crt       #指定当前客户端的证书文件路径
key client.key    #指定当前客户端的私钥文件路径
remote-cert-tls server      #指定采用服务器校验方式
;tls-auth ta.key 1     #如果服务器设置了防御DoS等攻击的ta.key,则必须每个客户端开启;如果未设置,则注释掉这一行;
comp-lzo              #与服务器保持一致
verb 3                #指定日志文件的记录详细级别,可选0-9,等级越高日志内容越详细
开启OpenVPN
服务端开启
- 阿里云安全策略的入规则要允许UPP 1194端口
- 最后关闭防火墙,或者为安装目录下bin/openvpn.exe添加防火墙例外
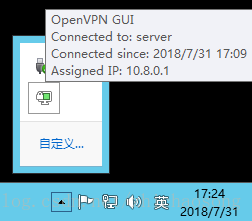
- 双击桌面的 OpenVPN GUI 启动
- 如果报错可以右键右下角小图标 View log 查看错误信息,或者双击查看状态信息
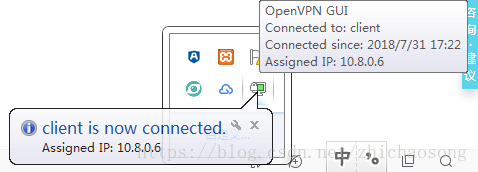
客户端开启
- 拷贝服务端上生成的客户端证书文件(一共4个,3个证书密钥和1个配置文件),放到安装目录的config文件夹下
- 双击桌面的 OpenVPN GUI 启动
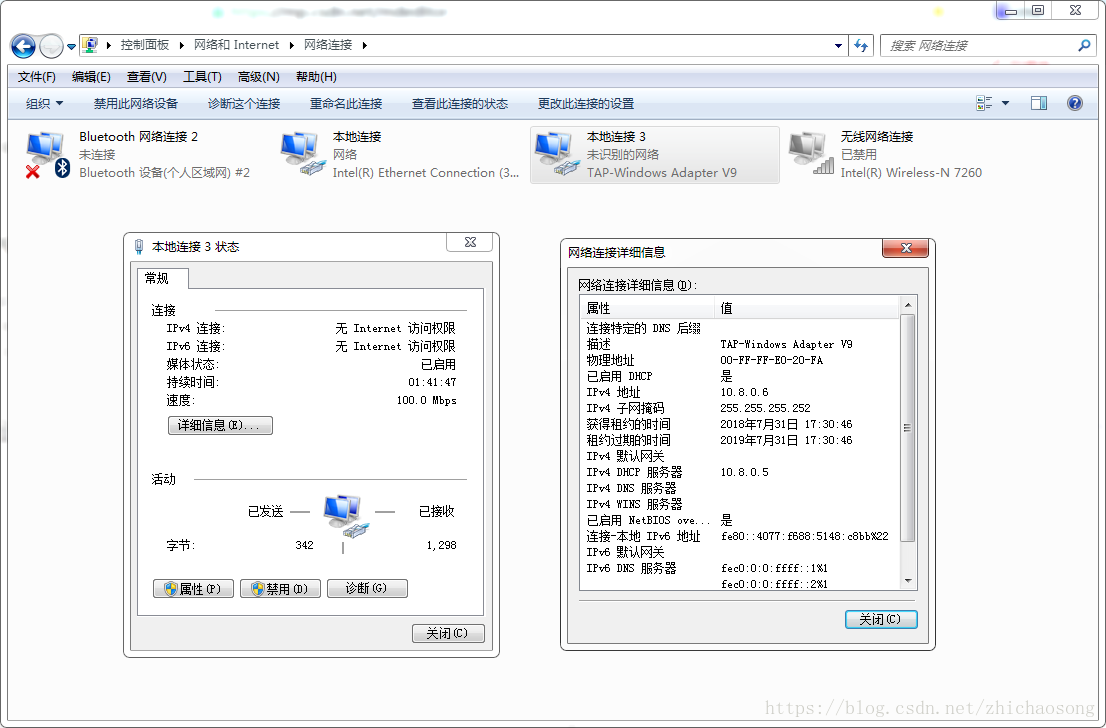
- 查看网络适配器信息,能访问10.8.0.1的服务就代表成功了
linux客户端配置
#安装 epel yum 源:
$ rpm -ivh http://mirrors.sohu.com/fedora-epel/6/x86_64/epel-release-6-8.noarch.rpm
$ sed -i 's/^mirrorlist=https/mirrorlist=http/' /etc/yum.repos.d/epel.repo
yum 安装 openvpn:
$ yum -y install openvpn安装成功后,客户端不需要特别配置,只要将服务器上生成的证书和客户端配置文件拷贝到客户端配置目录中。
客户端配置文件client.ovpn:
client1
dev tun # 路由模式,跟服务端配置一致
proto tcp # TCP协议,跟服务端配置一致
remote xxx.xxx.xxx.xxx 1194 # openvpn服务端的公网的IP和端口
resolv-retry infinite
nobind
persist-key
persist-tun
ca ca.crt
cert client1.crt # 客户端client1的证书文件
key client1.key  # 客户端client1的密钥文件
remote-cert-tls server
tls-auth ta.key 1
comp-lzo
verb 3将上面的文件,都上传到/etc/openvpn/目录下,然后日志输出到/var/log/openvpn.log。
后台启动命令(注意对应client1.ovpn文件):
$ openvpn --daemon --cd /etc/openvpn --config client1.ovpn --log-append /var/log/openvpn.log参数解释:
- --daemon:openvpn以daemon方式启动。
- --cd dir:配置文件的目录,openvpn初始化前,先切换到此目录。
- --config file:客户端配置文件的路径。
- --log-append file:日志文件路径,如果文件不存在会自动创建。
最后可以将上述命令加到/etc/rc.local里开机启动。