一、 认识MyBatis
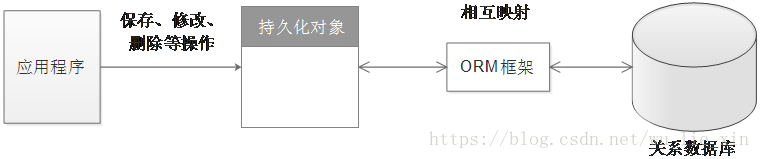
MyBatis框架也被称之为ORM(Object/Relation Mapping,即对象关系映射)框架。所谓的ORM就是一种为了解决面向对象与关系型数据库中数据类型不匹配的技术,它通过描述Java对象与数据库表之间的映射关系,自动将Java应用程序中的对象持久化到关系型数据库的表中。
二、Hibernate与MyBatis的区别
1. Hibernate:
Hibernate是一个全表映射的框架。
通常开发者只需定义好持久化对象到数据库表的映射关系,就可以通过Hibernate提供的方法完成持久层操作。
开发者并不需要熟练的掌握SQL语句的编写,Hibernate会根据制定的存储逻辑,自动的生成对应的SQL,并调用JDBC接口来执行,所以其开发效率会高于MyBatis。
Hibernate也存在一些缺点,例如它在多表关联时,对SQL查询的支持较差;更新数据时,需要发送所有字段;不支持存储过程;不能通过优化SQL来优化性能等。
2. MyBatis
MyBatis是一个半自动映射的框架。
“半自动”是相对于Hibernate全表映射而言的,MyBatis需要手动匹配提供POJO、SQL和映射关系,而Hibernate只需提供POJO和映射关系即可。
与Hibernate相比,虽然使用MyBatis手动编写SQL要比使用Hibernate的工作量大,但MyBatis可以配置动态SQL并优化SQL,可以通过配置决定SQL的映射规则,它还支持存储过程等。对于一些复杂的和需要优化性能的项目来说,显然使用MyBatis更加合适。
三、MyBatis工作流程

四、 MyBatis配置
1 . 在gradle中添加依赖:
    compile group: 'org.mybatis', name: 'mybatis', version: '3.4.1'
    compile group: 'org.mybatis', name: 'mybatis-spring', version: '1.3.1'
2 . 编写数据库连接配置文件: db.properties
#mysql数据库连接信息
driver=com.mysql.jdbc.Driver
url=jdbc:mysql://localhost:3306/goodssale?useUnicode=true&characterEncoding=utf-8
username=root
password=123456

#定义初始连接数
initialSize=0
#定义最大连接数
maxActive=20
#定义最大空闲
#maxIdle=20
#定义最小空闲
minIdle=1
#定义最长等待时间
maxWait=60000
3 . 配置前端控制器: web.xml
<?xml version="1.0" encoding="UTF-8"?>
<web-app xmlns="http://xmlns.jcp.org/xml/ns/javaee"
         xmlns:xsi="http://www.w3.org/2001/XMLSchema-instance"
         xsi:schemaLocation="http://xmlns.jcp.org/xml/ns/javaee http://xmlns.jcp.org/xml/ns/javaee/web-app_3_1.xsd"
         version="3.1">
    <!--三个容器:web,spring,springmvc协同工作-->
<!--Spring容器-->
    <context-param>
        <param-name>contextConfigLocation</param-name>
        <param-value>classpath:config/applicationContext.xml</param-value>
    </context-param>
    <!--以监听方式启动spring容器-->
    <listener>
        <listener-class>org.springframework.web.context.ContextLoaderListener</listener-class>
    </listener>

    <!--servlet的配置-->
    <servlet>
        <servlet-name>springMVCDisptch</servlet-name>
        <servlet-class>org.springframework.web.servlet.DispatcherServlet</servlet-class>
        <!--初始化参数,启动springMVC容器-->
        <init-param>
            <param-name>contextConfigLocation</param-name>
            <param-value>classpath:config/springmvc.xml</param-value>
        </init-param>
        <!--启动顺序-->
        <load-on-startup>1</load-on-startup>
    </servlet>
    <!--servlet mappint 配置-->
    <servlet-mapping>
        <servlet-name>springMVCDisptch</servlet-name>
        <!--对所有请求进行处理-->
        <url-pattern>/</url-pattern>
    </servlet-mapping>
</web-app>
4 . 配置控制器: springmvc.xml
<?xml version="1.0" encoding="UTF-8"?>
<beans xmlns="http://www.springframework.org/schema/beans"
       xmlns:mvc="http://www.springframework.org/schema/mvc"
       xmlns:aop="http://www.springframework.org/schema/aop"
       xmlns:context="http://www.springframework.org/schema/context"
       xmlns:xsi="http://www.w3.org/2001/XMLSchema-instance"
       xsi:schemaLocation="
            http://www.springframework.org/schema/beans
            http://www.springframework.org/schema/beans/spring-beans.xsd
            http://www.springframework.org/schema/context
            http://www.springframework.org/schema/context/spring-context.xsd
            http://www.springframework.org/schema/mvc
            http://www.springframework.org/schema/mvc/spring-mvc.xsd
            http://www.springframework.org/schema/aop
            http://www.springframework.org/schema/aop/spring-aop.xsd ">
    <!--springmvc的扫描包,识别@Controller,注册生成bean-->
    <context:component-scan base-package="com.edusoft"/>
    <!--注解驱动配置-->
    <mvc:annotation-driven>
        <mvc:message-converters register-defaults="true">
            <!--配置bean,解决json数据传输中中文乱码的问题-->
            <bean class="org.springframework.http.converter.StringHttpMessageConverter">
                <property name="supportedMediaTypes">
                    <list>
                        <value>text/html;charset=utf-8</value>
                        <value>application/json;charset=utf-8</value>
                    </list>
                </property>
            </bean>
            <bean class="org.springframework.http.converter.json.MappingJackson2HttpMessageConverter"/>
        </mvc:message-converters>
    </mvc:annotation-driven>
    <!--视图解析器配置-->
    <bean id="viewResol" class="org.springframework.web.servlet.view.InternalResourceViewResolver">
        <!--前缀属性-->
        <property name="prefix" value="/WEB-INF/views/"/>
        <!--后缀属性-->
        <property name="suffix" value=".jsp"/>
    </bean>

    <!--multipartResolver配置,上传文件-->
    <bean id="multipartResolver"
          class="org.springframework.web.multipart.commons.CommonsMultipartResolver">
        <property name="defaultEncoding" value="UTF-8" />
        <property name="maxUploadSize" value="2097152" />
    </bean>

</beans>
5 . 配置BeanFactory: applicationContext.xml
<?xml version="1.0" encoding="UTF-8"?>
<beans xmlns="http://www.springframework.org/schema/beans"
       xmlns:mvc="http://www.springframework.org/schema/mvc"
       xmlns:tx="http://www.springframework.org/schema/tx"
       xmlns:aop="http://www.springframework.org/schema/aop"
       xmlns:context="http://www.springframework.org/schema/context"
       xmlns:xsi="http://www.w3.org/2001/XMLSchema-instance"
       xsi:schemaLocation="
            http://www.springframework.org/schema/beans
            http://www.springframework.org/schema/beans/spring-beans.xsd
            http://www.springframework.org/schema/context
            http://www.springframework.org/schema/context/spring-context.xsd
            http://www.springframework.org/schema/mvc
            http://www.springframework.org/schema/mvc/spring-mvc.xsd
            http://www.springframework.org/schema/tx
            http://www.springframework.org/schema/tx/spring-tx.xsd
            http://www.springframework.org/schema/aop
            http://www.springframework.org/schema/aop/spring-aop.xsd ">
    <!--自动扫描,注入@Service,@Repository,@Component注解bean,并管理其关联-->
    <context:component-scan base-package="com.edusoft"/>

    <!--0 引入db.properties配置文件-->
    <bean id="propertyConfiger"
          class="org.springframework.beans.factory.config.PropertyPlaceholderConfigurer">
        <property name="location" value="classpath:config/db.properties"/>
    </bean>
    <!--1 数据源连接数据库-->
    <bean id="dataSource" class="com.alibaba.druid.pool.DruidDataSource">
        <property name="driverClassName" value="${driver}"/>
        <property name="url" value="${url}"/>
        <property name="username" value="${username}"/>
        <property name="password" value="${password}"/>
        <!--定义初始连接数-->
        <property name="initialSize" value="${initialSize}"/>
        <!--定义最大连接数-->
        <property name="maxActive" value="${maxActive}"/>
        <!--定义最小空闲-->
        <property name="minIdle" value="${minIdle}"/>
        <!--定义最长等待时间-->
        <property name="maxWait" value="${maxWait}"/>
    </bean>
    <!--2 创建sqlSessionFactory,生成sqlSession-->
    <bean id="sqlSessionFactory" class="org.mybatis.spring.SqlSessionFactoryBean">
        <!--2-1数据源信息-->
        <property name="dataSource" ref="dataSource"/>
        <!--2-2映射信息-->
        <property name="mapperLocations" value="classpath:mapper/*.xml"/>
    </bean>
    <!--3 扫描dao所在的包,spring会自动查找其下的类-->
    <bean class="org.mybatis.spring.mapper.MapperScannerConfigurer">
        <!--扫描dao,生成@Mapper注解的接口bean-->
        <property name="basePackage" value="com.edusoft.dao"/>
        <!--将接口bean纳入sqlSessionFactory工厂管理-->
        <property name="sqlSessionFactoryBeanName" value="sqlSessionFactory"/>
    </bean>
    <!--4 配置JDBC事务管理-->
    <bean id="transactionManager"
          class="org.springframework.jdbc.datasource.DataSourceTransactionManager">
        <property name="dataSource" ref="dataSource"/>
    </bean>
    <!--5 配置基于注解的声明式事务-->
    <tx:annotation-driven transaction-manager="transactionManager"/>
</beans>