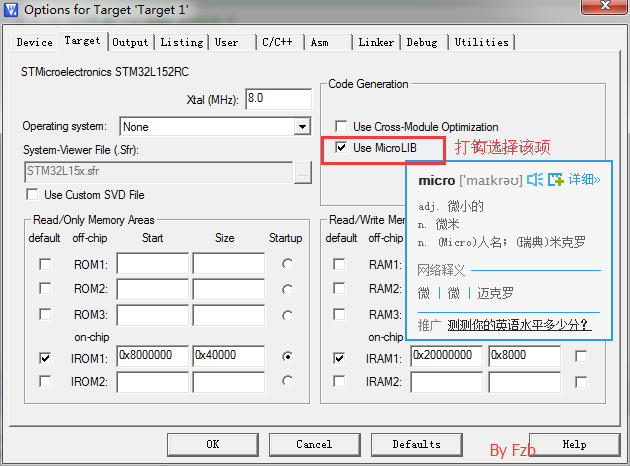
1、在keil中配置使用Micro LIB,如下图
2、配置USART模块
void SYS_USARTInit(void)
{
static USART_InitTypeDef USART_InitStructure;
static GPIO_InitTypeDef GPIO_InitStructure;
USART_InitStructure.USART_BaudRate = 115200;
USART_InitStructure.USART_WordLength = USART_WordLength_8b;
USART_InitStructure.USART_StopBits = USART_StopBits_1;
USART_InitStructure.USART_Parity = USART_Parity_No;
USART_InitStructure.USART_HardwareFlowControl = USART_HardwareFlowControl_None;
USART_InitStructure.USART_Mode = USART_Mode_Rx | USART_Mode_Tx;
/* Enable GPIO clock */
RCC_AHBPeriphClockCmd(RCC_AHBPeriph_GPIOA, ENABLE);
/* Enable UART clock */
RCC_APB2PeriphClockCmd(RCC_APB2Periph_USART1, ENABLE);
/* Connect PA9 to USARTx_Tx */
GPIO_PinAFConfig(USE_USART_PORT, USE_USART_TX_GPIO_PinSource, GPIO_AF_USART1);
/* Connect PA10 to USARTx_Rx */
GPIO_PinAFConfig(USE_USART_PORT, USE_USART_RX_GPIO_PinSource, GPIO_AF_USART1);
/* Configure USART Tx PA9 as alternate function push-pull */
GPIO_InitStructure.GPIO_Pin = USE_USART_TX_PIN;
GPIO_InitStructure.GPIO_Mode = GPIO_Mode_AF;
GPIO_InitStructure.GPIO_Speed = GPIO_Speed_40MHz;
GPIO_InitStructure.GPIO_OType = GPIO_OType_PP;
GPIO_InitStructure.GPIO_PuPd = GPIO_PuPd_UP;
GPIO_Init(USE_USART_PORT, &GPIO_InitStructure);
/* Configure USART Rx PA10 as alternate function push-pull */
GPIO_InitStructure.GPIO_Pin = USE_USART_RX_PIN;
GPIO_Init(USE_USART_PORT, &GPIO_InitStructure);
/* USART configuration */
USART_Init(USE_USART, &USART_InitStructure);
/* Enable USART */
USART_Cmd(USE_USART, ENABLE);
}
3、重定向printf()
在工程中加入下面代码
#ifdef __GNUC__
/* With GCC/RAISONANCE, small printf (option LD Linker->Libraries->Small printf
set to 'Yes') calls __io_putchar() */
#define PUTCHAR_PROTOTYPE int __io_putchar(int ch)
#else
#define PUTCHAR_PROTOTYPE int fputc(int ch, FILE *f)
#define GETCHAR_PROTOTYPE int fgetc(FILE *f)
#endif /* __GNUC__ */
PUTCHAR_PROTOTYPE
{
/* Place your implementation of fputc here */
/* e.g. write a character to the USART */
USART_SendData(USE_USART, (uint8_t)ch);
/* Loop until transmit data register is empty */
while (USART_GetFlagStatus(USE_USART, USART_FLAG_TXE) == RESET)
{}
return ch;
}
GETCHAR_PROTOTYPE
{
while(USART_GetFlagStatus(USART1, USART_FLAG_RXNE) == RESET);
return (USART_ReceiveData(USART1));
}
上面三个步骤做完即可在工程中调用printf()和scanf()了。