一、前言
对于自定义View相信这是每一个初学者心里的痛,但开发久了,慢慢的你就会发现,其实自定义View并不难,看几篇基础文章,懂得了原理和流程套路,用的多了,实战多了,自然而然就掌握了。近期在时间上还算空余,所以打算在学习新的东西的同时,把旧的基础的东西也好好梳理一下,总不能捡一路丢一路吧。
二、自定义View
首先先总结一下一般自定义View的步骤,让我们在写的时候能有一个大致的方向:
1.继承一个View或者一个我们需要的View的子类,并添加构造方法
2.重写onMeasure方法
3.重写onDraw方法
4.在xml中自定义View属性
看了很多文章都是先设置View属性,这主要是看个人习惯吧,因为我在写自定义View的时候,有时候属性想的不够全面或者写的多余最后用不到,修改起来比较频繁,所以我就习惯先将需要的属性通过成员变量赋予固定的测试值,当自定义的view成型了,再把测试值替换成xml中设置的View属性值。
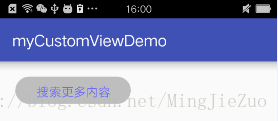
闲话不多说了,我们直接来拿一个小例子来从头到尾的实现一下吧,虽然没有实际用处吧,这种效果完全可以通过xml的shape实现,在这里就当是为了熟悉一下自定义View的流程吧,效果图如下:
这是我们自定义的View类,我们添加了不同参数的构造方法,并进行了相关初始化
public class MyCustomSimpleView extends View{

    //显示的文本
    String title;
    //字体的大小
    int wordSize;
    //字体的颜色
    int wordCorlor;
    //背景颜色
    int bgCorlor;

    //搜索栏出去左右两个半圆的长度
    int searchLength;
    //搜索栏的高度
    int searchHight;

    //搜索栏文本所占的区域
    Rect rect;
    //写字的笔
    Paint worldPaint;
    //画背景的笔
    Paint bgPaint;

    //在代码中直接new的时候,会调用一个参数构造方法
    public MyCustomSimpleView(Context context) {
        this(context, null);
    }

    //在xml中使用自定义控件的时候,不管有没有使用我们自己的自定义属性都会调用两个参数构造方法
    public MyCustomSimpleView(Context context, @Nullable AttributeSet attrs) {
        this(context, attrs, 0);
    }

    //这个构造方法系统不会默认调用,需要我们自己主动调用
    public MyCustomSimpleView(Context context, @Nullable AttributeSet attrs, int defStyleAttr) {
        super(context, attrs, defStyleAttr);
        init(context);
    }

    private void init(Context context) {
        wordSize = 16;
        title = "搜索更多内容";
        wordCorlor = 0xFF6a6aff;//浅蓝
        bgCorlor = 0xFFbebebe;//浅灰

        worldPaint = new Paint();
        worldPaint.setTextSize(CommentUtils.sp2px(context, wordSize));
        worldPaint.setColor(wordCorlor);

        bgPaint = new Paint();
        bgPaint.setColor(bgCorlor);

        rect = new Rect();//通过rect我们要获取title内容的宽度和高度
        worldPaint.getTextBounds(title, 0, title.length(), rect);
    }
}
通常我们习惯写上三个构造方法,这三个构造方法的使用时机请参考代码的注释
我们要重写onMeasure方法,我们知道,在xml中我们的layout_width和layout_height可以是wrap_content、match_parent或者固定大小,可其中wrap_content并没有指定真正大小,可是我们要绘制的view是要有具体的宽度的,所以这就要求我们自己去测量尺寸提供给父View让其给我们提供期望大小的区域,为此系统给我们提供了MeasureSpec类,通过MeasureSpec类我们可以获取父view提供给我们的宽高尺寸和其所用的测量模式。
测量模式分为3种:
1.EXACTLY:提供的尺寸就是当前view所应该取的尺寸,一般设置了明确的固定大小或者match_parent
2.AT_MOST:提供的尺寸就是当前view所能取的最大尺寸,一般设置了wrap_content
3.UNSPECIFIED:父view对当前view的尺寸没有限制,当前view想要多大都可以,一般很少用到
这是我们的onMeasure方法,对于layout_width和layout_height的不同情况做了相应的处理
    @Override
    protected void onMeasure(int widthMeasureSpec, int heightMeasureSpec) {
        super.onMeasure(widthMeasureSpec, heightMeasureSpec);
        int widthModel = MeasureSpec.getMode(widthMeasureSpec);
        int widthSize = MeasureSpec.getSize(widthMeasureSpec);
        int heightModel = MeasureSpec.getMode(heightMeasureSpec);
        int heightSize = MeasureSpec.getSize(heightMeasureSpec);
        switch (heightModel) {
            case MeasureSpec.UNSPECIFIED:
            case MeasureSpec.AT_MOST:
                //文字高度+上下边距
                heightSize = rect.height() + getPaddingTop() + getPaddingBottom();
                //当高度为wrap_content时
                searchHight = rect.height();
                break;
            case MeasureSpec.EXACTLY:
                //当高度全屏或者固定尺寸时候
                searchHight = heightSize - getPaddingTop() - getPaddingBottom();
                break;;
        }
        switch (widthModel) {
            case MeasureSpec.UNSPECIFIED:
            case MeasureSpec.AT_MOST:
                //文字宽度+两侧半圆半径
                widthSize = rect.width() + getPaddingLeft() + getPaddingRight()
                        + searchHight/2 + getPaddingRight() + searchHight/2 + getPaddingLeft();
                //当宽度为wrap_content时,搜索栏宽度(不包括两边半圆)为文字的宽度
                searchLength = rect.width();
                break;
            case MeasureSpec.EXACTLY:
                //当宽度全屏或者固定尺寸时候,宽度-左右半圆宽度-左右边距
                searchLength = widthSize - (searchHight/2 + getPaddingRight() + searchHight/2 + getPaddingLeft()) - getPaddingLeft() - getPaddingRight();
                break;
        }
        setMeasuredDimension(widthSize, heightSize);
    }
重写onDraw方法,通过我们上面定义的画笔在canvas上绘制就行啦,其实不管多么复杂的画面,都是由一个个最基础的元素构成的,Android为我们提供了画线、画圆、画弧形、画矩形等等的方法,我们用到的时候直接去查看api开发文档就行了,不需要死记硬背那么多,同样本例中的绘制方法也不需要完全缕清,无非是找到需要的点的坐标罢了,跟对于自定义view的理解没有关系
    @Override
    protected void onDraw(Canvas canvas) {
        super.onDraw(canvas);
        if(worldPaint != null){
            //左侧加个半圆
            RectF rectF_left = new RectF(0, 0
                    , 2 * getPaddingLeft() + searchHight
                    , searchHight + getPaddingTop() + getPaddingBottom());
            canvas.drawArc(rectF_left, 90, 180, false, bgPaint);
            //画一个矩形
            canvas.drawRect(searchHight/2 + getPaddingLeft(), 0
                    , searchLength + 2*getPaddingLeft() + getPaddingRight() + searchHight/2
                    , searchHight + getPaddingTop() +getPaddingBottom(), bgPaint);
            //在画的矩形区域上写内容,在这里默认都是padding 上下内边距一致 左右内边距一致
            canvas.drawText(title
                    , getPaddingLeft() + getPaddingLeft() + searchHight/2
                    , (searchHight + getPaddingTop() + getPaddingBottom())/2 + rect.height()/2, worldPaint);
            //右侧加个半圆
            RectF rectF_right = new RectF(searchLength + 2 * getPaddingLeft()
                    , 0, searchLength + 2 * getPaddingLeft() + 2 * getPaddingRight() + searchHight
                    , searchHight + getPaddingTop() + getPaddingBottom());
            canvas.drawArc(rectF_right, -90, 180, false, bgPaint);
        }
    }
好了,我们的自定义View基本已经成型了,但是你会发现我们的属性都是写死的测试值,不用担心,用我们自定义的属性替换下就好啦。我们先在res/values目录下新建一个attrs.xml:
<resources>

    <!--最好是自定义View的类名,查看起来一目了然-->
    <declare-styleable name="MyCustomSimpleView">
        <attr name="wordSize" format="integer"/>
        <attr name="test" format="string"/>
        <attr name="wordCorlor" format="integer"/>
        <attr name="bgCorlor" format="integer"/>
    </declare-styleable>
</resources>
我们的xml布局文件
<RelativeLayout xmlns:android="http://schemas.android.com/apk/res/android"
    android:layout_width="match_parent"
    android:layout_height="match_parent"
    xmlns:custom="http://schemas.android.com/apk/res-auto">

    <custom.com.mycustomviewdemo.widget.MyCustomSimpleView
        android:layout_width="wrap_content"
        android:layout_height="wrap_content"
        android:padding="10dp"
        android:layout_margin="20dp"
        custom:test="搜索更多内容"
        custom:wordSize="16"
        custom:wordCorlor="0xFF6a6aff"
        custom:bgCorlor="0xFFbebebe"
        />

</RelativeLayout>
注意需要在根目录引入我们的命名空间xmlns:custom=”http://schemas.android.com/apk/res-auto”,其中custom我们可以更改,没有具体名字要求
将我们自定义View里的测试值改成从xml属性中获取
private void init(Context context, @Nullable AttributeSet attrs, int defStyleAttr) {
        TypedArray array = context.getTheme().obtainStyledAttributes(attrs
                , R.styleable.MyCustomSimpleView
                , defStyleAttr, 0);
        title = array.getString(R.styleable.MyCustomSimpleView_test);
        wordSize = array.getInt(R.styleable.MyCustomSimpleView_wordSize, 16);
        wordCorlor = array.getInt(R.styleable.MyCustomSimpleView_wordCorlor, 0xFF6a6aff);//默认浅蓝
        bgCorlor = array.getInt(R.styleable.MyCustomSimpleView_bgCorlor, 0xFFbebebe);//默认浅灰
        //记得使用完销毁
        array.recycle();

        worldPaint = new Paint();
        worldPaint.setTextSize(CommentUtils.sp2px(context, wordSize));
        worldPaint.setColor(wordCorlor);

        bgPaint = new Paint();
        bgPaint.setColor(bgCorlor);

        rect = new Rect();
        worldPaint.getTextBounds(title, 0, title.length(), rect);
    }
三、总结
到此我已经基本介绍完自定义简单view的流程了,但其中涉及到的很多知识点,都没有具体的去深入介绍,充其量只是有个使用方法罢了,如果你感兴趣可以通过切入一个知识点,单独的再去查资料深入剖析一下。