之前 密码模式和客户端模式非常顺利的就搞好了,准备在试一下授权码模式,毕竟授权码模式在生活中已经随处可见了,比如CSDN使用QQ,或者微信账号登录。可是在之前代码的基础上测试授权码模式遇到了好多坑,所以有必要把采坑经过记录一下,也供大家参考。
当然阅读之前还是需要先看一下这两篇文章:
Spring boot 入门教程-在Spring Security基础上集成Oauth2.0
开始之前先了解一下 授权码模式的执行过程:
授权码模式(authorization code)是功能最完整、流程最严密的授权模式。它的特点就是通过客户端的后台服务器,与"服务提供商"的认证服务器进行互动。
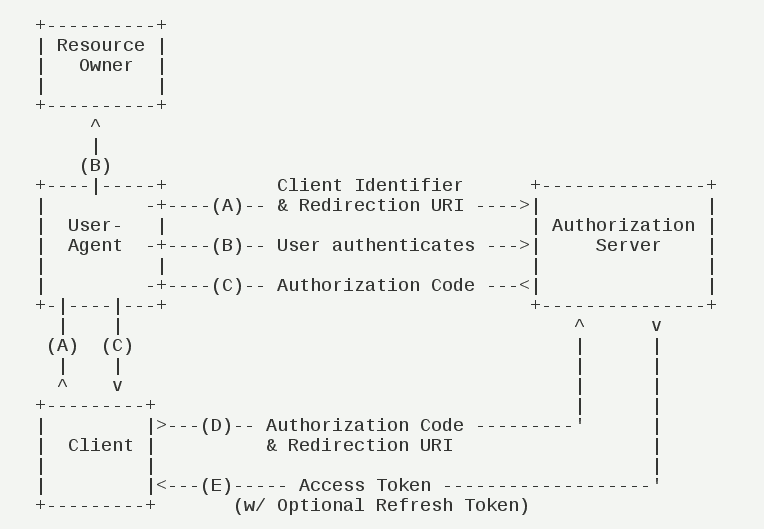
它的步骤如下:
(A)用户访问客户端,后者将前者导向认证服务器。
(B)用户选择是否给予客户端授权。
(C)假设用户给予授权,认证服务器将用户导向客户端事先指定的"重定向URI"(redirection URI),同时附上一个授权码。
(D)客户端收到授权码,附上早先的"重定向URI",向认证服务器申请令牌。这一步是在客户端的后台的服务器上完成的,对用户不可见。
(E)认证服务器核对了授权码和重定向URI,确认无误后,向客户端发送访问令牌(access token)和更新令牌(refresh token)。
先贴一下pom.xml
<?xml version="1.0" encoding="UTF-8"?>
<project xmlns="http://maven.apache.org/POM/4.0.0" xmlns:xsi="http://www.w3.org/2001/XMLSchema-instance"
         xsi:schemaLocation="http://maven.apache.org/POM/4.0.0 http://maven.apache.org/xsd/maven-4.0.0.xsd">
    <modelVersion>4.0.0</modelVersion>

    <groupId>com.elens.oauth</groupId>
    <artifactId>elens-oauth</artifactId>
    <version>0.0.1-SNAPSHOT</version>
    <packaging>jar</packaging>

    <name>elens-oauth</name>
    <description></description>

    <parent>
        <groupId>org.springframework.boot</groupId>
        <artifactId>spring-boot-starter-parent</artifactId>
        <version>2.0.4.RELEASE</version>
        <relativePath/> <!-- lookup parent from repository -->
    </parent>

    <properties>
        <project.build.sourceEncoding>UTF-8</project.build.sourceEncoding>
        <project.reporting.outputEncoding>UTF-8</project.reporting.outputEncoding>
        <java.version>1.8</java.version>
    </properties>

    <dependencies>
        <dependency>
            <groupId>org.springframework.boot</groupId>
            <artifactId>spring-boot-starter-security</artifactId>
        </dependency>
        <dependency>
            <groupId>org.springframework.boot</groupId>
            <artifactId>spring-boot-starter-web</artifactId>
        </dependency>
        <dependency>
            <groupId>org.mybatis.spring.boot</groupId>
            <artifactId>mybatis-spring-boot-starter</artifactId>
            <version>1.3.2</version>
        </dependency>

        <dependency>
            <groupId>mysql</groupId>
            <artifactId>mysql-connector-java</artifactId>
            <scope>runtime</scope>
        </dependency>

        <dependency>
            <groupId>org.springframework.security.oauth</groupId>
            <artifactId>spring-security-oauth2</artifactId>
            <version>2.3.3.RELEASE</version>
        </dependency>
        <dependency>
            <groupId>org.springframework.boot</groupId>
            <artifactId>spring-boot-starter-data-jpa</artifactId>
        </dependency>
    </dependencies>

    <build>
        <plugins>
            <plugin>
                <groupId>org.springframework.boot</groupId>
                <artifactId>spring-boot-maven-plugin</artifactId>
            </plugin>
        </plugins>
    </build>


</project>
1.创建授权码客户端
因为之前密码模式和客户端模式没有问题,所以直接配置授权码客户端,在授权服务器 @EnableAuthorizationServer
AuthorizationServerConfig 中配置 @Override
public void configure(ClientDetailsServiceConfigurer clients) throws Exception {
clients.jdbc(dataSource)
// .withClient("client")
// .secret(passwordEncoder.encode("123456"))
// .authorizedGrantTypes("password", "refresh_token")//允许授权范围 (密码授权和刷新令牌)
// .authorities("ROLE_ADMIN", "ROLE_USER")//客户端可以使用的权限
// .scopes("read", "write")
// .accessTokenValiditySeconds(7200)
// .refreshTokenValiditySeconds(10000)
//
// //客户端模式
// .and().withClient("client_1")
// .secret(passwordEncoder.encode("123456"))
// .authorizedGrantTypes("client_credentials")
// .scopes("read", "write")
// .authorities("client_credentials")
// .accessTokenValiditySeconds(7200)
//
// //授权码模式
// .and()
.withClient("client_code")
.secret(passwordEncoder.encode("123456"))
.authorizedGrantTypes("authorization_code", "refresh_token",
"password", "implicit")
.scopes("all")
.authorities("ROLE_ADMIN")
.redirectUris("http://ww.baidu.com")
.accessTokenValiditySeconds(1200)
.refreshTokenValiditySeconds(50000);
}将前两种客户端先注释掉,启动。
在浏览器中请求
- response_type:表示授权类型,必选项,此处的值固定为"code"
- client_id:表示客户端的ID,必选项
- redirect_uri:表示重定向URI,可选项
- scope:表示申请的权限范围,可选项
- state:表示客户端的当前状态,可以指定任意值,认证服务器会原封不动地返回这个值。
但是后台报错:

这个问题困扰我很长时间,经过查找资料了解了大概是oautho内部过滤器拦截顺序的原因,却不知道如何修改,
有篇博客说在application.properties,中添加security.oauth2.resource.filter-order = 3,但是添加后没有作用,按住ctrl 点击ti提示找不到,故推断是版本的问题,查看资料说spring boot 2.0 版本oauth2.0 做了许多更新。
在http://聊聊spring security oauth2的几个endpoint的认证 中
小结

需要保护/oauth/authorize以及/oauth/confirm_access这两个endpoint,当然主要是/oauth/authorize这个。

由于其他几个/oauth/开头的认证endpoint配置的认证优先级高于默认的WebSecurityConfigurerAdapter配置(order=100),因此默认的可以这样配置

@EnableWebSecurity
@EnableGlobalMethodSecurity(prePostEnabled = true)
public class SecurityConfig extends WebSecurityConfigurerAdapter {
    @Override
    public void configure(HttpSecurity http) throws Exception {
        http.csrf().disable();
        http
                .requestMatchers().antMatchers("/oauth/**","/login/**","/logout/**")
                .and()
                .authorizeRequests()
                .antMatchers("/oauth/**").authenticated()
                .and()
                .formLogin().permitAll(); //新增login form支持用户登录及授权
    }
}

把整个/oauth/**保护进来所以对代码做了修改,能够跳转到登录页面了,但是登录成功后没有跳转到redirect_uri=http://ww.baidu.com,测试几次没找到原因推测可能还是配置顺序的原因,突然想到看到过@Order的注解
ResourceServerConfiguration 和 SecurityConfiguration上配置的顺序, SecurityConfiguration一定要在ResourceServerConfiguration 之前,因为spring实现安全是通过添加过滤器(Filter)来实现的,基本的安全过滤应该在oauth过滤之前, 所以在SecurityConfiguration设置@Order(2), 在ResourceServerConfiguration上设置@Order(6)
配上之后测试成功终于出先了想要的结果。重新请求上边地址
返回:

拿着code去请求access_token:
localhost:18088/oauth/token?client_id=client_code&grant_type=authorization_code&redirect_uri=http://ww.baidu.com&client_secret=123456&code=nBYrX5
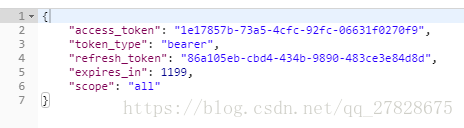
然后就可以拿着access_token 去请求资源了 如:http://localhost:18088/admin/me?access_token=27e23009-fe2a-4943-85a4-301bfa71c841
OK了。程序不是很完善也不完美,还有很多问题没有搞懂。希望大牛可以指教!!
最后贴一下WebSecurityConfig 和ResourceServerConfig 代码
/**
 * 用于保护oauth相关的endpoints,同时主要作用于用户的登录(form login,Basic auth)
 */
@Order(2)
@Configuration
@EnableWebSecurity
@EnableGlobalMethodSecurity(prePostEnabled = true)
public class WebSecurityConfig extends WebSecurityConfigurerAdapter {

    @Autowired
    private UserDetailsService userDetailsService;

    @Bean
    public PasswordEncoder passwordEncoder() {
        return new BCryptPasswordEncoder();
    }

    @Bean
    public AuthenticationManager authenticationManagerBean() throws Exception {
        return super.authenticationManagerBean();
    }

    /**
     * 配置用户签名服务 主要是user-details 机制,
     *
     * @param auth 签名管理器构造器,用于构建用户具体权限控制
     * @throws Exception
     */
    @Override
    protected void configure(AuthenticationManagerBuilder auth) throws Exception {
        System.out.println("---------------WebSecurityConfig-----------------");
        auth.userDetailsService(userDetailsService)
                .passwordEncoder(passwordEncoder());
    }

    /**
     * 用来构建 Filter 链
     *
     * @param web
     * @throws Exception
     */
//    @Override
//    public void configure(WebSecurity web) {
//
//       // 开放的资源
//        web.ignoring()
//                .antMatchers("/oauth/check_token","/oauth/authorize","/admin/login");
//    }

    /**
     * 用来配置拦截保护的请求
     *
     * @param http
     * @throws Exception
     */
    @Override
    protected void configure(HttpSecurity http) throws Exception {

        //不拦截 oauth 开放的资源
        http.csrf().disable();
        http.requestMatchers()
                .antMatchers("/oauth/**", "/login/**", "/logout/**")
                .and()
                .authorizeRequests()
                .antMatchers("/oauth/**").authenticated()
                .and()
                .formLogin().permitAll(); //新增login form支持用户登录及授权

//        http.authorizeRequests().anyRequest().fullyAuthenticated();
//        http.formLogin().loginPage("/login").failureUrl("/login?error").permitAll();
//        http.logout().permitAll();

    }

//    //开启全局方法拦截
//    @EnableGlobalMethodSecurity(prePostEnabled = true, jsr250Enabled = true)
//    public static class GlobalSecurityConfiguration extends GlobalMethodSecurityConfiguration {
//        @Override
//        protected MethodSecurityExpressionHandler createExpressionHandler() {
//            return new OAuth2MethodSecurityExpressionHandler();
//        }
//
//    }
}

@Order(6)
@Configuration
@EnableResourceServer //这个类表明了此应用是OAuth2 的资源服务器,此处主要指定了受资源服务器保护的资源链接
public class ResourceServerConfig extends ResourceServerConfigurerAdapter {


    @Override
    public void configure(HttpSecurity http) throws Exception {


        http.csrf().disable()//禁用了 csrf 功能
                .authorizeRequests()//限定签名成功的请求
                .antMatchers("/decision/**","/govern/**").hasAnyRole("USER","ADMIN")
//                .antMatchers("/admin/**").hasRole("ADMIN")
                .antMatchers("/test/**","/admin/**").authenticated()//签名成功后可访问,不受role限制
//                .antMatchers("/admin/login","/oauth/**").permitAll()
                .anyRequest().permitAll()//其他没有限定的请求,允许访问
                .and().anonymous()//对于没有配置权限的其他请求允许匿名访问
                .and().formLogin()//使用 spring security 默认登录页面
                .and().httpBasic();//启用http 基础验证


    }

}