豆瓣API实践项目-前言-0(可下载源码):
http://blog.csdn.net/mario_faker/article/details/79618210
豆瓣API实践项目-数据api接口-1: http://blog.csdn.net/mario_faker/article/details/79618235
豆瓣API实践项目-搭建项目基本框架-2: http://blog.csdn.net/mario_faker/article/details/79618245
豆瓣API实践项目-导入第三方library-3: http://blog.csdn.net/mario_faker/article/details/79618261
豆瓣API实践项目-单页细讲4: http://blog.csdn.net/mario_faker/article/details/79618272
豆瓣API实践项目-apk打包: http://blog.csdn.net/mario_faker/article/details/79618291
一、创建项目
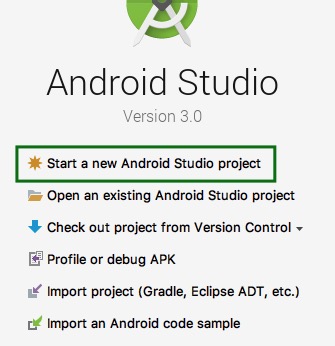
选择 Start a new Android Studio project
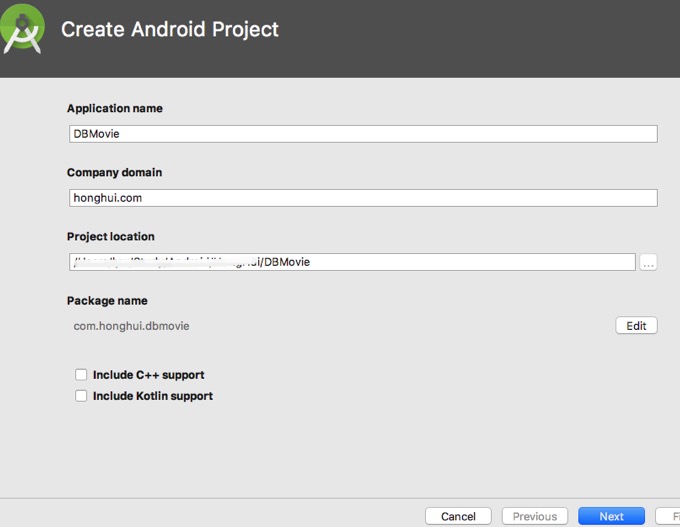
Anplication name: 填写你的项目名,这里的是:DBMovie
Company domain:表示公司域名,如果是个人开发者,没有公司域名的话,可以随便填,如我填的是:honghui.com
Package name: 这个是项目的包名,包名是分辨一个项目的重要因素,因此包名要唯一,android studio 会根据Company domain来为我们生成适合的包名,你也可以点击 Edit进行修改
Project location: 选择你的项目保存位置
点击“Next”
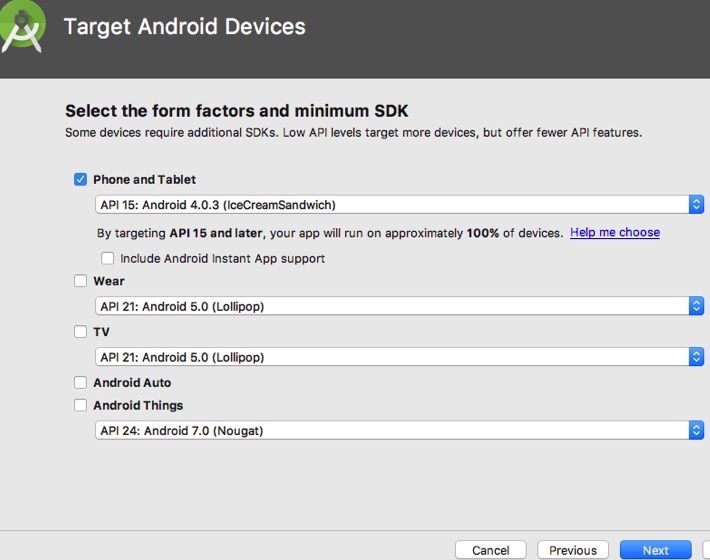
Phone and tablet 选择
你的应用所能支持的最低 Android 版本。
一般按照默认的就可以了。
选择 Empty Activity:

然后在
Customize theActivity 屏幕中,保留默认值并点击
Finish。
这样项目就创建完成了。
二、搭建项目基本框架
先把项目的基本框架搭建出来
1、把一些常用的包,先创建出来,由于这是个实践的小项目,所以按类的类型 进行划分,
顾名思义:ui:是存放像activity之类的界面类的
adapter:存放 adapter数据适配器
apivisit:存放api网络访问相关类
callback:可以存放一些回调接口类,这里暂时没有需要回调类的地方
model:存放model类
utils:存放一些工具类
widget:存放一些自定义控件
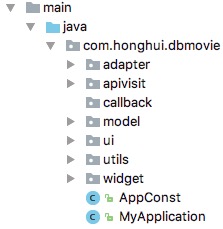
如果项目比较大的话,可以按 功能区进行划分,如:购物车模块相关类都放在一个包中,商城放在另外一个包中。
2、把常用的权限 添加到AndroidManifest.xml中:
<!-- 使用网络功能所需权限 -->
<uses-permission android:name="android.permission.ACCESS_WIFI_STATE" >
</uses-permission>
<uses-permission android:name="android.permission.CHANGE_WIFI_STATE" >
</uses-permission>
<uses-permission android:name="android.permission.ACCESS_NETWORK_STATE" />
<uses-permission android:name="android.permission.INTERNET" >
</uses-permission>

<!-- 操作SD卡权限 -->
<uses-permission android:name="android.permission.WRITE_EXTERNAL_STORAGE" />
<!-- 在SDCard中创建与删除文件权限 -->
<uses-permission android:name="android.permission.MOUNT_UNMOUNT_FILESYSTEMS" />
3、创建一个自定义的Application
关于Application:
- 每个APP都有一个Application实例:如果我们没有继承Application子类自定义它的话,APP会创建一个默认的实例。
- Application实例拥有着与APP一样长的生命周期:在APP开启的时候首先就会实例化它,然后才是入口的Activity或者Service等。
- Application与APP“同生共死”,在一个APP的生命周期只实例化一次,所以它“天生”就是一个单例,不需要使用单例模式去实现它。
这里,我自定义了一个MyApplication类,继承于Application,这样一些全局的初始化操作可以放在Application中进行。
同时,在AndroidManifest.xml中,你要指定你要使用的Application,否则你创建了也没用:
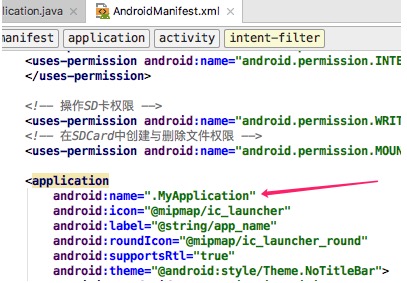
同时说明一下 application中:
icon:指定你的app的logo
label:指定你的app的名称
theme: 这里我 改成了使用
@android:style/Theme.NoTitleBar
这个主题
三、搭建基本的界面框架

这是一个常见的app界面框架,点击底部的3个tag,切换不同的界面
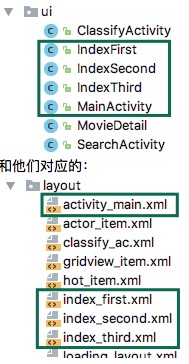
这样的界面,由一个FragmentActivity 和三个 Fragment组成
见项目中的这四个类:(项目源码在前言中可以下载)
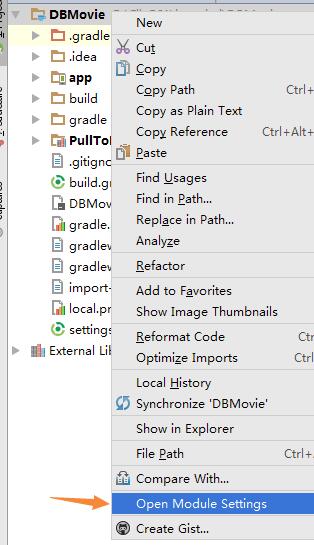
注意:这里需要用到v4包中的Fragment,所以,需要先在项目中导入v4包:
然后 右击项目,按如下图选择:
选择app模块,点击Dependencies,点击右边的加号,选择Library dependency
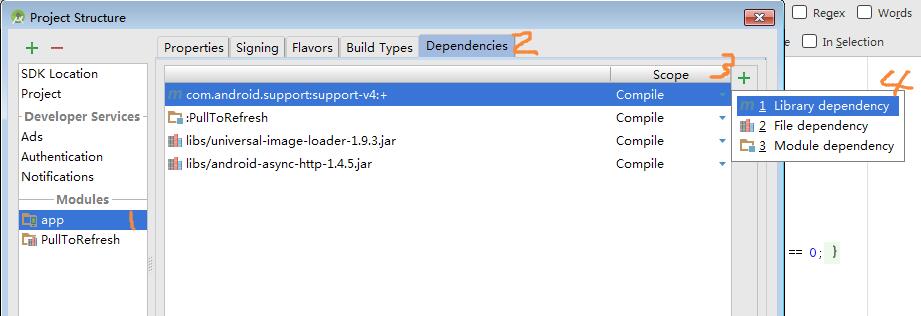
选择v4包,ok,就可以了

先看MainActivity的页面布局,activity_main.xml:
<?xml version="1.0" encoding="utf-8"?>
<LinearLayout xmlns:android="http://schemas.android.com/apk/res/android"
    android:layout_width="fill_parent"
    android:layout_height="fill_parent"
    android:background="@color/white"
    android:orientation="vertical" >

    <FrameLayout
        android:id="@+id/container"
        android:layout_width="fill_parent"
        android:layout_height="fill_parent"
        android:layout_weight="1"
        android:background="@color/white" >
    </FrameLayout>

    <View
        android:layout_width="fill_parent"
        android:layout_height="1px"
        android:background="#D7D7D7" />

    <LinearLayout
        android:id="@+id/ll_bottom"
        android:layout_width="fill_parent"
        android:layout_height="@dimen/bottom_height"
        android:background="@color/white"
        android:orientation="horizontal"
        android:paddingTop="5dp" >

        <LinearLayout
            android:id="@+id/view_index_first"
            android:layout_width="fill_parent"
            android:layout_height="fill_parent"
            android:layout_weight="1"
            android:gravity="center"
            android:orientation="vertical" >

            <ImageView
                android:id="@+id/iv_index_first"
                android:layout_width="wrap_content"
                android:layout_height="0dp"
                android:layout_weight="1"
                android:src="@drawable/m1_defult" />

            <TextView
                android:id="@+id/tv_index_first"
                android:layout_width="fill_parent"
                android:layout_height="0dp"
                android:layout_weight="1"
                android:gravity="center"
                android:text="@string/index_first"
                android:textColor="@color/bar_txt_default"
                android:textSize="12dp" />
        </LinearLayout>

        <LinearLayout
            android:id="@+id/view_index_second"
            android:layout_width="fill_parent"
            android:layout_height="fill_parent"
            android:layout_weight="1"
            android:gravity="center"
            android:orientation="vertical" >

            <ImageView
                android:id="@+id/iv_index_second"
                android:layout_width="wrap_content"
                android:layout_height="0dp"
                android:layout_weight="1"
                android:src="@drawable/m2_defult" />

            <TextView
                android:id="@+id/tv_index_second"
                android:layout_width="fill_parent"
                android:layout_height="0dp"
                android:layout_weight="1"
                android:gravity="center"
                android:text="@string/index_second"
                android:textColor="@color/bar_txt_default"
                android:textSize="12dp" />
        </LinearLayout>

        <LinearLayout
            android:id="@+id/view_index_third"
            android:layout_width="fill_parent"
            android:layout_height="fill_parent"
            android:layout_weight="1"
            android:gravity="center"
            android:orientation="vertical" >

            <ImageView
                android:id="@+id/iv_index_third"
                android:layout_width="wrap_content"
                android:layout_height="0dp"
                android:layout_weight="1"
                android:src="@drawable/m3_defult" />

            <TextView
                android:id="@+id/tv_index_third"
                android:layout_width="fill_parent"
                android:layout_height="0dp"
                android:layout_weight="1"
                android:gravity="center"
                android:text="@string/index_third"
                android:textColor="@color/bar_txt_default"
                android:textSize="12dp" />
        </LinearLayout>
    </LinearLayout>

</LinearLayout>
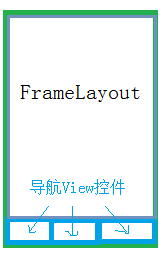
这就是常见的 底部导航栏模式 的布局,各模块的主内容放在FrameLayout中显示,底部3个View控件作为导航栏。
在FrameLayout容器中,放置Fragment控件显示主要内容,通过点击底部的不同导航按键,切换FrameLayout中的Fragment,从而显示不同的内容,到达导航的效果。
MainActivity.java的相关代码:
package com.honghui.dbmovie.ui;

import android.os.Bundle;
import android.support.v4.app.Fragment;
import android.support.v4.app.FragmentActivity;
import android.support.v4.app.FragmentManager;
import android.support.v4.app.FragmentTransaction;
import android.view.KeyEvent;
import android.view.View;
import android.widget.ImageView;
import android.widget.LinearLayout;
import android.widget.TextView;
import android.widget.Toast;

import com.honghui.dbmovie.R;

public class MainActivity extends FragmentActivity {

    //导航栏相关控件
    private LinearLayout view_index_first, view_index_third,view_index_second;
    private TextView tv_index_first, tv_index_third, tv_index_second;
    private ImageView iv_index_first, iv_index_third, iv_index_second;

    private FragmentManager fragmentManager;//用于管理Activity中的FragmentManager
    private Fragment curFragment;// 记录当前显示的Fragment
    private IndexFirst firstFragment = null;//热映Fragment
    private IndexSecond secondFragment = null;//排行Fragment
    private IndexThird thirdFragment = null;//分类Fragment

    public static String curTag = "";// 当前导航标签

    @Override
    protected void onCreate(Bundle savedInstanceState) {
        super.onCreate(savedInstanceState);
        setContentView(R.layout.activity_main);
        initView();

        curTag = "";
        toFirstFragment();
    }

    private void initView() {
        view_index_first = (LinearLayout) findViewById(R.id.view_index_first);
        view_index_second = (LinearLayout) findViewById(R.id.view_index_second);
        view_index_third = (LinearLayout) findViewById(R.id.view_index_third);

        tv_index_first = (TextView) findViewById(R.id.tv_index_first);
        tv_index_third = (TextView) findViewById(R.id.tv_index_third);
        tv_index_second = (TextView) findViewById(R.id.tv_index_second);

        iv_index_first = (ImageView) findViewById(R.id.iv_index_first);
        iv_index_third = (ImageView) findViewById(R.id.iv_index_third);
        iv_index_second = (ImageView) findViewById(R.id.iv_index_second);

        view_index_first.setOnClickListener(viewClickListener);
        view_index_third.setOnClickListener(viewClickListener);
        view_index_second.setOnClickListener(viewClickListener);

        //获取FragmentManager
        fragmentManager = getSupportFragmentManager();
    }

    //导航栏的点击事件
    private View.OnClickListener viewClickListener = new View.OnClickListener() {

        @Override
        public void onClick(View v) {
            switch (v.getId()) {
                case R.id.view_index_first:
                    toFirstFragment();//切换到“热映”Fragment
                    break;
                case R.id.view_index_second:
                    toSecondFragment();//切换到“排行”Fragment
                    break;
                case R.id.view_index_third:
                    toThirdFragment();//切换到“分类”Fragment
                    break;
                default:
                    break;
            }
        }
    };

    // 显示tab标签对应的数据
    private void showTabData(String tag) {
        curTag = tag;
        //在fragmentManager中,通过指定的tag,找到对应的Fragment
        Fragment fragment = fragmentManager.findFragmentByTag(tag);
        //开始一个事务
        FragmentTransaction transation = fragmentManager.beginTransaction();

        //如果没有找到 对应的Fragment,就创建一个
        if (fragment == null) {
            if (IndexFirst.TAG.equals(tag)) {
                firstFragment = new IndexFirst();
                fragment = firstFragment;
            } else if (IndexSecond.TAG.equals(tag)) {
                secondFragment = new IndexSecond();
                fragment = secondFragment;
            } else {
                thirdFragment = new IndexThird();
                fragment = thirdFragment;
            }
            //向activity中指定的位置(第一个参数),添加一个Fragment(第二个参数),这个Fragment对应的tag指定为(第三个参数)
            transation.add(R.id.container, fragment, tag);
        }

        if (curFragment != null) {
            //隐藏当前的Fragment
            transation.hide(curFragment);
        }
        //显示指定的Fragment
        transation.show(fragment);
        //提交一个事务
        transation.commitAllowingStateLoss();
        //记录当前显示的Fragment
        curFragment = fragment;
    }

    /**
     * 切换到 热映 界面
     * */
    private void toFirstFragment() {
        int breakColor = getResources().getColor(R.color.bar_txt_default);
        int blueColor = getResources().getColor(R.color.bar_txt_selected);
        if (!curTag.equals(IndexFirst.TAG)) {
            //显示指定的Fragment
            showTabData(IndexFirst.TAG);

            //更新导航栏控件
            tv_index_first.setTextColor(blueColor);
            tv_index_second.setTextColor(breakColor);
            tv_index_third.setTextColor(breakColor);

            iv_index_first.setImageResource(R.drawable.m1_selected);
            iv_index_second.setImageResource(R.drawable.m2_defult);
            iv_index_third.setImageResource(R.drawable.m3_defult);
        }
    }

    /**
     * 切换到 排行 界面
     * */
    public void toSecondFragment() {
        int breakColor = getResources().getColor(R.color.bar_txt_default);
        int blueColor = getResources().getColor(R.color.bar_txt_selected);
        if (!curTag.equals(IndexSecond.TAG)) {
            //显示指定的Fragment
            showTabData(IndexSecond.TAG);

            //更新导航栏控件
            tv_index_first.setTextColor(breakColor);
            tv_index_second.setTextColor(blueColor);
            tv_index_third.setTextColor(breakColor);

            iv_index_first.setImageResource(R.drawable.m1_defult);
            iv_index_second.setImageResource(R.drawable.m2_selected);
            iv_index_third.setImageResource(R.drawable.m3_defult);
        }
    }

    /**
     * 切换到 分类 界面
     * */
    public void toThirdFragment() {
        int breakColor = getResources().getColor(R.color.bar_txt_default);
        int blueColor = getResources().getColor(R.color.bar_txt_selected);
        if (!curTag.equals(IndexThird.TAG)) {
            //显示指定的Fragment
            showTabData(IndexThird.TAG);

            //更新导航栏控件
            tv_index_first.setTextColor(breakColor);
            tv_index_second.setTextColor(breakColor);
            tv_index_third.setTextColor(blueColor);

            iv_index_first.setImageResource(R.drawable.m1_defult);
            iv_index_second.setImageResource(R.drawable.m2_defult);
            iv_index_third.setImageResource(R.drawable.m3_selected);
        }
    }
}
这里科普一下Fragment:
Fragment是一个拥有自己生命周期的控件,可以嵌套在Activity中,作为一块UI界面显示。每个Fragment可以有各自的界面和逻辑代码,把Fragment写好后,放在Activity中显示就可以了,一个Activity可以通过FragmentManager管理多个Fragment。
如何创建一个Fragment,如项目中的IndexFirst.java:
在这里存放“热映”这个模块页面的相关代码
扫描二维码关注公众号,回复:
3279087 查看本文章

public class IndexFirst extends Fragment {
    public static String TAG = "IndexFirst";

    //onCreateView 初始化Fragment的布局。加载布局和findViewById的操作通常在此函数内完成
    @SuppressLint("InflateParams")
    @Override
    public View onCreateView(LayoutInflater inflater, ViewGroup container,
                             Bundle savedInstanceState) {
        // 加载自己的layout布局
        View view = inflater.inflate(R.layout.index_first, null);
        return view;
    }
}
它的对应layout:index_first.xml
<?xml version="1.0" encoding="utf-8"?>
<LinearLayout xmlns:android="http://schemas.android.com/apk/res/android"
    android:orientation="vertical"
    android:layout_width="match_parent"
    android:layout_height="match_parent"
    android:background="@color/white">
    <RelativeLayout
        android:layout_width="fill_parent"
        android:layout_height="@dimen/top_height"
        android:orientation="horizontal"
        android:background="@color/app_maincolor" >

        <TextView
            android:id="@+id/tv_tital"
            android:layout_width="wrap_content"
            android:layout_height="wrap_content"
            android:layout_centerInParent="true"
            android:text="@string/index_first"
            android:textColor="@color/white"
            android:textSize="@dimen/topbar_title_size"
            android:singleLine="true"
            android:layout_marginLeft="30dp"
            android:layout_marginRight="30dp"
            android:ellipsize="end"/>
        <View
            android:layout_width="fill_parent"
            android:layout_height="1px"
            android:layout_alignParentBottom="true"
            android:background="@color/line_belowTop"/>
    </RelativeLayout>
</LinearLayout>
其他两个模块“排行”和“分类”的Fragemnt创建方法也是一样,这里就不列出来了。
这样,基本的页面框架就出来了,再分别为 不同模块写对应的代码就可以了。
偶然发现,这里有讲述Fragment的相关的教程,比我讲的好多的,可以看看:http://www.runoob.com/w3cnote/android-tutorial-fragment-base.html