在前面的两篇博客中,给大家简单的介绍了Spring中的IOC和AOP,相信大家现在对IOC和AOP有一定的了解,同时也会有一些疑问,那么今天就来慢慢的给大家解释,相信大家在今天这篇博客中能够真正的认识到Spring框架,并且能够简单的写一个入门demo。
好了,先来给大家简单的看一张图片:
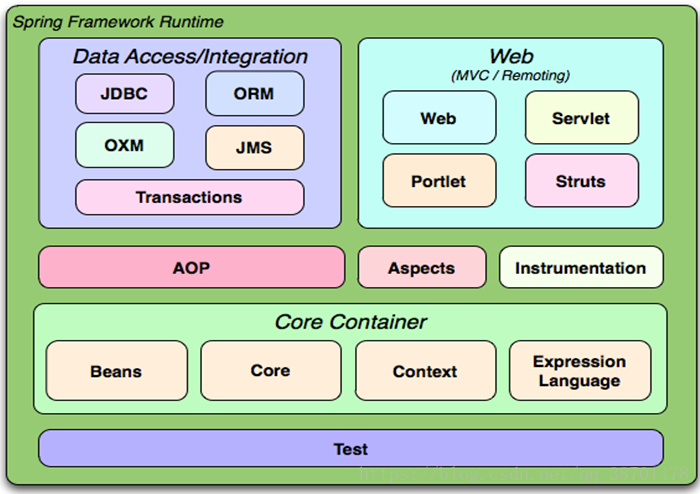
上述的图片就是spring的架构图,Core Container即核心容器其实就是前面我们提到的IOC容器,AOP是Spring自己实现的AOP模块,Aspects是对第三方AOP框架Aspects的支持。而整个spring中的其他模块都是运行在IOC和AOP之上的,现在大家知道了IOC和AOP在Spring中的作用了吧。
很多资料上都有这么一句话:spring是以IoC(Inverse Of Control:反转控制)和AOP(Aspect Oriented Programming:面向切面编程)为内核的分层的Java SE/EE应用 full-stack轻量级开源框架。这句话把IOC和AOP说成是Spring的内核一点也不为过。
既然在前面已经给大家介绍过IOC和AOP,那么今天就和大家聊一聊Spring框架中的其他的模块,在Spring4.X的版本中,一共有20个不同的模块,按照功能可以简单的分为六类。其中Spring核心容器和面向切面的支持这了个部分就不多说了。如上图所示。
我们来先看一下DateAccess数据访问层;
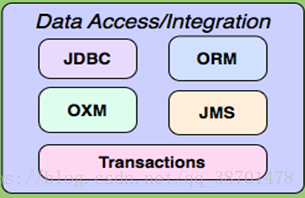
上图中我们可以看到,这个部分中包含了JDBC和ORM以及OXM和JMS,还有Transactions。
我们之前使用原生的JDBC操作数据库的时候会导致大量的样板式的代码,即重复的代码,因此在Spring中,抽象了这些模板代码,是我们在使用jDBC操作数据时变得更加简单明了,还可以避免因为关闭资源失败而导致的问题。所以Spring中提供了JDBC模板。
那么,ORM又是什么意思呢,同样的,有些喜欢ORM工具的人并不愿意去使用JDBC来操作数据库,因此在Spring中也提供了ORM模块,Spring中的ORM模块是建立在对DAO的支持之上。并为多个ORM框架提供了构建DAO的简便方式,需要注意的Spring并没有试图去取代市面上流行的ORM框架,也没有尝试去创建自己的ORM解决方案,而是对许多ORM框架进行了集成,提供支持。对大量的优秀框架提供支持这也是Spring的一种优势。
接下来看看web部分的,
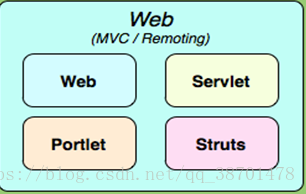
这个部分主要包含4和模块,大家都知道MVC模式是一种普遍被接受的Web应用的模式,它可以帮助用户将界面逻辑和应用逻辑分离,而在Java中优秀的MVC框架也有不少,就比如Struts、WebWork和JSF等等,Spring对他们多提供了支持,同时Spring也自带了一个强大的MVC框架,后续的文章中将会给大家介绍Spring的MVC框架。
好了,到这里相信大家已经对Spring框架的体系有所认识了把。
关于Spring的技术架构就给大家介绍到这里了。希望对大家有所帮助。
下面借给大家写一个Spring框架操作数据库的小Demo
老规矩,打开eclipse创建一个Java工程目录结构如下图所示:
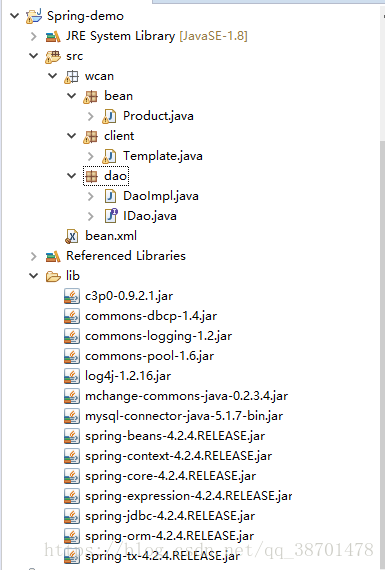
在项目下创建lib目录,导入上述图片中的jar包,除了Spring的bean、core、context、和jdbc的模板包外还需要加入c3p0的jar包,因为这个小案例用的是c3p0连接池。创建好了lib目录后接着按照上图中创建包结构,
这次的Demo需要用到数据库,因此接下来我们来创建数据库,
这里我用的是mysql数据库,创建好了后如下图所示:
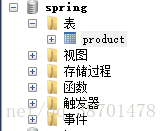
接着创建数据表product,并插入数据,如下图所示:

好了,回到我们的项目中,首先创建实体类,实体类的属性要和数据表中的字段对应,打开bean包,在该包下创建Product类,如下所示:
public class Product implements Serializable{
    private Integer id;
    private String name;
    private Float money;
    public Integer getId() {
        return id;
    }
    public void setId(Integer id) {
        this.id = id;
    }
    public String getName() {
        return name;
    }
    public void setName(String name) {
        this.name = name;
    }
    public Float getMoney() {
        return money;
    }
    public void setMoney(Float money) {
        this.money = money;
    }
    @Override
    public String toString() {
        return "Product [id=" + id + ", name=" + name + ", money=" + money + "]";
    }
}
有了实体类后我们接下来就在dao包下创建数据访问层的接口,接口中定义三个基本的查询方法,如下所示:
public interface IDao {

    Product findProductById(Integer accountId);

    Product findProductByName(String name);

    void updateProduct(Product product);
}
完成了这一步后接着就是创建该接口的实现类了,代码如下:
public class DaoImpl implements IDao {
    private JdbcTemplate jdbcTemplate;

    public void setJdbcTemplate(JdbcTemplate jdbcTemplate) {
        this.jdbcTemplate = jdbcTemplate;
    }

    @Override
    public Product findProductById(Integer Id) {
        List<Product> list = jdbcTemplate.query("select * from product where id = ? ", new BeanPropertyRowMapper<Product>(Product.class),Id);
        return list.isEmpty()?null:list.get(0);
    }

    @Override
    public Product findProductByName(String name) {
        List<Product> list = jdbcTemplate.query("select * from product where name = ? ", new BeanPropertyRowMapper<Product>(Product.class),name);
        if(list.isEmpty()){
            return null;//没有这个名称的账户
        }
        if(list.size()>1){
            //结果集不唯一,不符合我们的约定
            throw new RuntimeException("结果集不唯一,请检查数据");
        }
        return list.get(0);
    }

    @Override
    public void updateProduct(Product product) {
        jdbcTemplate.update("update product set name=?,money=? where id=?",product.getName(),product.getMoney(),product.getId());
    }

}
在这段代码中大家可以看到jdbcTemplate这个引用,其实该引用就是指向spring中提供的JDBC模板的实例,通过该实例我们可以直接操作数据库。
接下来就需要来创建xml配置文件了,首先我们需要用到的肯定是daoImpl的对象,因此我们需要现在bean.xml文件中配置dao,代码如下:
<!-- 配置dao -->
    <bean id="product" class="wcan.dao.DaoImpl">
        <property name="jdbcTemplate" ref="jdbcTemplate"></property>
    </bean>
其中id属性用于标识要创建对象,id值必须唯一,不能够同名,class属性用指定要根据哪一个类来创建实例。
property标签用于注入一个jdbcTemplate的对象,该方式是通过set方法注入的,关于依赖注入将会在下一篇博客中给大家详细的讲解。
好了,配置完了dao后我们接下来就需要配置jdbcTemplate了
继续创建一个bean标签,id属性设置为jdbcTemplate,class值为org.springframework.jdbc.core.JdbcTemplate,由此可见JDBC模板的类位于spring的core包中。配置好了如下图所示:
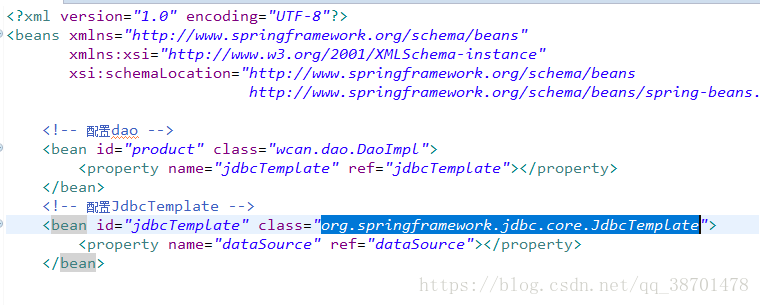
其中jdbcTemplate需要传入数据源来连接数据库,因此我们还需要配置数据源,本次demo中的数据源采用c3p0,配置信息如下:
<!-- 配置c3p0数据源 -->
    <bean id="dataSource" class="com.mchange.v2.c3p0.ComboPooledDataSource">
        <property name="driverClass" value="com.mysql.jdbc.Driver"></property>
        <property name="jdbcUrl" value="jdbc:mysql://localhost:3306/spring"></property>
        <property name="user" value="root"></property>
        <property name="password" value="root"></property>
    </bean>
将自己的数据库信息配置完成后基本就完成了这个demo了,接下来就剩下写Test了。顺便提一下,创建bean.xml文件的时候需要导入spring约束,emmmmm,这里给出完整的配置文件:
<?xml version="1.0" encoding="UTF-8"?>
<beans xmlns="http://www.springframework.org/schema/beans"
       xmlns:xsi="http://www.w3.org/2001/XMLSchema-instance"
       xsi:schemaLocation="http://www.springframework.org/schema/beans
                           http://www.springframework.org/schema/beans/spring-beans.xsd">

    <!-- 配置dao -->
    <bean id="product" class="wcan.dao.DaoImpl">
        <property name="jdbcTemplate" ref="jdbcTemplate"></property>
    </bean>
    <!-- 配置JdbcTemplate -->
    <bean id="jdbcTemplate" class="org.springframework.jdbc.core.JdbcTemplate">
        <property name="dataSource" ref="dataSource"></property>
    </bean>


    <!-- 配置c3p0数据源 -->
    <bean id="dataSource" class="com.mchange.v2.c3p0.ComboPooledDataSource">
        <property name="driverClass" value="com.mysql.jdbc.Driver"></property>
        <property name="jdbcUrl" value="jdbc:mysql://localhost:3306/spring"></property>
        <property name="user" value="root"></property>
        <property name="password" value="root"></property>
    </bean>
</beans>
好了,这个demo已经编写完成了。接下来就开始编写测试类了。
在client包下创建测试类,
在该类中添加测试方法如下:
@Test
    public void springTest() {
      Product product = ((DaoImpl) new ClassPathXmlApplicationContext("bean.xml")
                .getBean("product")).findProductById(1);
        System.out.println(product);

    }
测试结果如下图所示:
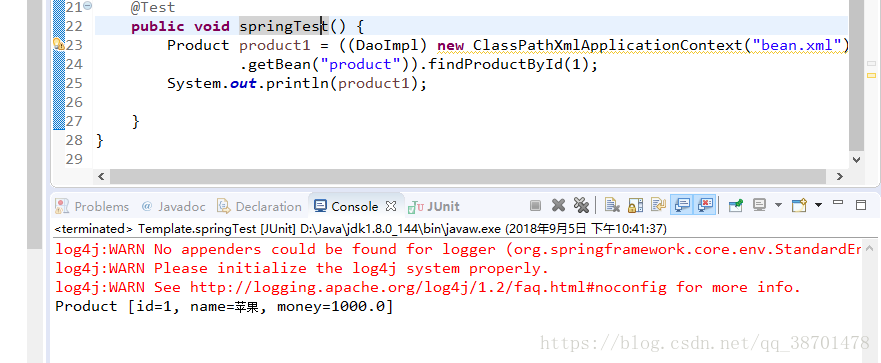
于是便可以得到查询的结果了。
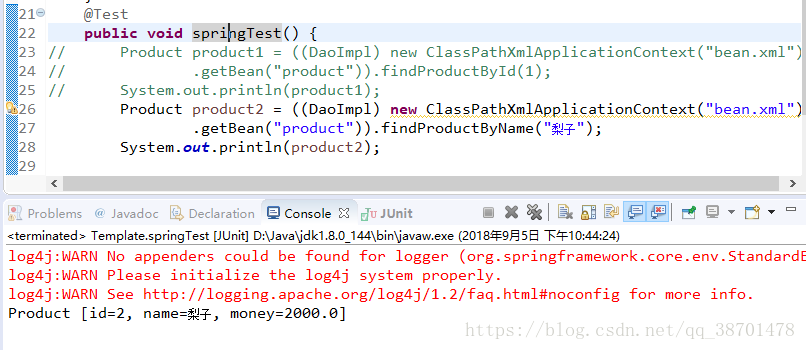
同样的,也可以试试通过name来查询的方法,结果如下图所示:
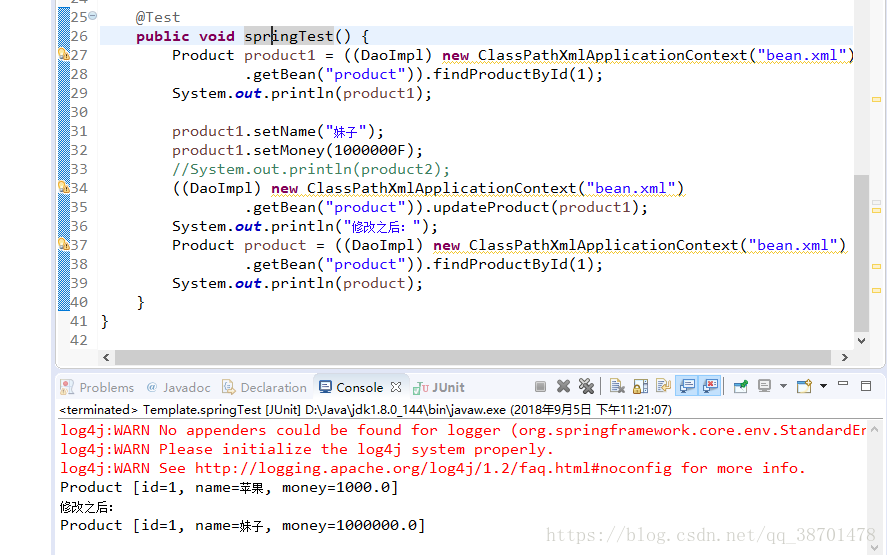
再来试试修改数据的功能:代码如下:
@Test
    public void springTest() {
        Product product1 = ((DaoImpl) new ClassPathXmlApplicationContext("bean.xml")
                .getBean("product")).findProductById(1);
        System.out.println(product1);

        product1.setName("妹纸");
        product1.setMoney(1000000F);
        //System.out.println(product2);
        ((DaoImpl) new ClassPathXmlApplicationContext("bean.xml")
                .getBean("product")).updateProduct(product1);
        System.out.println("修改之后:");
        Product product = ((DaoImpl) new ClassPathXmlApplicationContext("bean.xml")
                .getBean("product")).findProductById(1);
        System.out.println(product);


    }
运行结果如下:
好了,关于入门的小案例就写到这里了,大家需要知道的是在测试类中我们没有直接new对象,而是在Spring容器中通过getBean方法直接获取我们需要用的对象。因为当配置文件被加载的时候Spring就已经帮助我们创建好了对象。
关于ClassPathXmlApplicationContext这个类下一篇博客中将会详细的介绍。好了,大家可以自己试试这个入门小demo。今天差不多就这样把。
如果大家还是理解不了spring到底是个什么东西的话,大家现在只需要知道
其实Spring框架就是一个容器,作用就是用于管理项目中的各种对象之间的关系,以及集成其他的框架。所以我们在学习Spring中的重点还是要理解IOC,以及AOP。
好了,下一篇博客将会给大家详细的讲解Spring中IOC的实现原理。