前面两篇是对maven的基础的介绍,这一篇更侧重于实际的运用
1.maven设置编译级别的两种方式
- 用插件的形式:
<plugin>
		<groupId>org.apache.maven.plugins</groupId>
		<artifactId>maven-compiler-plugin</artifactId>
		<version>2.3.2</version>
		<configuration>
			<source>${JDK.VERSION}</source>
			<target>${JDK.VERSION}</target>
			<encoding>UTF-8</encoding>
		</configuration>
</plugin>
- 用properties的形式:
<properties>
    	<maven.compiler.source>1.8</maven.compiler.source>
    	<maven.compiler.target>1.8</maven.compiler.target>
</properties>
2.maven发布到远程库的三种方式
- 手动在Nexus网站进行添加,上传操作
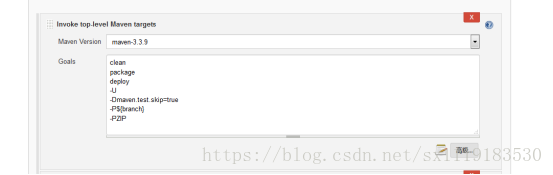
- 在jenkins中配置maven的构建操作,必须要有deploy操作,会将jar放置在本地库,上传到远程库
注:务必选择好分支,因为maven的构建操作,是需要抓取源代码的,这个跟配置项目的git路径类似,但是不同
- 在git bash中对应的项目下,通过mvn deploy手动上传
3.maven的单元测试(通过插件maven-surefire-plugin)
- Mvn test:Maven自动去寻找src/test/java下面的类,且类名是Test结尾,Test开头,*TestCase结尾的类
- 如果想运行其他方式命名的类的方法:mvn test -Dtest=类名 即可
- 模糊匹配:mvn test -Dtest=*Test
现象:
[INFO] -------------------------------------------------------
[INFO]  T E S T S
[INFO] -------------------------------------------------------
- mvn test -Dmaven.test.skip=true:跳过单元测试
- 实际上maven-surefire-plugin是maven内置的,但是如果想设置某些符合条件的类才进行test或者是否执行test时,就需要配置该插件了
<plugin>
		<groupId>org.apache.maven.plugins</groupId>
		<artifactId>maven-surefire-plugin</artifactId>
		<version>2.7.1</version>
		<configuration>
			<skipTests>true</skipTests>
			<includes>
	            		<include>**/*Tests.java</include>
			</includes>
	    		<excludes>
		            <exclude>**/*ServiceTest.java</exclude>
		            <exclude>**/TempDaoTest.java</exclude>
	     		 </excludes>
		</configuration>
</plugin>
4.关于maven的继承
- 在子工程中用
<parent>标签,引入父工程的三要素即可实现继承
<parent>
	<artifactId>eread.glass</artifactId>
	<groupId>com.myproject.class</groupId>
	<version>V300R0035800-SNAPSHOT</version>
</parent>
- 关于dependency
方式一:为了有效管理版本号,需要引入的依赖建议写在父pom的dependencyManagement下的dependencies中,这个dependency依赖至少有三个坐标元素:groupId、artifactId和version。
<dependencyManagement>
		<dependencies>
			<dependency>
				<groupId>org.springframework</groupId>
				<artifactId>spring-aop</artifactId>
				<version>${SPRINGFRAMEWORK.VERSION}</version>
			</dependency>
		</dependencies>
</dependencyManagement>
此时并没有真正意义上引入该依赖,可以理解为声明了一个依赖,然后在子工程dependencies里面加上这个依赖,坐标元素为父pom中的坐标元素删掉version。
<dependencies>
	<dependency>
		<groupId>org.springframework</groupId>
		<artifactId>spring-aop</artifactId>
	</dependency>
</dependencies>
方式二:参数化
在父pom中配置properties标签,且写死版本号,且在dependencyManagement标签中注明,子pom中引入即可
父pom:
<project>
	<properties>
		<EREAD.CLASS.VERSION>V300R003C20B311-SNAPSHOT</EREAD.CLASS.VERSION>
		<JDK.VERSION>1.6</JDK.VERSION>
	</properties>
	<dependencyManagement>
		<dependencies>
			<dependency>
				<groupId>com.myproject</groupId>
				<artifactId>eread.glass</artifactId>
				<version>${EREAD.CLASS.VERSION}</version>
			</dependency>
		</dependencies>
</dependencyManagement>
</project>
且在父pom中注明module
<modules>
	<module>eread.glass</module>
</modules>
子pom
<project>
	<artifactId>eread.glass</artifactId>
	<version>${EREAD.CLASS.VERSION}</version>
</project>