1 查看当前linux分区情况,可输入这条linux命令: fdisk -l (该命令可确定弹性块存储是否挂载成功,挂载成功的话会多出一块盘比如 /dev/vda /dev/vdb)
我当前的分区情况如下:
[root@localhost ~]# fdisk -l
Disk /dev/vda: 42.9 GB, 42949672960 bytes, 83886080 sectors
Units = sectors of 1 * 512 = 512 bytes
Sector size (logical/physical): 512 bytes / 512 bytes
I/O size (minimum/optimal): 512 bytes / 512 bytes
Disk label type: dos
Disk identifier: 0x000bea1aDevice Boot Start End Blocks Id System
/dev/vda1 * 2048 2099199 1048576 83 Linux
/dev/vda2 2099200 83886079 40893440 8e Linux LVMDisk /dev/mapper/cl-root: 37.7 GB, 37706792960 bytes, 73646080 sectors
Units = sectors of 1 * 512 = 512 bytes
Sector size (logical/physical): 512 bytes / 512 bytes
I/O size (minimum/optimal): 512 bytes / 512 bytes
Disk /dev/mapper/cl-swap: 4160 MB, 4160749568 bytes, 8126464 sectors
Units = sectors of 1 * 512 = 512 bytes
Sector size (logical/physical): 512 bytes / 512 bytes
I/O size (minimum/optimal): 512 bytes / 512 bytes
Disk /dev/vdb: 2147.5 GB, 2147483648000 bytes, 4194304000 sectors
Units = sectors of 1 * 512 = 512 bytes
Sector size (logical/physical): 512 bytes / 512 bytes
I/O size (minimum/optimal): 512 bytes / 512 bytes[root@localhost ~]#
2 从上面的linux命令截图中我们可以看出我有一个硬盘没有分区,现在我们就通过linux命令来对这个 /dev/vdb划分分区。
在光标闪动的地方输入: fdisk /dev/vdb
如下所示:
[root@localhost ~]# fdisk /dev/vdb
Welcome to fdisk (util-linux 2.23.2).Changes will remain in memory only, until you decide to write them.
Be careful before using the write command.Device does not contain a recognized partition table
Building a new DOS disklabel with disk identifier 0xb4e25196.Command (m for help):
3 在linux命令内再输入m(我们输入“m”选项可以查看到帮助信息),可以查看fdisk命令的主菜单:
如下所示:
Command (m for help): m
Command action
a toggle a bootable flag
b edit bsd disklabel
c toggle the dos compatibility flag
d delete a partition
g create a new empty GPT partition table
G create an IRIX (SGI) partition table
l list known partition types
m print this menu
n add a new partition
o create a new empty DOS partition table
p print the partition table
q quit without saving changes
s create a new empty Sun disklabel
t change a partition's system id
u change display/entry units
v verify the partition table
w write table to disk and exit
x extra functionality (experts only)Command (m for help):
我们主要掌握的是fdisk命令以下几个参数:
d 删除一个分区
n 创建一个分区
q 不保存退出
t 改变分区id
w 保存退出
4 我现在是要将新添加的硬盘做一个分区来添加,输入linux命令:如下,首先输入“n”,来增加一个新分区
Command (m for help): n
Partition type:
p primary (0 primary, 0 extended, 4 free)
e extended
Select (default p):
5 可以看到交互界面打印的信息,提示需要选择一个分区类型,“p":为基本分区(默认);"e":为扩展分区。在此我们选择"p",创建一个基本分区。
分区号、起始扇区和结束扇区使用默认即可,如下,
Select (default p): p
Partition number (1-4, default 1): 1 # 输入1,代表分第一个分区
First sector (2048-4194303999, default 2048):
Using default value 2048
Last sector, +sectors or +size{K,M,G} (2048-4194303999, default 4194303999):
Using default value 4194303999
Partition 1 of type Linux and of size 2 TiB is set # 分区1已设置为linux类型,大小设为2TiBCommand (m for help):
6 再通过p 命令查看一下刚才添加的新分区:
Command (m for help): p
Disk /dev/vdb: 2147.5 GB, 2147483648000 bytes, 4194304000 sectors
Units = sectors of 1 * 512 = 512 bytes
Sector size (logical/physical): 512 bytes / 512 bytes
I/O size (minimum/optimal): 512 bytes / 512 bytes
Disk label type: dos
Disk identifier: 0xb4e25196Device Boot Start End Blocks Id System
/dev/vdb1 2048 4194303999 2097150976 83 LinuxCommand (m for help):
可以看出新添加的分区id是83 ,代表linux分区,我们没有必要去改了,如果想要其他分区,可以先输入l,查看一下每种分区格式的id,可以
输入t,对照下表中输入id就可以了。
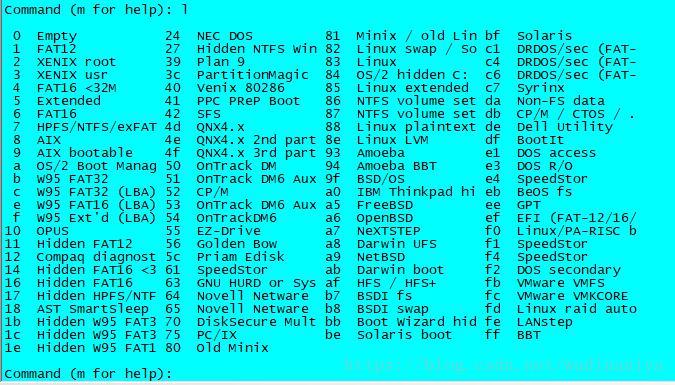
7 这里我不改变分区的id了,按w保存分区。表明新的分区已经建立好。
Command (m for help): w
The partition table has been altered!Calling ioctl() to re-read partition table.
Syncing disks.
[root@localhost ~]#
此时,再用linux命令 fdisk -l 来查看一下分区详细信息,发现已经分好了
[root@localhost dev]# fdisk -l
Disk /dev/vda: 42.9 GB, 42949672960 bytes, 83886080 sectors
Units = sectors of 1 * 512 = 512 bytes
Sector size (logical/physical): 512 bytes / 512 bytes
I/O size (minimum/optimal): 512 bytes / 512 bytes
Disk label type: dos
Disk identifier: 0x000bea1aDevice Boot Start End Blocks Id System
/dev/vda1 * 2048 2099199 1048576 83 Linux
/dev/vda2 2099200 83886079 40893440 8e Linux LVMDisk /dev/mapper/cl-root: 37.7 GB, 37706792960 bytes, 73646080 sectors
Units = sectors of 1 * 512 = 512 bytes
Sector size (logical/physical): 512 bytes / 512 bytes
I/O size (minimum/optimal): 512 bytes / 512 bytes
Disk /dev/mapper/cl-swap: 4160 MB, 4160749568 bytes, 8126464 sectors
Units = sectors of 1 * 512 = 512 bytes
Sector size (logical/physical): 512 bytes / 512 bytes
I/O size (minimum/optimal): 512 bytes / 512 bytes
Disk /dev/vdb: 2147.5 GB, 2147483648000 bytes, 4194304000 sectors
Units = sectors of 1 * 512 = 512 bytes
Sector size (logical/physical): 512 bytes / 512 bytes
I/O size (minimum/optimal): 512 bytes / 512 bytes
Disk label type: dos
Disk identifier: 0xb4e25196Device Boot Start End Blocks Id System
/dev/vdb1 2048 4194303999 2097150976 83 Linux
[root@localhost dev]#
注意:万一出现 The new table will be used at the next reboot 意思就是这个分区在下次启动的时候才能使用,我们可以
使用一个命令,让这个分区马上生效,输入 #partprobe,自己使用命令补全,然后再用linux命令 fdisk -l 来查看一下分区详细信息,看是否已经分好
8 格式化分区
linux分区已经完成,但只有格式化了才可以用。接下来要格式化这个分区。
8.1 接下来我们需要将物理分区格式化成某一个文件系统,我们使用mkfs进行分区格式化操作,输入mkfs -h 命令获取帮助信息
[root@localhost ~]# mkfs -h执行命令mkfs -h 会弹出用法介绍:
用法:
mkfs [选项] [-t <类型>] [文件系统选项] <设备> [<大小>]选项:
-t, --type=<类型> 文件系统类型;when unspecified,ext2 is used
fs-options 实际文件系统构建程序的参数
<设备> 要使用设备的路径
<大小> 要使用设备上的块数 number of blocks to be used on the device
-V, --verbose 解释正在进行的操作;explain what is being done;
多次指定 -V 将导致空运行(dry-run)
-V, --version 显示版本信息并退出
将 -V 作为 --version 选项时必须是惟一选项
-h, --help 显示此帮助并退出更多信息请参阅 mkfs(8)。
8.2 从帮助信息中我们可以看到,可以使用 mkfs -t xfs /dev/vdb1 进行格式化分区
图片 分区2.jpg 内容如下:
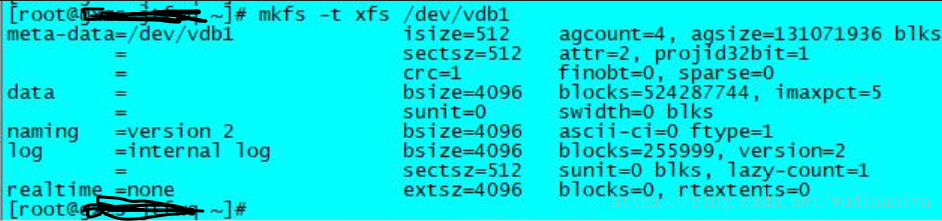
格式化成xfs时,若提示分区已存在文件系统,则需要在分区前面加上-f选项强行覆盖,例如: mkfs -t xfs -f /dev/sda2
。被格式化的设备既可以是分区,也可以是逻辑卷。要查看所有分区的文件系统格式则可以使用 df -Th 命令。
8.3 分区格式化完成之后则可以将分区挂载到某一个目录下面,正式开始使用该分区,
我们在系统中创建一个用户挂载该新分区的目录
[root@localhost ~]# mkdir /data
将分区挂载到目录上:
[root@localhost ~]# mount /dev/vdb1 /data/
可通过命令 df -h 查看是否挂载成功
[root@localhost ~]# df -h
Filesystem Size Used Avail Use% Mounted on
/dev/mapper/cl-root 36G 3.7G 32G 11% /
devtmpfs 3.8G 0 3.8G 0% /dev
tmpfs 3.9G 144K 3.9G 1% /dev/shm
tmpfs 3.9G 209M 3.7G 6% /run
tmpfs 3.9G 0 3.9G 0% /sys/fs/cgroup
/dev/vda1 1014M 228M 787M 23% /boot
tmpfs 781M 20K 781M 1% /run/user/0
/dev/sr0 428K 428K 0 100% /run/media/root/config-2
/dev/vdb1 2.0T 33M 2.0T 1% /data
8.4 设置开机自动挂载分区到挂载点,编辑 vim /etc/fstab
#
# /etc/fstab
# Created by anaconda on Wed Jan 24 11:10:43 2018
#
# Accessible filesystems, by reference, are maintained under '/dev/disk'
# See man pages fstab(5), findfs(8), mount(8) and/or blkid(8) for more info
#
/dev/mapper/cl-root / xfs defaults 0 0
UUID=876de951-ebfc-46d9-a138-9676a737bb19 /boot xfs defaults 0 0
/dev/mapper/cl-swap swap swap defaults 0 0/dev/vdb1 /data xfs defaults 0 0
8.5 如果想要卸载挂载点:
unmount /dev/vdb1