以下代码来自Deep Learning for Computer Vision with Python第十章。
本例程需要在同一文件内新建四个文件。分别是1、perceptron.py;2、perceptron_or.py;3、perceptron_and.py;4、perceptron_xor.py。
1、perceptron.py
# import the necessary packages
import numpy as np

class Perceptron:
	def __init__(self, N, alpha=0.1):
		# initialize the weight matrix and store the learning rate
		self.W = np.random.randn(N + 1) / np.sqrt(N)
		self.alpha = alpha

	def step(self, x):
		# apply the step function
		return 1 if x > 0 else 0

	def fit(self, X, y, epochs=10):
		# insert a column of 1's as the last entry in the feature
		# matrix -- this little trick allows us to treat the bias
		# as a trainable parameter within the weight matrix
		X = np.c_[X, np.ones((X.shape[0]))]

		# loop over the desired number of epochs
		for epoch in np.arange(0, epochs):
			# loop over each individual data point
			for (x, target) in zip(X, y):
				# take the dot product between the input features
				# and the weight matrix, then pass this value
				# through the step function to obtain the prediction
				p = self.step(np.dot(x, self.W))

				#print("[training] self.W={}, x={}, target={}".format(self.W, x, target))

				# only perform a weight update if our prediction
				# does not match the target
				if p != target:
					# determine the error
					error = p - target

					# update the weight matrix
					self.W += -self.alpha * error * x

	def predict(self, X, addBias=True):
		# ensure our input is a matrix
		X = np.atleast_2d(X)

		# check to see if the bias column should be added
		if addBias:
			# insert a column of 1's as the last entry in the feature
			# matrix (bias)
			X = np.c_[X, np.ones((X.shape[0]))]

		# take the dot product between the input features and the
		# weight matrix, then pass the value through the step
		# function
		return self.step(np.dot(X, self.W))
分析:Perception类是一个(3-1)结构的神经网络,(3-1)代表有输入层有3个神经元(其中两个神经元用于处理输入参数x1和x2,另外一个神经元输入固定为1),输出层有1个神经元。示意图见下图。
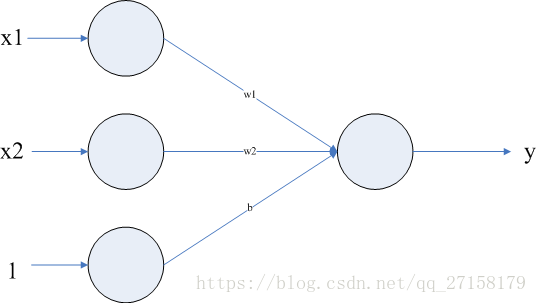
神经网络权重文件除了权重(w1和w2),还加上了偏置(b)。本身输入参数只有两个,对应的权值是w1和w2,输入层神经元为3的目的是把偏置b也加入权重矩阵中。当训练权重矩阵时,偏置b也得以更新。输出参数的表达式是y=step(x1*w1+x2*w2+b)。
神经元的激活函数是Step函数。Step函数包含一个输入参数和一个输出参数。当输入小于0,则输出为0;当输入大于0,则输出1。
fit函数用于训练,使用的是随机梯度下降法。predict函数作用是测试样品,把目标样品经过本神经网络,获得预测结果。
2、perceptron_or.py
# import the necessary packages
from perceptron import Perceptron
import numpy as np

# construct the OR dataset
X = np.array([[0, 0], [0, 1], [1, 0], [1, 1]])
y = np.array([[0], [1], [1], [1]])

# define our perceptron and train it
print("[INFO] training perceptron...")
p = Perceptron(X.shape[1], alpha=0.1)
p.fit(X, y, epochs=20)

# now that our perceptron is trained we can evaluate it
print("[INFO] testing perceptron...")

# now that our network is trained, loop over the data points
for (x, target) in zip(X, y):
	# make a prediction on the data point and display the result
	# to our console
	pred = p.predict(x)
	print("[INFO] data={}, ground-truth={}, pred={}".format(
		x, target[0], pred))
在或运算中,两个输入参数和一个输出参数的关系见下表。
| 输入参数1:x1 | 输入参数2:x2 | 输出参数:y |
| 0 | 0 | 0 |
| 0 | 1 | 1 |
| 1 | 0 | 1 |
| 1 | 1 | 1 |
Perceptron函数用于新建一个2层神经网络。第一个输入参数X.shape[1]是X中每个样品的参数个数。alpha是梯度下降、更新权值的速度。越接近1,速度越快,但是越大越容易错过局部最大值。
fit函数第一个参数是样品的输入参数矩阵,第二个参数是样品的输入参数的输出矩阵(真实值),第三个参数是迭代次数。data是样品的输入参数,ground-truth表示真实值,pred是预测结果。
用python运行perceptron_or.py,可得到以下结果:
============= RESTART: E:\FENG\workspace_python\perceptron_or.py =============
[INFO] training perceptron...
[INFO] testing perceptron...
[INFO] data=[0 0], ground-truth=0, pred=0
[INFO] data=[0 1], ground-truth=1, pred=1
[INFO] data=[1 0], ground-truth=1, pred=1
[INFO] data=[1 1], ground-truth=1, pred=1
3、perceptron_and.py
# import the necessary packages
from perceptron import Perceptron
import numpy as np

# construct the OR dataset
X = np.array([[0, 0], [0, 1], [1, 0], [1, 1]])
y = np.array([[0], [0], [0], [1]])

# define our perceptron and train it
print("[INFO] training perceptron...")
p = Perceptron(X.shape[1], alpha=0.1)
p.fit(X, y, epochs=20)

# now that our perceptron is trained we can evaluate it
print("[INFO] testing perceptron...")

# now that our network is trained, loop over the data points
for (x, target) in zip(X, y):
	# make a prediction on the data point and display the result
	# to our console
	pred = p.predict(x)
	print("[INFO] data={}, ground-truth={}, pred={}".format(
		x, target[0], pred))
这个文件和上面那份文件差别不大,因此不分析了。
4、perceptron_xor.py
# import the necessary packages
from perceptron import Perceptron
import numpy as np

# construct the OR dataset
X = np.array([[0, 0], [0, 1], [1, 0], [1, 1]])
y = np.array([[0], [1], [1], [0]])

# define our perceptron and train it
print("[INFO] training perceptron...")
p = Perceptron(X.shape[1], alpha=0.1)
p.fit(X, y, epochs=20)

# now that our perceptron is trained we can evaluate it
print("[INFO] testing perceptron...")

# now that our network is trained, loop over the data points
for (x, target) in zip(X, y):
	# make a prediction on the data point and display the result
	# to our console
	pred = p.predict(x)
	print("[INFO] data={}, ground-truth={}, pred={}".format(
		x, target[0], pred))
结果如下:
============ RESTART: E:\FENG\workspace_python\perceptron_xor.py ============
[INFO] training perceptron...
[INFO] testing perceptron...
[INFO] data=[0 0], ground-truth=0, pred=1
[INFO] data=[0 1], ground-truth=1, pred=1
[INFO] data=[1 0], ground-truth=1, pred=0
[INFO] data=[1 1], ground-truth=0, pred=0
可见,异或的预测结果并不准确。主要因为,只具有2层神经元、而不具备隐含层的神经网络并无法非线性的对样品分类。
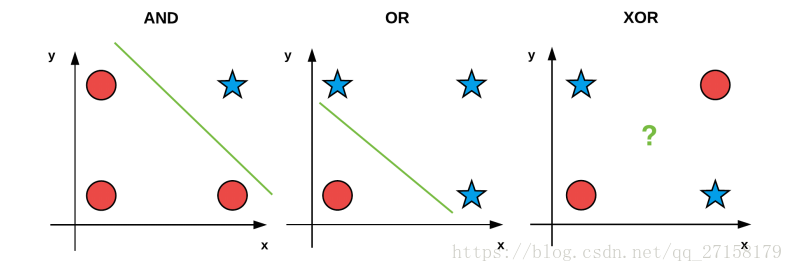
上图说明的是,与和或样本的空间分布,因为可以用一条直线把输出0和输出1的样本分类,因此比较简单。经过实践发现,使用2层神经网络的分类器也能实现预期效果。但是,异或的样本逻辑比较复杂。
为了正确分类异或样本,必须改变神经网络结构,进一步增加隐含层,尝试重新训练以及测试。