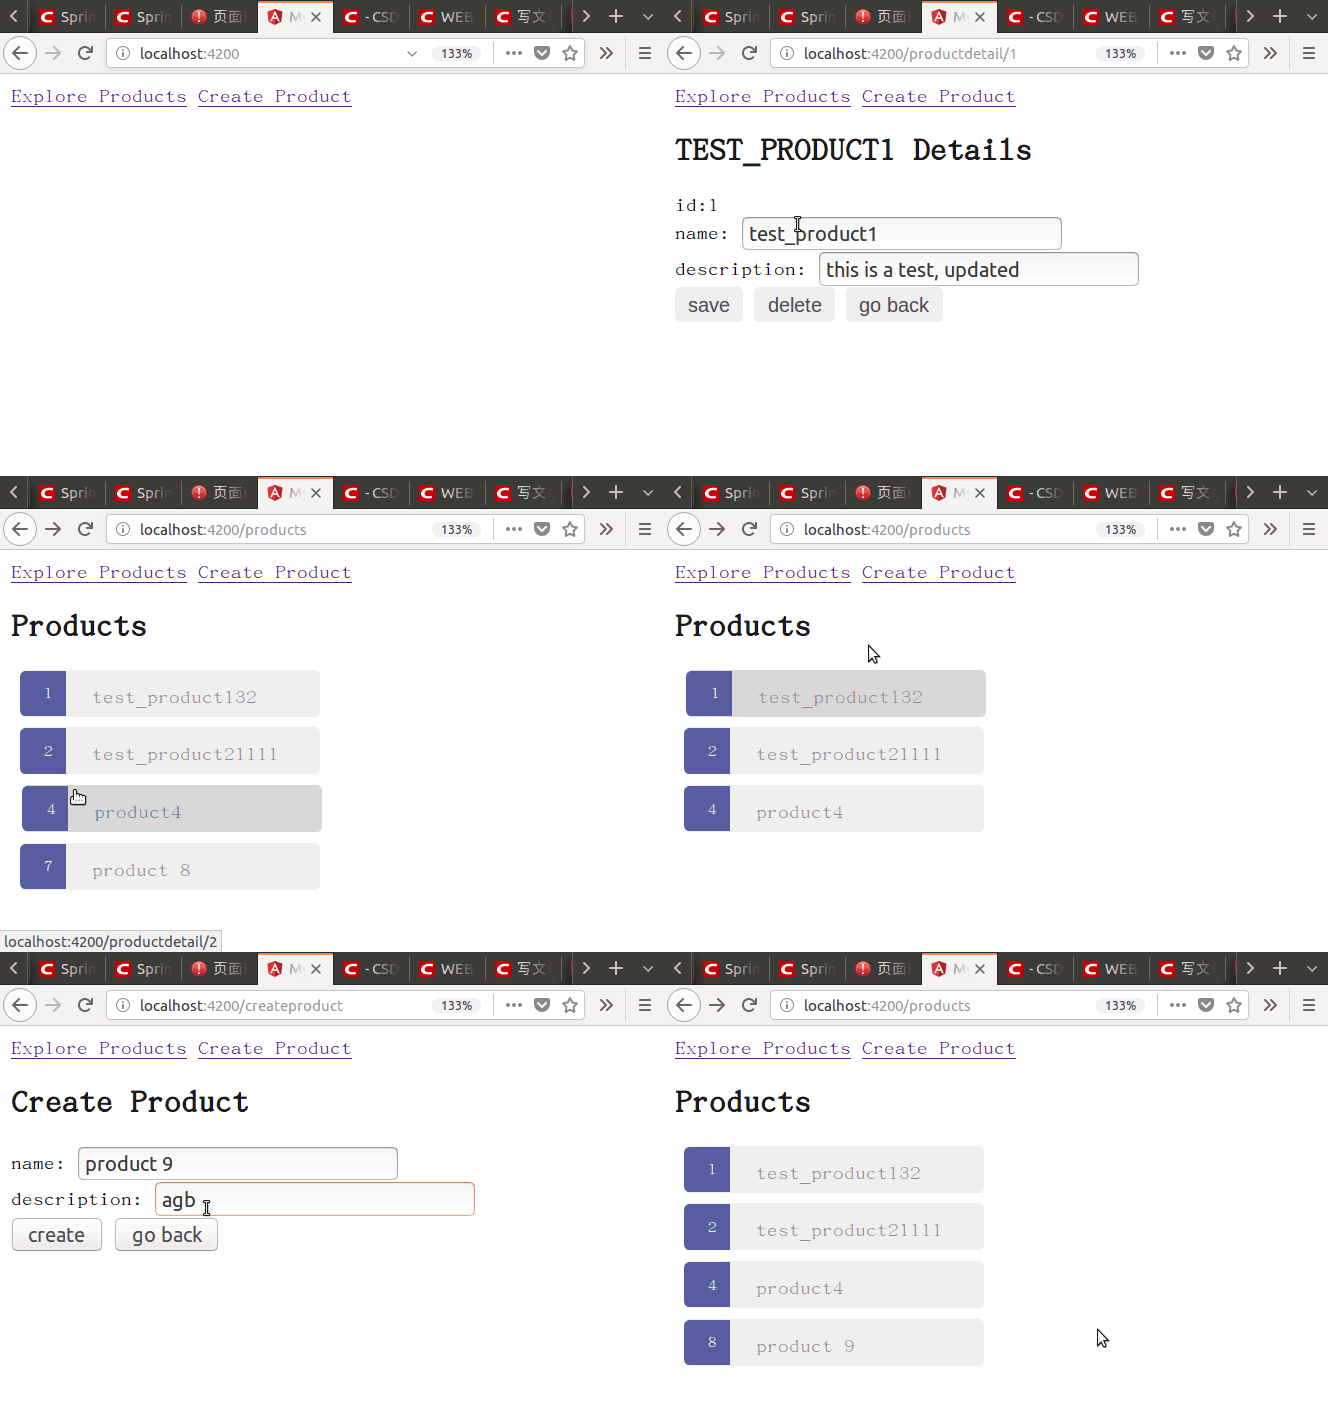
在上一篇的博文,我们建立了一个简单的WEB应用。现在让我们丰富一下功能,包括以下2个主要方面的改动:
1. 前端增加Routes路由的功能,可以点击跳转到不同的模块。
2. 后端增加了CRUD的功能,可以实现对产品的增加,删除,修改。
先来做后端的改动。对上次创建的ProductController.java文件做改动,增加了显示单个产品详细信息,增加产品,更新产品属性,删除产品这4个API,具体代码如下:
package com.example.myweb;
import org.springframework.beans.factory.annotation.Autowired;
import org.springframework.stereotype.Controller;
import org.springframework.ui.Model;
import org.springframework.web.bind.annotation.PathVariable;
import org.springframework.web.bind.annotation.RequestMapping;
import org.springframework.web.bind.annotation.GetMapping;
import org.springframework.web.bind.annotation.RequestMethod;
import org.springframework.web.bind.annotation.RestController;
import org.springframework.web.bind.annotation.RequestBody;
import org.springframework.web.bind.annotation.CrossOrigin;
import java.util.List;

@RestController
@CrossOrigin(origins ="http://localhost:4200")   //这个用于解决跨域访问的问题
public class ProductController {
    private ProductRepository productRepository;
    @Autowired
    public ProductController(
            ProductRepository productRepository) {
        this.productRepository= productRepository;
    }

    @RequestMapping("/all")
    public List allProducts(Model model) {
        List<Product> productList =
                productRepository.findAll();
        return productList;
    }

    @GetMapping("/productdetail/{id}")
    public Product getProduct(@PathVariable("id") long id) {
        Product product =
                productRepository.getOne(id);
        return product;
    }

    @RequestMapping(value = "/updateproduct", method = RequestMethod.PUT)
    public void updateProduct(
            @RequestBody Product product) {
        Product updatedProduct = new Product();
        updatedProduct.setId(product.getId());
        updatedProduct.setName(product.getName());
        updatedProduct.setDescription(product.getDescription());
        this.productRepository.save(updatedProduct);
    }

    @RequestMapping(value = "/createproduct", method = RequestMethod.PUT)
    public void createProduct(
            @RequestBody Product product) {
        Product newProduct = new Product();
        newProduct.setName(product.getName());
        newProduct.setDescription(product.getDescription());
        this.productRepository.save(newProduct);
    }

    @RequestMapping(value = "/deleteproduct", method = RequestMethod.PUT)
    public void deleteProduct(
            @RequestBody Product product) {
        this.productRepository.deleteById(product.getId());
    }
}
在IDEA中的Maven Projects的Spring boot:run下运行。
对于前端,需要增加路由功能。在my-app/目录下,命令行输入以下命令来创建一个AppRoutingModule:
ng generate module app-routing --flat --module=app对my-app/src/app/生成的app-routing.module.ts文件做修改,增加routes, 如以下:
import { NgModule }             from '@angular/core';
import { RouterModule, Routes } from '@angular/router';
import { ProductsComponent }      from './products/products.component';
import { ProductDetailComponent }      from './product-detail/product-detail.component';
import { AddProductComponent }      from './add-product/add-product.component';

const routes: Routes = [
  { path: 'products', component: ProductsComponent },
  { path: 'productdetail/:id', component: ProductDetailComponent },
  { path: 'createproduct', component: AddProductComponent }
];

@NgModule({
  imports: [ RouterModule.forRoot(routes) ],
  exports: [ RouterModule ]
})
export class AppRoutingModule {}
文件中的routes就是指向不同component的路径。
对于product.service.ts文件,需要做修改,增加几个新的方法来调用后端新增加的API,如以下代码:
import { Injectable } from '@angular/core';
import { Observable } from 'rxjs/Observable';
import { HttpClient, HttpHeaders } from '@angular/common/http';
import { Product } from './product';

const httpOptions = {
  headers: new HttpHeaders({ 'Content-Type': 'application/json' })
};

@Injectable()
export class ProductService {
  private productsUrl ='http://localhost:9090/all';  //这是REST API的URL
  private productDetailUrl ='http://localhost:9090/productdetail';
  private productUpdateUrl ='http://localhost:9090/updateproduct';
  private productCreateUrl ='http://localhost:9090/createproduct';
  private productDeleteUrl ='http://localhost:9090/deleteproduct';

  constructor(private http:HttpClient) { }

  getProducts(): Observable<Product[]> {
    return this.http.get<Product[]>(this.productsUrl)
  }

  /** GET hero by id. Will 404 if id not found */
  getProduct(id: number): Observable<Product> {
    const url = `${this.productDetailUrl}/${id}`;
    return this.http.get<Product>(url);
  }

  /** PUT: update the product on the server */
  updateProduct (product: Product): Observable<any> {
    return this.http.put(this.productUpdateUrl, product, httpOptions);
  }

  /** PUT: add a new product to the server */
  createProduct (product: Product): Observable<Product> {
    return this.http.put<Product>(this.productCreateUrl, product, httpOptions);
  }

  /** PUT: add a new product to the server */
  deleteProduct (product: Product): Observable<Product> {
    return this.http.put<Product>(this.productDeleteUrl, product, httpOptions);
  }
}
对于products模块的products.component.html,做一下修改,对于生成的Products列表,每一个产品增加一个链接,指向显示product-detail的模块,也就是刚才定义的其中一个route,代码如下:
<h2>Products</h2>
<ul class="products">
  <li *ngFor="let product of products">
    <a routerLink="/productdetail/{{product.id}}">
      <span class="badge">{{product.id}}</span> {{product.name}}
    </a>
  </li>
</ul>
Products模块的CSS样式表也更新一下,代码如下:
.products {
  margin: 0 0 2em 0;
  list-style-type: none;
  padding: 0;
  width: 15em;
}
.products li {
  position: relative;
  cursor: pointer;
  background-color: #EEE;
  margin: .5em;
  padding: .3em 0;
  height: 1.6em;
  border-radius: 4px;
}

.products li:hover {
  color: #607D8B;
  background-color: #DDD;
  left: .1em;
}

.products a {
  color: #888;
  text-decoration: none;
  position: relative;
  display: block;
  width: 250px;
}

.products a:hover {
  color:#607D8B;
}

.products .badge {
  display: inline-block;
  font-size: small;
  color: white;
  padding: 0.8em 0.7em 0 0.7em;
  background-color: #607D8B;
  line-height: 1em;
  position: relative;
  left: -1px;
  top: -4px;
  height: 1.8em;
  min-width: 16px;
  text-align: right;
  margin-right: .8em;
  border-radius: 4px 0 0 4px;
}

button {
  background-color: #eee;
  border: none;
  padding: 5px 10px;
  border-radius: 4px;
  cursor: pointer;
  cursor: hand;
  font-family: Arial;
}

button:hover {
  background-color: #cfd8dc;
}

button.delete {
  position: relative;
  left: 194px;
  top: -32px;
  background-color: gray !important;
  color: white;
}
对于product-detail模块做相应的修改,增加了删除和修改的功能。这些功能调用相应的product.service.ts中的相应方法。代码如下:
import { Component, OnInit, Input } from '@angular/core';
import { Product } from '../product';
import { ActivatedRoute } from '@angular/router';
import { Location } from '@angular/common';
import { ProductService }  from '../product.service';
@Component({
  selector:'app-product-detail',
  templateUrl:'./product-detail.component.html',
  styleUrls:['./product-detail.component.css']
})

export class ProductDetailComponent implements OnInit {
  product: Product;
  constructor(private route: ActivatedRoute,
    private productService: ProductService,
    private location: Location) { }

  ngOnInit() {
    this.getProduct()
  }

  getProduct() {
    const id = +this.route.snapshot.paramMap.get('id');
    this.productService.getProduct(id)
      .subscribe(product => this.product = product);
  }

  goBack(): void {
    this.location.back();
  }

  save(): void {
   this.productService.updateProduct(this.product)
     .subscribe(() => this.goBack());
  }

  delete(): void {
   this.productService.deleteProduct(this.product)
     .subscribe(() => this.goBack());
  }
}
相应的product-detail.component.html也要修改一下,增加几个对应的按钮:
<div *ngIf="product">
  <h2>{{ product.name |uppercase }} Details</h2>
  <div><span>id:</span>{{product.id}}</div>
  <div>
    <label>name:
      <input [(ngModel)]="product.name" placeholder="name"/>
    </label>
  </div>
  <div>
    <label>description:
      <input [(ngModel)]="product.description" placeholder="description"/>
    </label>
  </div>
  <button (click)="save()">save</button>
  <button (click)="delete()">delete</button>
  <button (click)="goBack()">go back</button>
</div>
再新增一个add-product的模块,用于创建新产品。在my-app/目录下执行以下命令:
ng generate component add-product修改新创建的add-product.component.ts文件,代码如下:
import { Component, OnInit } from '@angular/core';
import { Product } from '../product';
import { ActivatedRoute } from '@angular/router';
import { Location } from '@angular/common';
import { ProductService }  from '../product.service';

@Component({
  selector: 'app-add-product',
  templateUrl: './add-product.component.html',
  styleUrls: ['./add-product.component.css']
})
export class AddProductComponent implements OnInit {
  constructor(private route: ActivatedRoute,
    private productService: ProductService,
    private location: Location) { }

  ngOnInit() {
  }

  create(name: String, description: string): void {
   this.productService.createProduct({name, description} as Product)
     .subscribe(() => this.goBack());
  }

  goBack(): void {
    this.location.back();
  }
}
对于add-product.component.html文件修改如下:
<div>
  <h2>Create Product</h2>
  <div>
    <label>name:
      <input #name />
    </label>
  </div>
  <div>
    <label>description:
      <input #description />
    </label>
  </div>
  <button (click)="create(name.value, description.value); name.value=''; description.value=''">create</button>
  <button (click)="goBack()">go back</button>
</div>
修改完成后,在命令行下输入:
ng serve -open最终完成的效果如下:
