springmvc
简介
是一个mvc框架,用来简化web应用程序的开发。
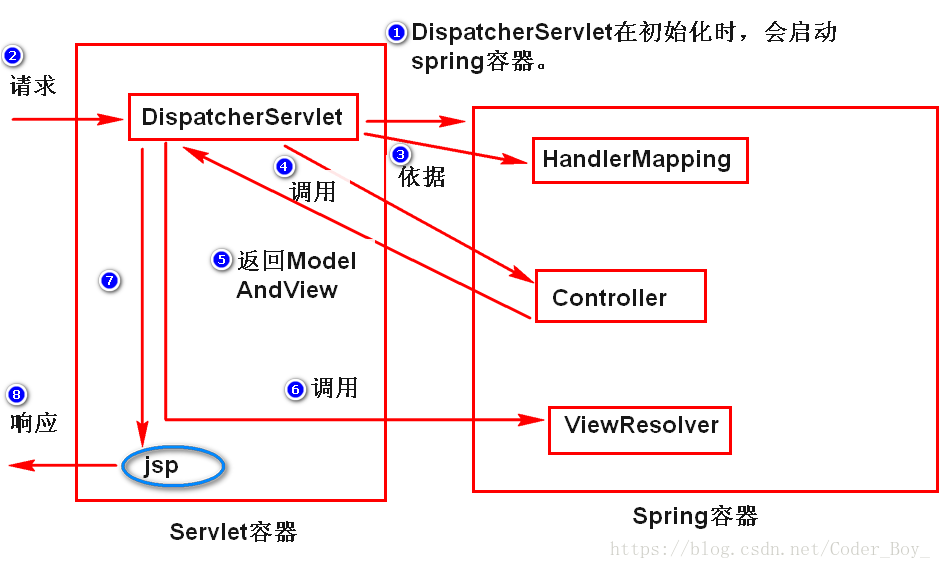
五大组件
. DispatcherServlet(前端控制器)
. HandlerMapping(处理映射)
. Controller(处理器)
. ModelAndView(模型和视图)
. ViewResovler(视图解析器)
step1.请求先发送给DispatcherServlet,
DispatcherServlet会依据HandlerMapping
的配置调用相应的处理器(Controller)来处理。
step2.处理器将处理结果封装成ModelAndView
之后发送给DispatcherServlet。
step3.DispatcherServlet会调用ViewResovler来
将视图名解析成真正的视图对象(也就是说,
到底使用哪种技术来展现数据)。
step4.视图对象对数据进行处理,生成相应的页面。

编程步骤
step1. 导包(springmvc相关的jar文件。
step2. 添加spring配置文件。
step3. 配置前端控制器(DispatcherServlet)。
注:web.xml文件当中去配置。
step4. 写Controller
注:业务处理写在Controller里面。
step5. 写JSP
step6. 修改spring配置文件,添加
HandleMapping与ViewResolver的配置信息。
案例演示:
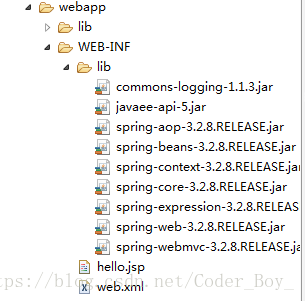
工程案例目录结构

spring环境搭建必备jar:
web.xml
<?xml version="1.0" encoding="UTF-8"?>
<web-app xmlns:xsi="http://www.w3.org/2001/XMLSchema-instance" xmlns="http://java.sun.com/xml/ns/javaee" xsi:schemaLocation="http://java.sun.com/xml/ns/javaee http://java.sun.com/xml/ns/javaee/web-app_2_5.xsd" version="2.5">
  <display-name>springcase-day03-2</display-name>
  <welcome-file-list>
    <welcome-file>index.html</welcome-file>
    <welcome-file>index.htm</welcome-file>
    <welcome-file>index.jsp</welcome-file>
    <welcome-file>default.html</welcome-file>
    <welcome-file>default.htm</welcome-file>
    <welcome-file>default.jsp</welcome-file>
  </welcome-file-list>

  <servlet>
  	<servlet-name>springmvc</servlet-name>
  	<servlet-class>org.springframework.web.servlet.DispatcherServlet</servlet-class>
  	<init-param>
  		<param-name>contextConfigLocation</param-name>
  		<param-value>classpath:app.xml</param-value>
  	</init-param>
  	<load-on-startup>1</load-on-startup>
  </servlet>
  <servlet-mapping>
  	<servlet-name>springmvc</servlet-name>
  	<url-pattern>*.do</url-pattern>
  </servlet-mapping>
</web-app>
app.xml
<?xml version="1.0" encoding="UTF-8"?>
<beans xmlns="http://www.springframework.org/schema/beans"
	xmlns:xsi="http://www.w3.org/2001/XMLSchema-instance"
	xmlns:context="http://www.springframework.org/schema/context"
	xmlns:jdbc="http://www.springframework.org/schema/jdbc"
	xmlns:jee="http://www.springframework.org/schema/jee"
	xmlns:tx="http://www.springframework.org/schema/tx"
	xmlns:aop="http://www.springframework.org/schema/aop"
	xmlns:mvc="http://www.springframework.org/schema/mvc"
	xmlns:util="http://www.springframework.org/schema/util"
	xmlns:jpa="http://www.springframework.org/schema/data/jpa"
	xsi:schemaLocation="
		http://www.springframework.org/schema/beans http://www.springframework.org/schema/beans/spring-beans-3.2.xsd
		http://www.springframework.org/schema/context http://www.springframework.org/schema/context/spring-context-3.2.xsd
		http://www.springframework.org/schema/jdbc http://www.springframework.org/schema/jdbc/spring-jdbc-3.2.xsd
		http://www.springframework.org/schema/jee http://www.springframework.org/schema/jee/spring-jee-3.2.xsd
		http://www.springframework.org/schema/tx http://www.springframework.org/schema/tx/spring-tx-3.2.xsd
		http://www.springframework.org/schema/data/jpa http://www.springframework.org/schema/data/jpa/spring-jpa-1.3.xsd
		http://www.springframework.org/schema/aop http://www.springframework.org/schema/aop/spring-aop-3.2.xsd
		http://www.springframework.org/schema/mvc http://www.springframework.org/schema/mvc/spring-mvc-3.2.xsd
		http://www.springframework.org/schema/util http://www.springframework.org/schema/util/spring-util-3.2.xsd">

		<!--
			配置HandleMapping
			负责指定请求路径与处理器(Controller)的
			对应关系。
		 -->
		<bean class="org.springframework.web.servlet.handler.SimpleUrlHandlerMapping">
			<property name="mappings">
				<props>
					<prop key="/hello.do">helloController</prop>
				</props>
			</property>
		</bean>
		<!--
			配置处理器
		 -->
		<bean id="helloController" class="controller.HelloController">
		</bean>
		<!--
			配置视图解析器。
			负责将视图名解析成真正的视图对象(比如jsp)。
		 -->
		<bean class="org.springframework.web.servlet.view.InternalResourceViewResolver">
			<property name="prefix" value="/WEB-INF/"></property>
			<property name="suffix" value=".jsp"></property>
		</bean>

</beans>
HelloController.java
package controller;

import javax.servlet.http.HttpServletRequest;
import javax.servlet.http.HttpServletResponse;

import org.springframework.web.servlet.ModelAndView;
import org.springframework.web.servlet.mvc.Controller;

/**
 * 处理器(用于处理业务逻辑)
 * 要求:
 * 1.实现Controller接口。
 * 2.在handlerRequest方法当中,完成业务
 * 逻辑的处理。该方法必须将处理结果封装成
 * ModelAndView对象,然后返回。
 * @author Cher_du
 *
 */
public class HelloController implements Controller{

	@Override
	public ModelAndView handleRequest(HttpServletRequest req,
			HttpServletResponse res) throws Exception {

			System.out.println("HelloController的handleRequest方法...");
			/*
			 * ModelAndView有两个构造器:
			 * 1.ModelAndView(String viewName):viewName
			 * 是视图名,视图名称会被ViewResolver解析
			 * 成相应的视图对象(比如jsp)。
			 * 2.ModelAndView(String viewName,Map data):
			 * data是处理结果。
			 */
			return new ModelAndView("hello");
	}

}
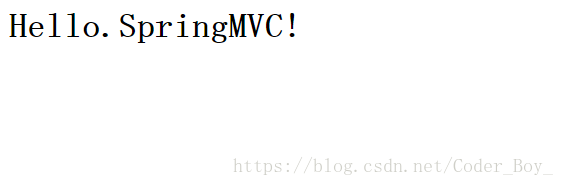
hello.jsp
<h1>Hello.SpringMVC!依次运行 springcase-day03-2工程,页面运行结果
拓展:Tomcat部署机制相关
如果按照如下路径存储 jar ,build Path 到类路径后

在运行工程 会出现如下报错:
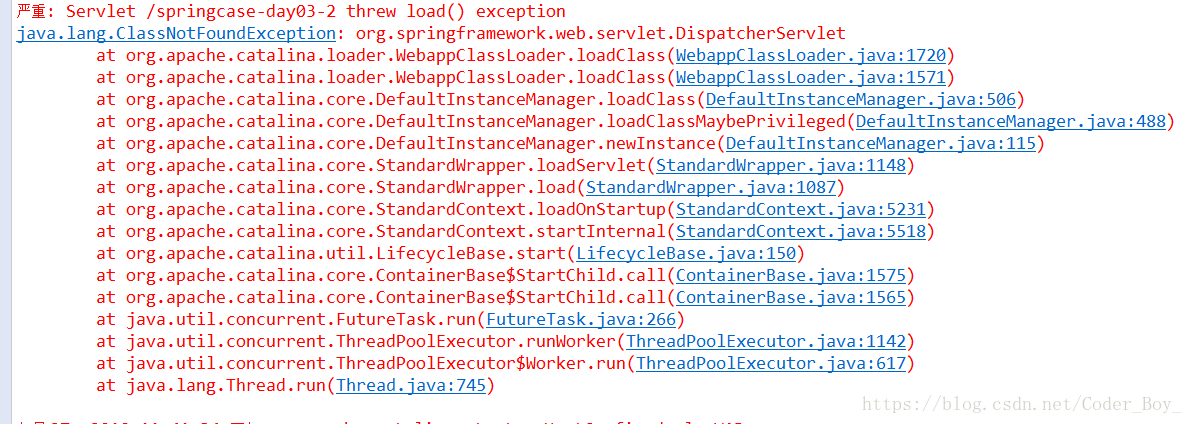
编译时没错,在运行时报错,就说明可能发布到tomcat服务器没有找到这个jar包。到tomcat安装目录下查看是否有这个jar包:apache-tomcat-7.0.57\wtpwebapps\springcase-day03-2\WEB-INF\lib,经检查,发现是没有的。问题找到了。

把项目所需的jar包复制到项目的WEB-INF/lib目录下即可
重新部署,启动tomcat访问,一切正常
总结:为何一开始在build path引入了相关jar包,但是发布项目的时候却发布不到tomcat下去呢?
项目中引用lib 是为了编译代码生成WEB-INF/classes里面的class文件使用;
tomcat的加载运行机制
1、首先加载Tomcat_HOME/lib目录下的jar包
2、然后加载Tomcat_HOME/webapps/项目名/WEB-INF/lib的jar包
3、最后加载的是Tomcat_HOME/webapps/项目名/WEB-INF/classes下的类文件
所以通过build path引入的jar包只是保证了类在编译的时候可以引用的到,而WEB-INF/lib下的jar包才是运行时必需的jar包。
其他路径下的引用的 jar不能加载到Tomcat下。
一般的做法是先把jar包放到WEB-INF/lib下,然后build path的时候,引用该项目的WEB-INF/lib下的jar包就可以了