mach-s5pv210\mach-smdkc110.c
/* Maintainer: Kukjin Kim <[email protected]> */
.phys_io = S3C_PA_UART & 0xfff00000,
.io_pg_offst = (((u32)S3C_VA_UART) >> 18) & 0xfffc,
.boot_params = S5P_PA_SDRAM + 0x100,
//.fixup = smdkv210_fixup,
.init_irq = s5pv210_init_irq,
.map_io = smdkc110_map_io,
.init_machine = smdkc110_machine_init,
.timer = &s5p_systimer,
mach-s5pv210\mach-smdkc110.c
static void __init smdkc110_map_io(void)
{
s5p_init_io(NULL, 0, S5P_VA_CHIPID);
s3c24xx_init_clocks(24000000);
s5pv210_gpiolib_init(); //真正的gpiolib初始化
s3c24xx_init_uarts(smdkc110_uartcfgs, ARRAY_SIZE(smdkc110_uartcfgs));
s5p_reserve_bootmem(smdkc110_media_devs, ARRAY_SIZE(smdkc110_media_devs));
s5p_device_rtc.name = "smdkc110-rtc";
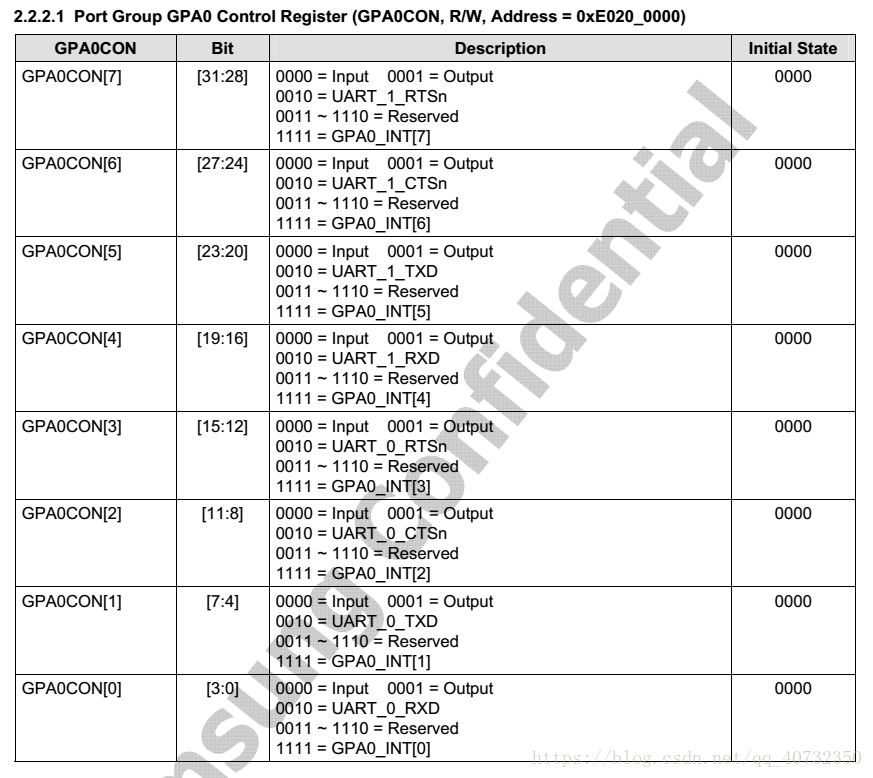
}GPA0称为一个总端口
GPA0CON[1] ---》 GPA0CON[7]为 IO端口
有的总端口有8个IO端口,有的有5个,范围为0 ~ 8
进入真正的初始化***********************************************
第一阶段--------------------------------
mach-s5pv210\gpiolib.c
__init int s5pv210_gpiolib_init(void)
{
	struct s3c_gpio_chip *chip = s5pv210_gpio_4bit;  //指向已经设置好的结构体数组
	int nr_chips = ARRAY_SIZE(s5pv210_gpio_4bit);  //算出有多少个GPIO端口,即数组元素个数
	int i = 0;

	for (i = 0; i < nr_chips; i++, chip++) {  //查找每个端口
		if (chip->config == NULL)//判断是否指定是否指定config
			chip->config = &gpio_cfg;
		if (chip->base == NULL)//判断是否指定是否指定基地址
			chip->base = S5PV210_BANK_BASE(i);
	}

	samsung_gpiolib_add_4bit_chips(s5pv210_gpio_4bit, nr_chips);//把数组地址和个数做参数

	return 0;
}
重要结构体:
struct s3c_gpio_chip {
	struct gpio_chip	chip;  //通过gpiolib出口的芯片结构
	struct s3c_gpio_cfg	*config;  //特殊功能和拉阻控制信息
	struct s3c_gpio_pm	*pm;
	void __iomem		*base;   //指向gpio配置寄存器的基地址
	int			eint_offset;
	spinlock_t		 lock;  //锁定这个gpio bank 的独占访问权
#ifdef CONFIG_PM
	u32			pm_save[7];  //保存用于暂停/恢复支持的信息
#endif
};
struct gpio_chip {
const char *label; //该gpio的名字
struct device *dev; //提供GPIOs的可选设备
struct module *owner; //帮助防止删除导出活动的GPIOs的模块
int (*request)(struct gpio_chip *chip,//申请gpio
unsigned offset);
void (*free)(struct gpio_chip *chip,//释放gpio
unsigned offset);
int (*direction_input)(struct gpio_chip *chip,
unsigned offset);//设置为输入模式
int (*get)(struct gpio_chip *chip,//获取IO值
unsigned offset);
int (*direction_output)(struct gpio_chip *chip,
unsigned offset, int value);//设置为输出模式
int (*set_debounce)(struct gpio_chip *chip,
unsigned offset, unsigned debounce);
void (*set)(struct gpio_chip *chip,//设置IO值
unsigned offset, int value);
int (*to_irq)(struct gpio_chip *chip,
unsigned offset);
//在debugfs中显示内容的可选例程;默认的代码当省略这个时将会使用,但是自定义代码可以显示额外的
//状态(如下拉/下拉配置)
void (*dbg_show)(struct seq_file *s,
struct gpio_chip *chip);
int base;//gpio的端口编号
u16 ngpio;//该端口有多少给IO端口;最后GPIO处理是
//(base+ngpio-1)
const char *const *names; //名字
unsigned can_sleep:1;
unsigned exported:1;
};GPIO的结构体数组
(1)s5pv210_gpio_4bit是一个s3c_gpio_chip类型的结构体数组。
(2)将所有的gpio的.chip结构体中的一些元素初始化,这个数组的所有元素是与数据手册中的所有gpio是一一对应的。
(3)分析可知,这个数组就是对当前MPU中的所有的IO端口和每个端口的IO口进行了统一的描述,有了这个数组, 我们就知道当前开发板有多少个端口,有多少个IO口,以及每个IO口的编号。
 static struct s3c_gpio_chip s5pv210_gpio_4bit[] = {
	{
		.chip	= {
			.base	= S5PV210_GPA0(0),//得到GPIO的编号
			.ngpio	= S5PV210_GPIO_A0_NR, //得到该GPIO有多少个编号
			.label	= "GPA0", //指定名字
			.to_irq = s5p_gpiolib_gpioint_to_irq,
		},
	}, {
		.chip	= {
			.base	= S5PV210_GPA1(0),
			.ngpio	= S5PV210_GPIO_A1_NR,
			.label	= "GPA1",
			.to_irq = s5p_gpiolib_gpioint_to_irq,
		},
	}, {
		.base	= (S5P_VA_GPIO + 0xC20),  //指定虚拟地址
		.config	= &gpio_cfg_noint,  //
		.eint_offset = IRQ_EINT(8),  //得到中断号
		.chip	= {
			.base	= S5PV210_GPH1(0),
			.ngpio	= S5PV210_GPIO_H1_NR,
			.label	= "GPH1",
			.to_irq = s5p_gpiolib_eint_to_irq,
	}
}
第二阶段--------------------------------
1. \arch\arm\plat-samsung\gpiolib.c
void __init samsung_gpiolib_add_4bit_chips(struct s3c_gpio_chip *chip,
					   int nr_chips)
{
	for (; nr_chips > 0; nr_chips--, chip++) {  //遍历每个数组
		samsung_gpiolib_add_4bit(chip);  //
		s3c_gpiolib_add(chip);
	}
}
1.1 -------进入samsung_gpiolib_add_4bit
void __init samsung_gpiolib_add_4bit(struct s3c_gpio_chip *chip)
{
	chip->chip.direction_input = samsung_gpiolib_4bit_input;  //添加输入函数
	chip->chip.direction_output = samsung_gpiolib_4bit_output;  //添加输出函数
	chip->pm = __gpio_pm(&s3c_gpio_pm_4bit);  //添加电源管理函数
}
1.1.1 -------进入samsung_gpiolib_4bit_input
static int samsung_gpiolib_4bit_input(struct gpio_chip *chip,
				      unsigned int offset)
{
          //to_s3c_gpio通过结构体变量中 某个成员 的首地址进而获得 整个 结构体变量的首地址
	struct s3c_gpio_chip *ourchip = to_s3c_gpio(chip);
	void __iomem *base = ourchip->base;  //指向端口基地址
	unsigned long con;

	con = __raw_readl(base + GPIOCON_OFF);  //得到该CON端口的值
	con &= ~(0xf << con_4bit_shift(offset));  //把oxff左移offset*4位
	__raw_writel(con, base + GPIOCON_OFF);  //写oxff

	gpio_dbg("%s: %p: CON now %08lx\n", __func__, base, con);

	return 0;
}
1.1.2 -------进入samsung_gpiolib_4bit_output
static int samsung_gpiolib_4bit_output(struct gpio_chip *chip,
				       unsigned int offset, int value)
{
	struct s3c_gpio_chip *ourchip = to_s3c_gpio(chip);  //转换结构体地址
	void __iomem *base = ourchip->base;
	unsigned long con;
	unsigned long dat;

	con = __raw_readl(base + GPIOCON_OFF);
	con &= ~(0xf << con_4bit_shift(offset));  //清零
	con |= 0x1 << con_4bit_shift(offset);  //得到ox1

	dat = __raw_readl(base + GPIODAT_OFF);  //写ox1

	if (value)  //判断是关还是开
		dat |= 1 << offset;
	else
		dat &= ~(1 << offset);

	__raw_writel(dat, base + GPIODAT_OFF);  //把值写到DAT端口
	__raw_writel(con, base + GPIOCON_OFF);  //把值写到CON端口
	__raw_writel(dat, base + GPIODAT_OFF);

	gpio_dbg("%s: %p: CON %08lx, DAT %08lx\n", __func__, base, con, dat);

	return 0;
}
1.2 -------进入s3c_gpiolib_add
\arch\arm\plat-samsung\gpio.c
__init void s3c_gpiolib_add(struct s3c_gpio_chip *chip)
{
	struct gpio_chip *gc = &chip->chip;
	int ret;

	BUG_ON(!chip->base);  //检验是不是为空
	BUG_ON(!gc->label);
	BUG_ON(!gc->ngpio);

	spin_lock_init(&chip->lock);  //自旋锁初始化

	if (!gc->direction_input) //判断为不为空
		gc->direction_input = s3c_gpiolib_input;//添加本文件提供的输入函数
	if (!gc->direction_output)
		gc->direction_output = s3c_gpiolib_output;//添加本文件提供的输出函数
	if (!gc->set)
		gc->set = s3c_gpiolib_set;//添加本文件提供的设置函数
	if (!gc->get)
		gc->get = s3c_gpiolib_get;//添加本文件提供的获取函数

#ifdef CONFIG_PM
	if (chip->pm != NULL) {
		if (!chip->pm->save || !chip->pm->resume)
			printk(KERN_ERR "gpio: %s has missing PM functions\n",
			       gc->label);
	} else
		printk(KERN_ERR "gpio: %s has no PM function\n", gc->label);
#endif

	/* gpiochip_add() prints own failure message on error. */
	ret = gpiochip_add(gc);  //进入真正的内核添加
	if (ret >= 0)
		s3c_gpiolib_track(chip);  //添加到一个轨迹数组
}
1.2.1 -------进入gpiochip_add
\drivers\gpio\gpiolib.c
int gpiochip_add(struct gpio_chip *chip)
{
	unsigned long	flags;
	int		status = 0;
	unsigned	id;
	int		base = chip->base;

	if ((!gpio_is_valid(base) || !gpio_is_valid(base + chip->ngpio - 1))//基地址和最高编号的
			&& base >= 0) {                        //IO端口不能为空
		status = -EINVAL;
		goto fail;
	}

	spin_lock_irqsave(&gpio_lock, flags);//上锁

	if (base < 0) {
		base = gpiochip_find_base(chip->ngpio);
		if (base < 0) {
			status = base;
			goto unlock;
		}
		chip->base = base;
	}

	/* these GPIO numbers must not be managed by another gpio_chip */
	for (id = base; id < base + chip->ngpio; id++) {
		if (gpio_desc[id].chip != NULL) {
			status = -EBUSY;
			break;
		}
	}
	if (status == 0) {
		for (id = base; id < base + chip->ngpio; id++) {
			gpio_desc[id].chip = chip;  //在gpio设备数组中添加端口

			/* REVISIT:  most hardware initializes GPIOs as
			 * inputs (often with pullups enabled) so power
			 * usage is minimized.  Linux code should set the
			 * gpio direction first thing; but until it does,
			 * we may expose the wrong direction in sysfs.
			 */
			gpio_desc[id].flags = !chip->direction_input
				? (1 << FLAG_IS_OUT)
				: 0;
		}
	}

unlock:
	spin_unlock_irqrestore(&gpio_lock, flags);
	if (status == 0)
		status = gpiochip_export(chip);
fail:
	/* failures here can mean systems won't boot... */
	if (status)
		pr_err("gpiochip_add: gpios %d..%d (%s) failed to register\n",
			chip->base, chip->base + chip->ngpio - 1,
			chip->label ? : "generic");
	return status;
}
1.2.1 -------进入s3c_gpiolib_track
\arch\arm\plat-samsung\gpio.c
static __init void s3c_gpiolib_track(struct s3c_gpio_chip *chip)
{
	unsigned int gpn;
	int i;

	gpn = chip->chip.base;//指向基地址
	for (i = 0; i < chip->chip.ngpio; i++, gpn++) {
		BUG_ON(gpn >= ARRAY_SIZE(s3c_gpios));
		s3c_gpios[gpn] = chip;
	}
}
第三阶段--------------------------------如何用gpiolib 框架
drivers/gpio/gpiolib.c 这个文件中所有的函数构成了内核开发者写的gpiolib框架部分。
这个文件中提供的函数主要有以下部分:
gpiochip_add: 添加gpio端口
是框架开出来的接口,给厂商驱动工程师用,用于向内核注册我们的gpio端口
gpiochip_remove:删除gpio端口
用于内核删除gpio端口
gpio_request: 使用申请
是框架开出来的接口,给使用gpiolib来编写自己的驱动的驱动工程师用的,驱动中要想使用某一个gpio,就必须先调用gpio_request接口来向内核的gpiolib部分使用申请,得到允许后才可以去使用这个gpio。
gpio_free: 释放申请
对应gpio_request,用来释放申请后用完了的gpio
gpio_request_one/gpio_request_array:
这两个是gpio_request的变种
gpiochip_is_requested: 判断
接口用来判断某一个gpio是否已经被申请了
gpio_direction_input/gpio_direction_output:
接口用来设置GPIO为输入/输出模式,
注意:
该函数内部实际并没有对硬件进行操作,只是通过chip结构体变量的函数指针调用了将来SoC厂商的驱动工程师写的真正的操作硬件实现gpio设置成输出模式的那个函数。
以上的接口属于一类,这些都是给写其他驱动并且用到了gpiolib的人使用的