前提:
已安装好appium
安装依赖:
Appium iOS真机测试依赖于中心第三方软件套件:libimobiledevice, 用homebrew很容易安装brew install libimobiledevice
除了依赖libimobiledevice以外, Appium支持真机在iOS 9.3以上版本使用Xcode 8+ 还要依赖于ios-deploy,通过npm和homebrew很容易安装:npm install -g ios-deploy
brew install ios-deploy
(对于hybrid或者web测试, 还需要遵循ios-webkit-debug-proxy设置指令)XCUITest driver工作方式是在真机上安装一个名为WebDriverAgent-Runner的助手应用程序, 通过该应用程序,测试应用程序是自动化的。虽然这在理论上是简单的,但是开发和测试的代码签名和配置文件的环节可能会让人有点头疼。
基本(自动)配置:
使用自动配置策略最简单的方法是用Appium的XCUITest Support在IOS真机上获取启动和运行,有2种方式:
* 使用xcodeOrgId和xcodeSigningId这2个desired capabilities:
{
"xcodeOrgId": "<Team ID>",
"xcodeSigningId": "iPhone Developer"
}
* 在你的文件系统的某个地方创建一个.xcconfig文件并添加以下内容到文件中:
DEVELOPMENT_TEAM = <Team ID>
CODE_SIGN_IDENTITY = iPhone Developer
在这两种情况下,Team ID都是由Apple生成的一个独特的10个字符的字符串,它被分配给您的团队。
可以用你的开发者账号找到你的Team ID. 登录你的开发者账号developer.apple.com/account, 在侧栏中点击Membership. 你的Team ID会在团队名称下面的Membership Information部分显示.
也可以在keychain里面找到你的iphone开发者证书,team ID就列在"Organizational Unit"字段下。
注意:这些互斥策略;要么使用xcodeConfigFile,要么用xcodeOrgId和xcodeSigningId组合.
一旦配置成功,要开始测试只不过是在desired capability指定为一个真机的udid问题
如果这个不起作用,通常会在Appium server日志中显现出类似如下错误:
XCUITest xcodebuild exited with code '65' and signal 'null'.
这一般意味着必要的签名未设置正确,通过手工配置来做
如果WebDriverAgentRunner在设备上安装成功了,但是Appium日志中有类似以下这种错误:
……xcodebuild[30385:339674] Error Domain=com.apple.platform.iphoneos Code=-12
"Unable to launch com.apple.test.WebDriverAgentRunner-Runner" UserInfo={NSLocalizedDescription=Unable to launch com.apple.test.WebDriverAgentRunner-Runner, NSUnderlyingError=0x7fa839cadc60
{Error Domain=DTXMessage Code=1 "(null)" UserInfo={DTXExceptionKey=The operation couldn’t be completed. Unable to launch com.apple.test.WebDriverAgentRunner-Runner because it has an invalid code signature, inadequate entitlements or its profile has not been explicitly trusted by the user. : Failed to launch process with bundle identifier 'com.apple.test.WebDriverAgentRunner-Runner'}}}
…… xcodebuild[30385:339674] Error Domain=IDETestOperationsObserverErrorDomain Code=5 "Early unexpected exit, operation never finished bootstrapping - no restart will be attempted" UserInfo={NSLocalizedDescription=Early unexpected exit, operation never finished bootstrapping - no restart will be attempted}
Testing failed:
Test target WebDriverAgentRunner encountered an error (Early unexpected exit, operation never finished bootstrapping - no restart will be attempted)
这个问题是未在设备上信任开发者. 如果你手工在设备上跑WebDriverAgentRunner,看到弹出消息: Untrusted Developer。
你可以在ios设备上进入 Settings => General => Device Management,信任开发者并允许WebDriverAgentRunner运行 (参考Apple documentation for more information).
基本(手工)配置
WebDriverAgent目录:
/usr/local/n/versions/node/10.4.0/lib/node_modules/appium/node_modules/appium-xcuitest-driver/WebDriverAgent
* 找到appium的安装盘:
$ which appium
/usr/local/n/versions/node/10.4.0/bin/appium 用n管理器安装的node指向
->/usr/local/n/versions/node/10.4.0/lib/node_modules/appium/build/lib/main.js
* 进入appium安装盘:/path/where/installed/bin/appium, 在以下路径下找到WebDriverAgent
/usr/local/n/versions/node/10.4.0/lib/node_modules/appium/node_modules/appium-xcuitest-driver/WebDriverAgent
* 打开terminal到上面的目录下, 执行以下命令来配置项目:
$ mkdir -p Resources/WebDriverAgent.bundle
$ ./Scripts/bootstrap.sh -d
用Xcode打开WebDriverAgent.xcodeproj
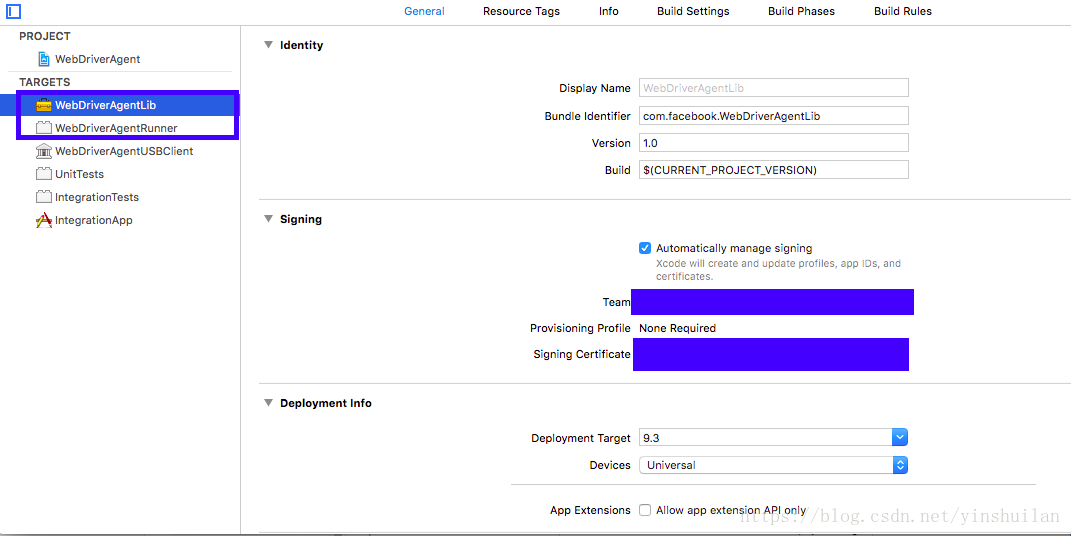
以下2个目标在"General"选项卡下都选"Automatically manage signing"并选择你的Development Team,应该会自动选择Signing Ceritificate.
如下图所示: WebDriverAgentLib、WebDriverAgentRunner
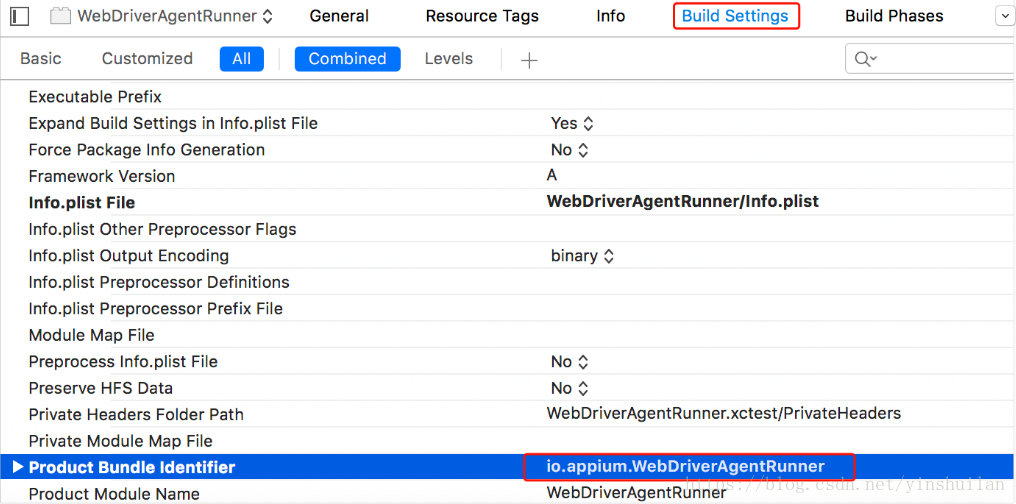
如果Signing Provisioning profile失败则需要先去Build Settings选项卡下面把bundle Id修改成xcode接受的bundle id
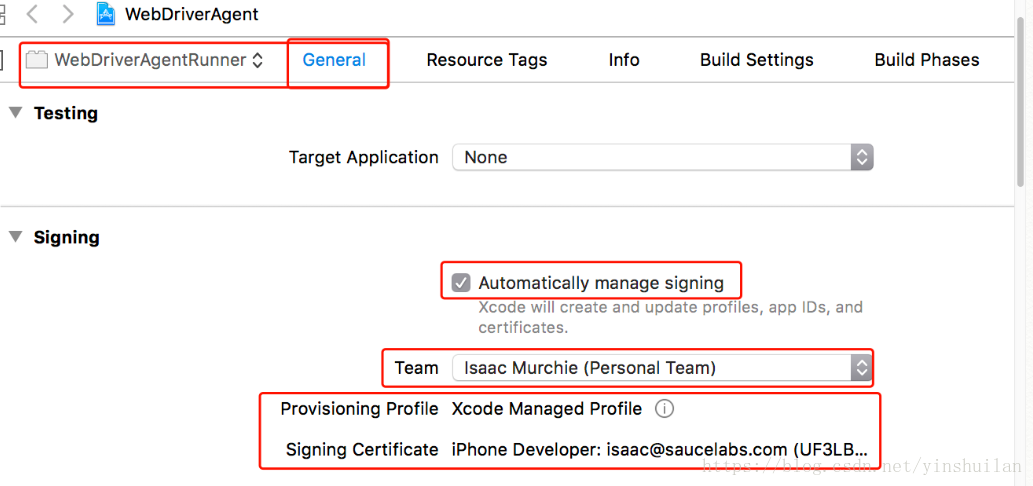
返回到WebDriverAgentRunner 目标下的"General" 选项卡, 应该可以看到创建了一个provisioning profile如下图:
* 最后 Build the project:
xcodebuild -project WebDriverAgent.xcodeproj -scheme WebDriverAgentRunner -destination 'id=<udid>' test
* 如果成功的话,会看到类似如下的输出:
Test Suite 'All tests' started at 2017-01-23 15:49:12.585
Test Suite 'WebDriverAgentRunner.xctest' started at 2017-01-23 15:49:12.586
Test Suite 'UITestingUITests' started at 2017-01-23 15:49:12.587
Test Case '-[UITestingUITests testRunner]' started.
t = 0.00s Start Test at 2017-01-23 15:49:12.588
t = 0.00s Set Up
* 为了完成验证, 你可以尝试访问WebDriverAgent服务的状态 (注意: 必须跟手机设备在同一个网络下, 并且要知道它的IP地址:Settings => Wi-Fi => Current Network):
export DEVICE_URL='http://<device IP>:8100'
export JSON_HEADER='-H "Content-Type: application/json;charset=UTF-8, accept: application/json"'
curl -X GET $JSON_HEADER $DEVICE_URL/status
你可能会得到类似如下的输出:
{
"value" : {
"state" : "success",
"os" : {
"name" : "iOS",
"version" : "10.2"
},
"ios" : {
"simulatorVersion" : "10.2",
"ip" : "192.168.0.7"
},
"build" : {
"time" : "Jan 23 2017 14:59:57"
}
},
"sessionId" : "8951A6DD-F3AD-410E-A5DB-D042F42F68A7",
"status" : 0
}
配置要测试的应用程序AUT
不仅WebDriverAgent要在你的设备上配置并能跑起来,要测试的app也要在设备上进行配置并能够跑起来。
中心思想是一致的: 使用已签署的开发配置文件构建应用程序(a.IPA文件)
更详细地说,要开始一个真机测试,你需要以下几点:
- 一个Apple Developer ID和一个有效的带有已配置的开发证书和配置文件的开发者账号 .
- 在真实设备上测试,一个有效的IOS developer 和配置文件是必需的,被测app也要签名。参考Apple documentation
- 一台iphone/ipad,确保这是在xcode中开发的.
- 一个已签名的app应用程序包.app或者.ipa文件,或者用源代码构建一个
- 一台Mac电脑装有Xcode和Xcode Command Line Developer Tools.
Appium使用ideviceinstaller处理安装应用程序到设备上(它是作为libimobiledevice的一部分安装的), 但是为了确保没有问题,有时使用Xcode先安装你的应用会更加容易。
故障排除:
1. 确认UDID是正确的,通过Xcode Organizer或者iTunes. 它是一长串字符串 (20多个字符).
2. 确保你可以在Simulator上运行你的测试.
3. 确保UI Automation在你的设备-配置上是enabled:Settings -> Developer -> Enable UI Automation