1:什么是Spring的aop
AOP(Aspect Oriented Programming),即面向切面编程,可以说是OOP(Object Oriented Programming,面向对象编程)的补充和完善。OOP引入封装、继承、多态等概念来建立一种对象层次结构,用于模拟公共行为的一个集合。不过OOP允许开发者定义纵向的关系,但并不适合定义横向的关系,例如日志功能。日志代码往往横向地散布在所有对象层次中,而与它对应的对象的核心功能毫无关系对于其他类型的代码,如安全性、异常处理和透明的持续性也都是如此,这种散布在各处的无关的代码被称为横切(cross cutting),在OOP设计中,它导致了大量代码的重复,而不利于各个模块的重用。
AOP技术恰恰相反,它利用一种称为"横切"的技术,剖解开封装的对象内部,并将那些影响了多个类的公共行为封装到一个可重用模块,并将其命名为"Aspect",即切面。所谓"切面",简单说就是那些与业务无关,却为业务模块所共同调用的逻辑或责任封装起来,便于减少系统的重复代码,降低模块之间的耦合度,并有利于未来的可操作性和可维护性。
使用"横切"技术,AOP把软件系统分为两个部分:核心关注点和横切关注点。业务处理的主要流程是核心关注点,与之关系不大的部分是横切关注点。横切关注点的一个特点是,他们经常发生在核心关注点的多处,而各处基本相似,比如权限认证、日志、事物。AOP的作用在于分离系统中的各种关注点,将核心关注点和横切关注点分离开来。(例如在用户购买之前检查是否登录,用户修改数据是否是管理员的等等需求上面,将核心关注点和和切关注点拆分出来)
AOP核心概念
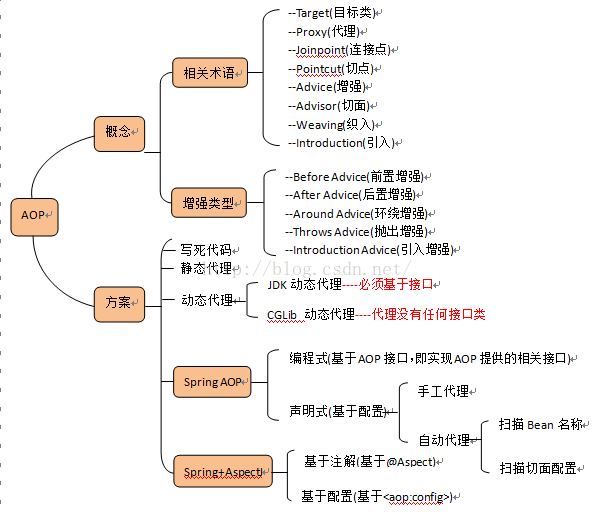
1、横切关注点
对哪些方法进行拦截,拦截后怎么处理,这些关注点称之为横切关注点
2、切面(aspect)
类是对物体特征的抽象,切面就是对横切关注点的抽象
3、连接点(joinpoint)
被拦截到的点,因为Spring只支持方法类型的连接点,所以在Spring中连接点指的就是被拦截到的方法,实际上连接点还可以是字段或者构造器
4、切入点(pointcut)
对连接点进行拦截的定义
5、通知(advice)
所谓通知指的就是指拦截到连接点之后要执行的代码,通知分为前置、后置、异常、最终、环绕通知五类
6、目标对象
代理的目标对象
7、织入(weave)
将切面应用到目标对象并导致代理对象创建的过程
8、引入(introduction)
在不修改代码的前提下,引入可以在运行期为类动态地添加一些方法或字段
Spring对AOP的支持
Spring中AOP代理由Spring的IOC容器负责生成、管理,其依赖关系也由IOC容器负责管理。因此,AOP代理可以直接使用容器中的其它bean实例作为目标,这种关系可由IOC容器的依赖注入提供。Spring创建代理的规则为:
1、默认使用Java动态代理来创建AOP代理,这样就可以为任何接口实例创建代理了
2、当需要代理的类不是代理接口的时候,Spring会切换为使用CGLIB代理,也可强制使用CGLIB
AOP编程其实是很简单的事情,纵观AOP编程,程序员只需要参与三个部分:
1、定义普通业务组件
2、定义切入点,一个切入点可能横切多个业务组件
3、定义增强处理,增强处理就是在AOP框架为普通业务组件织入的处理动作
2:实现Spring的aop
spring实现AOP主要有两种方式
第一种:Spring自身经典的AOP
第二种:AspectJ实现AOP
2.1.1 Spring自身经典的AOP(连接点都当做切点(拦截每一个方法))
接口
public interface studentdao {
	public void add();
	public void select();
}
接口实现
public class studentdaoImpl implements studentdao{
	public void add() {
		// TODO Auto-generated method stub
		System.out.println("student添加方法");
	}

	public void select() {
		// TODO Auto-generated method stub
		System.out.println("student查询方法");
	}
}
通知方法
public class BeforeAdvice  implements MethodBeforeAdvice{
	public void before(Method method, Object[] args, Object target) throws Throwable {
		// TODO Auto-generated method stub
		System.out.println("方法执行之前!");
	}
}
配置文件
此配置文件为传统aop全部拦截
    <bean id="studentdao" class="com.thit.dao.studentdaoImpl"></bean>

	<bean id="BeforeAdvice" class="com.thit.dao.BeforeAdvice"></bean>

	  Spring  aop产生代理对象
	<bean id="studentProxy" class="org.springframework.aop.framework.ProxyFactoryBean">
		  目标类来自ProxyFactoryBean 的属性
		<property name="target" ref="studentdao"></property>
		  实现接口
		<property name="proxyInterfaces" value="com.thit.dao.studentdao"></property>
		  采用拦截的名称
        <property name="interceptorNames" value="BeforeAdvice"/>
		  强制使用cglib
		<property name="optimize" value="true"></property>
	</bean>
测试代码
	public static void main(String[] args) {
		test1();
	}
	static void test1(){
		ApplicationContext applicationContext=new ClassPathXmlApplicationContext("applicationContext.xml");
		studentdao dao=(studentdao) applicationContext.getBean("studentProxy");
		dao.add();
		System.out.println("----------");
		dao.select();
	}
输出结果是:
环绕方法之前
student添加方法
------------------
环绕方法之前
student查询方法
2.1.2 Spring自身经典的AOP(制定拦截方法)
接口和接口实现如上所示
通知方法
//环绕通知
public class AroundAdvice implements  MethodInterceptor{
	public Object invoke(MethodInvocation invocation) throws Throwable {
		// TODO Auto-generated method stub
		System.out.println("环绕方法之前");
		//执行目标方法
		Object o=invocation.proceed();
		System.out.println("环绕方法之后");
		return o;
	}
}
配置文件新增
	<!--目标类  -->
	<bean id="studentdao" class="com.thit.dao.studentdaoImpl"></bean>
	<!-- 环绕通知 -->
	<bean id="AroundAdvice" class="com.thit.dao.AroundAdvice"></bean>

	<!-- 配置切入点 .-->
	<bean id="AroundAdvice123" class="org.springframework.aop.support.RegexpMethodPointcutAdvisor">
		<property name="patterns" value=".*ad.*"></property>
		<property name="advice" ref="AroundAdvice"></property>
	</bean>

	<!--Spring  aop产生代理对象-->
	<bean id="studentProxy" class="org.springframework.aop.framework.ProxyFactoryBean">
		<!--目标类来自ProxyFactoryBean 的属性  -->
		<property name="target" ref="studentdao"></property>
		<!-- 实现接口 -->
		<property name="proxyInterfaces" value="com.thit.dao.studentdao"></property>
		<!-- 采用拦截的名称 -->
        <property name="interceptorNames" value="AroundAdvice123"/>
	</bean>
测试方法
	public static void main(String[] args) {
		test1();
	}
	static void test1(){
		ApplicationContext applicationContext=new ClassPathXmlApplicationContext("applicationContext.xml");
		studentdao dao=(studentdao) applicationContext.getBean("studentProxy");
		dao.add();
		System.out.println("----------");
		dao.select();
	}
执行结果:
环绕方法之前
student添加方法
环绕方法之后
----------
student查询方法
在此思考,随着需要增强的目标类的增多,例如随着dao的增加,每一个dao都需要增加切点,springAOP产生的代理对象会增加
那么配置文件需要不断增加,以为每一个代理都是通过org.springframework.aop.framework.ProxyFactoryBean织入切面代理的,导致ProxyFactoryBean维护变大,所以引进动态代理。
动态代理方法一:基于baan名称的自动代理方式 BeanNameAutoProxyCreator
配置文件新增
	<!-- 传统aop 全部拦截 -->
	<!--目标类  -->
	<bean id="studentdao" class="com.thit.dao.studentdaoImpl"></bean>
	<!-- 环绕通知 -->
	<bean id="AroundAdvice" class="com.thit.dao.AroundAdvice"></bean>

	<!-- 配置切入点 .*ad.*,.*select.*-->
	<bean id="AroundAdvice123" class="org.springframework.aop.support.RegexpMethodPointcutAdvisor">
		<property name="patterns" value=".*ad.*"></property>
		<property name="advice" ref="AroundAdvice"></property>
	</bean>

	<bean id="studentProxy" class="org.springframework.aop.framework.autoproxy.BeanNameAutoProxyCreator">
		<property name="beanNames" value="*dao1"></property>
        <property name="interceptorNames" value="AroundAdvice123"></property>
	</bean>
测试方法
	 void test2(){
			ApplicationContext applicationContext=new ClassPathXmlApplicationContext("applicationContext.xml");
			studentdao dao=(studentdao) applicationContext.getBean("studentdao");
			dao.add();
			System.out.println("----------");
			dao.select();
	}
输出结果
环绕方法之前
student添加方法
环绕方法之后
----------
student查询方法
动态代理方法二:基于切面信息的自动代理方式 DefaultAdvisorAutoProxyCreator
配置文件新增
	<!--目标类  -->
	<bean id="studentdao" class="com.thit.dao.studentdaoImpl"></bean>
	<!-- 环绕通知 -->
	<bean id="AroundAdvice" class="com.thit.dao.AroundAdvice"></bean>
	<!-- 配置切入点 .*ad.*,.*select.*-->
	<bean id="AroundAdvice123" class="org.springframework.aop.support.RegexpMethodPointcutAdvisor">
		<property name="patterns" value=".*ad.*"></property>
		<property name="advice" ref="AroundAdvice"></property>
	</bean>

	<bean class="org.springframework.aop.framework.autoproxy.DefaultAdvisorAutoProxyCreator"/>
测试代码如下
	 void test2(){
			ApplicationContext applicationContext=new ClassPathXmlApplicationContext("applicationContext.xml");
			studentdao dao=(studentdao) applicationContext.getBean("studentdao");
			dao.add();
			System.out.println("----------");
			dao.select();
	}
输出结果:
环绕方法之前
student添加方法
环绕方法之后
----------
student查询方法