版权声明:本文为King_HAW原创文章,未经King_HAW允许不得转载。 https://blog.csdn.net/King_HAW/article/details/76695456
系统 Ubuntu14.04.4 LTS x64
GPU NVIDIA GeForce GTX 750Ti
TensorFlow GPU版本首先需要安装NVIDIA显卡驱动,并且需要CUDA以及cuDNN支持,这里采用的显卡驱动版本为375.39,CUDA版本为8.0,cuDNN版本为5.1。具体安装过程请见深度学习平台Caffe环境搭建【GPU版】
安装完成之后,开始搭建TensorFlow平台。
首先安装libcupti-dev library,官方给出的解释为NVIDIA CUDA Profile Tools Interface。其实就是NVIDIA的一个库。执行命令:
sudo apt-get install libcupti-dev官方给出了4种安装方法,因为电脑里面已经装有Caffe,为了避免产生冲突,这里选择使用virtualenv安装,virtualenv是一个python管理工具,它可以创建一个独立的python环境,程序运行在这里面可以不受其他python library版本的影响。使用python 2.7,执行命令:
sudo apt-get install python-pip python-dev python-virtualenv创建一个名为tensorflow的virtualenv环境
virtualenv --system-site-packages ~/tensorflow激活virtualenv环境
source ~/tensorflow/bin/activate此时在命令行的最前面会出现(tensorflow),表示环境激活成功。
接下来安装TensorFlow GPU版本。
pip install --upgrade tensorflow-gpu可能出现问题:
Downloading/unpacking tensorflow-gpu
Could not find any downloads that satisfy the requirement tensorflow-gpu
Cleaning up...
No distributions at all found for tensorflow-gpu
Storing debug log for failure in /tmp/tmpmUPZAM
这是因为pip的版本过低,执行命令:
pip install -U pip升级pip之后,再次执行TensorFlow GPU版本安装命令。
安装完成之后,执行deactivate关闭环境。
为了以后激活tensorflow环境更加简单,执行以下命令将tensorflow激活命令写入bash
sudo printf '\nalias tensorflow="source ~/tensorflow/bin/activate"' >>~/.bashrc刷新bash之后,键入tensorflow即可激活tensorflow环境。
激活tensorflow环境后开始测试。
进入python, 执行以下命令:
>>> import tensorflow as tf
>>> hello = tf.constant('Hello, TensorFlow!')
>>> sess = tf.Session()
>>> print(sess.run(hello))
Hello, TensorFlow!
>>> a = tf.constant(10)
>>> b = tf.constant(32)
>>> print(sess.run(a + b))
42
出现上述结果说明安装成功。
执行测试demo
# encoding: utf-8
import tensorflow as tf
import numpy
import matplotlib.pyplot as plt
rng = numpy.random
learning_rate = 0.01
training_epochs = 1000
display_step = 50
# 数据集x
train_X = numpy.asarray([3.3,4.4,5.5,7.997,5.654,.71,6.93,4.168,9.779,6.182,7.59,2.167,
7.042,10.791,5.313,9.27,3.1])
# 数据集y
train_Y = numpy.asarray([1.7,2.76,3.366,2.596,2.53,1.221,1.694,1.573,3.465,1.65,2.09,
2.827,3.19,2.904,2.42,2.94,1.3])
n_samples = train_X.shape[0]
X = tf.placeholder("float")
Y = tf.placeholder("float")
W = tf.Variable(rng.randn(), name="weight")
b = tf.Variable(rng.randn(), name="bias")
pred = tf.add(tf.multiply(X, W), b)
cost = tf.reduce_sum(tf.pow(pred-Y, 2))/(2*n_samples)
optimizer = tf.train.GradientDescentOptimizer(learning_rate).minimize(cost)
init = tf.initialize_all_variables()
with tf.Session() as sess:
sess.run(init)
# 训练数据
for epoch in range(training_epochs):
for (x, y) in zip(train_X, train_Y):
sess.run(optimizer, feed_dict={X: x, Y: y})
print "优化完成!"
training_cost = sess.run(cost, feed_dict={X: train_X, Y: train_Y})
print "Training cost=", training_cost, "W=", sess.run(W), "b=", sess.run(b), '\n'
#可视化显示
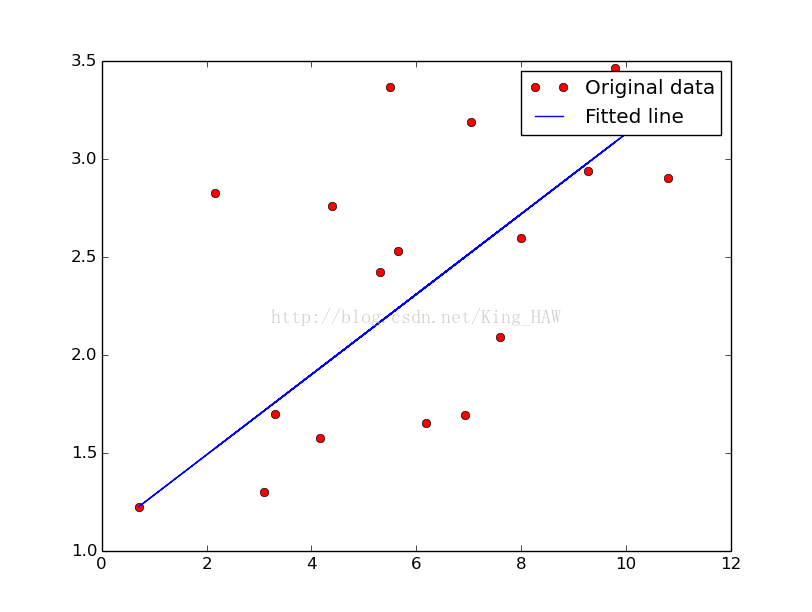
plt.plot(train_X, train_Y, 'ro', label='Original data')
plt.plot(train_X, sess.run(W) * train_X + sess.run(b), label='Fitted line')
plt.legend()
plt.show()出现结果
至此tensorflow安装结束,可以开始构建网络了。