第二章学习笔记
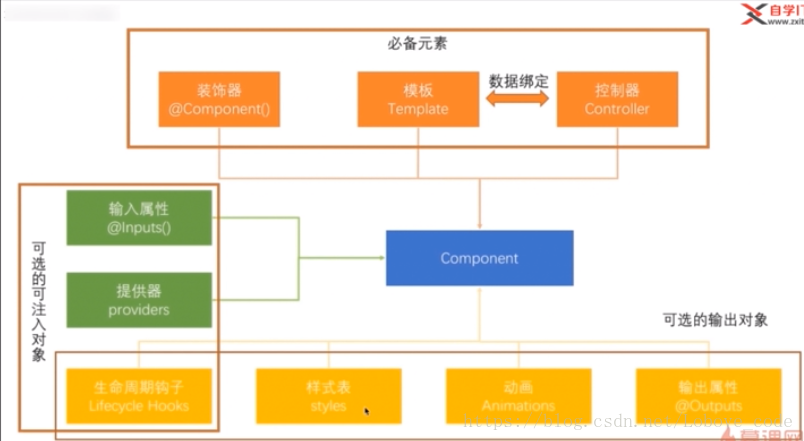
Angular程序架构
组件:是Angular应用的基本构建块,你可以把一个组件理解为一段带有业务逻辑和数据的html
模块:模块用来将应用中不同的部分组织成一个Angular框架可以理解的单元
服务:用来封装可重用的业务逻辑
指令:允许你向html元素添加自定义行为
环境搭建
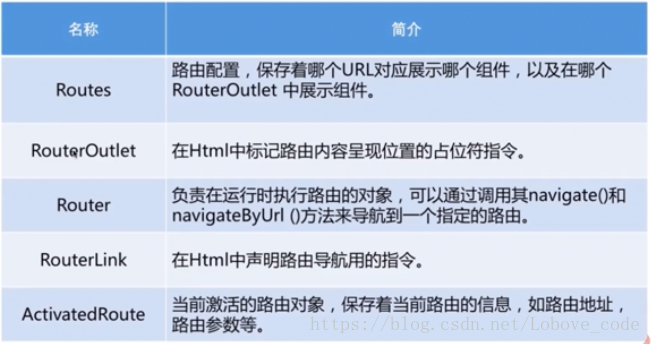
第三章 使用Angular Route路由
路由基础:
路由传参:
1.在查询参数中传递数据
/product?id=1&name=2  =>  ActivatedRoute.queryParams[id]
[routerLink]="['/product']" [queryParams]="{id:1}"
this.routeInfo.snapshot.queryParams['id']
2.在路由的路径中传递数据
{path:/product/:id}  =>  /product/1  =>  ActivatedRoute.params[id]
[routerLink]="['/product',1]"
this.routeInfo.snapshot.params['id']
3.在路由配置中传递数据
{path:/product,component:ProductComponent,data:[{isProd:true}]} => ActivatedRoute.data[0][isProd]参数快照和参数订阅(subscribe)
this.routeInfo.snapshot.params['id'] //参数快照
this.routeInfo.params.subscribe((params:Params)=>{this.id=params['id']}) //参数订阅,解决相同页面改变参数的问题路由重定向:在用户访问一个特定的地址时,将其重定向到另一个指定的地址
www.aaa.com => www.aaa.com/products
{ path: '', redirectTo: '/home', pathMatch: 'full' } /是重定向到根路由,不加是在子路由中找子路由:
 { path: '', redirectTo: 'home', pathMatch: 'full' },
  {
    path: '', component: MessageHomeComponent,
    children: [
      { path: 'home', component: MessageCenterComponent },
      { path: 'resource', component: ExternalResourceComponent },
    ]
  }

[routerLink]="['./home]" ./表示当前路由的子路由,/表示是从根路由开始辅助路由:
<router-outlet></router-outlet> //主插座  独立变化
<router-outlet name="aux"></router-outlet>//辅助插座{path:'xxx',component:XxxComponent,outlet:'aux'}
{path:'yyy',component:YyyComponent,outlet:'aux'}
[routerLink]="[{outlets:{aux:'xxx}}]" //辅助路由与主路由无关
[routerLink]="[{outlets:{primary:'home',aux:'yyy}}]" //辅助路由跳到yyy的同时,主路由也跳到home
[routerLink]="[outlets:{aux:null}]" //不使用辅助路由路由守卫:
CanActivate:处理导航到某路由的情况
CanDeactivate:处理路由从当前路由离开的情况
Resolve:在路由激活之前获取路由数据 (带着数据进去路由,使其进去就有数据)
第四章 依赖注入
依赖注入:Dependency Injection 简称DI 控制反转:Inversion of Control 简称IOC
**使用依赖注入的好处:**1.松耦合,可重用 2.提高可测试性
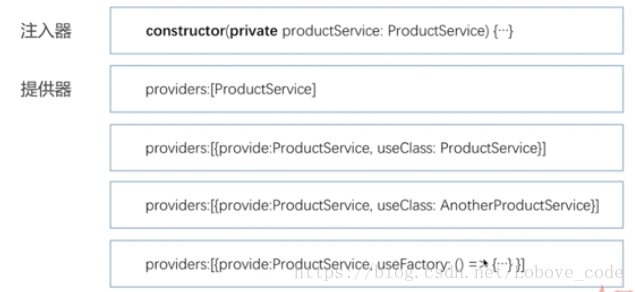
provider提供的作用域:
1.声明器声明在模块中时,对模块中所有组件可见
2.声明器声明在组件中时,只对声明它的组件及其子组件可见
3.当模块的和组件中的provide相同时,组件中的声明器覆盖模块中的
4.优先在模块中声明
服务中的@Injectable():意思是该服务可以注入其他服务
第五章 数据绑定、响应式编程和管道
数据绑定:默认单向绑定
1.使用插值表达式{{}}
2.使用[]绑定属性
3.使用()绑定事件
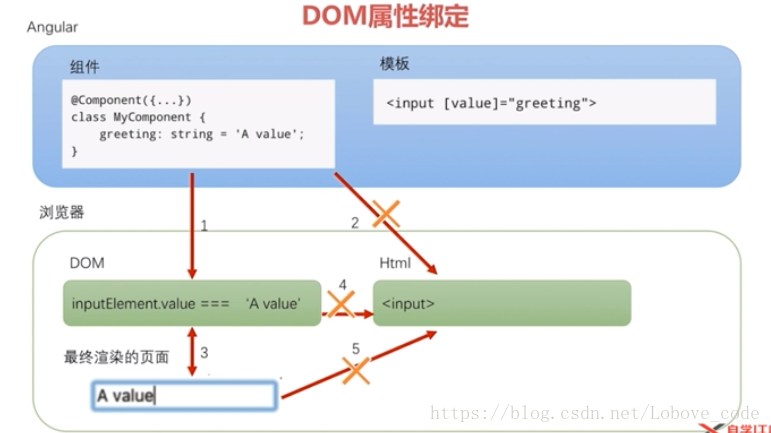
DOM属性和Html属性,angular改变的是DOM属性,html属性不会发生变化
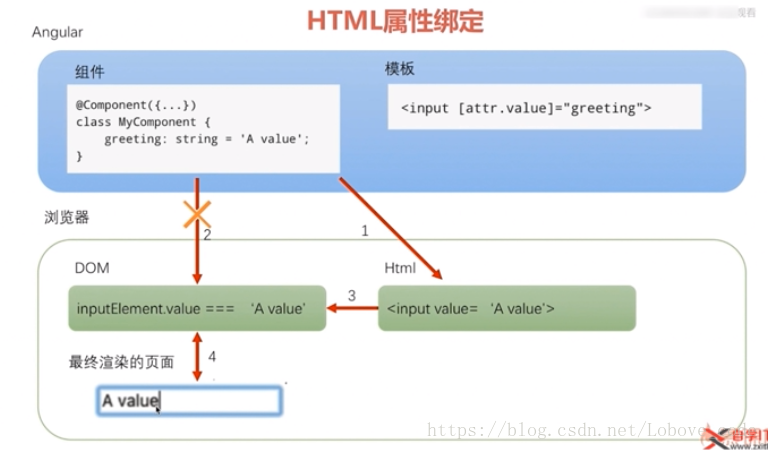
HTML属性绑定:
1.基本Html属性绑定 <td [attr.colspan]="tableColspan">Something<td>
2.CSS类属性绑定
<div class="aaa bbb" [class]="someExpression">something</div>    表达式的值会完全替换掉class的值
<div [class.special]="isSpecial">something</div>   根据boolean值判断是否需要special
<div [ngClass]="{aaa:isA,bbb:idB}">something</div> 3.样式绑定
<button [style.color]="isSpecial?'red':'green'">red</button>
[style.font-size.px] //带单位
[ngStyle]="{}"双向数据绑定:[()]
内置管道:
date:'yyyy-MM-dd HH:mm:ss'
number:'2.1-4'  //两位整数,小数最少1(默认为0)位最多4(默认为3)位
json  //JSON.stringify
uppercase  //所有小写转化为大写字母
lowercase  //所有大写转化为小写
currency: 'CNY': true: '3.1-3'  //货币管道
percent  //百分数
slice:start[:end]  //截取 slice()
async //异步流自定义管道:
import { Pipe, PipeTransform } from '@angular/core';
import { DomSanitizer } from '@angular/platform-browser';
@Pipe({
    name: 'textFiltering'
})
export class TextFilteringPipe implements PipeTransform {
     transform(value: any, args?: any): any {
         //value是管道前面的值,args是管道后面的可选参数
        value = value || '暂无获取内容';
        return this.sanitizer.bypassSecurityTrustHtml(value);
    }
}<div [innerHtml]="data?.content| textFiltering"></div> //data?.content为管道的value值
<span>发布时间:{{item?.startDate | date:'yyyy-MM-dd'}}</span> //'yyyy-MM-dd'为管道的args第六章 组件间通信
父组件传值给子组件:
父组件:
<app-index [title]="title" [run]="run"></app-index>子组件:
import { Input } from '@angular/core';
@Input() title;
@Input() run;
//这样就可以直接使用{{title}},和this.run()在子组件使用父组件的值和方法。
子组件传值给父组件
子组件中:
import { EventEmitter, Input, Output } from '@angular/core';
@Output() selectionChange = new EventEmitter();
//事件中
 this.selectionChange.emit("我是子组件的数据");
父组件中
// selectionChange即是子组件发送的数据
<app-index (selectionChange)="getData($event)"></app-index>
// ts文件中:
getData(msg:string)
{
     console.log(msg);// 接收到的数据
}
父组件主动调用子组件
// 引用子组件
<app-index #index></app-index>
// 使用子组件中的方法
<button (click)="index.childRun()">调用index中的方法</button>
也可以在ts文件中调用:
// 引用子组件 html文件
<app-index #index></app-index>
<button (click)="parentClick(index)">调用index中的方法</button>
// ts 文件
parentClick(obj)
{
    obj.childRun();
}ViewChild主动获取数据:
在页面中引入ViewChild
import { ViewChild } from '@angular/core';
@ViewChild("index") index;
// html中引用组件
<app-index #index></app-index>  //#index相当于是一个选择器,包含模板
<button (click)="parentClick()">调用index中的方法</button>
// ts文件中使用子组件的方法和数据
parentChild()
{
    this.index.childRun();
}组件生命周期函数:
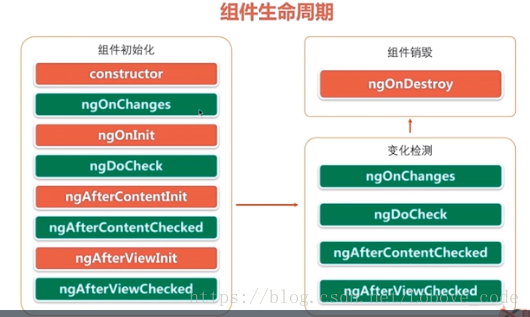
(红色的只执行一次,绿色的执行多次)
调用顺序:
- cunstructor- 构造
- ngOnChanges - 当数据绑定输入属性的值发生变化时调用
- ngOnInit - 在第一次 ngOnChanges 后调用,只调用一次
- ngDoCheck - 自定义的方法,用于检测和处理值的改变,调用特别频繁
- ngAfterContentInit - 在组件内容初始化之后调用,它主要用于获取通过 @ContentChild 或 @ContentChildren 属性装饰器查询的内容视图元素。
- ngAfterContentChecked - 组件每次检查内容时调用
- ngAfterViewInit - 组件相应的视图初始化之后,调用它主要用于获取通过 @ViewChild 或 @ViewChildren 属性装饰器查询的视图元素。
- ngAfterViewChecked - 组件每次检查视图时调用
- ngOnDestroy - 指令销毁前调用
ngAfterViewInit和ngAfterViewChecked钩子注意:
- 子组件调用完毕之后,父组件才调用
- 不能再这两个函数中改变绑定到视图中的值,可以用
setTimeout(()=>{
    this.message="Hello"
},0)投影:
父组件中:
<app-child>
    <div class="header">header这是父组件投影到子组件中的内容</div>
    <div class="footer">footer这是父组件投影到子组件中的内容</div>
</app-child>
子组件中:
<ng-content select=".header"></ng-content> //父组件的header内容投影到这里
<ng-content select=".footer"></ng-content> //父组件的footer内容投影到这里
第七章 表单处理
模板式表单:表单的数据模型是通过组件模板中的相关指令来定义的,因为使用这种方式定义表单的数据模型时,我们会受限于HTML的语法,所以模板驱动方式只适合用于一些简单的场景。
响应式表单:使用响应式表单时,你通过编写TypeScript代码而不是Html代码来创建一个底层的数据模型,在这个模型定义好以后,你使用一些特定的指定,将模板上的Html元素与底层的数据模型连接在一起。
模板式表单需要引入FormsModule
响应式表单需要引入ReactiveFormsModule
import { FormsModule,ReactiveFormsModule } from "@angular/forms"; 模板式表单:
<form action="/login" method="post">   //angular会默认改为ngForm,当点击登录时,不会走/login
    <div>用户名:<input type="text"/></div>
    <div>密码:<input type="password"/></div>
    <button type="submit">登录</button>
</form>
<div ngForm></div>  //效果同form
<form action="/login" method="post" ngNoForm> </form> //此刻angular不会接管该表单,会走/login响应式表单:
html:
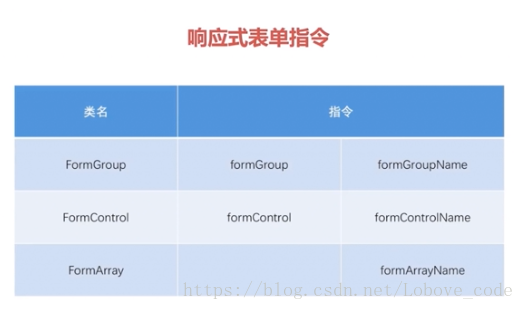
<form [formGroup]="formModel" (submit)="onSubmit()">
    <input formControlName="username">
    <div formGroupName="dateRange">
        起始时间:<input type="date" formControlName="from">
        截止时间:<input type="date" formControlName="to">
    </div>
    <div>
        <ul formArrayName="emails">
            <li *ngFor="let e of this.formModel.get('emails').controls;let i=index;">
                <input type="text" [formControlName]="i">
            </li>
        </ul>
        <button type="button" (click)="addEmail()">增加Email</button>
    </div>
    <div>
        <button type="submit">保存</button>
    </div>
</form>
ts:
import { FormBuilder, FormGroup, Validators, FormControl } from '@angular/forms';
export class ReactiveFormComponent implements Oninit{
    cunstructor(
     private fb: FormBuilder,
    ){}
    formModel:FormGroup = new FormGroup({  // this.fb.group({})
        dateRange:new FormGroup({
            from:new FormControl(), //from:['初始值',检验方法,异步的校验方法]
            to:new FormControl()        }),
        emails:new FormArray([
            new FormControl("[email protected]"),
            new FormControl("[email protected]")
        ]),
        userName:new FormControl('aaa')
    })
    addEmail(){
        let emails=this.formModel.get("emails") as FormArray;
        emails.push(new FormControl());
    }
}表单校验:
预定义校验器,Validators.XXX
required、minLength()、maxLength()
formModel:FormGroup=this.fb.FormGroup({
    userName:['',[Validator.required,Validators.maxLength(20)]]
})
//验证
this.formModel.get('userName').valid  //boolean
this.formModel.get('userName').errors //打印错误
*ngIf="this.formModel.hasError('required','userName')" //下载html里做提示判断
this.formModel.getError('equal','passwordsGroup')?.descxxx //自己写的验证器里的错误提示状态字段:
touched和untouched 字段是否获取过焦点
pristine和dirty 字段的值未被改变过时,pristine为true,dirty为false
pending 当字段进行异步校验时,pending为true
针对所有的这些状态字段,Angular都会自动根据其状态为其添加一些样式,你可以通过定义这些样式,来个性化dom元素在不同状态下的外观 以下:
ng-untouched, ng-pristine, ng-invalid ng-touched, ng-dirty, ng-valid
第八章 与服务器通讯
第九章 构建和部署
构建:编译和合并(将typeScript代码编译成静态文件)
执行 ng build或者npm run build 之后,在项目app文件夹下回增加一个dist文件夹
部署:与服务器整合
将构建以后的dist里的所有文件复制到服务器里去,有时候会找不到路径,需要在
appModule.ts中
providers: [{provide: LocationStrategy, useClass: HashLocationStrategy}] 这样设置后,访问angular站点,会自动在根节点后面加一个#锚点。再次刷新便不会报404错误了。
多环境:一套代码支持多种环境
在.angular-cli.json中,不同环境对应不同的环境配置
"environments": { //几个环境对象的属性保持一致
    "source":"environments/environment.ts",
    "dev": "environments/environment.ts",
    "test": "environments/environment.test.ts",
    "prod": "environments/environment.prod.ts"
} 想要项目启动的环境,在package.json中:
"scripts": {
     //"start": "ng serve --proxy-config proxy.conf.json",
    "start": "ng serve --env=prod --proxy-config proxy.conf.json",
} 想要部署中更换环境,执行ng build –env=prod或者 nom run build –env=prod