入门安装go-etherenum
搭建私有链
官方文档提供两种方式,本文使用源码编译
下载源码
git clone https://github.com/ethereum/go-ethereum
安装golang
yum install golang
编译
cd go-ethereum
make geth

config配置文件
{
  "coinbase"   : "0x0000000000000000000000000000000000000000",
  "difficulty" : "0x400",
  "extraData"  : "0x0",
  "gasLimit"   : "0x2fefd8",
  "nonce"      : "0xdeadbeefdeadbeef",
  "mixhash"    : "0x0000000000000000000000000000000000000000000000000000000000000000",
  "parentHash" : "0x0000000000000000000000000000000000000000000000000000000000000000",
  "timestamp"  : "0x00",
  "alloc"      : {}
}
异常
go-ethereum/build/bin/geth init go-ethereum/eth/piccgenesis.json Fatal: invalid genesis file: json: cannot unmarshal hex string without 0x prefix into Go struct field Genesis.extraData of type hexutil.Bytes
[root@iz2ze20vl8jnph0si0n7jsz watt]# go-ethereum/build/bin/geth init go-ethereum/eth/piccgenesis.json
INFO [01-29|21:20:19] Allocated cache and file handles         database=/root/.ethereum/geth/chaindata cache=16 handles=16
Fatal: Failed to write genesis block: database already contains an incompatible genesis block (have d4e56740f876aef8, new a0e580c6769ac3dd)
原因由于上次执行命令初始化
启动私有链节点
启动Geth即可以启动以太坊的区块链,为了构建私有链 ,需要在Geth启动时加入一些参数,Geth参数含义如下:
 指定datadir存储位置,重新执行命令
build/bin/geth --datadir /home/watt/ethereumdata init eth/piccgenesis.json
config.json文件
{
  "config": {
        "chainId": 15,
        "homesteadBlock": 0,
        "eip155Block": 0,
        "eip158Block": 0
    },
    "coinbase" : "0x0000000000000000000000000000000000000000",
    "difficulty" : "0x40000",
    "extraData" : "",
    "gasLimit" : "0xffffffff",
    "nonce" : "0x0000000000000042",
    "mixhash" : "0x0000000000000000000000000000000000000000000000000000000000000000",
    "parentHash" : "0x0000000000000000000000000000000000000000000000000000000000000000",
    "timestamp" : "0x00",
    "alloc": { }
}

有个疑问那初始化的数据存储路径在哪呢? 通过指定的路径生成数据文件名称,使用find命令查找如下


查看初始化数据文件大小如下

重新配置参数
获取当前的目录

/home/watt/go-ethereum/build/bin/geth  --datadir "/home/watt/ethereumchain" init /home/watt/go-ethereum/eth/piccgenesis.json

创建数据存放地址并初始化创世块

/home/watt/go-ethereum/build/bin/geth --identity "PICCetherum"  --rpc  --rpccorsdomain "*" --datadir "/home/watt/ethereumchain" --port "30303"  --rpcapi "db,eth,net,web3"--networkid 95518 console
启动日志
INFO [01-29|22:08:58] Allocated cache and file handles         database=/home/watt/ethereumchain/geth/chaindata cache=16 handles=16
INFO [01-29|22:08:58] Writing custom genesis block
INFO [01-29|22:08:58] Successfully wrote genesis state         database=chaindata                               hash=a0e580…a5e82e
INFO [01-29|22:08:58] Allocated cache and file handles         database=/home/watt/ethereumchain/geth/lightchaindata cache=16 handles=16
INFO [01-29|22:08:58] Writing custom genesis block
INFO [01-29|22:08:58] Successfully wrote genesis state         database=lightchaindata                               hash=a0e580…a5e82e
[root@iz2ze20vl8jnph0si0n7jsz go-ethereum]# /home/watt/go-ethereum/build/bin/geth --identity "PICCetherum"  --rpc  --rpccorsdomain "*" --datadir "/home/watt/ethereumchain" --port "30303"  --rpcapi "db,eth,net,web3"--networkid 95518 console
INFO [01-29|22:09:20] Starting peer-to-peer node               instance=Geth/PICCetherum/v1.8.0-unstable-722bac84/linux-amd64/go1.8.3
INFO [01-29|22:09:20] Allocated cache and file handles         database=/home/watt/ethereumchain/geth/chaindata cache=128 handles=1024
WARN [01-29|22:09:20] Upgrading database to use lookup entries
INFO [01-29|22:09:20] Initialised chain configuration          config="{ChainID: 15 Homestead: 0 DAO: <nil> DAOSupport: false EIP150: <nil> EIP155: 0 EIP158: 0 Byzantium: <nil> Engine: unknown}"
INFO [01-29|22:09:20] Disk storage enabled for ethash caches   dir=/home/watt/ethereumchain/geth/ethash count=3
INFO [01-29|22:09:20] Disk storage enabled for ethash DAGs     dir=/root/.ethash                        count=2
INFO [01-29|22:09:20] Initialising Ethereum protocol           versions="[63 62]" network=1
INFO [01-29|22:09:20] Database deduplication successful        deduped=0
INFO [01-29|22:09:20] Loaded most recent local header          number=0 hash=a0e580…a5e82e td=262144
INFO [01-29|22:09:20] Loaded most recent local full block      number=0 hash=a0e580…a5e82e td=262144
INFO [01-29|22:09:20] Loaded most recent local fast block      number=0 hash=a0e580…a5e82e td=262144
INFO [01-29|22:09:20] Regenerated local transaction journal    transactions=0 accounts=0
INFO [01-29|22:09:20] Starting P2P networking
INFO [01-29|22:09:22] UDP listener up                          self=enode://4fadb2bd1b9e7efca20c99c067930c7bb5cd9c27ea38aef11fd514bed4abb1b2697651194fd1b765a51c3648e001542fbf57ef2c4912469e384139bb61c57f60@[::]:30303
INFO [01-29|22:09:22] HTTP endpoint opened: http://127.0.0.1:8545
INFO [01-29|22:09:22] IPC endpoint opened: /home/watt/ethereumchain/geth.ipc
INFO [01-29|22:09:22] RLPx listener up                         self=enode://4fadb2bd1b9e7efca20c99c067930c7bb5cd9c27ea38aef11fd514bed4abb1b2697651194fd1b765a51c3648e001542fbf57ef2c4912469e384139bb61c57f60@[::]:30303
卡住了,需要把root下的
rm -rf ethereumchain/
rm -rf .ethereum/
清除后重现执行执行输出如下:
INFO [01-29|22:47:57] HTTP endpoint opened: http://127.0.0.1:8545
INFO [01-29|22:47:57] RLPx listener up                         self=enode://fc07f632a636c713a2621902d5eac3b1969afd54d255812ac767484d926fd1d5113d243467e59e8c0864e63b60240dbd7d55d3b34058fa388f1002f6b20bcfec@[::]:30303
INFO [01-29|22:47:57] IPC endpoint opened: /home/watt/ethereumchain/geth.ipc
INFO [01-29|22:48:17] Block synchronisation started
INFO [01-29|22:48:24] Imported new block headers               count=192 elapsed=1.250s number=192 hash=723899…123390 ignored=0
INFO [01-29|22:48:24] Imported new block headers               count=384 elapsed=53.824ms number=576 hash=41a746…6a8b38 ignored=0
INFO [01-29|22:48:24] Imported new block receipts              count=2   elapsed=17.637ms bytes=8 number=2   hash=b495a1…4698c9 ignored=0
INFO [01-29|22:48:24] Imported new block headers               count=384 elapsed=55.720ms number=960 hash=916910…1d0e2a ignored=0
INFO [01-29|22:48:24] Imported new block receipts
但是未能调用javasript console页面 通过查询发现需要增加 --dev 参数 另开窗口输入命令
/home/watt/go-ethereum/build/bin/geth --dev console 2>> file_to_log_output
看到如下结果: 
使用私有链
查看账户
eth.accounts
创建用户:
personal.newAccount("111111")
其中参数为此账户的密码。
也可以先创建账户,然后输入密码:
personal.newAccount()
查看区块数据
eth.blockNumber
启动挖矿
miner.start()
返回结果为true则启动成功,具体执行情况可查看日志。
停止挖矿
miner.stop()
当在执行挖矿时日志会不停刷屏,不用管,只要命令输入全,执行即可停止挖矿。
查看账户余额
其中参数为区块链地址
eth.getBalance("0x7d1f7be4112ce63b9de04a0bf95c1e87e430bd1b")
转账
从账户0x7d1f7be4112ce63b9de04a0bf95c1e87e430bd1b转账3个以太币到0x587e57a516730381958f86703b1f8e970ff445d9。
eth.sendTransaction({from:"0x7d1f7be4112ce63b9de04a0bf95c1e87e430bd1b",to:"0x587e57a516730381958f86703b1f8e970ff445d9",value:web3.toWei(3,"ether")})
当直接执行此方法时会抛出异常:
account is locked
    at web3.js:3119:20
    at web3.js:6023:15
    at web3.js:4995:36
    at <anonymous>:1:1
很明显,账户被锁。
解锁转出账户
其中第一个参数为转出账户,第二个参数为密码。也可以直填写第一个参数,然后通过命令行提示再输入密码。
personal.unlockAccount("0x7d1f7be4112ce63b9de04a0bf95c1e87e430bd1b","111111")
解锁完成之后,即可执行转账操作。但此时查看时会发现接收账户依旧为原来数值。此时需要执行挖矿命令,才会把转账真正完成。
看似美好,执行命令后
> eth.accounts
["0x709447961e479f696a496243cbeff83b851908b2"]
> personal.newAccount("111111")
"0x489835dff4d2270ae2c6a148ca313858bf1e4994"
> eth.blockNumber
0
> miner.start()
null
>
发现miner.start() 为null
Pre-allocating ether to your account
A difficulty of “0x400” allows you to mine Ether very quickly on your private testnet chain. If you create your chain and start mining, you should have hundreds of ether in a matter of minutes which is way more than enough to test transactions on your network. If you would still like to pre-allocate Ether to your account, you will need to:

Create a new Ethereum account after you create your private chain
Copy your new account address
Add the following command to your Custom_Genesis.json file:
"alloc":
{
        "0x709447961e479f696a496243cbeff83b851908b2":
        { "balance": "20000000000000000000" }
}
Note

Replace 0x1fb891f92eb557f4d688463d0d7c560552263b5a with your account address.

Save your genesis file and rerun your private chain command. Once geth is fully loaded, close it by .

We want to assign an address to the variable primary and check its balance.

Run the command geth account list in your terminal to see what account # your new address was assigned.
需要执行命令
miner.setEtherbase(personal.listAccounts[0])
查看日志
INFO [01-29|23:14:53] Starting mining operation
INFO [01-29|23:14:53] Commit new mining work                   number=1 txs=0 uncles=0 elapsed=65.571µs
WARN [01-29|23:14:53] Block sealing failed                     err="waiting for transactions
继续努力
#返回钱包管理的账户地址列表
#返回示例:["0x3138e3722fb4280cb67f6e858108136bfa1c9160"]
eth.accounts

#创建账户地址,参数为账户锁定密码,在转账前需要先解锁账户
#我们把这个命令运行两次,创建两个地址,加上默认的,一共有了三个账户地址
personal.newAccount('111111')
personal.newAccount('111111')

#为账户设置别名,方便命令输入
user1=eth.accounts[0]
user2=eth.accounts[1]
user3=eth.accounts[2]

#查看地址user1余额,这个地址是测试链默认开通的一个地址,里面初始化有很多币
#我们创建的另外两个地址余额未0
eth.getBalance(user1)

#查看区块高度,现在为0
eth.blockNumber

#转账测试,首先解锁账号user1
#命令运行后要求输入解锁密码,直接回车,默认账号锁定密码为空,返回true成功
personal.unlockAccount(user1)

#从user1向user2转账3个以太币
#命令运行后,提交交易立马回出发挖矿
eth.sendTransaction({from:user1,to:user2,value:web3.toWei(3,"ether")})

#查看区块高度,这时高度为1
eth.blockNumber
还是null
挖矿测试
geth启动后,自动启动挖矿,这时运行miner.start(),返回为null 无交易的时候不挖矿,当有交易时自动会触发挖矿流程

#我们可以先停止挖矿
miner.stop()

#提交交易,这时候只提交,查看账户余额,但是未确认
eth.sendTransaction({from:user1,to:user2,value:web3.toWei(3,"ether")})

#启动挖矿,确认交易,再次查看账户余额
miner.start()

#那么挖矿奖励去哪儿了?查看矿工地址
eth.coinbase

#设置矿工地址
miner.setEtherbase(eth.coinbase)
下面我列举了三种解决方案,前面两张是某两位大佬试出来的,第三种是我蒙出来的。
第一种解决方案
转载自 http://mp.weixin.qq.com/s/AB9vj1EzOgWT7JyryfQhDg
问题场景
最近技术群中的朋友经常问到这样的问题,环境搭建已经搭建好,geth节点也成功启动,可为什么当执行miner.start()方法时却没有挖矿,返回null。
其实,不仅仅这些朋友,本人在启动最新节点进行挖矿的时候也遇到类似的问题。今天就带大家分析一下引起这个问题可能的几个原因。
是否设置miner地址
启动节点挖矿之前,需要查看当前节点中是否已经存在账号,可执行以下命令,查看当前节点下面是否有账号存在。
>personal.listAccounts["0xc040cbd8a189d36f580fa83c2ffe3a26fb3e6a7e", "0xe0d1de6c934049fe4847b64becff5885bdb83fa4"]
当确认账户已经存在时,可以设置Etherbase。先查看以下coinbase账户:
>eth.coinbase"0xc040cbd8a189d36f580fa83c2ffe3a26fb3e6a7e"
通过上面的命令,可以看到coinbase的账户地址,也就是上面查看地址查到第一个地址。
执行设置miner地址:
>miner.setEtherbase(eth.coinbase)true
也可以执行执行以下命令进行设置:
>miner.setEtherbase(eth.accounts[0])true
然后,可以再执行挖矿命令,查看是否问题是否解决。
节点误报
另外一种情况就是其实miner.start()命令已经执行成功,只不过节点返回null。如果是dev模式,可以使用eth.blockNumber查看一下区块高度是否增加。
节点版本问题
本人安装的geth-1.7.3版本的节点,在dev环境下验证发现,当执行miner.start()时,返回null。但其实miner已经执行,只不过它在等待你发送交易之后才会生成新的区块。也就是说执行了miner.start(),它一直在等待,这是发送一笔交易,再查看区块高度发现已经增加一块。 (注意这句话,我瞎搞的来源)
第二种解决方案
转载自: https://blog.csdn.net/wo541075754/article/details/79260040
之前的那篇文章也是搜集汇总了网上的各种解决方案,但在实践的过程中发现并不能有效的解决问题,只有发送交易才会自动挖矿。因此,针对此问题又进行了大量资料的阅读查阅,终于找到原因和解决方案。
原因及解决方案
出现此问题的原因在于geth版本更新之后,–dev模式下新增了一个参数项:
--dev               Ephemeral proof-of-authority network with a pre-funded developer account, mining enabled
--dev.period value  Block period to use in developer mode (0 = mine only if transaction pending) (default: 0)
我们先看一下上面的两个参数,–dev是我们常用的参数,之前版本中我们只用使用–dev然后执行miner.start()就可以挖矿,但是在后面的版本中,当我们会发现只有发送交易了才会挖一个块。
引起此问题的原因就是新增了–dev.period value配置项。此配置默认值为0,也就是说只有有pending中的交易才会挖矿。
明白了这个参数的含义之后,解决问题就很简答了,之前的–dev参数依旧使用,然后再在后面添加–dev.period 1,注意,参数值为1,不是默认的0。
再重新启动节点,然后执行挖矿,先不管返回是否是null,执行之后,无论查看日志或执行eth.blockNumber都会发现块在不停的增高。
第三种解决方案
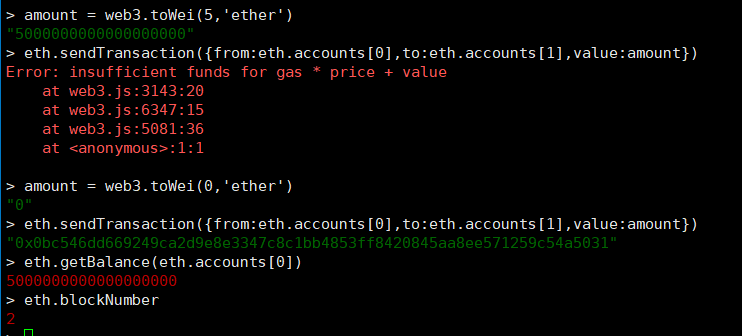
感觉我的不能算解决 miner.start() 放回 null 的问题,不过让 account[0] 拥有了一定 ether ,方便后面测试用,挖不挖矿无所谓啦,
首先解锁 accounts[0] 和 accounts[1]
$ personal.unlockAccount(eth.accounts[0])
$ personal.unlockAccount(eth.accounts[1])
发起一笔 5ether 的交易
$ amount = web3.toWei(5,'ether')
$ eth.sendTransaction({from:eth.accounts[0],to:eth.accounts[1],value:amount})
这时候会显示失败
Error: insufficient funds for gas * price + value
at web3.js:3143:20
at web3.js:6347:15
at web3.js:5081:36
at <anonymous>:1:1
没事,继续发起一笔 0ether 的交易
$ amount = web3.toWei(0,'ether')
$ eth.sendTransaction({from:eth.accounts[0],to:eth.accounts[1],value:amount})
然后就成功了,成功了,成功了,前一笔交易居然成功了。
截图奉上
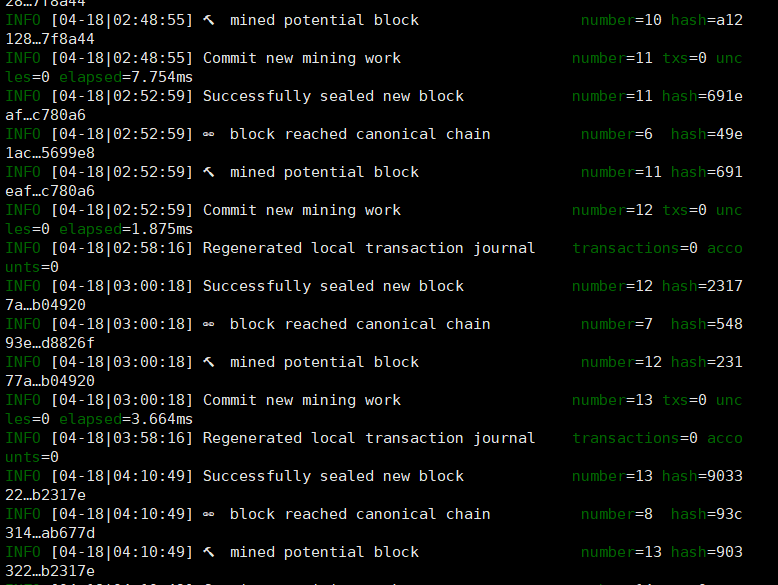
今天再试了一下,发现原来是我的挖矿速率太低,导致交易很久才被打包,平均10分钟挖一个矿(???难道我的私有链和比特币有某种神秘联系), 下面贴图
执行 eth.getHashrate(), 发现只有0,这是什么情况,google简单查了一下, 有说是ubuntu 问题,有说是 gpu 挖矿问题,有空才看看是什么情况,知道什么问题的大佬可以留言告诉我一下。

看到这里的,我建议,换台电脑试试
其他文章
在以太坊私有网络中建立节点集群,并发生交易
以太坊私有链-挖矿blockNumber总是为0是什么原因
以太坊中的账户、交易、Gas 和区块 Gas Limit
区块链纪录片 https://blog.csdn.net/column/details/24035.html
参考资料


欢迎大家一起加入讨论!!!