在分布式系统中,根据业务来拆分成一个个的微服务,服务与服务之间可以相互调用(RPC),在spring cloud 中可以用RestTemplate+ribbon和feign来调用。为了保证其高可用,单个服务有时候会集群部署,由于网络或程序自躾 的原因,服务并不能保证百分百可靠可用,如果单个服务出现问题,调用这个服务就出现线程阻塞,此时若有大量的请求涌入,servlet容器的线程资源就会被消耗完毕导致服务瘫痪。服务与服务之间的依赖性,故障会传播,会对整个微服务系统造成不可估量的严重后果,这就是常说的服务故障的“雪崩效应”。为了解决这个问题,有人就提出了一种解决问题的思路,断路器模型。就是每一个调用服务的接口处加一个断路器,默认是关闭的,当对服务调用时,不可用的次数达到一个阀值时,断路器就会打开,通过回调方法迅速返回一个值结束调用,避免出现连锁故障。
一、改造上一篇文章的zhangsanService(ribbon+restTemplate方式),在pom.xml中加入hystrix的依赖
<dependency>
<groupId>org.springframework.cloud</groupId>
<artifactId>spring-cloud-starter-hystrix</artifactId>
</dependency>
改造启动类ZhangsanServiceApplication.java:
package com.gaox.zhangsanService;

import com.netflix.hystrix.contrib.javanica.annotation.HystrixCommand;
import org.springframework.beans.factory.annotation.Autowired;
import org.springframework.boot.SpringApplication;
import org.springframework.boot.autoconfigure.SpringBootApplication;
import org.springframework.cloud.client.loadbalancer.LoadBalanced;
import org.springframework.cloud.netflix.eureka.EnableEurekaClient;
import org.springframework.cloud.netflix.hystrix.EnableHystrix;
import org.springframework.context.annotation.Bean;
import org.springframework.web.bind.annotation.RequestMapping;
import org.springframework.web.bind.annotation.RestController;
import org.springframework.web.client.RestTemplate;

@SpringBootApplication
@EnableEurekaClient
@EnableHystrix
@RestController
public class ZhangsanServiceApplication {

   public static void main(String[] args) {
      SpringApplication.run(ZhangsanServiceApplication.class, args);
   }
   @Bean
   @LoadBalanced
   public RestTemplate restTemplate(){
      return new RestTemplate();
   }

   @Autowired
   private RestTemplate restTemplate;

   @RequestMapping("/hello")
   @HystrixCommand(fallbackMethod = "helloError")
   public String hello(String name){
      String result=restTemplate.getForObject("http://HELLOSERVICE/hello?name="+name,String.class);
      return result;

   }
   public String helloError(String name){
      return "hello  ,"+name+"!  sorry ,error !";
   }
}
依次启动,serviceCenter,helloService:8762,helloService:8763,zhangsanService,在浏览器中访问http://localhost:8764/hello?name=zhangsan
浏览器依次会显示
你好,zhangsan。我是helloService,端口是8762
你好,zhangsan。我是helloService,端口是8763
此时关闭helloService:8763, http://localhost:8764/hello?name=zhangsan
浏览器依次会显示
你好,zhangsan。我是helloService,端口是8762
hello ,zhangsan! sorry ,error !
这说明当zhangsanService调用的服务helloService:8763不可用时,会执行快速失败,直接返回一个字符串,而不是等待响应超时,这就很好的控制了当大量请求涌入的时候线程不会阻塞
二、feign是自带断路器的,spring cloud的有些版本中,默认是关闭的,需要在配置文件中打开它,下面上一篇文章中的lisiService为基础来改造一下
Application.properties:
server.port=8765
spring.application.name=lisiService
eureka.client.service-url.defaultZone=http://localhost:8761/eureka/
feign.hystrix.enabled=true
LisiServiceApplication.java:
package com.gaox.lisiService;

import org.springframework.beans.factory.annotation.Autowired;
import org.springframework.boot.SpringApplication;
import org.springframework.boot.autoconfigure.SpringBootApplication;
import org.springframework.cloud.netflix.eureka.EnableEurekaClient;
import org.springframework.cloud.netflix.feign.EnableFeignClients;
import org.springframework.cloud.netflix.feign.FeignClient;
import org.springframework.stereotype.Component;
import org.springframework.web.bind.annotation.RequestMapping;
import org.springframework.web.bind.annotation.RequestMethod;
import org.springframework.web.bind.annotation.RequestParam;
import org.springframework.web.bind.annotation.RestController;

@SpringBootApplication
@EnableEurekaClient
@EnableFeignClients
@RestController
public class LisiServiceApplication {

    public static void main(String[] args) {
        SpringApplication.run(LisiServiceApplication.class, args);
    }


    @FeignClient(value = "helloService" ,fallback = HelloError.class)
    public interface HelloService {
        @RequestMapping(value = "/hello", method = RequestMethod.GET)
         String hello(@RequestParam("name") String name);
    }
    @Component
    public class HelloError implements HelloService {
        @Override
        public String hello(String name){
            return "hello  ,"+name+"!  sorry ,error !";
        }
    }
    @Autowired
   private HelloService helloService;

    @RequestMapping("/hello")
    public String hello(@RequestParam("name")String name){
    return helloService.hello(name);
    }
}
依次启动serviceCenter,helloService:8762,helloService:8763,lisiService,然后在浏览器输入http://localhost:8765/hello?name=lisi,浏览器会交替显示
你好,lisi。我是helloService,端口是8762
你好,lisi。我是helloService,端口是8763
此时关闭helloService:8763, http://localhost:8764/hello?name=zhangsan
浏览器依次会显示
你好,lisi。我是helloService,端口是8762
hello , lisi! sorry ,error !
这说明断路器起作用了,当lisiService调用的服务helloService:8763不可用时,会执行快速失败,直接返回一个字符串,而不是等待响应超时,这就很好的控制了当大量请求涌入的时候线程不会阻塞
三、在feign中使用hystrix dashboard(仪表盘)功能
Pom.xml添加以下内容:
<dependency>
   <groupId>org.springframework.cloud</groupId>
   <artifactId>spring-cloud-starter-hystrix</artifactId>
</dependency>
<dependency>
   <groupId>org.springframework.boot</groupId>
   <artifactId>spring-boot-starter-actuator</artifactId>
</dependency>
<dependency>
   <groupId>org.springframework.cloud</groupId>
   <artifactId>spring-cloud-starter-hystrix-dashboard</artifactId>
</dependency>
LisiServiceApplication.java启动类上加两个注解@EnableHystrixDashboard
和@EnableCircuitBreaker
package com.gaox.lisiService;
import org.springframework.beans.factory.annotation.Autowired;
import org.springframework.boot.SpringApplication;
import org.springframework.boot.autoconfigure.SpringBootApplication;
import org.springframework.cloud.client.circuitbreaker.EnableCircuitBreaker;
import org.springframework.cloud.netflix.eureka.EnableEurekaClient;
import org.springframework.cloud.netflix.feign.EnableFeignClients;
import org.springframework.cloud.netflix.feign.FeignClient;
import org.springframework.cloud.netflix.hystrix.dashboard.EnableHystrixDashboard;
import org.springframework.stereotype.Component;
import org.springframework.web.bind.annotation.RequestMapping;
import org.springframework.web.bind.annotation.RequestMethod;
import org.springframework.web.bind.annotation.RequestParam;
import org.springframework.web.bind.annotation.RestController;
@SpringBootApplication
@EnableEurekaClient
@EnableFeignClients
@RestController
@EnableHystrixDashboard
@EnableCircuitBreaker
publicclass LisiServiceApplication {
public static void main(String[]args) {
SpringApplication.run(LisiServiceApplication.class, args);
}
@FeignClient(value = "helloService",fallback = HelloError.class)
public interface HelloService{
@RequestMapping(value = "/hello", method =RequestMethod.GET)
String hello(@RequestParam("name") Stringname);
}
@Component
public class HelloError implements HelloService{
@Override
public String hello(Stringname){
return "hello ,"+name+"! sorry ,error !";
}
}
@Autowired
private HelloService helloService;
@RequestMapping("/hello")
public String hello(@RequestParam("name")Stringname){
return helloService.hello(name);
}
}
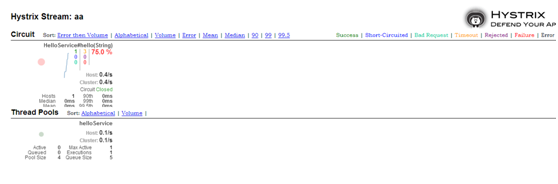
打开浏览器:访问http://localhost:8765/hystrix,界面如下:
第一个输入框:http://localhost:8765/hystrix.stream
Delay:默认不变即可
Title:(这个可以随便输入)

然后点击按钮进入,如图
四、在ribbon中使用hystrix dashboard(仪表盘)功能
Pom.xml添加以下内容:
<dependency>
   <groupId>org.springframework.boot</groupId>
   <artifactId>spring-boot-starter-actuator</artifactId>
</dependency>
<dependency>
   <groupId>org.springframework.cloud</groupId>
   <artifactId>spring-cloud-starter-hystrix-dashboard</artifactId>
</dependency>
LisiServiceApplication.java启动类上加个注解@EnableHystrixDashboard
package com.gaox.zhangsanService;

import com.netflix.hystrix.contrib.javanica.annotation.HystrixCommand;
import org.springframework.beans.factory.annotation.Autowired;
import org.springframework.boot.SpringApplication;
import org.springframework.boot.autoconfigure.SpringBootApplication;
import org.springframework.cloud.client.loadbalancer.LoadBalanced;
import org.springframework.cloud.netflix.eureka.EnableEurekaClient;
import org.springframework.cloud.netflix.hystrix.EnableHystrix;
import org.springframework.cloud.netflix.hystrix.dashboard.EnableHystrixDashboard;
import org.springframework.context.annotation.Bean;
import org.springframework.web.bind.annotation.RequestMapping;
import org.springframework.web.bind.annotation.RestController;
import org.springframework.web.client.RestTemplate;

@SpringBootApplication
@EnableEurekaClient
@EnableHystrix
@EnableHystrixDashboard
@RestController
public class ZhangsanServiceApplication {

   public static void main(String[] args) {
      SpringApplication.run(ZhangsanServiceApplication.class, args);
   }
   @Bean
   @LoadBalanced
   public RestTemplate restTemplate(){
      return new RestTemplate();
   }

   @Autowired
   private RestTemplate restTemplate;

   @RequestMapping("/hello")
   @HystrixCommand(fallbackMethod = "helloError")
   public String hello(String name){
      String result=restTemplate.getForObject("http://HELLOSERVICE/hello?name="+name,String.class);
      return result;

   }
   public String helloError(String name){
      return "hello  ,"+name+"!  sorry ,error !";
   }
}
然后打开浏览器之后的操作和上面feign方法的一样。