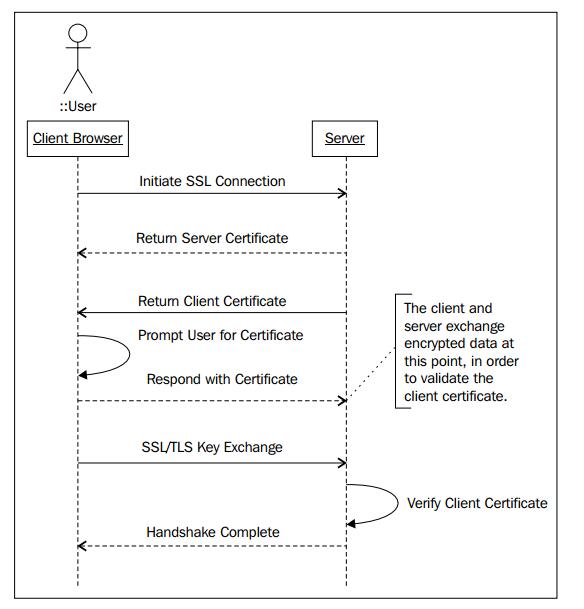
参考:
1.http://tomcat.apache.org/tomcat-8.0-doc/ssl-howto.html
2.http://www.eclipse.org/jetty/documentation/current/configuring-ssl.html
3.http://www.eclipse.org/jetty/documentation/9.3.0.v20150612/jetty-maven-plugin.html#maven-config-https
个人经验:keytool生成的JKS格式的密钥对是导不入到windows个人证书列表的,而PKCS12格式是可以的
使用keytool生成必要文件
1.生成服务端密钥对(keytool -genkeypair创建的keystore含有证书).
d:\jdk8\bin\keytool -genkeypair -alias server -keystore server.p12 -storetype PKCS12 -keyalg RSA -storepass changeit -keypass changeit -validity 365 -dname "CN=server, OU=test, O=test, L=TH, ST=GZ, C=CN"
2.生成客户端密钥对.两个作用:a.导入到个人证书列表;b.为导出客户端证书做铺垫,进而导入到服务端的信任库
d:\jdk8\bin\keytool -genkeypair -alias client -keystore client.p12 -storetype PKCS12 -keyalg RSA -storepass changeit -keypass changeit -validity 365 -dname "CN=client, OU=test, O=test, L=TH, ST=GZ, C=CN"
3.从客户端密钥对导出客户端证书.作用:接着上面的第2小步,为导入到服务端的信任库做铺垫
d:\jdk8\bin\keytool -exportcert -alias client -file client.cer -keystore client.p12 -storetype PKCS12 -storepass changeit
4.将客户端证书导入到服务端的信任库.接着上面的第3小步,目前没有truststore,所以会生成一个
d:\jdk8\bin\keytool -importcert -alias client -file client.cer -keystore server.truststore -storetype PKCS12 -storepass changeit -keypass changeit -noprompt
在客户端导入客户端证书到个人证书列表办法.
方法一:双击client.p12–>当前用户–>下一步–>输入密码changeit–>根据证书类型,自动选择证书存储–>下一步–>完成.
方法二(还可查看或删除):IE–>Internet选项–>内容–>证书–>个人选项卡–>导入
一.tomcat的ssl配置
1.复制第2步的server.p12,第4步的server.truststore文件到tomcat的conf目录
2.tomcat的server.xml
<Connector port="8443" protocol="org.apache.coyote.http11.Http11NioProtocol"
        maxThreads="150" SSLEnabled="true" scheme="https" secure="true"
        keystoreFile="conf/server.p12" keystorePass="changeit" keystoreType="PKCS12"
        truststoreFile="conf/server.truststore" truststorePass="changeit" truststoreType="PKCS12"
        clientAuth="true" sslProtocol="TLS" />
3.导入客户端证书
二.jetty-maven-plugin的ssl配置
1.新建目录src/etc,并下载jetty-distribution-9.3.3.v20150827.zip,解压etc目录下的jetty.xml,jetty-http.xml,jetty-ssl.xml,jetty-ssl-context.xml,jetty-https.xml几个文件到刚才新建的目录src/etc
2.生成密钥对,使用以下命令创建密钥库文件,并复制到新建的目录src/etc,同样使用上面生成的server.p12,client.p12,client.cer,server.truststore四个文件
3.修改jetty-ssl-context.xml文件内容,注释TrustStore的几个配置,并改一下keystore文件的位置和密码,修改过后的内容如下
<?xml version="1.0"?>
<!DOCTYPE Configure PUBLIC "-//Jetty//Configure//EN" "http://www.eclipse.org/jetty/configure_9_3.dtd">

<!-- ============================================================= -->
<!-- SSL ContextFactory configuration                              -->
<!-- ============================================================= -->
<Configure id="sslContextFactory" class="org.eclipse.jetty.util.ssl.SslContextFactory">
  <Set name="KeyStorePath"><Property name="jetty.sslContext.keyStorePath" deprecated="jetty.keystore" default="E:/ij/bak/jetty/server.p12"/></Set>
  <Set name="KeyStorePassword"><Property name="jetty.sslContext.keyStorePassword" deprecated="jetty.keystore.password" default="changeit"/></Set>
  <Set name="KeyStoreType"><Property name="jetty.sslContext.keyStoreType" default="PKCS12"/></Set>
  <Set name="KeyStoreProvider"><Property name="jetty.sslContext.keyStoreProvider"/></Set>
  <Set name="KeyManagerPassword"><Property name="jetty.sslContext.keyManagerPassword" deprecated="jetty.keymanager.password" default="changeit"/></Set>
  <Set name="TrustStorePath"><Property name="jetty.sslContext.trustStorePath" deprecated="jetty.truststore" default="E:/ij/bak/jetty/server.truststore"/></Set>
  <Set name="TrustStorePassword"><Property name="jetty.sslContext.trustStorePassword" deprecated="jetty.truststore.password" default="changeit"/></Set>
  <Set name="TrustStoreType"><Property name="jetty.sslContext.trustStoreType" default="PKCS12"/></Set>
  <Set name="TrustStoreProvider"><Property name="jetty.sslContext.trustStoreProvider"/></Set>
  <Set name="EndpointIdentificationAlgorithm"></Set>
  <Set name="NeedClientAuth"><Property name="jetty.sslContext.needClientAuth" deprecated="jetty.ssl.needClientAuth" default="true"/></Set>
  <Set name="WantClientAuth"><Property name="jetty.sslContext.wantClientAuth" deprecated="jetty.ssl.wantClientAuth" default="false"/></Set>
  <Set name="ExcludeCipherSuites">
   <Array type="String">
    <Item>SSL_RSA_WITH_DES_CBC_SHA</Item>
    <Item>SSL_DHE_RSA_WITH_DES_CBC_SHA</Item>
    <Item>SSL_DHE_DSS_WITH_DES_CBC_SHA</Item>
    <Item>SSL_RSA_EXPORT_WITH_RC4_40_MD5</Item>
    <Item>SSL_RSA_EXPORT_WITH_DES40_CBC_SHA</Item>
    <Item>SSL_DHE_RSA_EXPORT_WITH_DES40_CBC_SHA</Item>
    <Item>SSL_DHE_DSS_EXPORT_WITH_DES40_CBC_SHA</Item>
   </Array>
  </Set>
  <Set name="useCipherSuitesOrder"><Property name="jetty.sslContext.useCipherSuitesOrder" default="true"/></Set>
</Configure>
如果要混淆密码:d:\jdk8\bin\java -cp E:\mvnrepo\org\eclipse\jetty\jetty-util\9.3.3.v20150827\jetty-util-9.3.3.v20150827.jar org.eclipse.jetty.util.security.Password changeit,复制以OBF开头的那行字符串代替上面的changeit
4.pom.xml配置
<plugin>
    <groupId>org.eclipse.jetty</groupId>
    <artifactId>jetty-maven-plugin</artifactId>
    <version>${jetty.version}</version>
    <configuration>
        <systemProperties>
            <systemProperty>
                <name>org.eclipse.jetty.server.webapp.parentLoaderPriority</name>
                <value>true</value>
            </systemProperty>
        </systemProperties>
        <webApp>
            <contextPath>/${project.artifactId}</contextPath>
        </webApp>
        <jettyXml>
            src/etc/jetty.xml,src/etc/jetty-http.xml,src/etc/jetty-ssl.xml,src/etc/jetty-ssl-context.xml,src/etc/jetty-https.xml
        </jettyXml>
    </configuration>
</plugin>另下面是我参考https://examples.javacodegeeks.com/enterprise-java/jetty/jetty-ssl-configuration-example/做的一个实践
1.生成密钥.密码短语和确认密码短语都输入123456
openssl genrsa -aes128 -out jetty.key
2.生成证书.输入上面输入的密钥密码123456
openssl req -new -x509 -newkey rsa:2048 -sha256 -key jetty.key -out jetty.crt -days 365 -subj /C=CN/ST=GD/L=GZ/O=TEST/OU=TEST/CN=admin/[email protected]
3.将密钥和证书转成pkcs12文件,再次输入密钥密码123456,最后输入导出密码和确认导出密码123456
openssl pkcs12 -inkey jetty.key -in jetty.crt -export -out jetty.p12
4.再pkcs12文件导入到keystore.目标密钥库口令和确认口令123456,输入源密钥库口令123456
d:\jdk7\bin\keytool -importkeystore -srckeystore jetty.p12 -srcstoretype PKCS12 -srcstorepass 123456 -destkeystore jetty.keystore -deststoretype PKCS12 -deststorepass 123456
5.
进入到E:\mvnrepo\org\eclipse\jetty\jetty-util\9.2.6.v20141205目录,生成混淆密码,复制以OBF开头的那行OBF:19iy19j019j219j419j619j8
d:\jdk7\bin\java -cp jetty-util-9.2.6.v20141205.jar org.eclipse.jetty.util.security.Password 123456
配置jetty-ssl.xml
<?xml version="1.0"?>
<!DOCTYPE Configure PUBLIC "-//Jetty//Configure//EN" "http://www.eclipse.org/jetty/configure_9_0.dtd">

<!-- ============================================================= -->
<!-- Configure a TLS (SSL) Context Factory                         -->
<!-- This configuration must be used in conjunction with jetty.xml -->
<!-- and either jetty-https.xml or jetty-spdy.xml (but not both)   -->
<!-- ============================================================= -->
<Configure id="sslContextFactory" class="org.eclipse.jetty.util.ssl.SslContextFactory">
  <Set name="KeyStorePath"><Property name="jetty.keystore" default="E:/ij/bak/jetty/jetty.keystore"/></Set>
  <Set name="KeyStorePassword"><Property name="jetty.keystore.password" default="OBF:19iy19j019j219j419j619j8"/></Set>
  <Set name="KeyManagerPassword"><Property name="jetty.keymanager.password" default="OBF:19iy19j019j219j419j619j8"/></Set>
  <Set name="TrustStorePath"><Property name="jetty.truststore" default="E:/ij/bak/jetty/jetty.keystore"/></Set>
  <Set name="TrustStorePassword"><Property name="jetty.truststore.password" default="OBF:19iy19j019j219j419j619j8"/></Set>
  <Set name="EndpointIdentificationAlgorithm"></Set>
  <Set name="NeedClientAuth"><Property name="jetty.ssl.needClientAuth" default="true"/></Set>
  <Set name="WantClientAuth"><Property name="jetty.ssl.wantClientAuth" default="false"/></Set>
  <Set name="ExcludeCipherSuites">
    <Array type="String">
      <Item>SSL_RSA_WITH_DES_CBC_SHA</Item>
      <Item>SSL_DHE_RSA_WITH_DES_CBC_SHA</Item>
      <Item>SSL_DHE_DSS_WITH_DES_CBC_SHA</Item>
      <Item>SSL_RSA_EXPORT_WITH_RC4_40_MD5</Item>
      <Item>SSL_RSA_EXPORT_WITH_DES40_CBC_SHA</Item>
      <Item>SSL_DHE_RSA_EXPORT_WITH_DES40_CBC_SHA</Item>
      <Item>SSL_DHE_DSS_EXPORT_WITH_DES40_CBC_SHA</Item>
    </Array>
  </Set>

  <!-- =========================================================== -->
  <!-- Create a TLS specific HttpConfiguration based on the        -->
  <!-- common HttpConfiguration defined in jetty.xml               -->
  <!-- Add a SecureRequestCustomizer to extract certificate and    -->
  <!-- session information                                         -->
  <!-- =========================================================== -->
  <New id="sslHttpConfig" class="org.eclipse.jetty.server.HttpConfiguration">
    <Arg><Ref refid="httpConfig"/></Arg>
    <Call name="addCustomizer">
      <Arg><New class="org.eclipse.jetty.server.SecureRequestCustomizer"/></Arg>
    </Call>
  </New>

</Configure>
将jetty.p12导入到浏览器,最后启动chrome测试(IE和EDGE都不行,chrome是可以的)
